
I had so much fun making the little tangerine Paisley Jungle covered box that I decided to strike out on another one tonight. I have a couple more boxes in my craft closet and selected one that is just like the orange one, except it’s about 2 inches bigger.
I pulled out some generous KFC scraps to see what I wanted to use for this box. Initially, I thought I’d use this jade Lotus Leaf.
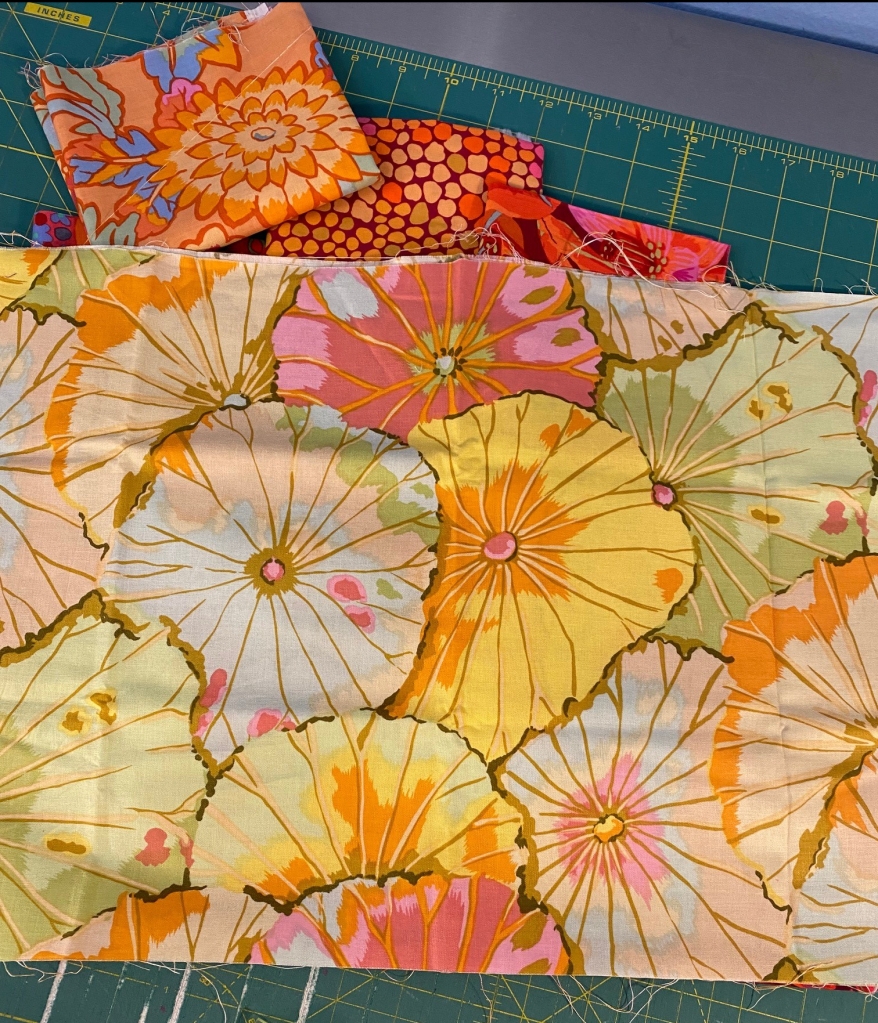
I decided instead to use this for a cigar box shaped box that I’ll cover later. I wanted to use something red for this box. So I dug out some red scraps…
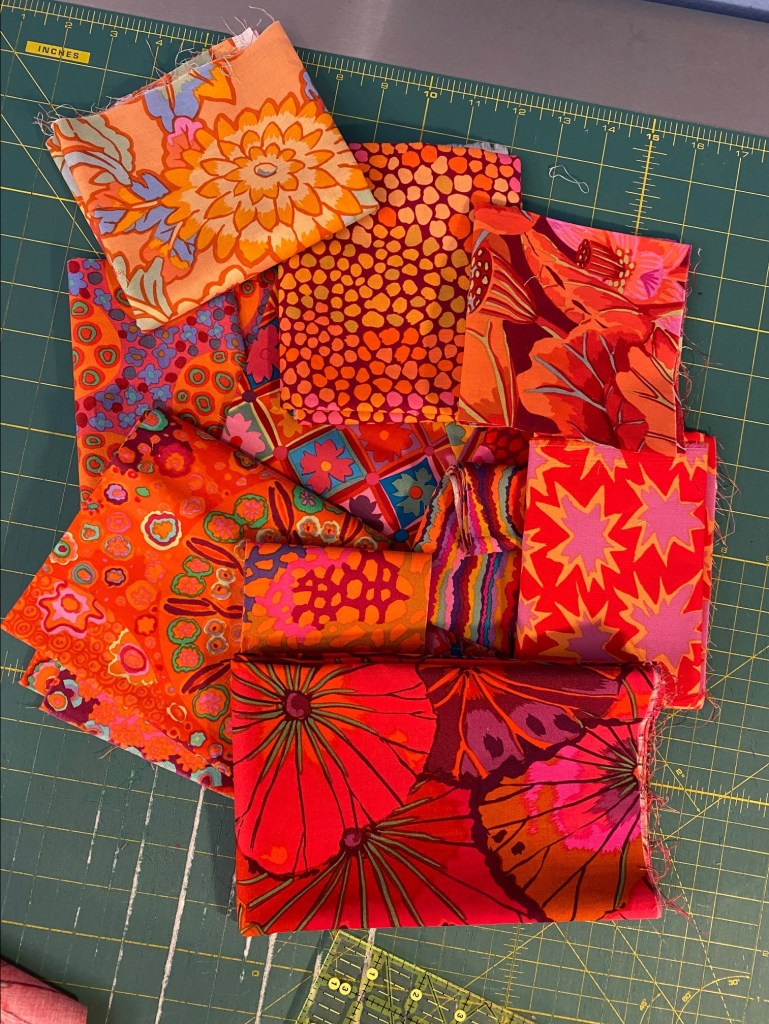
… and decided to go with this lotus leaf in wine. It’s so gorgeous!

I pulled out some red acrylic paints and selected one that works well with this fabric and got the inside and outside of the box painted in several sessions during the day, letting each coat dry nicely in the sun.
After dinner I pressed the fabric, did some measurements, and cut the pieces to cover the box. I cut the pieces about 1/8 inch larger than the measurement for the top of the box and used scissors to round off the corners. For the sides, I cut them to size in height and just a tad wider than the measurement so I would have some overlap on the corners. I dry fitted the pieces and I ended up cutting off just a hair in height on the side pieces because they were just a touch too big.
The fabric needs to fit pretty closely from top to bottom on the sides of the box but I want just a touch of overlap on the corners.

To apply the fabric to the box, I first put a layer of Mod Podge on one section of the painted box (I started with the top of the box). Then I carefully place the cut-to-size piece of fabric on the Mod Podged area, making sure the fabric is centered and even. Once I’ve gently pressed it into the layer of Mod Podge, I paint a generous coat of Mod Podge over the entire piece of fabric.
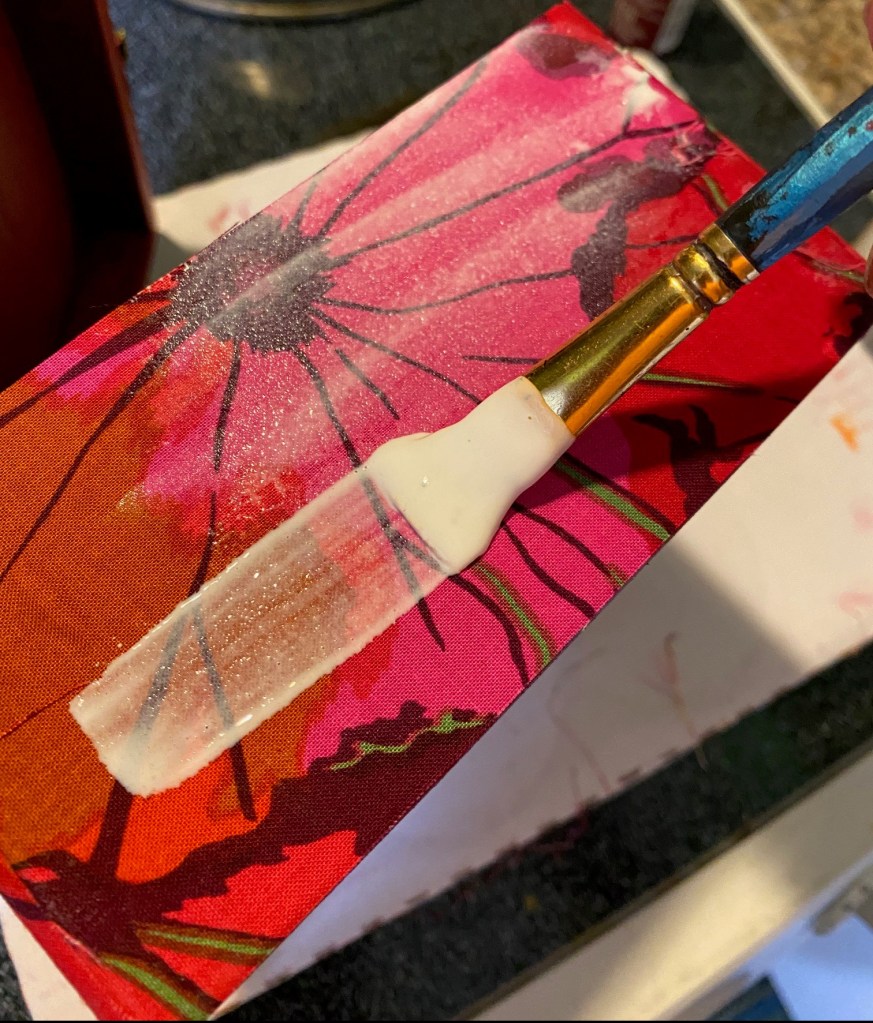
As you’re painting the Mod Podge on top of the fabric, make sure the edges are in good contact with the box. You don’t want any bumps or bubbles or loose edges of fabric soming loose.
I put the pieces of fabric for each section of the box on one by one. I put all four sides of fabric on this box and then applied the coat of Mod Podge over them all once all four sides were covered. This made it a little easier to handle the box as I was working.
One thing that you have to deal with is fraying fabric. Trim the loose threads from your fabric carefully before you apply it to the box. But you’ll probably still have to deal with loose threads in the Mod Podge. I just use my fingers to pull the threads out.

It’s messy to deal with these loose threads, but getting them off helps ensure a nicer finished box.
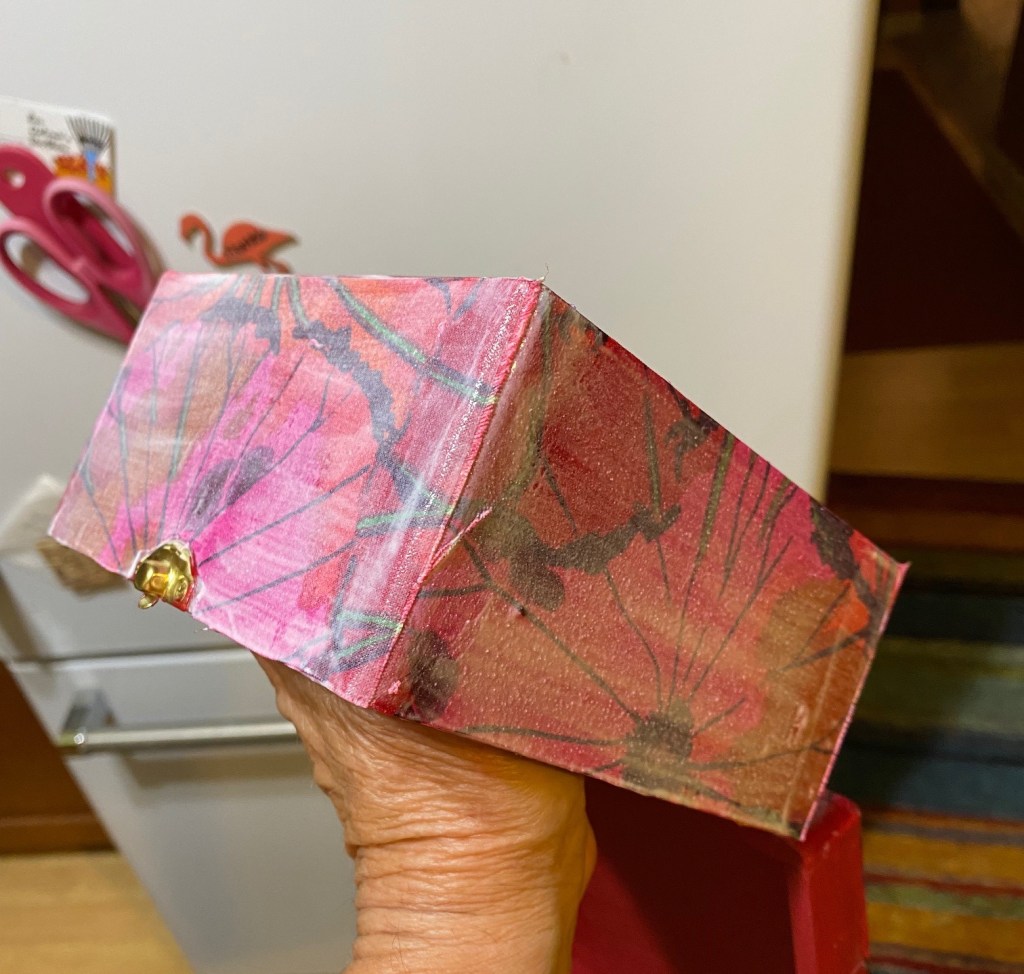
I got the top and for sides of the box done tonight. I’ll probably finish the remaining pieces tomorrow night. Then I’ll need to sand it all and apply a seal coat.

This is going to be another pretty box. It would make a lovely gift with a handful of pretty fat quarters arranged nicely inside!
Oh, and I just eyeball a cut around the box hardware (clasp and hinges). This doesn’t have to be terribly precise if your paint color is a close match.

I sat down Sunday night and made a couple more blocks for my “Secret Purple” Ruffled Feathers quilt.

That makes seven blocks done… 1/3 of the way! These blocks are big and I only need 20 to make a generous throw size quilt.

That photo is not true to color at all. Go to this blog post for a better color representation.
Holy cow! I’ve gotten so many Frankenbag photos from blog readers. There have been some really busy, productive and creative people at work out there!
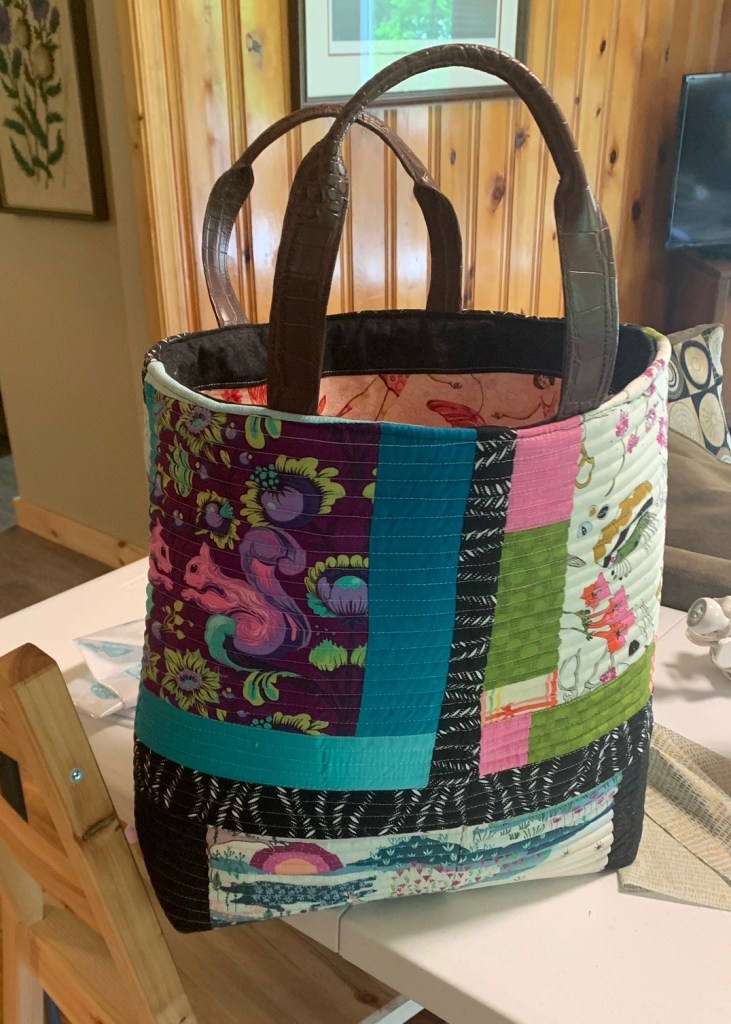
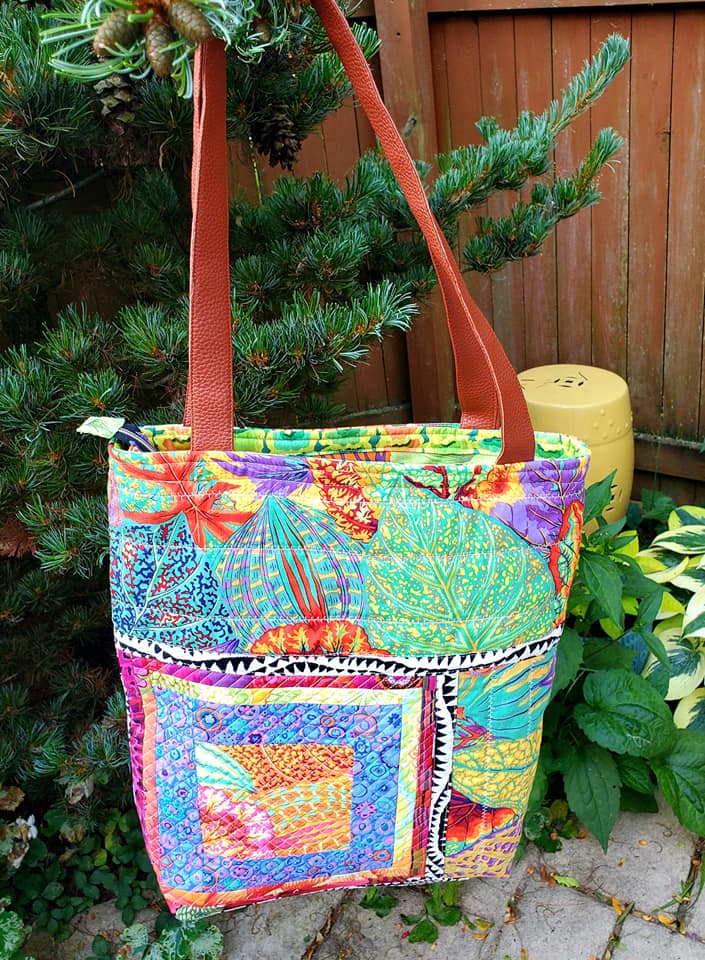
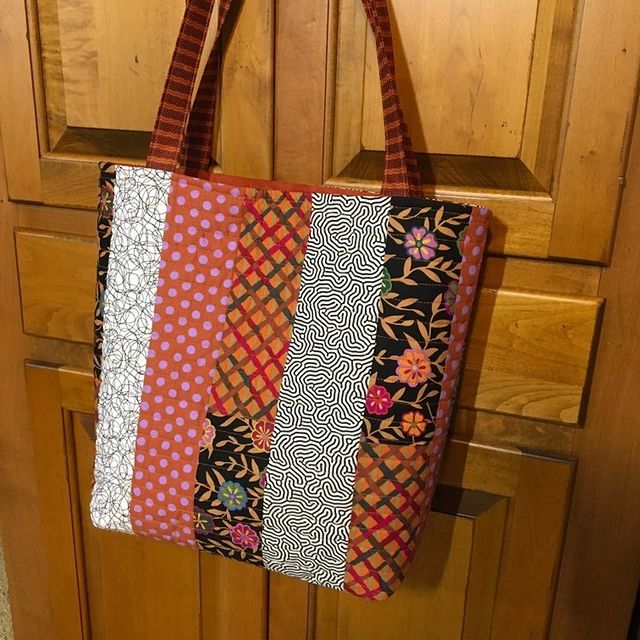
This first bag is from Nancy Lindsay. I love the eclectic fabrics in this bag, and look at that little fox panel. How adorable is that?


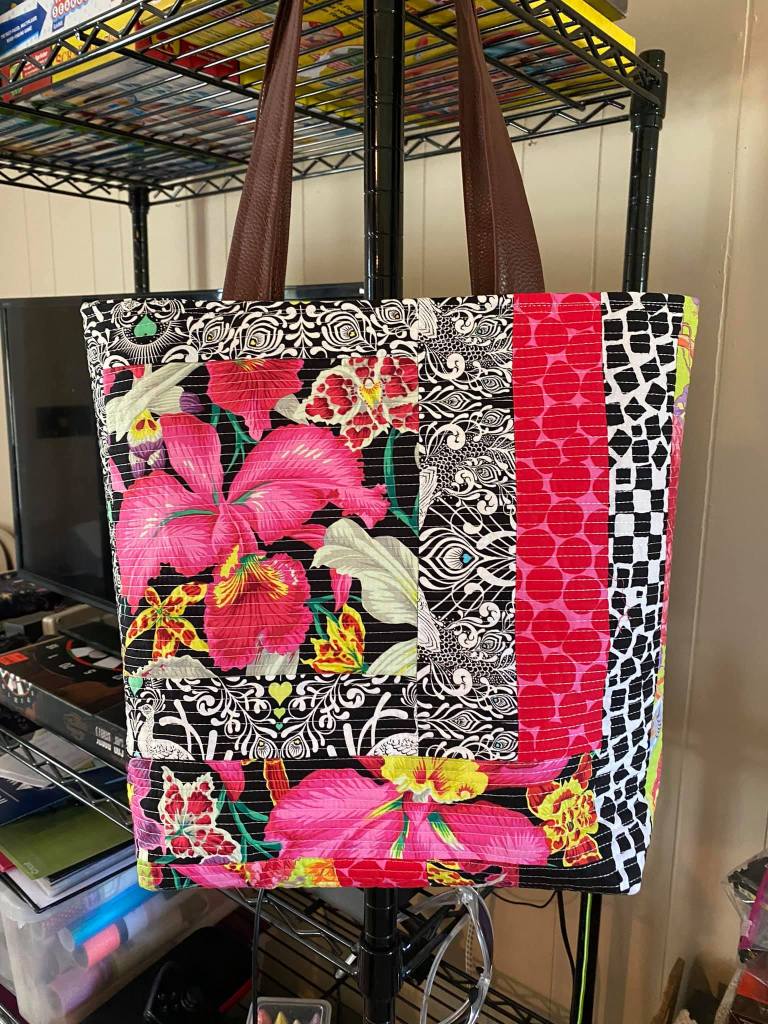
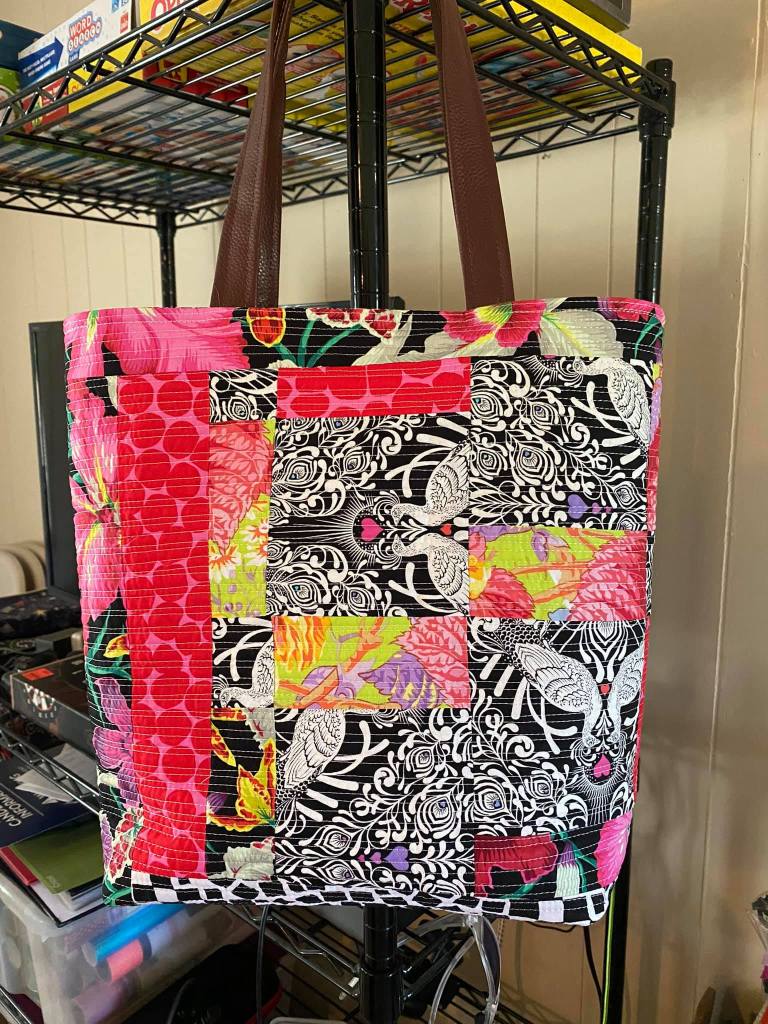
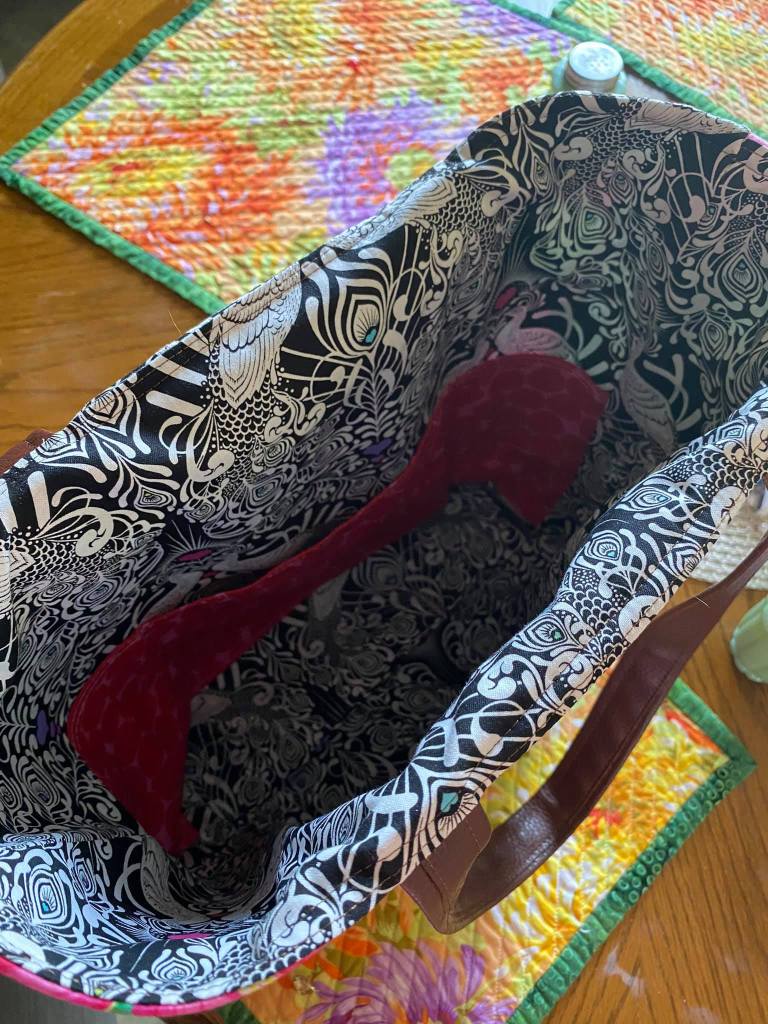
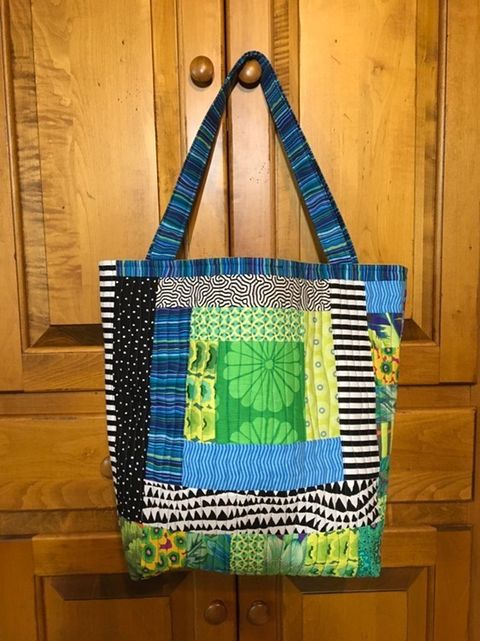
Next up is Cherry Naylor. She’s made a few of these bags and this one is a good one! I love the black and white fabrics she used, and the large iris print is so good!!! And that lining… well, it’s pretty spectacular! I love this bag!!!
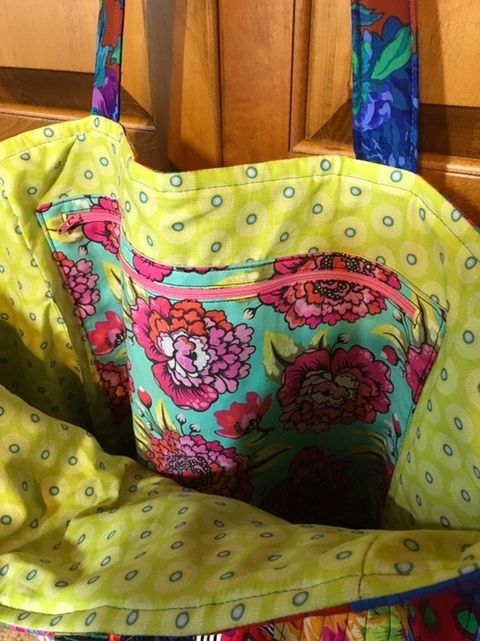
This next bag is from Mary Anne Bomberger. I just love the pastel yet bright fabrics she used, and the overall pale green feel of this bag. And look at that adorable kitten panel! I have some of those Mia Charro panels… dogs, cats, birds, and other wild animals. I need to pull them out and put some in a Frankenbag!


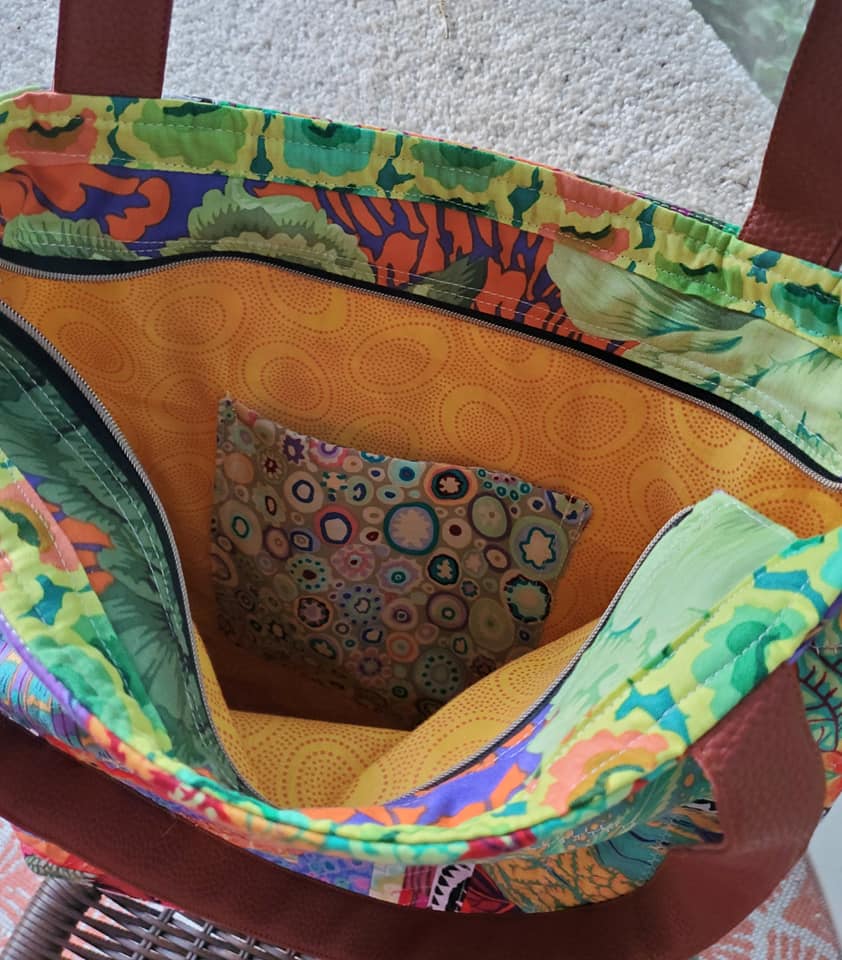
Mary Anne also put a zipper placket in her bag. Which reminds me that I still have a tutorial to write!
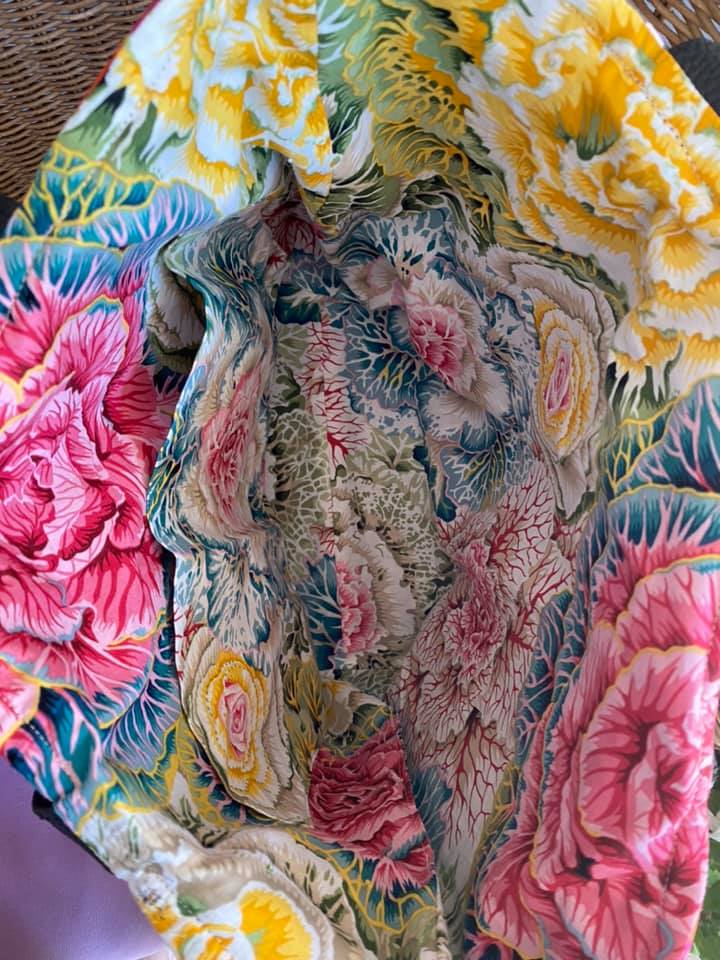
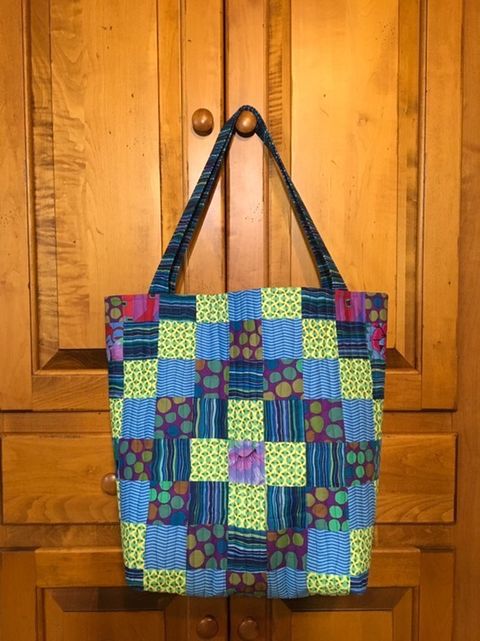
Here’s a sweet and comfy bag from Linda Allen. I love the eclectic and scrappy feel of this bag. It feels like a well loved and comfy quilt. I love the larger pieces of big prints she’s used, and I really love that she really went for it with a gorgeous lining of brassica! Love it!

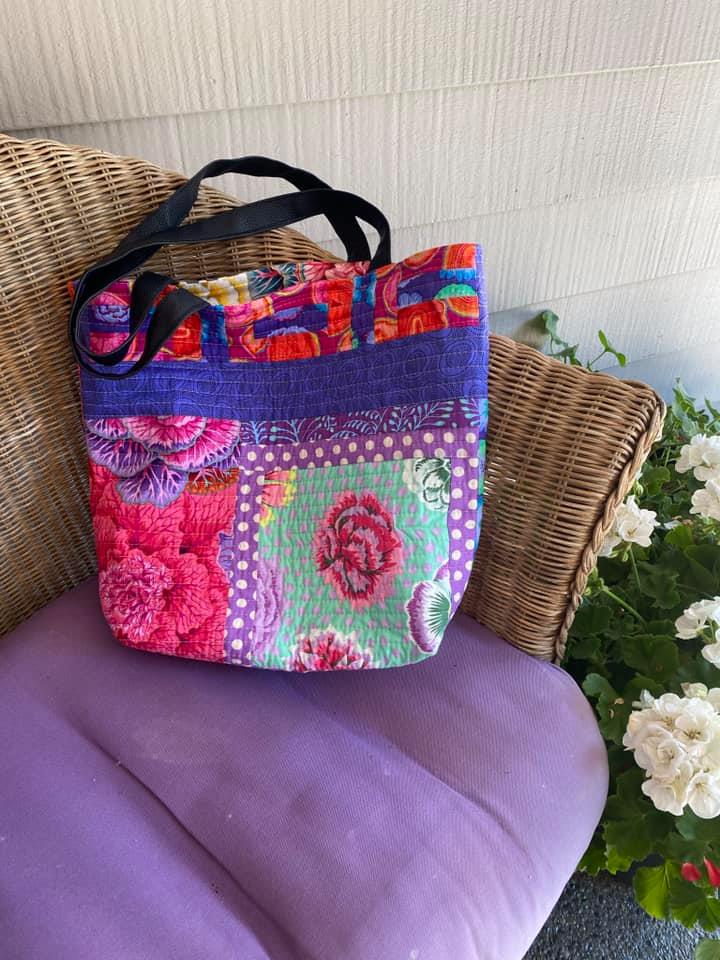
This next collection of bags is from Barb Schippa. She has been damned busy making bags… she’s almost putting me to shame! She’s got some really nice bags here, and a really great array of designs and fabrics. I just love these bags, and I really love Barb’s enthusiasm!


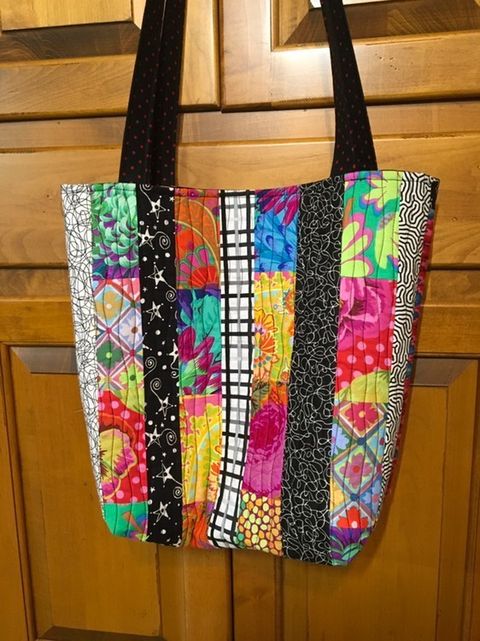
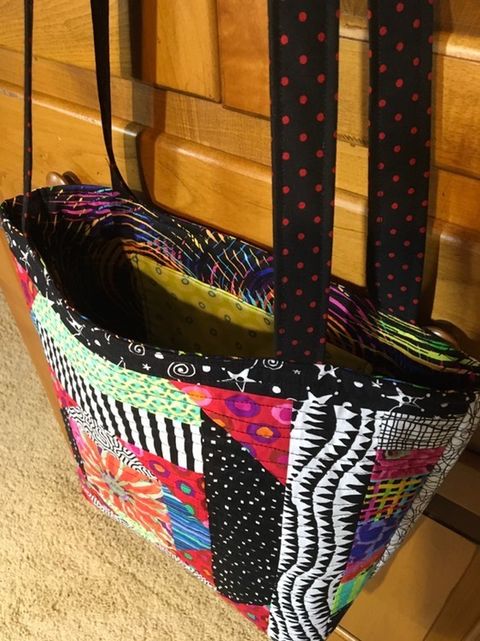


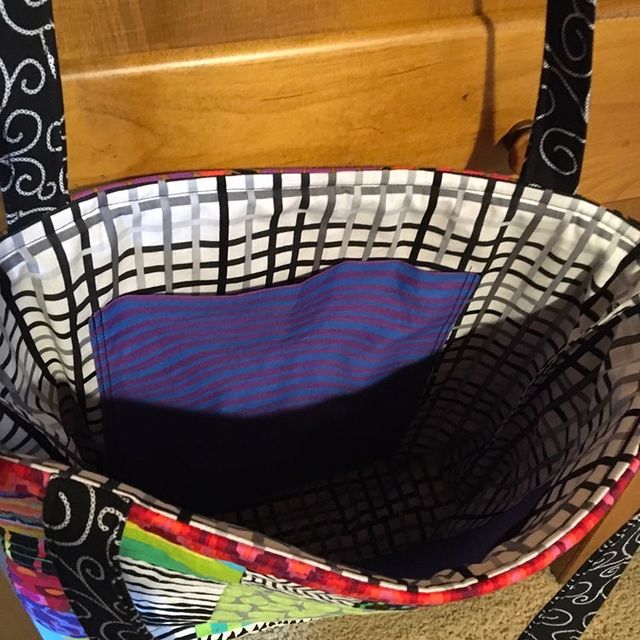
Thanks to all of you for taking the time to share photos of the Frankenbags you’ve made! I’m loving seeing what everyone is making!
Our heat wave finally broke last night. The temp dropped 30 degrees in just a few hours and it felt soooo good! I was so happy to see the end of 115 degrees! It was around 93 degrees for a high today and it felt so comfortable and reasonable! I’m sure it will feel hot again in a few days. Our temps will be in the low 90s for a week or so, then finally drop back down into the 80s.
It looked unlikely that I’d be able to get a mid day walk today so I got up early and took Bender and Rico for a three-mile walk before work.

It was nice and comfortable at about 72 degrees, but the humidity was around 72%. So it was a bit sticky. Bender cooled off immediately when we got home!

The boys spent a good part of their day sleeping as I worked. And I actually felt good all day too. I might have to build this into a habit!
My strawberries are doing really well. I actually picked two at the same time today. It was really a bumper crop.

They are sooooo tasty! The plants are really putting on a lot of berries. I feel confident that I may get to eat a small bowl of Anne-grown berries in a couple weeks!
Tomorrow we’re having a socially distanced outdoor lunch in the park for the 30 plus people in my department at work. It’s been almost a year and a half since I’ve seen most of these folks. Our fiscal year ends tomorrow and we’re going to have a bit of a celebration for a successful and challenging year. It will be great to see everyone!

New to your blog and really enjoying your outdoor and sewing adventures! You’ve inspired me to buy some KF fabric. Think I have a string quilt in my future….. As for the frankenbags, I call mine happy bags but a rose by any other name….. it’s all good 😀
LikeLiked by 1 person
Oh! I just love string quilts!!! Especially with Kaffe fabrics. And happy bags is such a great name!
Anne
LikeLike
Love your blog. I have gotten joy from watching your dogs. I am from New England so Oregon is another world for me. Waiting for zipper tutorial
LikeLiked by 1 person
Thanks! I’m glad you’ve found me! I’ll start working on the zipper tutorial. I might make another bag with one this weekend so it’s a good time to make an outline and take photos for a tutorial as I go.
Anne
LikeLike
I think you’ve veered off in a new direction with the fabric covered boxes! I’m still loving the Frankenbags and enjoy seeing all the photos. You go girl!
LikeLiked by 1 person
I have to keep it interesting! I’m not done making bags, I just need something new to keep my brain stimulated!!!
LikeLike
That Lotus Leaf print is a favorite of mine and this color is so spectacular.
I’m glad to hear you are cooling off out there and the heat wave is headed to us in the midwest now. We aren’t supposed to get quite as hot though. I just hope the humidity level stays down, that is the killer.
LikeLiked by 1 person
I hope your weather isn’t too bad. We’re lucky that humidity is not a huge issue here. I can’t imaging these temps with high humidity added in. It’s nice here today… cloudy and 68 degrees at 10:30 am. Nice to have it cooler and comfy!
LikeLike
Love your bags! Can you tell me more about your bag handles . What they’re made of and where you get them. Thanks.
LikeLiked by 1 person
I make my bag handles out of faux leather. There is a link at the very bottom of my Frankenbag tutorial to the material I’m using. The tutorial includes instructions for making the handles.
Here’s the Frankenbag tutorial. https://agilejack1.com/2021/03/25/frankenbag-tutorial/
Anne
LikeLike
Hi
Just asking the cost of getting a bag made in the Kaffe fabrics?
Thanks Jayne
LikeLike
Jayne; Please email me at anne@agilejack1.com and I’ll get you info along with some photos of what I currently have on hand.
Thanks, Anne
LikeLike
Where did you find such nice cigar boxes all your creativity is so beautiful you inspire me to get more daring in my quilting and seeing projects thanks for inspiring me
LikeLiked by 1 person
I’ve had them for a few years. But I’m pretty sure I bought them at Michael’s. they are nice little boxes. I had purchased some at Craft Warehouse and when I got them home they were all wonky… they weren’t square and would have been a nightmare to cover!
LikeLike
Your box looks lovely. I like to cover boxes too although not wooden ones as yet.
I hate getting my fingers all sticky and found that if I used Wonder Under, the Appliqué web (don’t know the name of it in your part of the world) on my fabric I could just iron it on. I would iron the web to the back of my piece of fabric, cut the shape, then just iron the whole thing to the box. No fraying fabric, no sticky fingers. But, I have never covered a wooden box. Just thought I’d mention that.
I am new to your site and I find it so informative and fun. I look forward to your emails. Thanks :))
LikeLiked by 1 person
I’ve used a wonder under type product, but never thought to use it to adhere fabric to a box. If I do these again I might give it a try.
Thanks!
Anne
LikeLike
Vôtre blog est superbe
bonne fête de fin d’année
LikeLiked by 1 person
thank you! And thanks for reading!
Anne
LikeLike