I made the front and back for another KFC Frankenbag Saturday afternoon. So I thought I’d take pictures as I made it to show you how I go about putting together the pieces and assembling these panels. For your reference, here’s a link to my Frankenbag tutorial.
Here’s the final front and back that I’ll be showing you.
I taped off a 17×17 inch grid on my cutting table so it’s easier for you to see the size I want to make these panels. I don’t do this when I’m making my panels. Usually, I’m just using the measurements on my cutting table.
Here are the pieces I’ll use to make the front of this bag. There’s the larger flying geese block, the stacked block of strips on the right, and some crumb blocks at the bottom.
I think about putting these panels together a little bit like putting a puzzle together. Except that instead of finding a puzzle piece that has to fit the hole exactly, I MAKE a puzzle piece to fit that hole. If the puzzle piece is too big, I’ll cut some off. If it’s too small, I’ll add some fabric.
I assemble the top section of these panels first. The first thing I want to do is line up the pieces and get a general idea of how much space I’m going to need to fill to make it 17 inches wide. In this next photo you can see that I have about 4.5 inches of space that I need to fill. And remember that when you’re laying out these pieces you need to keep seam allowances in mind — you need to add extra width for the seam allowances. That’s an additional 1/2 inch of width for every vertical seam across the width. The more pieces you have horizontally, the more you’ll lose in seam allowances once it’s all sewn.
So I want to determine how I’m going to fill that 4.5 inches. I could add a crumb panel, or another block. But I like wide sashing on these pieces. So I start out by trying out different fabrics for the border on this larger block.
I’m pretending that I might actually use something here besides this Jumble. Haha. Nope. It will be Jumble! So I cut some two inch strips and sewed these borders onto that flying geese block. I like to use two inch strips because it makes a bold border, but it also gives me enough fabric that I can trim a little if I need to in order to make these pieces come out to 17 inches.
Before I get too far along I trim the big block so all the edges are straight.
Now I can figure out how I’m going to fill the space around that vertical stripped block on the right. I trimmed a little off that block so that I could use a wider border on it.
In the next photo, I’ve overlapped the two existing blocks to mimic my seam allowance. You can see that I have about 3 inches to fill to make these two blocks 17 inches wide.
So I selected some red Guinea Flower to border this block, cut it into two inch strips and sewed it to all four sides of this block.
When I got to this point I realized that I has going to be less than 17 inches when I sewed that vertical seam between these two blocks because I hadn’t allowed enough for the seam allowance. No worry. Just select a fabric to sew between those two bordered blocks to get you the width you need.
I love that red Strata fabric! It’s fun in a narrow strip. I sewed the Strata strip to the block on the right and checked my width again. See how I’ve overlapped the two blocks to mimic the seam allowance?
So it looks like I will have plenty of width when I sew these two blocks together. In fact… too much. So I trimmed a little off of that strata strip to account for the excess.
And when I sewed it all together I only had about a quarter inch to trim off of the right side. That’s pretty good.
I’m going to leave that quarter inch and move onto finishing the bottom of this panel. It’s nice to have a little extra that you can trim off at the end of the assembly. You don’t have to have it all perfect at this stage.
So next, I selected some of the crumb blocks that I made previously. I chose blocks that are similar in height, and selected enough to add up to more than 17 inches wide once they are trimmed and sewn together. At this point I’m just eye balling this. And it looks like I’ll have plenty of width with these four crumb blocks.
So next, I trim the edges of the blocks where they’re going to be sewn together so I’ll have a nice straight seam.
I do this on each seam and sew the crumb blocks into a strip, keeping the top edge of the blocks as even as possible.
Then I trim off the edge that will be sewn to the top part of this panel.
And when it’s lined up, I can see that it’s not tall enough to get me to 17 inches in height. So I needed to add in some more fabric. I could add more crumb blocks, but I decided to add a strip of fabric. So I pulled out some fabric to see what I liked in that space.
First I tried Crease.
Then I tried this little zebra print I have in my stash.
Then I tried Brandon Mably’s Vibrations. This is the one I decided to go with.
So I cut a 2 inch strip and sewed it in place.
And now that those two seams are sewn, you can see that I have a little more than 17 inches in height. So I trimmed off the little bit of excess at the bottom. And that means that this front panel is now 17 inches square. Yay!
Now let’s move onto the back panel. I’ve been making the back panel less involved than the front panel. So these bags definitely have a front and a back. You could certainly do something more involved for both sides if that floats your boat.
So, I’m using mostly crumb blocks on the back. I start by lining up some of my pre-made crumb blocks across the width of the space I taped off.
I had a choice to make on this first row. I could either add some crumb pieces to fill in that space, or I could make a little block to fill that space. I decided to use black and white KFC fabrics to fill that space.
When I eye balled these two strips to fill that space, I didn’t feel positive that I had enough width once I trimmed the blocks and sewed the seams.
So I added another strip of black and white fabric to make that piece wider and it looks like we’re good to go now.
So I sewed it all together and It’s plenty wide now.
So I trimmed the bottom and top off straight and moved on to adding fabric to the bottom of this piece. I don’t trim the sides until I have this whole 17×17 piece put together.
I continued adding strips of fabric and crumb blocks, making those puzzle pieces and putting them in place… trying out different things as I went along.
Trying out different combos of fabric….
… and different arrangements.
And when I liked the arrangement, I sewed all the elements together and trimmed it to 17 inches square.
And that’s how I make my Frankenbag panels. With whatever blocks I decide to use in a panel, it’s all just a matter of making the pieces of the puzzle fit together.
Give it a try! This is really the fun part for me. Leave me a comment if you have any questions.
I’m so close to having this Aboriginal Frankenbag done, but I’m just too tired to do the final finishing. All I have left to do is sew in the lining and top stitch the top of the bag. The handles are from the darker faux leather I purchased.
I like to have a nice finish at the top of the bag… even sewing, nice pressing, and even top stitching. If you go to all the trouble of making a nice bag and then make a mess of the final piece that is the most visible, all the care is for naught. I’m so tired from a stressful week of work that I decided to stop at this point and finish it up tomorrow night when I’m more fresh.
I just love these Aboriginal fabrics. The designs are so intricate and free form, and the colors are amazing. I might have to keep this one. But then I say that with every one I make!
Look at some of the fun little details in these fabrics.
I switched up the quilting on this one a little. I still did the match stick quilting at the top of the bag because I like the structure it brings. But I did the body of the bag with straight line quilting, spaced about 3.8 inch apart.
Tomorrow (Friday) is Bender’s eighth birthday! I can’t believe that I’m already seeing his face turn white. He felt very special today as he was the only dog who got to go with me on our two walks. Rico tweaked his back at our agility lesson last night and had to stay home by himself. He was not happy about this situation! I will cook a peanut butter, carrot and honey birthday cake for him tomorrow night. Rico will get some too.
Facebook fed me this memory of my Parson Russell Terriers Forrest (left) and Skeeter yesterday. Look how cute they were! This photo was taken shortly before Bender was born. We were anxiously waiting for news that a boy border collie was born and would be on his way to us!
I lost my magnificent Forrest about 3.5 years ago when he was 14.5 years old. I loved that dog like I’ll never love another dog. Skeeter is living with a friend of mine on Vashon Island, Washington. She has a pretty amazing life and is thriving.
I went out this afternoon to check on my apple tree and was happy to see some really healthy looking buds.
This tree can be really hit and miss on how much fruit it produces. Two summers ago I was buried in apples. I just couldn’t keep up. I was making a batch of apple sauce and a dehydrator full of apple slices every evening and still couldn’t keep up. Last year I barely had any apples.
I had my yard guy prune this tree way back a few weeks ago. But he left me a couple branches that are the ones that usually bear the most fruit. So I’m hopeful that I’ll have a reasonable amount of apples this year.
Look at the amazing weather we have coming up. It would normally be raining at this time of year. I actually had to water a portion of my lawn this afternoon.
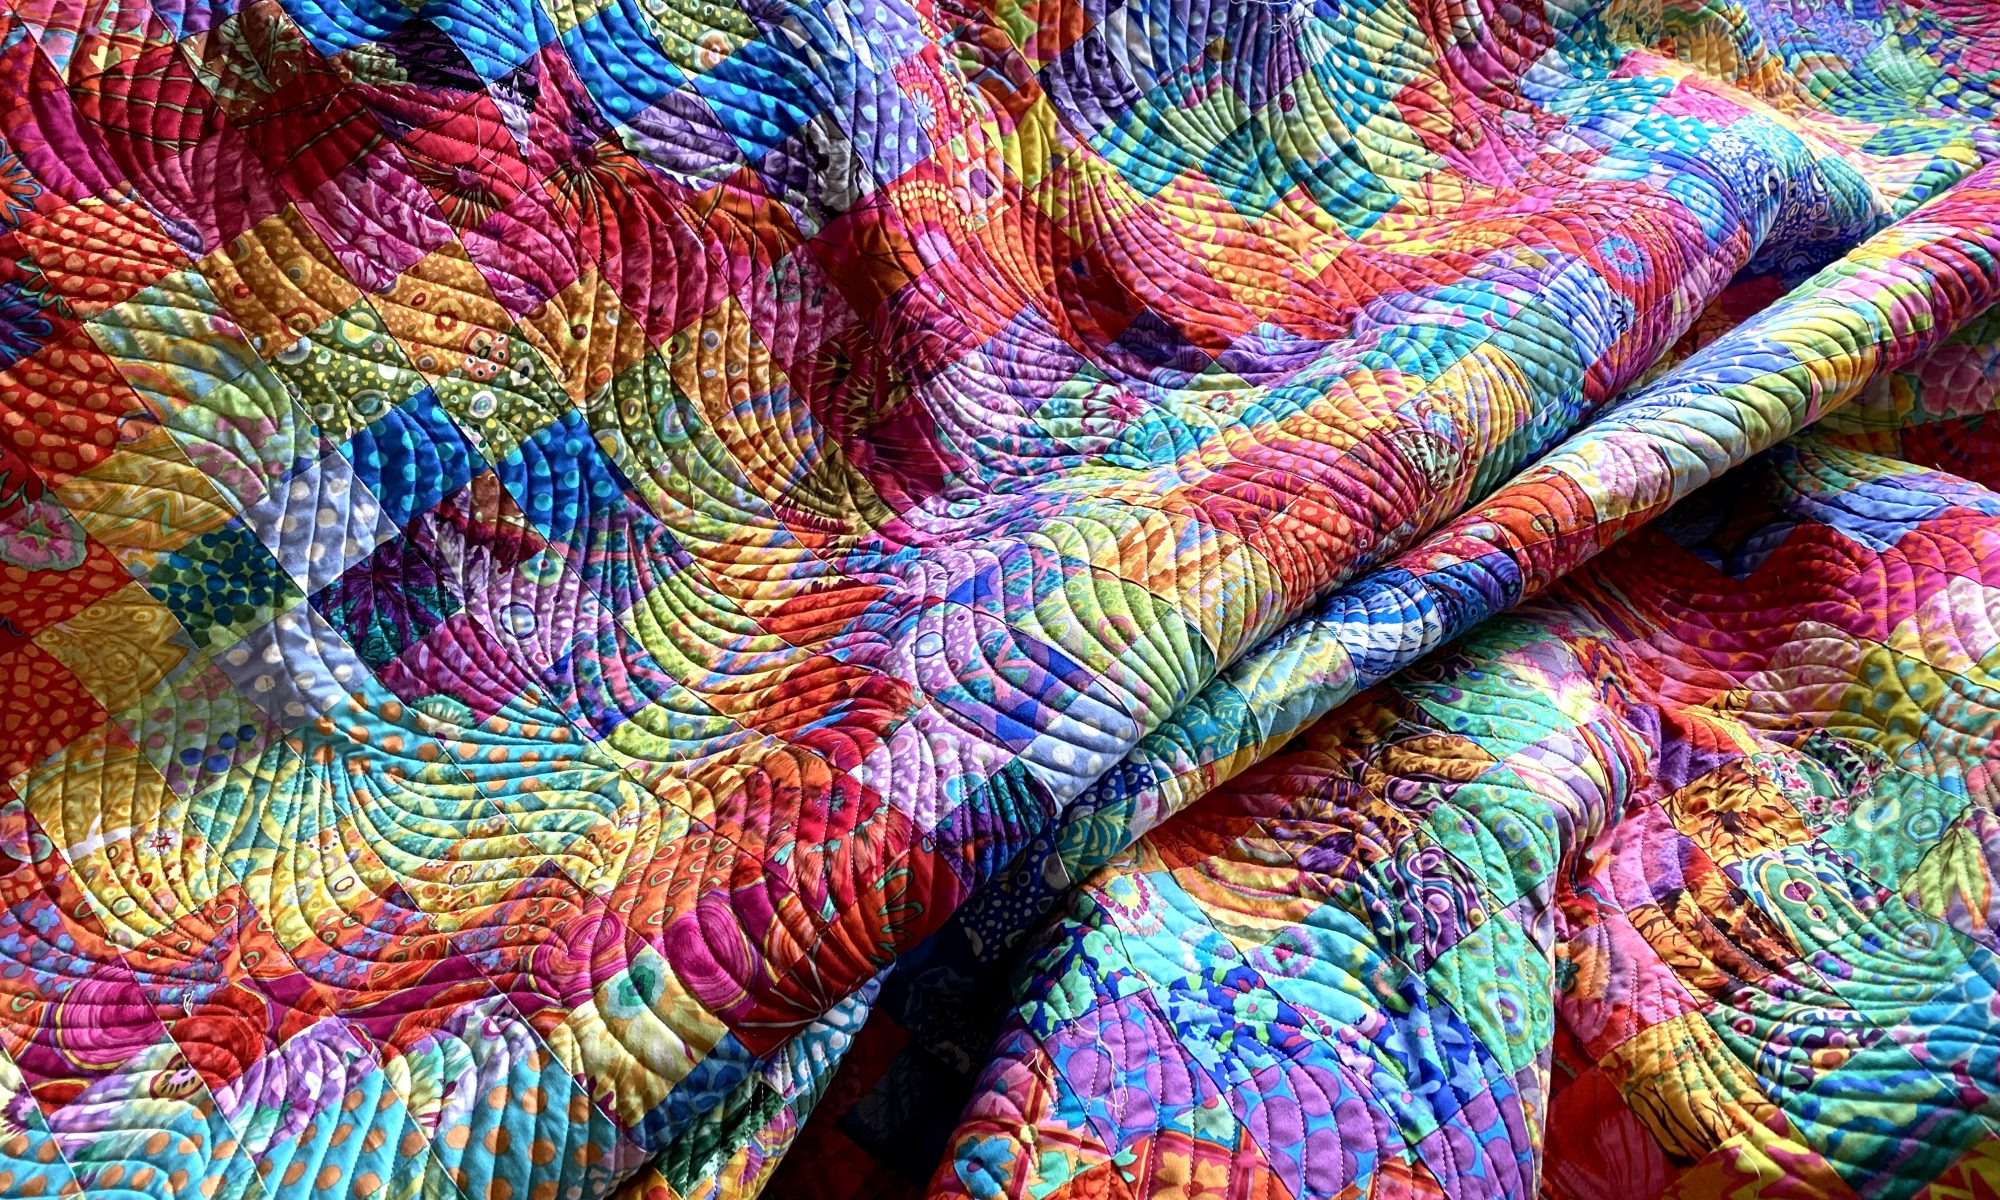
I finished putting this Frankenbag together tonight. And I like it a lot more than I thought I was going to.
I think the black and white jumble, crease, and the swirly background fabric help these crazy fabrics make sense.
Here’s the other side of the bag.
And I love the black and white crease lining on this bag. I think it works much nicer than a bold print would have.
And that pocket made out of jumble. Well, it’s kind of fabulous!
Two of my blog readers made bags from my Frankenbag Tutorial and sent me photos of what they made. It was really fun to get to see them. I asked them if I could share them here and they were on board!
Poppy MacLean made this one that includes what looks like stack and whack KFC orphan blocks and some fun checkerboard piecing on the other side. I love all the color on this one! Those pops of orange are pretty fabulous!
Sharon Osborne also made one from KFC scraps. She included a really fun paper pieced plant in a pot, with lots of orphan nine patches. That green jumble is really bold and I love it!
Here’s the back with some great little nine patches.
Sharon’s paper pieced plant reminded me of a book I purchased a few months ago that features some similar blocks.
She’s gotten all kinds of creative juices flowing for me! You will probably see a little potted plant in a bag very soon.
I’m thinking my next bag will include some border collie and sheep fabrics surrounded by a variety of black and white fabrics.
The crumb piecing will be made from the various black and white fabrics and the accent blocks will use the border collie and sheep fabrics. Haven’t decided yet what those blocks will be. I made some zipper pouches out of these fabrics a few years ago.
I have a lot of black and white fabrics. They are some of my favorites.
I celebrated my 11th anniversary of starting work at Oregon Public Broadcasting today. My job there is heading up the membership fundraising team. I’m so lucky to work with a group of really amazing people. I can’t believe how fortunate I am.
This job was the reason I picked up my life and moved to Portland from Salt Lake City. I’d had my eye on this job for quite a few years and when I got a call asking if I’d ever considered a move to Oregon, I jumped on it. I’ve never regretted the move. I can’t believe it’s been 11 years.
When I celebrated my tenth anniversary last year, sitting alone in my guest room office, I never had any idea that I’d celebrate the next one in the same way. I’m hoping for good things to come and that I’ll be celebrating with friends and co-workers in person next year.
Today was an absolutely gorgeous day here in Portland. It was in the mid 60s and sunny. A truly glorious spring day. My yard guy came by to plant the trees he brought by a week or so ago. But before that he wanted to dig the bamboo out of the stock tanks on my patio so we could get a clear view to position my new trees. The tanks were terribly root bound and the bamboo removal turned out to be a huge job. Five hours later he had gotten out four clumps.
This is really tall bamboo. We had hoped it would grow and fill in to provide much needed shade to my patio on summer afternoons and evenings. But it failed to thrive so we’re abandoning that hope after several years. I will use the stock tanks as raised garden beds this summer. I’m looking forward to fresh lettuce throughout most of the summer.
A friend of mine will come and pick up the bamboo and plant it in her yard. She is also bringing me a clump of smaller bamboo that I’ll put in a pot on my patio. My yard guy will come back tomorrow and we’ll finalize the location for my new patio shade trees and he’ll get them in the ground.
I’ve been chipping away on a couple of new Frankenbags over the last few days. Tonight I finished one and got the panels quilted for another one.
Here’s the front view of tonight’s finish.
It’s made from all KFC fabric scraps, except for one black and white fabric on the back — the one that’s set on the diagonal in the big block.
And here’s the back.
I decided to use one of my FAVORITE KFC fabrics for the lining — Paisley Jungle Tangerine. It’s so fantastic!!!
Hey! And look! It’s on the top of that wonky block on the front of the bag!
I’ve also been working on a bag made from the fabrics left over from this quilt. I finished piecing the panels last night and got them both quilted tonight. These fabrics are all KFC in the contrast colorway, except the jumbles aren’t contrast. And the swirly white background is not KFC.
These panels have taken some time to make because I’m somewhat limited on the scraps I have. It was tricky to make the blocks out of the limited longer strips I had available. But I made some fun ones.
One of the large blocks is a simple star block.
One smaller one is a not very perfect log cabin with a fussy cut center.
This other small block is free form and wonky with a fussy cut center.
And the larger block on the other panel is a sort of log cabin kind of thing.
I have a few crumb pieces left but not enough to make another tote. I’ll have to think about what I can make from them.
It was another nice day here in Portland. We had nice sunshine most of the day. The boys were happy when I stepped away from work for a game of frisbee.
I visited my herding teacher at her sheep ranch Saturday and got to hang out and smooch on some lambs for an hour. It was a gorgeous sunny day full of lambs that were just hours old.
These little lambs had been born the night before. They were so tiny and so amazingly cute. Do I look happy? It was so fantastic!
I also learned a lot about what lambing season is like for a sheep ranch owner. I’m really glad I don’t have a sheep ranch of my own! But it’s really nice to have friends who do.
After seeing lambs my friend and I went to another friend’s place and did some sheep herding, followed by a nice hike with my boys on BLM land.
What a gorgeous spring day! Nothing like a sunny spring day in the Pacific Northwest.
I didn’t do any sewing last night because I had to be up ridiculously early today to head to Olympia, Washington, for a sheep herding trial. We were in the car and on our way at 5:15 this morning. By the way… I am NOT a morning person.
Rico did a great job at the trial and we were done nice and early. I was back home by noon. I took a little nap and then hit the sewing room and assembled the Frankenbag panels I started on Friday.
I got them both quilted and ready for assembly tonight. I used the same matchstick and wavy line quilting as on the other two bags I’ve made. I like the matchstick quilting at the top of the bag as it ads some additional structure to keep the shape.
After I started quilting I regretted that I hadn’t checked my bobbin to make sure there was enough thread to finish one piece. Well, I did run out part way through, but it happened right at the end of a row!
I didn’t finish the bags tonight because I’m pretty tired and was afraid I’d make a mistake. So I pulled out my KFC contrast color way scraps from my first Ruffled Feathers quilt and started putting together crumb blocks. Here’s a pile of the first chain pieced crumb pieces.
… and a nice stack of blocks of varying sizes that will be put together like puzzle pieces later.
I wanted to see how these would all look as larger piece so I laid some out side by side.
I think this will be a fun one! I will have to make a few accent blocks out of some rectangles that are left over since I don’t have any orphan blocks on these fabrics. Haven’t decided yet what I’m going to do for those blocks but I will be limited a bit by the sizes of the scraps. I’ll probably toss some low volume black and whites in there.
I’m so glad the weekend is here and it’s gonna be a fun one! Tomorrow I’m meeting a friend down at my herding teacher’s farm to visit her lambs! I haven’t had my hands on lambs for a couple years and I’m so excited! I just love lambs. One of my favorite things about spring.
That’s me with a brand new lamb back in 2017. Look how happy I am!
After we see the lambs we’re going to a different friend’s place to do some herding training.
Then on Sunday, Rico is entered in another sheep herding trial up near Olympia, Washinton. Later on Sunday I have a Zoom call with my siblings and nephews. We haven’t done that for a few months so that will be fun.
I’m feeling a real surge of creativity in sewing right now. I had so much fun making my two crumb and improv pieced totes bags earlier this week and I can’t wait to make more.
I’ve been working on organizing my scraps and creating some random blocks and crumb blocks the last couple of evenings.
I think I have enough crumb pieces to make two bags. I’ll need to make a few bigger blocks to fill it all out and make them interesting.
I have so many ideas running around in my head. It’s so funny to me that I can get so excited to make something new and can almost be obsessed about it. But I’ve had more fun making these bags than I’ve had making anything else for awhile. Maybe because they’re small and finish up quickly. But I think part of it is that they’re so free form and creative. At any rate, all I can think about is the next bag I’m going to make.
In going through my KFC scraps I found a bunch of scraps from my first Ruffled Feathers quilt made from all contrast color way fabrics. I’m pretty sure there’s enough to make one of these tote bags. It promises to be chaotic but probably fun! I’m giving some thought on what to combine with those fabrics to make it interesting.
My friend offered the other night to send me some of her scraps and I told her no. Well, I called her today and told her I needed her scraps! I don’t have enough scraps to match up with my ideas!
I’ve been thinking about black fabrics recently. I’ve been looking at a lot of them on Pinterest and have some ideas percolating for a quilt. So I went online the other night and ordered some black and white fabrics. I had a few pieces already, but not enough to make a black and white quilt interesting.
I just love graphic black and whites combined with bright colors. So many ideas running around in my head, but this may all go toward some kind of zig zag quilt. I have a pattern I’ve wanted to make for a couple years and my friend loaned me the required template.
I’ve been worried that my trusted iron is on the way out. My mom gave me this iron when I graduated from college back in 1983! It’s got a lot of miles on it and it’s a great iron. It makes me so sad to think it’s life might be coming to an end.
It LOOKS like it’s got a few miles on it.
I don’t want to end up without an iron because that would mean I can’t do much sewing. So I went on Amazon tonight and ordered a new one. It will be here on Monday. And guess what. I bought another Sunbeam Steam Master! I hope the new one is as good as this one.
PLEASE DO NOT SHARE THIS TUTORIAL FOR COMMERCIAL/BUSINESS REASONS WITHOUT MY PERMISSION. CONTACT ME AT anne@agilejack1.com FOR PERMISSION.
(I’m really happy that a lot of people are making this bag! Since it’s free, when you post a photo of your bag on social media, please credit me, use the hashtag #frankenbag, and provide a link to this tutorial so others can find it.
Regarding selling bags you make from my tutorial… I’d rather that any sales are limited in number and are done locally and not through internet stores. Any sales should acknowledge my tutorial. Simply: Pattern by http://www.agilejack1.com. If you have questions about sales, please email me at anne@agilejack1.com. Thanks!!!)
I had so much fun making that quilted bag last night that I decided to make another one. I decided to document how I made it and share it here so you can make one of your own.
I’m calling this my Frankenbag because it’s made from a lot of spare parts! I dug into my orphan KFC blocks and crumb blocks to incorporate them here.
I think I like this one better than the first one I made! It’s about 13 inches high and 15 inches wide at the top edge. It’s a generous bag, but not TOO big. And it has a nice deep gusset. It will hold a lot of stuff.
Let’s dig in and make one! And a note to you… I’m writing this assuming you know basic sewing and construction techniques. But hopefully it will work for sewers of all skill levels.
Please read through this entire post before starting because I’ve added notes, updates and tips as I’ve made more of these bags.
Scraps or fabric to make the front and back of your bag. I made mine with crumb quilting and orphan blocks. You can use any technique you want to make your scraps into a panel, or use blocks you already have. You could even cut up a quilt to make one. This is a good opportunity to try something new!
1/2 yard of fabric for the lining. I love a lining that does my pieced panel justice! A nice pop of color or print in a lining is so much fun! Don’t skimp on the lining!
1/2 yard of fabric for the backing for your quilt sandwich when you quilt the front. This can be essentially any fabric as it will be hidden inside the bag. It’s a great way to use up larger scraps or fabric that you can’t imagine what made you buy it five years ago.
1/2 yard of fusible fleece or batting. (I’m currently using Pellon TP971F)
Cork fabric that is large enough for you to cut 2 pieces at 3×18 inches each. For handles long enough to use as shoulder straps, you’ll need to cut your pieces 3×24 inches. (UPDATE: after I used the cork I had on hand, I had a difficult time finding cork that was the quality I wanted. So I switched to faux leather and am making the handles longer. I really like the faux leather much better than the cork. Scroll all the way to the bottom of this post for a link to the product I’m using and info on making the handles longer so they can be used for a shoulder bag.)
Make the Handles
Fold the cork fabric in thirds lengthwise and clip.
Stitch a line of top stitching along the long edge on each side of the handle.
Make the pieced panels for the front of the bag:
(Note: I used my time machine and went into the future and made a bit of a tutorial showing how I make these pieced panels. You can find it here.)
Make a pieced panel of your choice. I used crumb piecing and some orphan blocks, bordered them with fabric and combined them in a really random way. You can use blocks you have on hand, or make some new blocks for this. You can do improv piecing, paper piecing, anything that floats your boat. This tutorial is written for a 17×17 inch square panel.
If you want to do some crumb pieced blocks, check out my blog post that includes some info on how I make mine. Or go to Youtube and search for “crumb block tutorial” and you’ll get some good options.
These panels are really the fun part for me! It’s a great opportunity to make something that you’ve always wanted to try. Just make sure that yours end up 17 inches square.
For my Frankenbag, one panel was all crumb pieced and the other one included some orphan blocks with crumb piecing. Here’s both panels:
The panel on the right is all crumb piecing. The one on the left includes two orphan blocks. Here’s all the pieces I had available to use in this orphan panel:
I chose the pineapple block and the small log cabin block. I put the black and white jumble border on the larger pineapple block, and a red guinea flower border on the smaller log cabin block.
This picture shows part way through putting this panel together. The next step was to sew the crumb piece at the bottom to the top part. As I put these together I kept in mind that 17 inch square I needed and put these pieces together with that in mind.
Once it was all sewed together, I trimmed it to 17 inches square.
Quilt your pieced panels
I used fusible fleece for my bag, but you can use any batting you like. The fleece was cut to about 18×18 inches and fused to the back of the pieced panel. If you’re using fusible fleece, be careful when using your iron on this. Keep your iron on the panel fabric and don’t get too close to the edge and melt the glue exposed glue on the fleece.
Then I cut a 19×19 piece of the fabric for the back of the quilt sandwich. I used two batik fat quarters that I’ve had laying around forever. Remember, the print on this fabric doesn’t matter because it will all be hidden inside the bag. It just adds some stability to your quilting.
Make your quilt sandwich with the backing fabric first, then the fleece and panel on top. I like to have the backing a little bigger than the fleece/batting, and have the panel a little smaller. This helps make sure that things don’t shift away from the edge as you’re quilting and you can be confident that all of your quilting will have batting and backing behind it.
I used some spray basting to adhere the backing to the fleece.
Quilt your panel in any way you like. I used my walking foot and did some matchstick quilting on the top 1.5 inches of each panel, and then used wavy horizontal lines for the remainder of the panel.
Use your favorite method, or try something new! It’s just a 17×17 inch piece of fabric! Nothing to lose if you mess it up!
Once you get your two panels quilted, trim away the extra batting and backing. Keep these as close to 17×17 as you can.
Next, cut out a 2.5 inch square from the bottom corners of both panels. This will become the gusset which makes the bottom of the bag flat.
Attach the handles to the quilted panels
I actually did this after I sewed the side seams on my bag, but it would be easier to do this prior to sewing the sides together.
On the wrong side of the panel, locate and mark (on the wrong side) the center of the top edge of each panel. Then measure 3 inches over on each side of the center and mark with a pen.
For shoulder length straps, measure over 4 inches from the center line.
With the handles on the right side of the panel and the ends of the handles facing up, line up the handle inside the 3 inch mark (inside the 4 inch mark for longer handles). Leave about 1/4 inch of the handle edge sticking up beyond the top of the bag, Pin the handle securely in place. I use two pins.
Make sure your handle isn’t twisted. The same side of the handle should be against the panel on both sides. If you have the front side touching on one side and the back side on the other side, your handle will be twisted. Take some time to flip your handle up after you pin it to see if it looks right. I also put the two sides of the bag to make sure I have the handles placed the same on both sides. It’s a lot easier to fix it now than it would be after you stitch it!
Stitch the handles onto the panels. I just sew one long line from one handle to the next, making sure to go back and forth across each handle end a few times to reinforce it. Make sure that all of this stitching will be inside your final top stitching seam allowance so it won’t show.
Sew the sides and back of the panels
Put the two panels right sides together and pin the sides and bottom, and then sew along all three edges. I used a seam allowance of about 3/8 inches. You can use any seam allowance you like… quarter inch, or something larger. Just be sure to use the same seam allowance on all of the bag seams so your lining will fit the outside of the bag.
Press these seams open. I like the 3/8 inch seam allowance because it’ makes it easier to press these seams open. These panels are pretty thick, so pressing the seams open helps reduce bulk at the top of the bag.
Make the gussets
Push the side and bottom of the outside of the bag together until the side and bottom seams match and voila! You have a gussett! Make sure you have right sides together.
Line up the seams and pin the gusset. Sew it with the same seam allowance you’re using elsewhere. Be sure to back tack at the beginning and end, and be careful sewing over the seam allowances. It’s bulky and can be a needle breaker! Go slow!
Look at that beautiful gussett!
Make the lining and pocket
Take your half yard of lining fabric and cut the whole thing to 17 inches wide. Cut off the selvedge, cut a 17 inch square, and leave the section on the fold intact — this will become the pocket.
*******Lining update added 4/22/21*******
After making ten of these bags, I’ve found that the lining fits better if I cut it 16 & 3/4 inches wide and 16.5 inches high. The assembly is the same.
To make the pocket press the fabric to remove the fold. Fold the piece in half the other direction with right sides together.
Sew around three sides of this folded piece, leaving an opening large enough to turn the pocket right side out. Clip the corners and turn the pocket right side out. Gently push out all the corners and press the pocket, making sure to fold the seam allowances under at the opening. Topstitch across the top of the pocket. You get to choose the top! Your pocket should be close to square, or it may be a slight rectangle. Just decide which side you want to be the top.
Now cut a 2.5 inch square out of the bottom two corners of the lining pieces.
Take one piece of the lining and mark the center. Place the pocket on the right side of this fabric. Make sure it’s centered, and place it about 3 inches down from the top of the lining.
Pin it in place and stitch around the sides and bottom of the pocket. Back tack at the two top edges. (you can also sew an additional vertical line to divide the pocket, or make a thinner slot for a pen.)
Honestly, no one will ever know if your pocket is crooked, but you’ll feel better knowing it’s not on a slant.
Place the two lining pieces right sides together and pin. Sew the bottom seam and the two side seams, LEAVING A SIX INCH OPENING IN THE MIDDLE OF ONE SIDE SEAM. This is very important! This opening will allow you to turn the bag right side out after you attach the lining to the bag front. (It’s a good idea to press back the seam allowances on that opening now while the lining is flat. It will make closing it up later much easier.)
Press the seams open. Then make the gussets the same way you made the gussets on the outside of the bag.
Attach the lining to the bag front
You’re so close to being done!
Turn the bag front wrong side out and the lining right side out. Place the lining inside the bag. Your pieces should be right sides together at this point. Match and pin the side seams, and then pin all the way around the top edge of the bag, matching the top edges. (I have found that pinning with the pins facing the opposite direction from what the photo shows — with the points facing into the bag body — makes sewing this easier… I don’t get poked as much and it makes the pins easier to remove as I’m sewing.)
You can see the ends of the handles sticking up above the top of the bag. Don’t freak out. This is supposed to happen.
Your handles should be BETWEEN the outside of the bag and the lining. If they aren’t, stop now and figure out what the hell is going on!
Sew a seam all the way around the top of the bag. Back tack at the beginning and end of this seam. Be careful of all that bulk where the side seams meet and at the handles. . Speed kills at this point. And it eats needles!
Reach through the hole in the side of the lining and gently turn the bag right side out. Put your hand inside and push out all the bottom corners.
Line up the sides of the opening in the lining and pin it carefully. Stitch the opening closed very close to the edge, making sure you’re catching both sides.
Push the lining into the bag, smoothing and pushing the corners into the corners of the bag front.
Press the top of the bag so the seam is at the very top. Take a few minutes here to make sure this looks nice. This careful finishing makes a big difference in your bag.
Top stitch about 3/8 inch from the top of the bag. You can go back and forth at the handles again to reinforce them. it’s also a good idea to be mindful of all that bulk at this stage. Back tack at the beginning and end of this top stitching.
AND YOU’RE DONE!!! I hope you end up with a bag you love! I’d love to see a photo of your bag if you make this. You can email me at anne@agilejack1.com and when you post photos on social media, use the hashtag #frankenbag.
Leave me a comment if you have a question, or if you find an error.
NOTES ADDED ON 4-4-2021 TO ALTER THE HANDLES, and where to buy faux leather.
The first four Frankenbags I made had cork handles. And that was all the cork I had. So I went online and found some at Fabric.com. When it arrived I realized it was really thin and didn’t feel like it would hold up with use. So I went online and looked for other options.
On this border collie bag linked above I made the handles longer so they would comfortably go over my shoulder but they still work to carry with your hand. I altered the handle instructions included in this tutorial in two ways:
I cut the faux leather 3 inches wide and 24 inches long.
I marked four inches from the center of the bag to place the handles, rather than three inches.
I sat down after work tonight and decided to start working on a bag made from the crumb panels I made last night. It went together really easily and it turned out so cute!
It’s a nice generous size and I put a slip pocket in the lining.
I trimmed the two crumb panels to 17 inches square and made a quilt sandwich out of each piece. I used my walking foot and started out with matchstick quilting and I liked doing it, but I realized it would take a week to get this all quilted with that narrow spacing. So after about 1.5 inches of matchstick, I switched to an organic wavy line.
The section with the matchstick became the top of the bag.
Here’s a photo of the wavy quilting.
I decided to make the handles out of some cork fabric that I’ve had for a while. It was really lovely to sew on and I like the way the handles turned out.
My cork was 18 by 12 inches, so I was limited on the length of handles I could make. 18 inches is fine for regular handles, but not long enough to put over your shoulder. I’m going to keep an eye out for cork that comes in larger sizes for more flexibility.
I cut the cork 3 inches by 18 inches and folded it lengthwise in thirds. I clipped it all in place and top stitched down both sides.
I’m curious to see how the cork wears and washes. It has a nice soft feel and is comfortable.
I dug into my drawer of larger pieces of fabric to see what I wanted to use for the lining and selected this gorgeous Philip Jacobs Snow Leopard design. It’s called Padma. And it’s perfect!
I just love a bold and surprising lining to a bag. In my mind, the lining is not the place to skimp!
I wanted a nice deep gusset on this bag, so I cut out a 2.5 inch square from each of the bottom corners of the lining and bag front.
You can see the pocket on this lining piece.
I love making gussets this way! They come out beautifully every time.
The paisley fabric you see was used as the backing for the quilting. I left the wrong side out so it wouldn’t be as dark. I knew it would eventually be covered by the lining, but wanted to add some stability to the quilting.
I had so much fun making this and am so happy with how it turned out… I’ll definitely make more of these!
I took a little diversion tonight and continued taming some of my KFC scraps. All these little pieces came together in crumb blocks.
I kept some scrap strips aside to complete the starburst blocks I’m making. But I actually used up almost all the other KFC small scraps that I’ve saved. This is all I have left:
I made a few nice size panels that will make a fun project. I’m thinking I’ll use the two larger panels on the right in this photo to make a medium size tote bag.
The one on the bottom right measures about 19 inches square.
I’ve been wanting to try some matchstick machine quilting and will probably do that on this bag. I’m thinking I’ll make a deep gusset on the bag as well, one single handle long enough to go over my shoulder and maybe a couple pockets on the inside. It’s all up in the air, but that’s what I’m thinking.
When I make these crumb blocks I chain piece them and it goes pretty fast. It’s amazing how quickly all those tiny pieces turn into larger panels.
I do enjoy making crumb blocks. Improv piecing like this truly is my happy place. It’s nice to just let each piece be what it wants to be.
Took a photo during our afternoon walk today. So many trees in my neighborhood are blooming and the aroma in the neighborhood is so lovely. I came across a winter Daphne today that smelled so incredible! And some apple trees were so lovely.
My forsythia is in such gorgeous bloom right now. It’s at it’s peak.
This is just it’s third bloom. It’s grown crazy fast. It was only about 18 inches tall when I planted it two years ago. It’s going to get a serious trim when its bloom is done. I like them to be all sprangly rather than shaped, but this is a little thin. I’m hoping trimming it back will encourage it to thicken up and fill in.
We have a couple more days of rain and then a stretch of really gorgeous weather coming up. This is usually a very rainy time of year here in Portland, so this will be a treat and everything will come to life and explode with blooms!