Here it is! The long-awaited crumb piecing tutorial. There are some preliminary things I’ll cover here in this post, and then there’s a looong video, included below, to give you a look inside my crumb piecing brain.
I absolutely love crumb piecing. I find it almost meditative… sitting at my machine, matching small pieces of fabric to other small pieces of fabric, taking joy in lovely fabric combos in tiny pieces. It’s free form. It’s easy. There’s something about the quiet repetitiveness of it that is very calming for me. And after a few minutes at my sewing machine, I’ve created some really fun blocks or even a piece of fabric I can use to make something wonderful.
To get started, the first thing I did was dig into my big bucket of scraps and sort out some Kaffe Fassett Collective scraps that are perfect for crumb piecing.

I decided to go with all KFC fabric scraps, but I’ve done crumb piecing before with only batik scraps. You can use any fabrics you like and mix and match any way you like. You could select fabrics from all one color family (like all reds, or all blues, etc…), you could do all black and white, or you could do all one color family with an occasional pop of a contrasting color thrown in.
I pulled out some smaller pieces, anywhere from about 1.5×2 inches all the way up to 2.5 x 3 inches or so. Squares, rectangles, triangles, irregular shapes, they all work. I also pulled out some strips.


The video will show some good images of the type of pieces I’m using and how I piece them.
Once I had my pieces selected, I pressed them all and sorted them according to size and shape: larger pieces, smaller pieces, irregular pieces. Then I sat down at the sewing machine and got started.
Before you dive into the video, the one thing I want you to remember is that there are no rules in crumb piecing. Nothing has to line up, no seams have to match, no shapes have to be a particular shape. So relax, have some fun, sew some fabric together, and dive in!
Ok, I promised you that I’d show you some things that can be made with crumb piecing. So here we go.
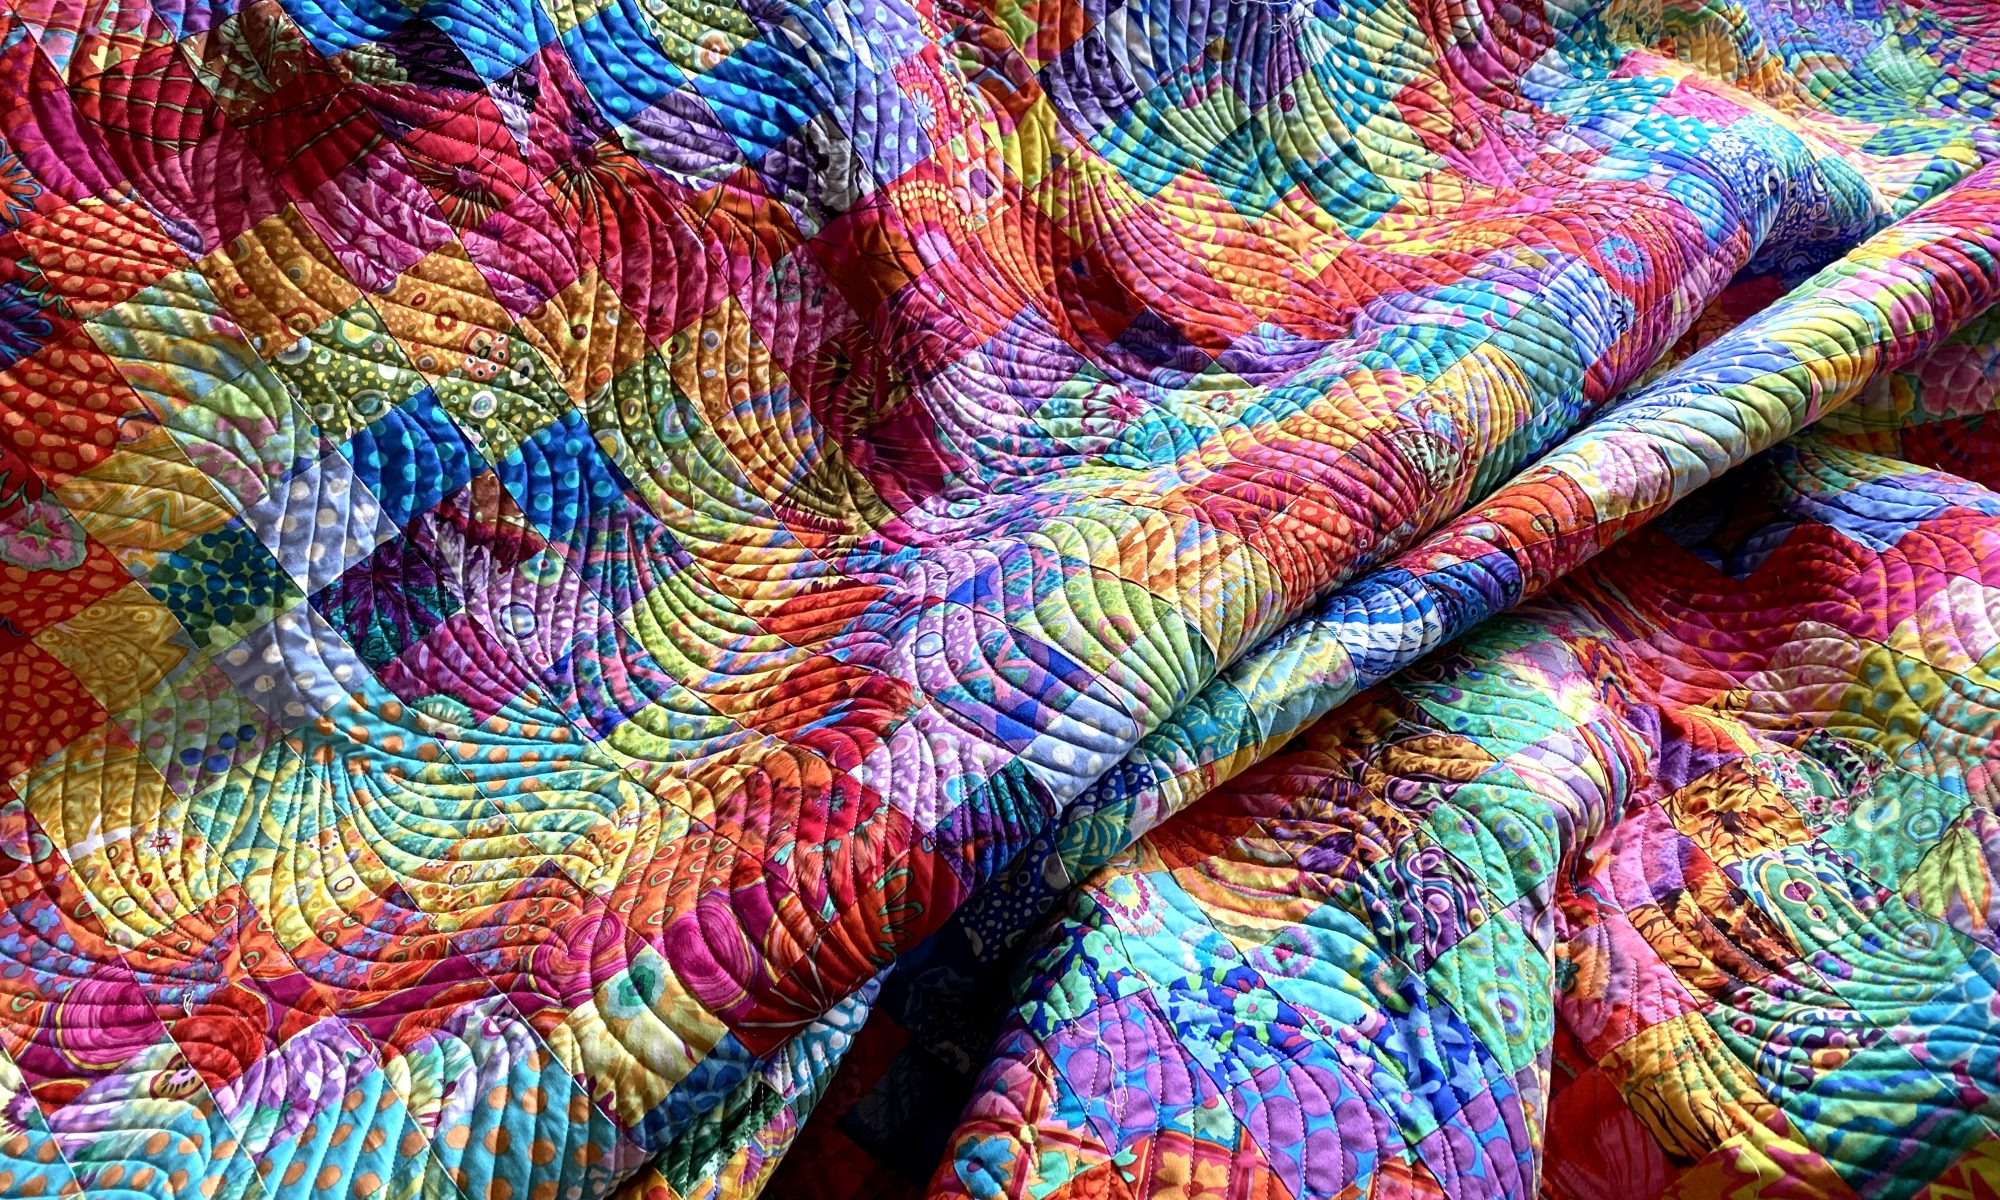
This quilt is probably my favorite of all I’ve ever made. I haven’t had it quilted yet, but it will stay with me when it’s done. I made crumb blocks and squared them up to 8 inches and then added borders and sashing.

You can also use crumb piecing to make a bag. Either make the bag out of entirely crumb pieced fabric like this one…

Or use various sized crumb blocks like in these Frankenbags.


Here’s a deconstructed look at how you can incorporate crumb blocks in a bag:

I made this batik wall hanging out of crumb blocks.

I later cut this wall hanging into four pieces and made two Frankenbags. Here’s one of them.

I hope the video is clear. Let me know if you have any questions or need clarifications.
Absolutely mind blowingly gorgeous!!
Thank so much for being very inspiring. I love your quilts.
Thank you! And thanks for reading and for commenting.
Anne
I love what you do! I came across your YouTube video and watched it first and then read the blog post. This is the quilting method for me! I’m wheelchair-bound and have dexterity issues. I’ve always struggled with precision and this has freed me from it! I’ve subscribed to your YouTube channel as well. I would never have the nerve to cut up that beautiful wall hanging though, but what you did with it was equally as beautiful. I’ll continue watching your content and I can’t wait to get started on my first block.
I don’t love precision. It’s too fiddly for me. It’s not fun. So crumb piecing is my go to! Funny to me how some people are just terribly uncomfortable with this more free form type of sewing. But I love it!
I never loved that wall hanging. It was so much better as two bags! I’ve never looked back!
Anne
Hi Anne Love love love the tute! Thank you so much!!! Been doing crumbs for a while, or trying to, but what your tute and video have now done for me is to lay it out systematically, and show me the optimum points at which to start correcting for straight edges. Me, Id just keep going until I reached a Point of No Return, ending up with great misshapen blobs that could no longer be put together, nohow.
On a different topic, Id like to offer you my thanks again, this time for your recent remarks about not doing commissions. You have captured my thoughts on this exactly. I only ever did ONE commissioned quilt. It was a very pretty quilt but it took me FIVE YEARS, because I so totally lost interest in the damn thing, for all the reasons that you have enunciated. I hated it, and will never, ever do another. Fortunately, the friend for whom I made it was extraordinarily patient, and politely said nothing about it in all that time, despite having chosen and paid for all the initial fabrics, and I know she was genuinely delighted to get it finally. (As was I, to see the back of it.) I couldnt bring myself to charge her the agreed price for my labour, either, because it had amounted to such an astronomical sum that I didnt have the nerve to even mention it, which probably helped us both to reach the whole amicable outcome. I just asked her to compensate me for the cost of having it professionally quilted, about two hundred dollars, which she was happy to do, and indeed she quietly and very graciously doubled it. But I think what I want to say to you about this is that what you said is really important. It indicates, and indeed vindicates, our right to regard our craft as also an Art. I mean, we all know that craftswomanship is required to do this Thing of ours and do it properly, but theres also a big question of artistic freedom mingled in there, isnt there? Im not putting this well, I know, but dammit, we who work so joyously with design, colour and pattern are Artists, as well as Craftspersons, and we should all think of ourselves that way, not just those of us who do those rather pretentious pieces that nowadays get called art quilts!
Kind thoughts Selma
PS I think I may be going to weaken, quite soon, and have a go at making a Frankenbag. But I promise NOT to send you a photo
Sent from Mailhttps://go.microsoft.com/fwlink/?LinkId=550986 for Windows
I’ve read your comment several times and laugh every time… and also commiserate with your commission experience. I think the overwhelming emotion I get when doing commissions is sadness. There just isn’t much joy in a commission… and I hate being held to a timeline. I just don’t work that way.
I think there area a lot of people who think we just love to shove fabric through a machine. These are the people who ask us to mend their jeans or make their Halloween costume. They don’t understand that it’s all a creative process.
I’m do disappointed that you;re going to make a bag and NOt send me a photo! hahAHA!
Anne
Absolutely amazing your eye for colour is wonderful and a wonderful way to use your scarps
Thanks! I have to give the Kaffe and his colorways with a lot of the credit! But the color is really what excites me the most!
Anne
I LOVE Kaff’s fabrics!
I learned a lot from this. Now i believe I can make some nice crumb blocks. Thank you!
Definitely give it a try! it’s really fun!
Anne
Whoa. That. Was. A. Terrific. Tutorial. Thank you so much! I made crumb pieces before I knew they were called that, but your method streamlines the process. I see now how I can make them faster and turn them into more useful shapes. Thank you for sharing your knowledge/process.
the speed is critical for me! I love finding efficient ways to do things. the chain piecing of crumb blocks is brilliant! That combined with some prep and organization of your scraps and it goes really fast!
Anne
Thanks so much for the crumbing video! Too cool 😎! Was hoping the boys would show up 😉. Love the crumb pieced bag , so pretty 😻. Hope y’all had a good 4th, luckily ours was not too noisy outside.
My neighborhood is like a war zone on the fourth. Bender doesn’t mind the noise, but Rico hates it. He doesn’t freak out, he just gets sad and needs a lot of consoling. Luckily I haven’t heard any noise tonight.
Anne
The video was not too long. I’ve wanted to try crumb piecing for bags. At last, now I can tackle it. Excellent video. Thank you.
You should definitely give crumb piecing a try! you might love it like me!
Anne
You got me hooked on crumb piecing when you first showed your crumb quilt on the blog while trying to decide on the sashing colors. I agree that this is by far the least amount of stress you can have while quilting. Its addicting on how freeing it is and I can’t stop doing it!! I use any scrap that’s at least 1″ wide! I love it. Thanks for sharing ALL your creative juices with us. You are very inspiring.
I really went crazy when I was making that quilt. I think I made all the crumb blocks for it in a couple weeks. I had so much fun with it! I had no plan for those blocks…. just sad down one night and decided to try some crumb piecing!
Anne
I can understand why that’s your favourite quilt – it is a beauty! Love how you turned your wall hanging into a bag. I always enjoy seeing your shared posts of other peoples bags. I made a crumb quilt last year, but your colourful Kaffe fabrics really are the best 🙂
That wall hanging was much better as two bags. As a wall hanging it was ok, but the bags were really cool! I might have to cut up one of the quilt tops I made during the pandemic. There are a lot of them!
Anne
Thanks so much for the video.
You’re welcome!
Anne
Oooo! Thanks for the tutorial! Kaffe fabrics are much too interesting/fun/colorful to leave them to molder away in a scrap pile. Can’t wait to try this.
The Kaffe fabrics really do work well in crumb quilting. it’s all just a riot of color, which makes me very happy!
Anne
Outstanding post and video – I love crumb piecing and have done a lot of it but I still learned a couple of “tips” from watching your method. Thanks a lot and here’s to saving small scraps to make beautiful things.
Thanks! I love crumb piecing. So relaxing and free form. And I don’t know how I end up with so many scraps! It seems like everything is from scraps. Where the heck are all these scraps coming from?
Anne
Loved the video and hearing your voice! Great job! I figured I knew how to do this, but you gave so many great tips. Thanks so much for sharing🤗
Thanks! I think I sound really loud and formal! I should relax a little!
Anne
Thank you for sharing…so much inspiration.
You’re welcome. Thanks for reading!
Anne
Thank you so much for the clear instructions on how to crumb piece. You’ve inspired me to give it a try. Love your quilt!
Oh good! that makes me happy!
Anne
Thank you so much – what a great reference tutorial – it will be my ‘go-to’ for crumb quilting. I am grateful for the effort and time you devoted to sharing with us.
I’m glad you liked it! Thanks for reading and for commenting!
Anne
LOVE your crumb quilt!!!!!
Thanks! I feel happy whenever I look at it.
Anne
Thank you for the fabulous video ❤️.
I will be trying crumb piecing soon…
This evening 😄. You made it look so effortless and freeing! I need some free form fun in my life! You have a great eye for color.
Thanks! I’m glad you liked it. You should definitely try some crumb piecing, but be careful because it can be addictive!
Anne
Thanks for sharing you method to crumb piecing. Every video author has a slightly different method. Yours is nicely displayed and easy to follow plus inspiring! Thanks again!
Thanks! I go about it a little differently than the video tutorial I used when I first started. But it’s a method that works for me and works for the type of scraps I tend to generate.
Anne
My brain likes to sort everything by color but I like the ones with a combo too!
I don’t think I’ve ever done crumb blocks in one color way. I should try it.
Anne
Excellent video and written tutorial, thank you! I have crumbs in the millions I think but having read and seen the video I’m certainly going to be sorting pieces. as soon as possible.
I love your quilt!!
Thanks! that quilt is actually my favorite of everything I’ve made. It’s not quilted yet, but will be staying with me when it’s done.
I think sorting the scraps is probably the worst part for me. I just get so distracted. But this is a great way to use up those smaller pieces that you just can’t part with.
Anne
Love the all crumb Franken bag….
Thanks!
Anne
Thanks! I love using some crumb piecing in my bags.
Anne
I must be slow but can’t find the video for crumb piecing!! love your posts so much!!!
It’s in the post that you commented on. But here’s a link to the Youtube video: https://www.youtube.com/watch?v=4RgB3ZsGRJU
Anne
W OULD you MIND GIVING INFORMATION AS TO WHERE YOU PURCHASED THE POLKA DOT FABRIC?
Lots of places carry it, but a good place to start is http://www.sewcolorful.com
Anne
I like your bags a lot!!!! Please tell me why they are called Frankenbags?
What does it mean.
Aranka from Switzerland
they are called Frankenbags because they’re made from spare parts, just like Dr. Frankenstein’s monster.
Anne
Hi, I’ve just discovered your tutorials and am looking forward to giving crumb quilting a try. Thanks so much for sharing your amazing talent.
I love crumb quilting. I hope you like it too! So many uses for those crumb pieces.
Anne
Oh my goodness! You are such an inspiration! I am so excited I found your blog! I am headed to the sewing room NOW! I taught art for 37 years and I’m finding it difficult to transition to fabric as a medium. You have shown me the canvas and my palette of fabric awaits!
All I need for inspiration to create with sewing is beautiful fabrics! Then my brain goes wild!
I hope you create something amazing!
Anne
Hi Anne,
I just discovered this gorgeous crumb-pieced quilt. I love your bright and lively colors, and the way you’ve bordered and sashed the blocks. Such a beautiful finish. Thank you so much for the tutorial. I have plunged into my scraps and while you did say that you cut your blocks at 8″, I’m wondering if your polka dot borders were cut to 1.5 inches and the sashing to 2 inches?? Or larger? I experimented a bit but I think the 2 inch borders were too big. Thank you for your help and I am happy to reimburse you for the measurements!!!! Thanks so much, Sherrie from Tennessee
I think I may have cut those spot borders to 1.5 inches so they finished at 1 inc. the red sashing was definitely cut to 2 inches. It’s been a few years. I don’t exactly remember.
Anne
Thank you for the inspiration and information. I appreciate it very much. Sherrie