Thanksgiving 2018 Pouches

Another rainy day and I had to take my car into the shop for new tires and some servicing. So I caught a ride home, and hunkered down in my sewing room.

I always love to try new things and I decided to quilt the panels on this set of pouches with straight line stitching using my walking foot. Have I told you how much I love my walking foot?

IMG_9898

I wasn’t sure it would work, but I’m really happy with how it turned out. I love it because it feels very ordered and structured, which I just love with the randomness of some of these fabrics. It’s just a combination that works in my brain.

IMG_9895

I just love all the hard, straight lines with the bright colors and swirls. So pretty.

IMG_9894

This one made from yellows, oranges and reds was the first one I quilted this way. I thought the straight line quilting would work well on this one. Then I decided to give it a try on one of the flying geese panels… and I loved it there too. So I did the same stitching on all four.

IMG_9900

I just love the one above with the teal colors and taupe linen. It’s so sharp and classy! Such a great combo.

Wonky Log Cabin Quilt

IMG_8110

Finished this quilt top recently after several months of  making these blocks every now and then. They are free-form wonky log cabin blocks. Really fun to make. Really relaxing. Great thing to do at the end of the evening when you want to do some sewing, but know that paying attention to something complicated isn’t in the cards.

At first I pictured the sashing in a zebra print. In fact, I bought the black and white that I actually used because I liked it and thought it would suffice if I couldn’t find a zebra print I liked. After looking for a couple of months, I DID find a zebra print I liked, but it just doesn’t work well in the quilt. Or, this one just worked much better.

I recently finished this top because I wanted to get it off my design wall. So I cracked along over a couple of weeks and cranked out the blocks, then got the sashing done and the top assembled in a weekend.

IMG_8356

And it’s been sitting there for months waiting for me to put together the backing. I had thought I’d use up some of my odds and ends black and white fabrics and piece a backing. Then when I was on vacation I found a cow hyde print black and white fabric on sale and bought six yards of it. I want to use it for the back, but can’t seem to talk myself into it.

I added some black and white borders, along with one thin aqua border.

IMG_8363

It’s a good size quilt. This is it on the double bed in my guest room.

IMG_8360

I just love these scrappy batik quilts. They are so bright and happy. And the graphic black and white just makes all those colors pop.


Productive Herringbone Pouch Weekend

IMG_9851

IMG_9857

I have company coming this week and needed to get my house cleaned this weekend, but really had a desire to get some serious sewing done. So I budgeted my time, and told myself that if I accomplished what I needed to in housecleaning on Saturday, I could sew the rest of the weekend.

I started out friday night by selecting fabrics for six pouches. I had made one last week with this herringbone panel and batik scraps and wanted to make some out of Kaffe Fassett Collective fabrics. So I dug into some charm packs that I’ve been holding onto. . . I thought this would be a great way to use that variety of fabric. I also made one from batiks left over from a quilt I made for a friend, and a batik charm pack.

These herringbone panels go together really fast. I got 12 done on Friday night… enough for six pouches.

For the herringbone panel, I followed this tutorial from Craftsy.  The tutorial has you cut your strips 1.5 inches by 4 inches. I used charm squares, so my strips were 5 inches long. My panels ended up too tall for my pouches. They would have looked odd and there wouldn’t have been much of the body fabric showing at the bottom of the pouch. So I cut about 1/5 inch off of the top and bottom of each panel to make it fit better. When I do these panels again, I’ll cut the pieces to 4 inches.

I continued adding strips to the panels until the panel was long enough that I could cut a piece 12 inches long and the width I wanted. With the five inch strips, I initially cut them 6 inches wide. And later cut them down to 5 inches, so they finished at 4.5 inches high, which makes a good proportion for the pouch.

Warning; These panels, when done, are all on the bias, so they stretch like crazy! Be very careful when working with them to not stretch them out of shape.

Once the panels were done, I decided which body fabric I’d use for each one. I decided to just use my beige linen and blue chambray.

To construct the pouch, I used my basic pouch pattern, according to my zipper pouch tutorial here. 

Once I got my house cleaning done on Saturday… and met a friend for dinner… and did some Thanksgiving grocery shopping, I dug in and started preparing body and lining pieces. I started constructing the pouch sides and was productive enough to get one side of each pouch pinned to the zipper and lining… all ready to start sewing the zippers on Sunday.

Once the zippers were in and the topstitching was done, It was time to quilt. I quilted all twelve panels in the same session. They are small, and it goes really fast if you’re not having any issues with your machine.

IMG_9842

The lining is fused to the batting and I used spray basting to adhere the front pieces to the batting for quilting. I did the walking foot quilted lines at the bottom of the panel first, and then quilted the panels using a basic meander for each panel. I used my Bernina stitch regulator for the free motion quilting.

Once the quilting was done, I finished the pouches according to my tutorial.

I’m really happy with how they turned out. I’m excited to try different fabric combinations with this herringbone pattern.

Election Returns Linen Pouch

IMG_9740

I couldn’t stand just sitting and watching election returns, so I turned on the radio and whipped up this handsome grey linen and aboriginal prints pouch.

This is the linen I bought this weekend, and this shit is so thick!!! I knew I’d never get the thickness of a handle to go through my machine, so I didn’t even try.

I BROKE THREE NEEDLES ON THIS THING!!!

I bought a yard of this fabric, and doubt I’ll make another pouch because there’s just too much thickness. So I’m thinking a couple of tote bags with pieced and quilted panels. I’ll have to give it some thought.

I did some stipple quilting on the pieced panel, and that’s my favorite part of the bag. I’m definitely going to make that a permanent part of my wheel house.

IMG_9741

IMG_9742

Bright Checks Zipper Pouches

IMG_9733

Had to run some errands tonight, so when I got home I was looking for something that I could whip up quickly. I had cut these bright Kaffe Fassett Collective squares a couple of months ago and had never sewn them together, and they were stacked up on my sewing table so it seemed like the perfect project. I love the way they look combined with the soft blue chambray.

To get these squares, I went through my small KFC scraps and pulled out anything that could be cut into a 2×2 inch square. Once they were cut, I separated them by design, and then stacked them by color family. Hmmm… not a lot of blues in my pile!

IMG_9004

I then selected a bunch of the squares from many different fabrics and colors and started arranging them. Eight squares wide by three squares high turns out perfect to make the pieced panel for a pouch following my zipper pouch tutorial. 

The front and back panels of this pouch actually have the same arrangement of fabrics. I’m not really sure why I took the time to do this because no one would ever notice! But it satisfies my need for order, and it’s a detail that I like taking the time to do. Even if no one else notices, I know it’s there.

IMG_9003

I sewed the squares into horizontal rows and then I sewed the three rows together. It helps to press all the seam allowances on the top row to the left, press the middle row allowances to the right, and press the allowances on the bottom row to the left. That way your seams will nest when you sew the rows together. I’m a pinner, so I pinned the rows before sewing.

Once the panel was done I started constructing the pouch. Once the zipper was in and top stitched, I quilted the front and back panels of the pouch with a simple stipple meander in a light grey thread, and did two straight lines of quilting with my walking foot below the panel.

It’s amazing how the light grey thread almost disappears in these beautiful bright fabrics.

IMG_9734

IMG_9735

I made two pouches with these panels recently, but this is the first one where I quilted the panel. I’m thinking the quilting will become a necessity. It just adds a really nice finish and texture. I’m loving it!

IMG_9034

This next one was made from a charm pack of Kaffe paperweight and Roman glass that I’ve had in my stash for awhile. It’s nice to finally use some of it.

IMG_8980

I’ll be making more of these. I just love the bright and happy, scrappy look.


Chambray, blue and yellow quilted pouch

I was ready to get up early today and drive down to Brooks to visit a litter of seven week old puppies, and, unbelievably, the whole event got canceled because it was supposed to rain. Can you believe that in NW Oregon something gets canceled because of rain? And it turned out to be a gorgeous day. Not a drop here at my place in Portland.

Since I was already up, and after a nice leisurely breakfast of pumpkin pie, I decided to go and look at some fabric. I had seen some really nice chambray at a fabric store a couple of weeks ago when  friend and I were there looking for linen. I’ve been thinking about it ever since, so I got ready and hit the road.

I took about an hour and touched a lot of fabric at the store… a large store that has quilting fabric, designer fabrics, decor fabrics, and just about anything you’d want. So I really enjoyed myself.

I found the chambray that I’d seen a couple of weeks ago, and found a nice charcoal grey linen that I didn’t see that last time I was there. The chambray was inexpensive, so I bought two yards, and it’s about 70 inches wide! It will go with just about any bright quilting fabric I put with it. I bought a yard of the linen and it will be great with the bright colors too. It’s wide too so I can get a lot of bags and pouches out of that yard.

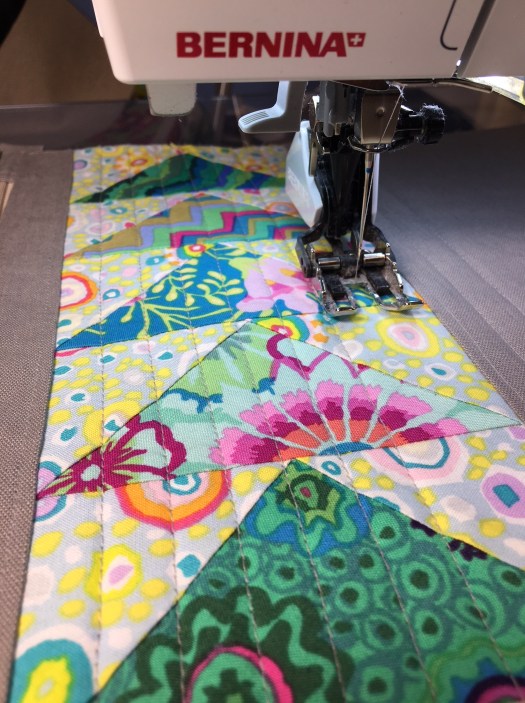
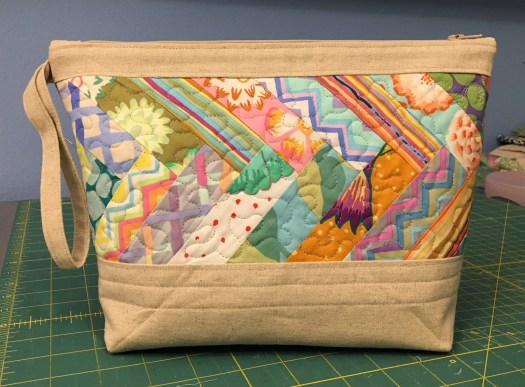
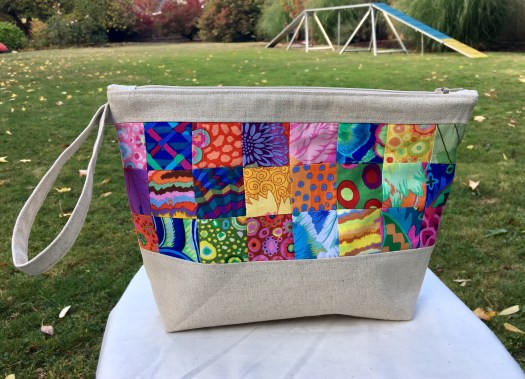
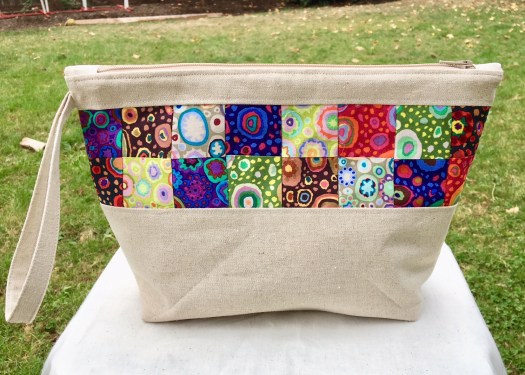
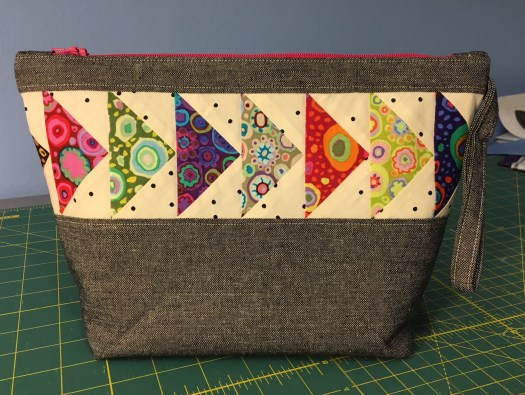
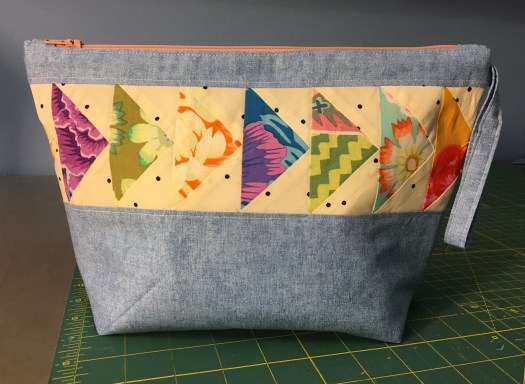
Once home, I decided to start on a pouch that I’ve been wanting to make. It’s a pennant design out of blues and yellows. I made a paper piecing template a couple weeks ago to use for this bag. I considered just drawing out the template on graph paper, which would have been easier, but decided to try making it on Excel, and it worked! It took a long time, but it’s really accurate and the lines are nice and straight and fine. The blocks finish up right around 4 inches square.

IMG_9722

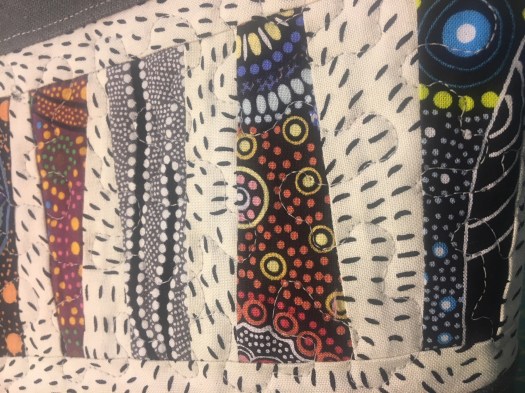
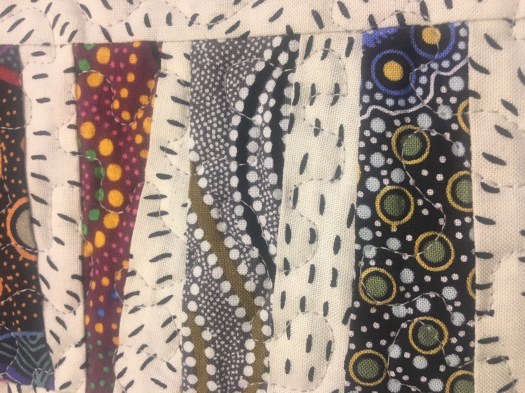
I decided to use more of the Kaffe Fassett Roman Glass and Paperweight because I had some cut and ready to go, plus, it’s gorgeous and the colors are just what I wanted.

I made six blocks using three different blues and two different yellows, then I arranged them in sets of three and sewed them together for the panels for the front and back of my pouch. I’m so happy with how these panels turned out!

IMG_9712

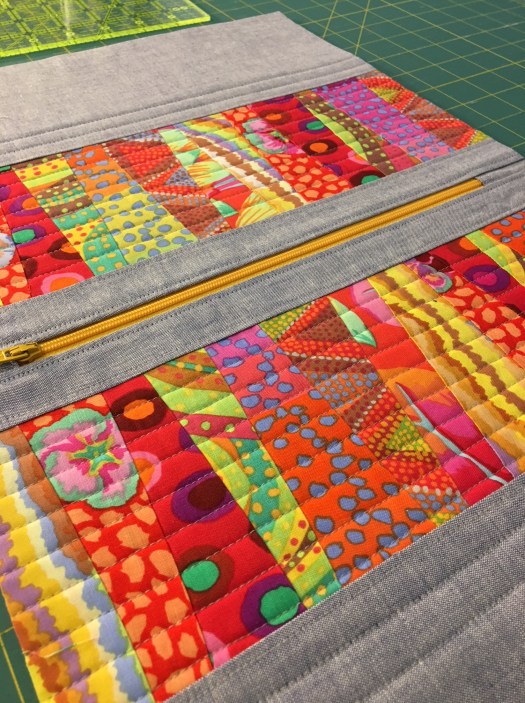
Once I had the panels done, I started assembling the pouch using the new chambray that I bought today. I left the paper on to sew the blocks together to add stability and so the blocks wouldn’t distort. I kept the paper on as I assembled the different parts of the pouch, removing what I needed to so I could top stitch. Once I had the chambray sewn on above and below the panels, I removed all the paper. I’ll probably do this in the future with paper pieced blocks as these panels went into the pouch much more accurately than they usually do.

IMG_9716

The chambray looks grey, but it’s actually blue. A really soft, neutral blue.

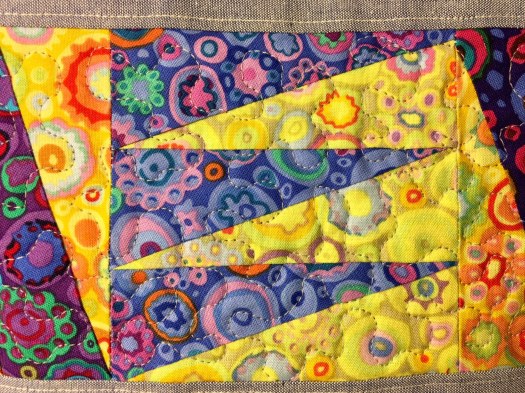
Once I had the pouch at this stage, I started thinking that I wanted to do some free motion quilting on the panel… I was a little worried what would happen to this section when the pouch is washed. I figured the quilting would keep everything in place through use and washing.

So, I did a basic stippling… a really great go-to quilting design, especially for a small piece like this. I used a light grey thread because I didn’t want it to show, and it really did disappear on these fabrics.

The quilting feels amazing on the pouch. It gives the panel great texture and really makes it feel luxurious. I’m so glad I decided to add the quilting.

IMG_9721

IMG_9720

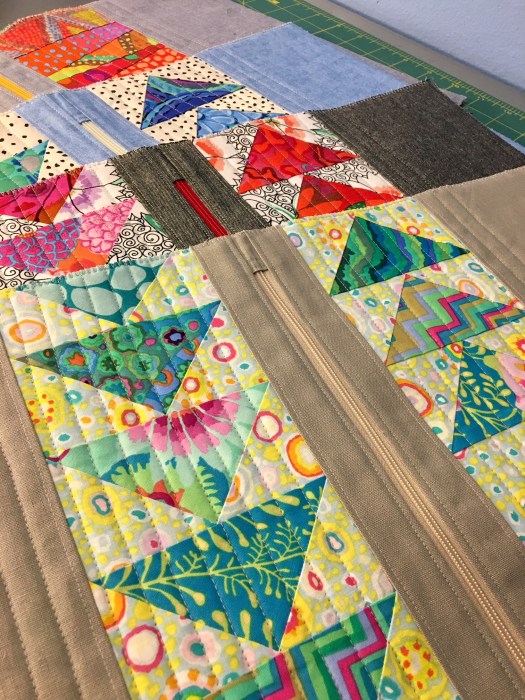
I arranged the blocks differently on the two panels, which makes it so much fun. I just love these blocks and will definitely try different color combinations. I’m wanting to do something in mostly reds, so that might be next.

Here’s the finished pouch from two sides.

IMG_9717

IMG_9719


Crafty Ceramics Saturday

Every few months my friends Carol and Heather and I try to get together and do something crafty. About a year ago we decided to spend a day doing paper mache. What a colossal failure! But we got one thing out of it — we never want to do paper mache again!

Today it was painting ceramics. Carol has all the glazes and a kiln so we met at a ceramics store in the morning to pick out the pieces we would paint, and then headed to Carol’s house to get busy.

I made wheel thrown pottery many years ago, back before I acquired my best boy Forrest in 2003. It was one of the many things that belonged to my life before Forrest.  I probably made pottery for 10 years or so, and actually got pretty good at it.

We have talked about painting ceramics for some time, and I was really looking forward to it. And it was really a fun day.

We tossed the dogs in the back yard and gathered around Carol’s dining table, full of bottles of glazes, brushes, and all kinds of tools and jars, and dug in.

IMG_9616

I purchased a big bowl and a big platter and had sort of an idea of what I wanted to do for the design. . . something really simple, and something that would play well with all my colorful Fiesta Ware. So I went with a combo of red, chartreuse and orange, with a black line design.

I did the platter first, and made the cardinal mistake that I often make: I didn’t stop soon enough! I kept going, and went too far. So the black design isn’t what I had pictured, but it’s fine for a firs try. I can’t wait to see what it looks like after it’s fired.

IMG_9630

The second piece I made was the bowl, and I stopped before I went to far. I did the basic same design but it’s cleaner and the design is nicer. I’m pretty happy with how it turned out.

IMG_9629

The green in the center of both of these pieces should be quite bright… and that bright green is my favorite color. So it if works, I’ll be very satisfied.

Carol was painting some smaller bowls to replace some she had that she gave away. She really does a great job with the drawing on the bowls — even gets some really cute sheep on there. Sort of puts me to shame.

carols bowls

But it was Heather that really went crazy with her platter. She took a couple hours to paint the radiating sunset colors, blending very carefully. Then she thought about the tree for what seemed like another two hours. Then decided what she wanted to do and forged ahead. I can’t wait to see how this turns out after being fired!

IMG_9628

When we were done, I came home and did some sewing, finishing up two paper pieced panel pouches, and a three-pouch set for a work colleague’s daughter who loves lizards.

IMG_9634IMG_9635IMG_9642

Tomorrow is a day of puppies! I need a puppy fix.