NOTE: Copyright Anne Ibach 2024.
PLEASE DO NOT SHARE THIS TUTORIAL FOR COMMERCIAL/BUSINESS REASONS WITHOUT MY PERMISSION. CONTACT ME AT anne@agilejack1.com FOR PERMISSION.

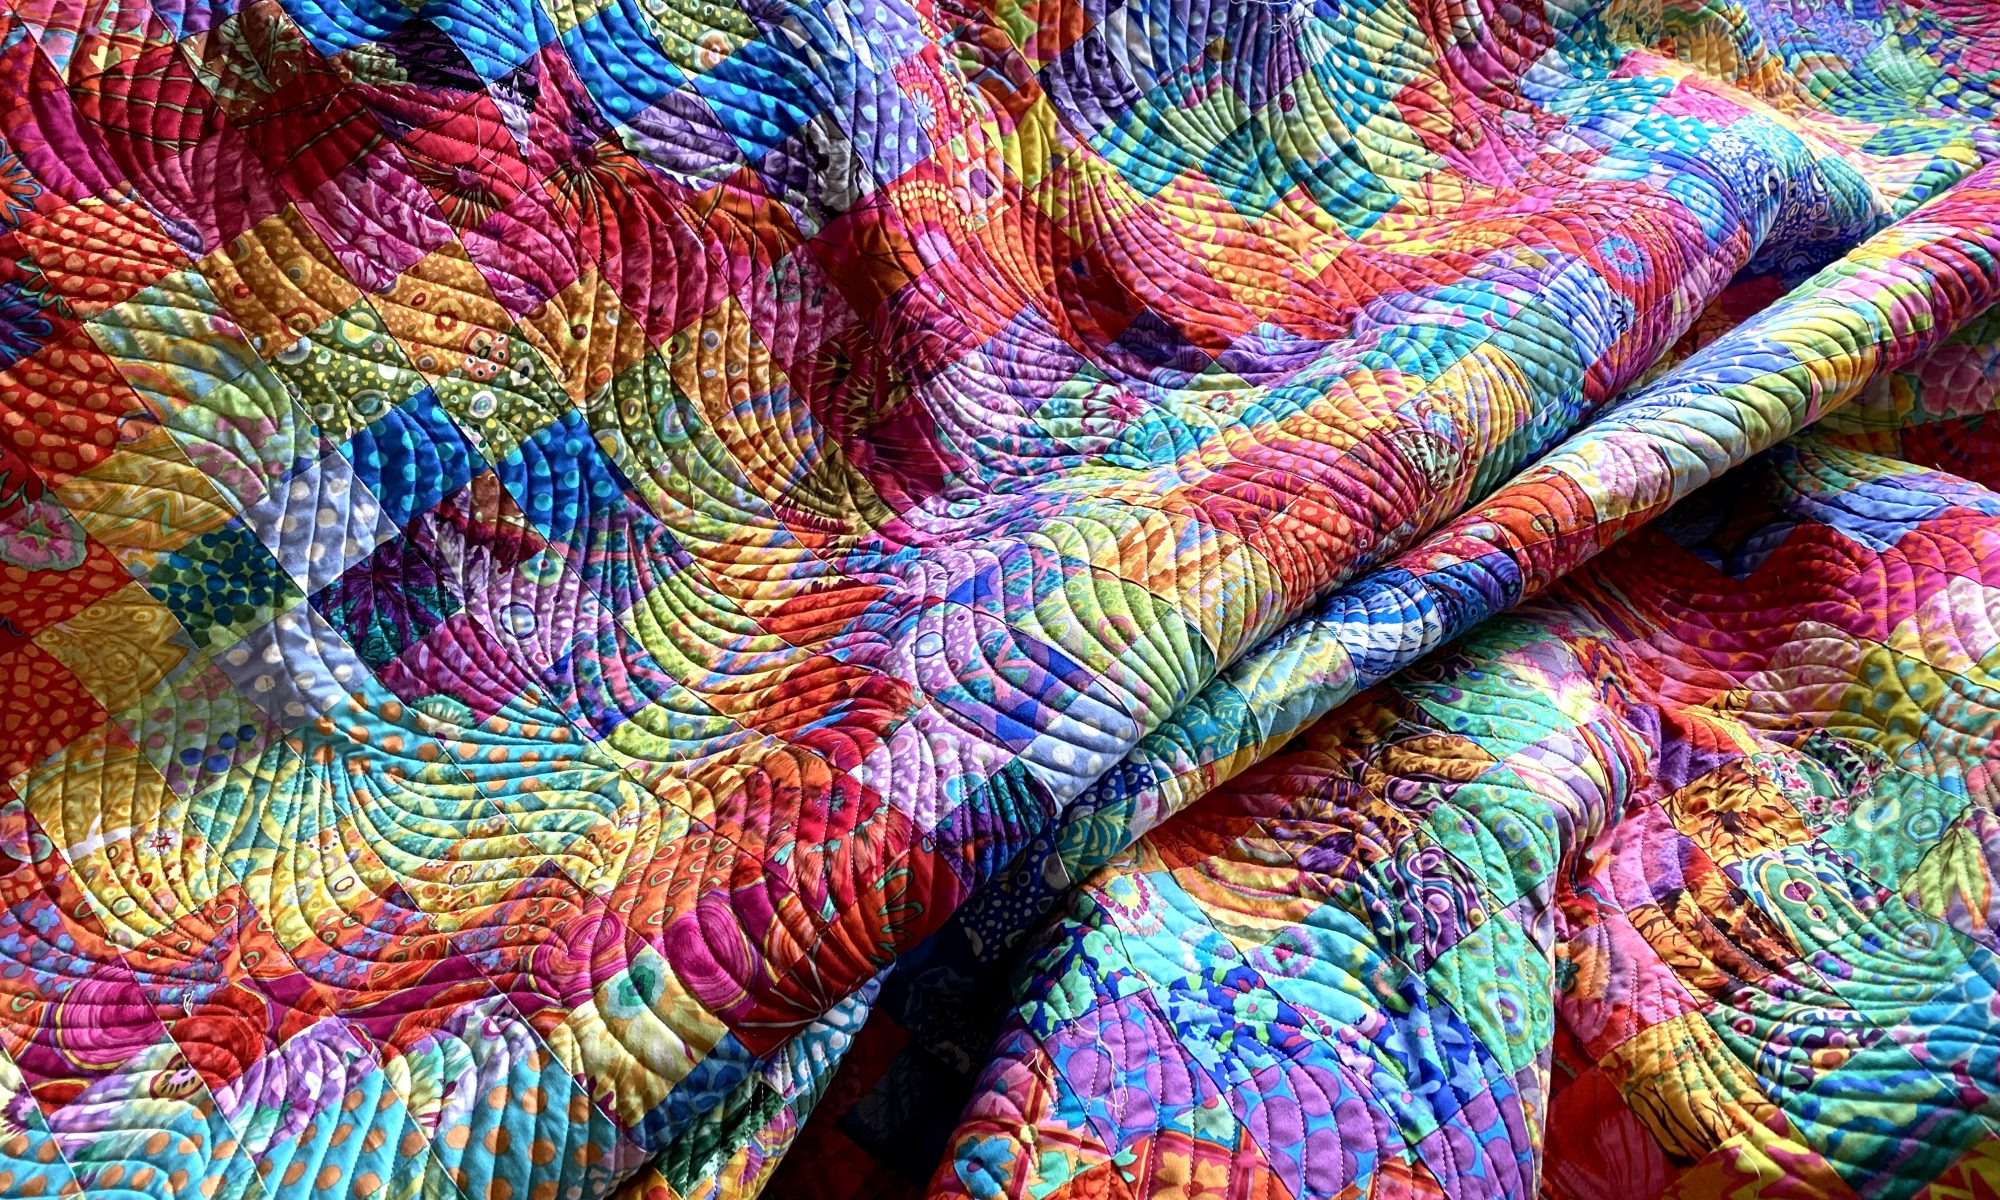
This tutorial is for making this 8.5 inch block that is repeated across the quilt top. This is my variation of a quilt block that’s been around for ages. The quilt design is mine.

I made my quilt a throw size with 8 blocks by 10 blocks. A total of 80 blocks. The top measures approximately 64 x 80 inches. To make your quilt bigger, make more blocks, over and over and over.
Fabrics needed for 80 quilt blocks:
Block centers: 1/2 yard cuts of 10 different color coordinated fabrics
Sashing strips (Roman Glass): 2 yards
Corner triangles (Sharks Teeth): 2 yards
Here’s a list of the blue fabrics I used. They are all Kaffe Fassett Collective fabrics

Center Strips
Philip Jacobs Glory in Cool – maybe out of print or hard to find
Philip Jacobs Curly Kale in blue
Philip Jacobs Caladiums in blue
Philip Jacobs Dorothy in blue
Philip Jacobs Lucy in blue
Philip Jacobs Feathers in Cool
Philip Jacobs Curly Baskets in Delft – Out of print. Could sub Philip’s spiral shells
Kaffe Fassett Paisley Jungle in blue – likely out of print and hard to find. Very expensive on Etsy
Sashing strips — Kaffe’s Roman Glass in blue
Corner Squares/triangles — Brandon Mably Sharks Teeth in Cobalt
Cutting Instructions
Cut eighty 4 X 12.5 inch center strips from the 10-1/2 yard cuts. Eight from each fabric
Cut 160 Sashing strips: 1.5 inches by 10 inches
Cut 80 corner squares: 5.5 X 5.5 inches
Cutting corner squares into triangles: Critical to maintaining swirling effect where blocks meet.
Stack up your 5.5 inch squares with the right side of the fabric facing up and with all the sharks teeth pointing up.

I stack up five or six and then cut these squares along the diagonal with the cutting line going from the lower left to the upper right. STACK AND CUT ALL 80 BLOCKS THE SAME WAY TO MAINTAIN SWIRLING EFFECT in the corners where four blocks meet.

Sashing strip cutting notes:
I cut a 10 inch width of fabric strip and sub cut the 1.5 inch strips from that piece.

Constructing the blocks
Center sashing strips on each side of the the block centers and sew. Press seam allowances toward the sashing strip. I make a lot of these units at one time.

Center sharks teeth triangles on each side of the center strips with sashing. Pin and sew being careful to not stretch the cut bias edge of the triangle. Press seam allowances toward the sharks teeth.

Square up each block to 8.5 inches, being careful to maintain the diagonal center line of the block.

Make many more blocks and lay them out on your design wall. Alternate orientation of the diagonal of each block to create the criss cross pattern. Sew it all together.
Variations on this block:
I’m putting together fabrics for a red/orange version

Since color ways of sharks teeth are limited, try different fabric patterns for the corners that will give interesting swirly effects.
Maybe colored stripes….

Or black and white stripes…

You can see a quilt top made from a variation of this quilt block here.
I can’t wait to see what you come up with!
Thank you! I can’t wait to make one. I just love your quilts.
Lynn
<
div dir=”ltr”>
<
blockquote type=”cite”>
👌⭐🤩
Anne, this quilt is absolutely fabulous!
<
div>
Sent from my iPad
<
div dir=”ltr”>
<
blockquote type=”cite”>
thanks! I’m glad you like it!
Anne
Thank you for providing your instructions. I originally saw that being assembled in a totally different way. I’m sure my sharks teeth would have been facing every different direction. Brilliant idea, so simple yet striking.
This quilt looks a lot more complicated than it is. the method to get the sharks teeth to work right is easy but also easy to mess up!!!
Anne
Thank you for your generosity and inspiration, Anne.I have followed your blog posts for some time now and never cease to be amazed by your productivity and energy!And I love Bender and Ricco too! Take care and thank you. Wendy
Sent from the all-new AOL app for iOS
thanks of much for reading! It’s been fun sharing things I make with so many people all over the world. Bender and Rico say hi!
Anne
Bon dia, veix que ets molt treballadora i els teus tutorials molt didactics.A mi m’agrada el quilt blau i el verd els altres son massa potens encara que les teles m’agradan mes pero juntes son agosaredes.recort al Bender i al Rico.
Realment em vas desafiar a esbrinar el teu idioma! Gràcies a Déu per Google Translate! A mi m’agraden les combinacions de teixits atrevides! No és per a tothom!!! Però m’encanta que la gent pugui agafar una idea i adaptar-la al seu gust! Gràcies per llegir!
Anne
excellent! excellent!
thanks! Thanks!
Anne
Thank you for the tutorial! Your quilts are beautiful.What are the fabrics used in the last photo example…the black/white stripe, pink/green jumble and what? Love the combination!
the stripe is a fabric I’ve had in my stash. The pink is one of Brandon Mably’s jumble color ways. The center is a Brandon design called Brollies. it’s so good! I want it in more colors!
Anne
Absolutely brilliant. Thanks for taking the time to do the tutorial for all of us. so many creative ideas. can’t wait to get started.
I hope you come up with something really fantastic!
Anne
I loved how your blue quilt turned out – thanks for sharing your process 🙂
thanks! it’s been fun to share this with so many!
Anne
Its so early and already my mind is blown. Your quilt pattern is fabulous and your combinations are crazy and exciting. Thank you for the tutorial. I can’t wait to pull out my fabric and get busy. Thank you! Happy Leap Day!!
Can’t wait to see what you come up with! Happy sewing!!!
Anne
Thank
Thank you so much for the tutorial!
you are an amazing designer and teacher and I look forward to every email you send.
Thank you for sharing your beautiful shark tooth tutorial ❤️ it is amazing!
Happy to share! Thanks for reading!
Anne
I absolutely love this quilt and your unique design! Thank you so much for sharing the pattern and instructions. I never cease to be amazed at your quilting and creative skills!
It’s fun to share my ideas and what I make with others. thanks for reading!
Anne
Thanks so much for the tutorial and alternate suggestions! This is going on my to do list. Also look forward to and enjoy your blog so much. Thanks!
n
I’m looking forward to what others come up with! Thanks for reading!
Anne
You definitely have a winner, here, with your variation on the block. By adding the sharks teeth/striped element to the center, it completely changes the look of the quilt. And I just said what you and everyone else already figured out, but I add the description for emphasis because it is astounding to me how one fabric choice can change everything in a design. Thank you once again, for your generosity in posting the tutorial. I think I love the last “colorway” you suggested the very best simply because I love black and white graphic prints with Kaffe. Well done, indeed!
so true that one fabric and how it’s used can make a world of difference. It sort of makes me look at fabrics differently! How can you cut it and position it for something really unexpected and wonderful!
I’m excited to see what others come up with for this block.
Anne
If you sold this pattern (and you should — I’d edit the pattern for a free copy! And you have myriad testers available among your readers!) you’d sell twice as many copies with that first photo with your “assistant” standing by!
Maybe I’ll become a pattern designer and seller in my retirement! I’ll look you up then!
Anne
Thank you from Josephine Abbott
You’re welcome!
Anne
Bravo, Anne!! You should call this “Feeding Frenzy”!!! It is a gorgeous reworking of an unusual block, and as others have pointed out, what a difference one fabric choice can make.
Thanks for posting the excellent tutorial. And the great, meme-worthy photo:
Bender: “So gorgeous! And mom’s quilt isn’t bad either!“
Bender does tend to make every quilt a little better! And he’s such a cooperative model!
I like your name for this quilt! Much more dramatic that what I came up with!
Anne
BLESS YOU MY DEAR!!! and MANY THANKS! Beautiful quilt and tutorial as always!!! as so
great tutorial but I have trouble in the last squaring up so that inside corners match when blocks sewn together. Any suggestions
I don’t fret over perfect matching of those pieces. Mine all come out pretty close without paying any special attention. If you’re careful about keeping the block centered as you square it up, they will be very close.
I fold the block in half and finger press a fold in the center of the end of the center strip. Then I make sure the points of my square ruler are in line with those marks on both ends when I line it up to cut off the excess. That works well for me.
this quilt is so busy that no one will ever notice that those pieces are a fraction of an inch off. At least that’s how I approach it. I don’t worry too much about it.
Anne
Yay, thank you Anne! I can’t wait to get started on your design, but I still need to gather a few more fabrics. I found some lovely OOPs that are coming from our friend Roma. I love your saturated red bundle; what a different look you’ll have compared to your beautiful breezy blue quilt. I think my brown Sharks Teeth, with rusts, golds, and greens will have a strong presence too. Once again you inspired me and many others. I’ll send you a pic when I’m finished, as I hope others will too. I’d love to see other quilters’ take on your design!
I’m really excited to see what others do with this block! I’m expecting some fun stuff!
My red version is definitely very different from the blue one. Will be fun to see it realized.
Anne
Fabulous instructions!!! You made it so clear and understandable. You rocked it girl 👍👍👍
PJ Kytlica 805-660-4400
thanks! That’s always nice to hear!
Anne
Hi Anne, I only just learned your name from other contributions.
I can’t thank you enough for your almost daily messages, they are one of the first things I read each morning (I live in the UK). I absolutely love all that you create and can’t quite get my head around how much you do and how much fabric you not only have but is locally available to you – you are so lucky!
I fully intend to make your first scrappy version of this quilt, lap size though :), I love the blue version, not so keen on the hot red and orange version but will stand corrected once it is finished, my favourite version would be the last, red, green with black and white, I would love to see this made up, clean and distinct, just gorgeous, would be great made with Christmas fabrics but I don’t see Kaffe going down that route just yet 🙂
Thank you for all your very interesting blogs, you have a full and varied life.
One question if I may – how was your design wall created? To me it looks like you are able to roll it up or remove it from view somehow ?? I need one but don’t have space for one .
Keep up the good work – you are a wonderful inspiration xx
I need to write a blog post just about my design wall because a lot of people ask me about it. This blog post has some pretty complete info about what it is and how it works.https://agilejack1.com/2023/04/25/down-with-the-old-up-with-the-new/
It’s a nice item. I’ve seen some info online for making similar items. If you know someone who is handy they might be able to make something like this for you. I love it because it hangs over the closet door. I don’t have a wall that I can dedicate to a design wall.
Thanks so much for your lovely comments and thanks for reading!!!
Anne
The blue quilt is gorgeous! Thank you for sharing your pattern. It will be a great way to use up some of my Kaffe stash! ❤️
Thanks for doing the tutorial!
you’re welcome!
Anne
Your quilt is a stunner Anne, congratulations! And the tutorial is excellent. I have been collecting KFC fabrics to make a grey/lavender/black and white version of your quilt. Looking forward to seeing all the variations quilters come up with!
Ooh. That sounds fun! Send photos when you’re done1
Anne
I think we should do a dat quilt retreat at my place with Columbia River views and donate the proceeds to OPB
I love this quilt but it would be nice if you wrote up your tutorials so that hand sewers also have a clue how big things are.
I don’t understand what you mean. Aren’t the sizes the same for hand sewers? My tutorial includes all the sizes. What’s missing?
Anne