
This tutorial is copyrighted 2025 by Anne Ibach. You are not free to reproduce it at will.
This block design has been around for ages and there are a lot of different tutorials for this on the web. I’m providing this tutorial to show how I make my personal take on it. I did not invent this block.
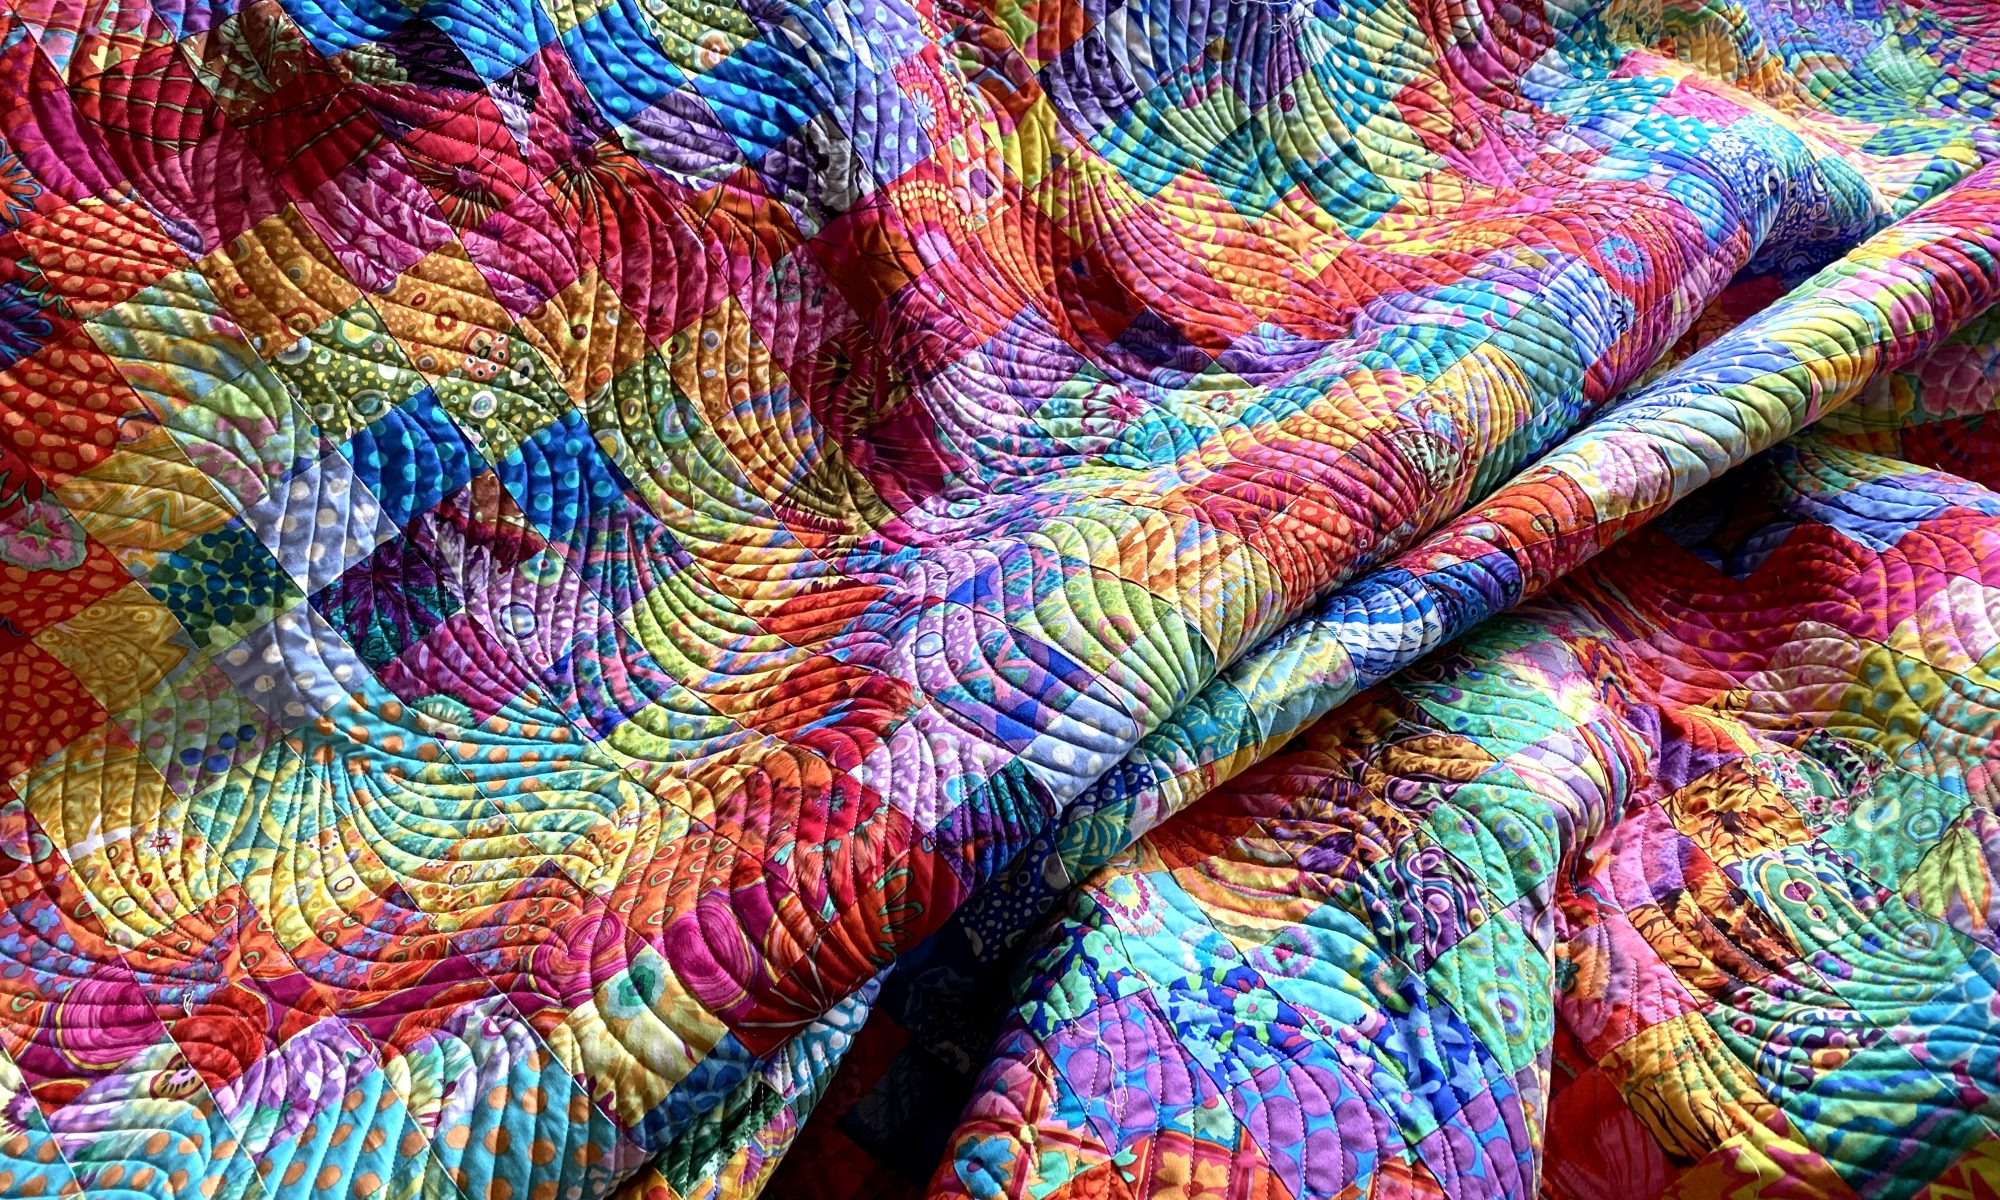
I was inspired to make this quilt a few months ago when I made small versions of this block for pin cushions and four of them ended up together on my cutting table… and an idea was born!
Please feel free to use this tutorial and share it with your quilting friends. All I ask is that you give me credit when posting about it on social media or in other mass communications.
If you are a quilt store or individual interested in teaching classes on this tutorial, please contact me for permission.
My blocks measure 9.5 inches and will finish at 9 inches
There are three elements to each block.
Block center – made from scrap strips
Sashing strips — made from prints that read as solids.
Corner triangles — I used black and white fabrics. Half the blocks have white corners, half have black corners.

Selecting Fabrics
Center strips. Scrap strips of varying width (1.5 inches to 2.5 inches) and varying lengths (at least the width of the finished strip you want.) My center strips are cut to 3.5 inches wide. I used Kaffe Fassett Collective and Australian Aboriginal fabric scraps. I press and organize my scraps before sitting down to sew.

Sashing for center strips: Fabric prints that read as solids. They have pattern, but from a distance read as a solid. If I have enough duplicate pieces in my scrap bin, I’ll use scraps. But for most of these blocks I cut the sashing fabrics from yardage.
Here’s some of the fabrics I’m using.

Corners for blocks: The black fabric I used is an Australian Aboriginal design from M&S Textiles called Land of Utopia. The “white” fabric is Brandon Mably’s jumble in white, a Kaffe Fassett Collective fabric.

You can use any black and white fabrics you want for the corners. You could use solid colors for the corner triangles, or all different colors of polka dots, or a selection of different black and white prints for variety.
For the strips and sashing, you can select scraps that are more color coordinated, like one block could be all green scraps, and another could be all red scraps, etc… You could use a common fabric for the strips along the center piece… maybe a black and white stripe, or a common color or common print for all the blocks.
Making the Center of the block
I make my centers by sewing strip sets that I can cut multiple block centers from. You could certainly make them one at a time if you want to use up your smaller scraps. My strips vary in length… anywhere from 12 inches to 20 inches or so.

Decide how wide you want your center of your block to be. Mine are 3.5 inches. I would love to see this made with wider center sections. 5 inches? 6 inches?
Calculate how long the center needs to be… measure the diagonal of the square and add one inch. I make mine around 15 inches long for my 9.5 inch block.

Better to have a little more than you need, rather than your strip set being too short.
I pair up three or four sets of scrap strips before I sit down to sew. I select a variety of colors for each strip set and try not to put like colors next to each other. The width of the strips varies and I select enough strips to add up to approximately 15 inches tall. I can always add more if I don’t have enough.

Then I sew the multiple strip sets before I get up to press them.

Once I have three or for strip sets sewn I press them all at the same time, square up one edge of each strip set, then cut them to my 3.5 inches in width starting with that squared edge.


Whatever is left over at the end is tossed into my crumb scrap basket.
Adding sashing to center of block
My sashing strips are cut 1-3/4 inches wide and 11 inches long. Calculate how long your strips need to be based on your block size.
Place your square ruler on top of your center strip with the strip centered between two corners. Measure the line where the side of the ruler intersects with the edges of the center section.

For my 9.5 inch blocks this measures around 9 inches. I cut my sashing strips to 11 inches long. Basically, I add about two inches to my measurement so I have some leeway when squaring up my blocks. I only have to calculate this once. There’s no need to do it with each block.
I’ve been using strips cut from yardage, or scraps if I have duplicates that are wide enough. If you’re making a different size block, you can calculate using the same method. Just measure using your block size.
Lay your sashing strips along either edge of the center piece, centering it as best you can. I just make sure that the ends of the sashing strips are each the same distance away from the ends of the center piece.

I lay both strips on at the same time and then sew both seams.

Sew a 1/4 inch seam along each edge, then press the seam allowance toward the sashing.
Trim the sashing pieces to 1 inch wide

Here’s the center piece with both sashing pieces trimmed to 1 inch.

I trim my sashing to 1 inch rather than cut it to that size initially because I get a more precise piece to sew the triangles to. This is a step you could skip if you feel your piecing is precise enough. Mine is not!
Adding Corner Triangles
Calculate the size of square you need to cut into two triangles. For my 9.5 inch block this measures about 6 inches. I cut my squares 7.5 inches. This gives me enough room to square up my blocks with about 1/4 inch to spare all the way around the block.

Since these squares will be cut in half along the diagonal, thus exposing a bias edge, I press my squares using Best Press to help keep them from stretching as I work with them. You could use starch or other spray stabilizers that you prefer. You don’t have to use stabilizer.
Cut your squares in half along the diagonal.

Mark the center of each side of the sashing on your center strip by folding it in half and finger pressing the crease. Do the same for the two triangles for this block.

Line up two pieces and pin them together. Do this to both sides. The diagonal cut for these corners is on the bias, so be very careful handling these triangles so you don’t stretch that edge.
When you pin the triangles to the sashing pieces the triangles will overlap each other so you want to make sure you fold the corner of the first one down before pinning the second one on. I fold it down and gently finger press, then pin the second triangle in place. Pinning helps you prevent stretching that bias edge.


Sew these pieces together, then press with the seam allowance toward the corner triangles.
Squaring up your blocks
I’m using a 9.5 inch square ruler to square up my blocks. You just want to make sure that you keep the corners of the square ruler lined up with the center of the strip. You can use a pen to mark the center of the end of each strip so you have a visual marker. I’ve had good luck just eye balling it to keep it centered.


I remove a little more than 1/4 inch of excess fabric all the way around the block. This is acceptable waste for me. I like having a little bit of room when I square up.

There are lots of videos on YouTube on how to square up quilt blocks so I won’t explain that here.
It’s not a bad idea to make one block to make sure all your measurements and calculations work. I did that and made several adjustments to subsequent blocks to make construction and trimming more efficient.
Now make 90 more blocks!!!
Perfect tutorial.. You’re awesome! Quick question… i agree i too like to trim a bigger block. So you start the side strips at 1.75, sew a seem at .25. Now you’re trimming off 1/2″ to get to 1″? Couldn’t we just cut 1.5″ strips? Or maybe we’re supposed to trim to 1.25″ ultimately getting a 1″ wide side piece. L is the final side strip supposed to be 1″ or 3/4″ when finished?
You can cut those strips any size you like. You can even make them without trimming. Since I was using mostly scraps to start, I wasn’t concerned about that little bit of waste.
I trim the strip to 1 inch, so it finishes at 3/4 inch. You can make those sashing piece any width you want. it would be interesting to see how it looks with them substantially wider.
Anne
Sent from my iPad
<
div dir=”ltr”>
<
blockquote type=”cite”>
Your comment didn’t come through.
Anne
I’m loving this. Thanks so much!!!!!
PJ Kytlica 805-660-4400
You’re welcome! Have fun!
Anne
Thank you for sharing, so generously, photos & patterns of the work you do. I particularly like reading the blog of your everyday life, pickle ball, the dogs, your work.
I love the fabrics you use & need to cut into them & make something. At present they are eye candy.
Cheers Denise from New Zealand
You should cut into the fabrics!!!! It’s so good for you and there’s always more fabric!
Anne
Wonderful tutorial! Very detailed explanations. Thank you for spending the time to create this and sharing with us. I think I may use my aboriginal fabrics for this project.
Thanks for the feedback. this would be gorgeous out of all Aboriginal fabrics!
Anne
Love this tutorial! Thanks for all the effort that went into creating it.
You’re welcome. I hope you make some incredible blocks!
Anne
Thanks for the tutorial.That is a lot easier then for me to try to figure it out. I have lots of scraps…i have lots of fabric period!
Happy to help. I actually enjoy the process of digging in and figuring things out! Happy to share what I’ve come up with
Anne
THANK YOU!!! Excellent tutorial…you do gre
Thank you, and thanks for reading!
Anne
Thanks for the tutorial. Much appreciated.
You’re welcome.
Anne
Your tutorials are great. That’s how I made a bag for my sister and then one for me as two of my very first quilting projects last spring. How do I send photos to you?
thanks! I’m glad my tutorials are helpful.
You can email photos to me at anne@agilejack1.com
Anne
Thanks for the tutorial, your directions are wonderfully detailed and clear.
Quick question: can you estimate the yardage for the black and white fabrics used for the side triangle pieces?
Yardage will all depend on how big you make your quilt. I get five corner squares out of 7.5 inches width of fabric . So you would have to calculate how many total blocks you need, divide that by five, and times it by 7.5. then divide that number by 2 for how much white you get and how much black. You should check my math but that should get you close. I’d buy an extra half hard to be safe.
Anne
Anne is being thrifty and responsible…if you LOVE a fabric, buy 5 yards. Not my advice, but Freddy Moran’s and I try to live by it! : )
Hahaha! that’s what I do. I didn’t have enough of that black Aboriginal fabric so I called the original store where I got it, which is 80 miles away from me. I bought all they had, which wasn’t as much as I wanted! I know I’ll used it again.
Anne
Your tutorial is very helpful! Excellent job! Both the words and the pictures to go along make it so easy to do and avoid confusion in making this block. Thanks!
thanks! I’m glad it all makes sense and is clear.
Anne
Thanks for the great tutorial. The photos really clarify what you’re doing
thanks for the feed back! I’m a visual person and find photos really helpful.
Anne
Thank you what size is your quilt going to be with the 90 blocks
Haven’t actually decided yet how big this will be. It will be a throw size, but I’m not sure of the actual dimensions until I get more blocks done.
Anne
Anne!!! Wow! What a great tutorial. You are just so very generous. Thank you so very much for this!
You’re welcome! Ae
Thank you for posting the instructions for this block!
<
div>Pam
Sent from my iPhone
<
div dir=”ltr”>
You’re welcome! Ae
Thank you for your generosity!
you’re welcome! Thanks for reading!
Anne
Oooh, thank you! It’s so dramatic!
Thanks! I’m having fun making these blocks and seeing the quilt top grow!
Ane
A most excellent tutorial! I have a stash of leftover aboriginals after making Coddiwomple . . . Hmmmmm, I sense another project happening here 🙂
A most excellent tutorial! I have the fabric, I just need to get busy and quit playing with my paper stash.
Hahaha! I know how that is! but I tend to get off my jags as quickly as I get on them!
Anne
Thank you so much for this tutorial and all your emails! I love how you show all the steps involved. I look forward to your emails!
Lynn
<
div dir=”ltr”>
<
blockquote type=”cite”>
I try to give detail without giving too much detail! That’s where the editing comes in!
thanks for reading!
Anne
Will you please set this up on pinterest as well? Thank you.
Anyone can pin this on Pinterest. It’s probably already there!
Anne
I will never make this quilt, but your tutorial is FABULOUS. You are a very gifted teacher!
Thanks! Are you SURE you’ll never make it?
Anne
very. I do scrappy, wonky stuff. hate measuring. I sew to relax, not use my brain to calculate. but much appreciation for those that do! enjoy reading about your exploits and projects, too.
I love that king of piecing too. But that’s one of the things I like about this block. There is no precision needed from block to block because there’s just nothing to match up other than the corners of the blocks. It’s all very free form.
Anne
I love this and I love the fabric – I should have picked some up when I was in Australia, to have my friend ship me some is exorbitant! I like this idea and am going to try to make it work with what I have !
Where are you located? You can easily purchase it online in the US. I hear it’s hard to come by in the UK.
You certainly don’t have to use Aboriginal fabrics. There are a lot of fun black options out there!
Anne
Thanks for all the work!!! I am hoping after we get settled in the new apartment here in Astoria, NY; I will find some scraps to make a block. I am keeping my fingers crossed.:)
Good luck! I hope you’re able to give it a try.
Anne
Love this, so many different fabric combinations would be amazing!
there are so many different things you could do with this block! I might have to make several more quilts like this!
Anne
Is the finished a square or a rectangle? If it is a rectangle what are the finished dimensions?
It’s all in the tutorial. My blocks are 9.5 inches square.
Anne
Thank you. Your tutorial is very clear but my display makes the blocks look more rectangular and I wanted to be sure I hadn’t missed something. I am ready to make this my first project of the new year.
Probably because you’re reading it in email. Email clients often distort photos in emails. try going directly to my blog for the tutorial at http://www.agilejack1.com
When I add a blog post the emails are generated automatically by WordPress. You can always go directly to the blog. Also, if you go to the blog you can scroll past posts, you can search, you an read all the comments and my responses.
Anne
Thank you so much for the information on this pattern from the moment I first saw the block I thought how wonderful it is and I want to make it my next project!!
You’re welcome. Good luck when you give this a try!
Anne
Thank you for such a lovely detailed tutorial. I am going to have a go at this. Your blocks are really fab.
Thanks! I hope you give it a try!
Anne
Thank you for a great tutorial! I love your block
thank you! I hope you try at least one!
Anne
Thanks for sharing .
Thanks for reading!
Anne
Wow wow wow. You did such a great job of explaining everything for this fabulous block. I have admired it ever since you were making the pin cushion. Absolutely love reading your blog.
Marie
thanks for your wonderful comments! And thanks for reading!
Anne
Tutorial is perfection as always! This is get added to the list of projects! I am wondering what that is that’s stuck on the front of your machine with the green light and white wires?!
That is a rechargeable battery operated LED light. I bought it from Sewing Parts Online but they don’t have them any more. There are all kinds of this type of light on Amazon. This one slips into a little sleeve that is stuck to the front of my machine. It adds a nice concentration of light where I need it.
Anne
Love these squares. I am going to make a quilt with your directions. Thanks for taking the time to make the video so we have written and visual directions
Yay! This makes me so happy!
Thanks for reading!
Anne
Anne,
Thanks so much for all of your time and work. The blocks are beautiful, I will definitely give this a try. You have increased my appreciation for the many ways you use color and pattern, You have made me a more daring quilter!
Kate
This makes me so happy! bold color is so much fun to work with and it makes me so happy that you’re going beyond your comfort zone!
Anne
Hi again, I really like the scrap quilt you’re making. Looks best with the X’s on both sides of the quilt. Going to try this one day.
Thanks for your input. If you look, both sides have Xs on the edge. They just appear on different rows on the different sides of the quilt!
Anne
This is a great tutorial! Thanks so much for sharing and BTW I love this quilt!
thanks! I hope you give it a try!
Anne
Thank You and bless your heart for sharing your talent. 🌻🤩
thank you for reading!
Anne
Great tutorial.
I made a toddler quilt using a similar design from a tutorial by Teresa Rawson (someone mentioned her in the comments on an earlier post). I used brights and kids novelty prints for the center strip and black with white or color designs as the sashing. The only difference was the side triangles were done with strip piecing instead of a single fabric triange. The black sashing created a secondary design of big squares throughout the quilt.
I love your quilts and your use of vibrant color.
I’ve seen quilts like the one you’re talking about. it’s a very versatile block!
thanks for reading!
Anne
Thank you ♥️ your tutorials are always so awesome! Easy to follow and I do love the visuals!
I’m a visual person. I love photos that illustrate what I’m talking about!
Anne
Another perfect tutorial! Many thanks for your generosity and love of sewing and quilting. Can’t wait to get started ❤️
This is stunning – I love this! You always have the most inspiring ideas, and I love how clearly you explain it! I have been organizing scraps and leftover binding strips – I must try it! BTW, your frankenbag tutorial is my go to reference when making bags.
I have a million ideas! I wonder if I’ll ever have the time to actually make half of them!
I’m glad you like my Frankenbag tutorial. I know I’ve made a ton of them and continue to make one every now and then. they are great gifts!
Anne
I’m starting a table runner. I’m doing it a bit different than you did. I used jelly roll straps. I’ll send more as I complete. Thanks Diane
Cool! I’m so happy to see people giving this a try!
Anne
Love your blocks and quilt! The tutorial is awesome and I want to give it a shot soon. I don’t have much for Kaffe fabrics and no Aboriginal so I need to come up with an idea for fabric colors/design. I do have a jelly roll of a Kaffe line with all cobalt blues but that won’t get me too far so I need to come up with a color or colors to use with it. Any ideas?
You could mix it up with other blue scraps you have, or maybe mix it with any other varied colored bright prints you have. You’ll just have to play around and see what works.
You could do it with any scraps you have. It doesn’t have to be Kaffe or Aboriginal fabrics.
Anne
I printed your instructions. Plan is to make a California King for my son. This will use my scraps and stash of aboriginals and Kaffes. Good thing it will be scrappy, it uses so much fabric since his bed is so huuuugge!
that will be a big quilt! but I’m afraid the it won’t make much of a dent in your scraps. At least it didn’t ‘make a dent in mine. But my scrap pile is a little frightening!
Anne
I am going to give it a good try! Thanks for your instructions!
Thank you for this tutorial and for your blog posts. I enjoy getting a new one when you write it. I made this quilt much like yours (ok, just like yours) last year during a time when I had a unexpected cancer diagnosis and subsequent surgery. This kept my mind occupied and I will never forget that. All is well now but I will always have a soft spot in my heart for this quilt. Thank you.
Thanks for the lovely comments. It’s so wonderful to hear stores like yours!
thank for reading!
Anne