Aboriginal Blocks Assembly

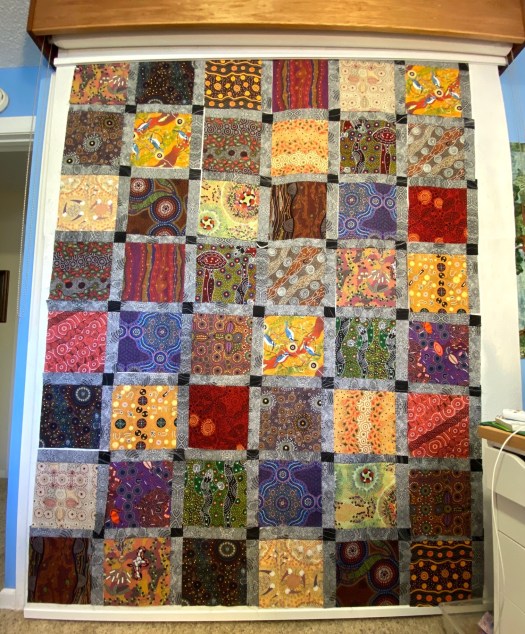
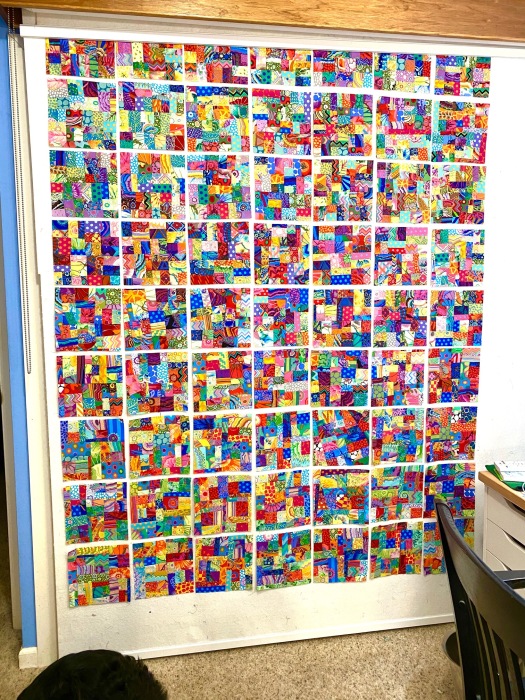
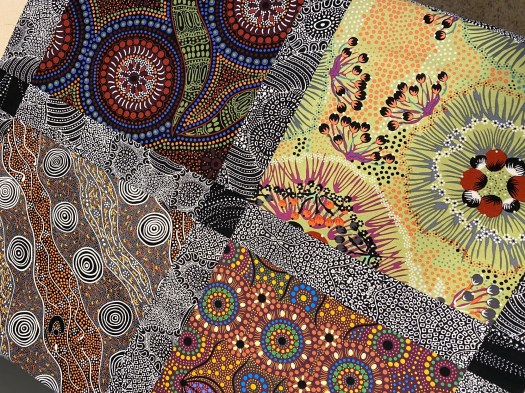
I did my final messing around with these Australian Aboriginal fabrics on the design wall and confirmed with my sister in law that she wants a throw size quilt, so today I started assembling the rows of blocks.

block

These blocks go together really quickly, but there are a few tricks to make it all work right and easily.

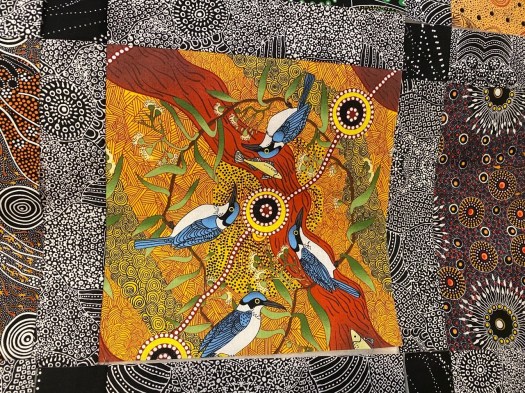
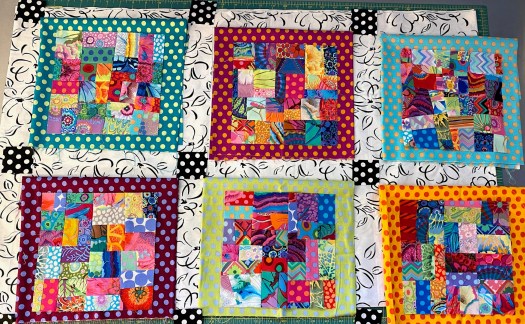
As I wrote in my blog post about this quilt a couple of weeks ago, I add the sashing to each individual block, rather than sewing on long strings of sashing and cornerstones. Here’s what each block looks like when done.

birds

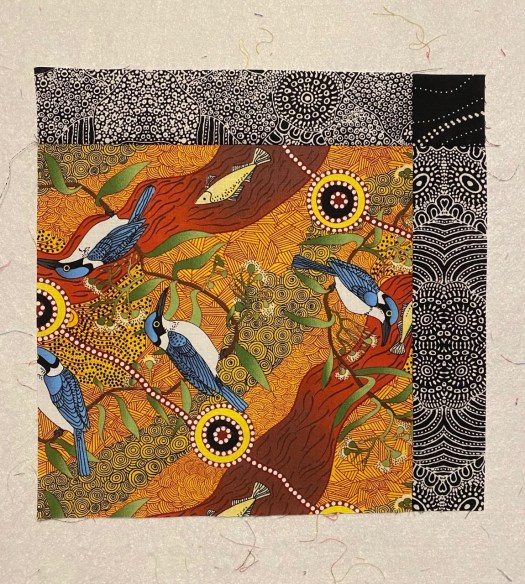
I like assembling the quilt better this way. I just don’t like managing all those long strings of sashing.

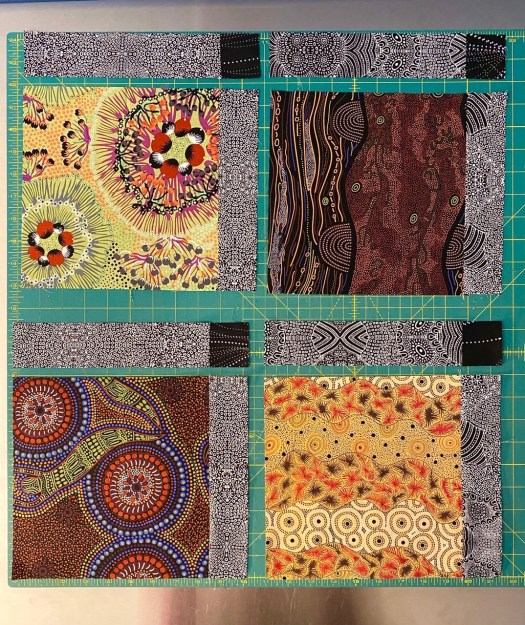
To get the assembly going, I start with the lowest row on the quilt, and the first block on the left. Because of the way I’ve made each block, the bottom row of the blocks needs sashing and cornerstones on the bottom of the blocks, and the first block on the left needs sashing and a cornerstone all the way around the block.

Here’s the block for the lower left hand corner of the quilt:

block11

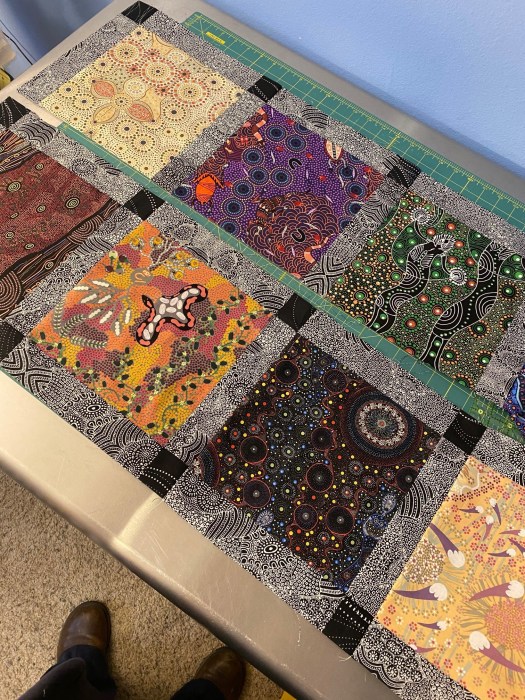
And then each remaining block in the bottom row needs to have the sashing and cornerstone added to the bottom of the block. Then those blocks are added one by one to the block above, moving from left to right.

block1

Here’s what the bottom row looks like:

blocksss

After this bottom row, the rest of the rows go together more simply and quickly.

For each following row, all you have to do is add a piece of sashing with cornerstone to the left side of the first block so it looks like this:

bloxk11111

And then you just add each block to the right hand side of the previous block, one by one, until the row is done.

It’s not a bad idea to give a little thought to what direction you press your seam allowances so that they will nest when you sew the blocks and rows together. It’s not unusual for me to re-press seam allowances so that my seams will nest.

bllck1111

Once this row is done and pressed, sew it to the top of the bottom row and then press.

blockss

I have two rows completed. This should all go together really quickly.

I was going to try to get more of it done this weekend, but I ended up going on a hike with two friends yesterday. It was our last hurrah as we’re anticipating that our governor will order us all to stay home in the next day or two. I don’t know what she’s waiting for.

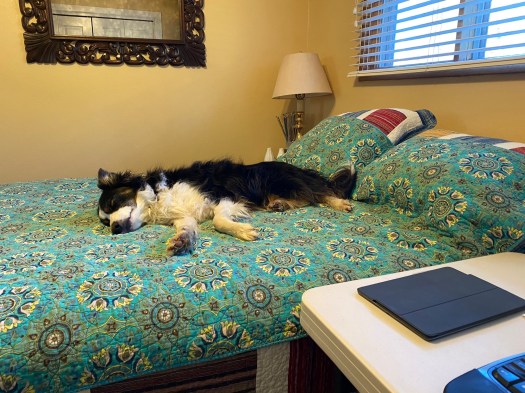
This photo was taken by my friend Carol. It’s the eight dogs who were on the hike with us. The dogs all get along really well and they absolutely love it! My Bender and Rico are on the far left.

dogshike

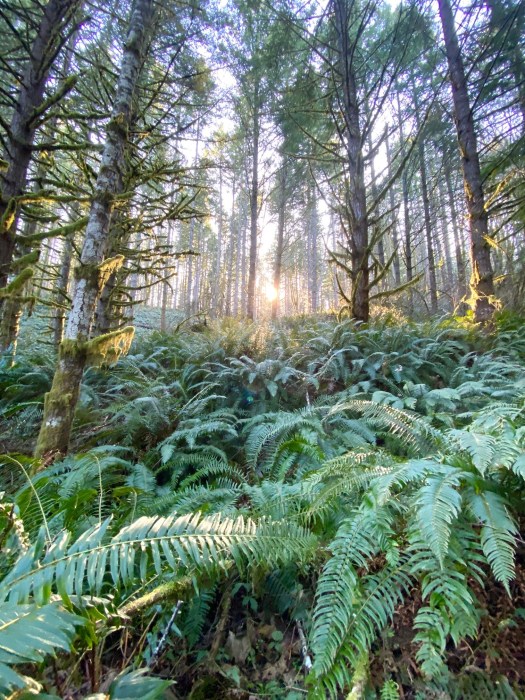
We’ve been having such incredible weather… really not typical for Portland in March. But the rains are coming back tomorrow… rain as far as you can see in the forecast. So I’m glad I got some outside time this weekend.

Here’s my favorite photo that I took during the hike. We came around the corner and this is what I saw. It was so magical. I’m so glad we had the chance to get out one more time.

trees


Working From Home

After working from home on Friday to take part in a test of our technical capabilities to have the majority of staff telecommute, today was the first official day of working from home for most of the staff. There’s no way to know for sure, but I’m betting it will be for at least a couple of months.

I set up an office in my guest bedroom, complete with a dog-proof comforter on the bed for the dogs.

asdadfadf
Rico looks so little in this photo.

So far, it’s going well. All the technology is working so we’re able to have one-on-one conversations and larger meetings. It’s interesting to see everyone electronically rather than in person. It’s been a crazy couple of days as we deal with the logistics of working from home, but also reacting to the issues that COVID-19 is causing. I’m so lucky to have  the privilege to lead such an amazing team of people. I’m so proud of how well they’ve adapted and how hard they’ve worked together to make sure we can continue our work.

aadsf
All day long today I felt like someone was watching me work…

It’s going to be a difficult and interesting few months. We’re definitely entering a different time that is so unknown at the moment. I feel very fortunate to have a job that won’t be threatened by the economic effects of the virus… they’re going to need my skills and experience as a fundraiser now more than ever. I know that we’ll be seeing our share of challenges on the road ahead.

I have friends who are self employed and I’m worried about them. The nature of their work does not allow them to work from home. I’m hoping that they’ll be able to find a way to stay at home and stay safe.

The dogs seem to be enjoying having me home. I’m planning on taking them for a short walk each day after lunch. It’s good for them, and I need to get away from my desk. And this is such a gorgeous time of year in the Pacific Northwest.

iuyiuyiuy
This photo was taken on our Sunday afternoon walk. It was such a beautiful day, especially after a snowy Saturday.


Then we’re taking a longer walk at night. We walked 1.4 miles for lunch today and about 3.5 after work. The weather has been beautiful the last few days so it’s really wonderful to get outside.

I think having me home is going to keep the dogs on their toes for awhile. Bender was absolutely exhausted this afternoon and had a lovely little nap at my side.

oiu
This is kind of unusual behavior for Bender. He’s always up and ready to go. I like it when he stops for awhile.

Bender did have plenty of moments of activity today. I had to put up a gate to keep him out of the room during a video conference call this morning. Then he took about five minutes to pile up all these toys under my feet, hoping dearly that I would play with him.

asdfdd
If I’m not careful, I’ll be buried in dog toys by the end of the week.

After setting up my home office on Sunday I spent a little bit of time working on my new Aboriginal fabrics quilt.  I have enough blocks on the design wall to make a generous throw size quilt, but I’m thinking I might go ahead and extend it to a queen size quilt. But either way, I just love how this is turning out! These fabrics are so amazing, and the large blocks really show how dynamic and colorful each print is.

adf

I’m going to call my sister in law and see if I can get her to actually tell me which size she wants. So far, she wants whatever size I want!

Thanks to everyone who is checking out my blog. Would love to hear from you at any time. I try to respond to every comment.


Finally Cutting Into My Aboriginal Fabrics

I’ve been collecting Australian Aboriginal fabrics for a couple years now and have never made anything from them. That ended today! I’m making this quilt for my brother and his wife.

bksks

These fabrics are so amazing that I wanted to let them sing. So I cut the blocks to 9 inches square and have added a 2 inch sashing with darker cornerstones. I just love the way the larger blocks really let the fabrics sing. And the sashing adds color and pattern variation that is just wonderful. I just love the simplicity of this quilt.

I used 20 different 1/3 yard pieces of fabric. I got four nine inch blocks out of each piece, plus a full 2.5 inch strip that I’ll save for later. I haven’t really decided yet how big I’m going to make this quilt. I have enough blocks cut to make it a bigger quilt, but I’m thinking a throw is more practical. I need to give it some thought and make a decision.

My brother and his wife were at my place a few weeks ago so I took my sister in law into my sewing room and we picked out fabrics for this quilt. She tends to be a little less daring  with color so I pushed her on some of the fabrics. She loved what we pulled once we had it all together. I was very proud that she stepped out of her comfort zone.

These fabrics are so amazing. Just look at these blocks:

qeqewrdgfhasdf

I got all of this accomplished in one day. It’s not done yet, but it’s well on its way.

When I make something like this I love to do chain piecing and i love to make it all as efficient as possible.

Once I had all the nine inch blocks cut, I cut the pieces for the sashing. I cut nine inch strips across the width of the fabric, stacked up three pieces, and cut them into 2 inch pieces. Then I sat down at the machine and sewed the sashing pieces onto all the 60 blocks I decided to start with.

mnb

Once this was done I started making the sashing pieces with the cornerstones attached.

I cut more nine inch strips across the width of the sashing fabric, then cut a 2 inch strip across the width of the cornerstone fabric. Then I sewed the 2 inch strip to the 9 inch strip. I pressed them open, stacked them up carefully and cut them into 2 inch pieces.

poiu

eklje

Once these sashing pieces with cornerstones were assembled and pressed, I sat down and pinned the pieces onto blocks until I ran out of pins, sewed all those blocks and pressed them open, then pinned and sewed again, and then again. I got almost 40 blocks completed this evening before I got too tired to keep going.

I really hate sewing long strips of sashing to blocks, so I assemble the blocks with sashing and cornerstones on two sides of the block. Then when these blocks are arranged for the quilt, you get a completed look and you don’t have to line up all those seams along the long strip. Each block looks like this.

birds

zxv

Once I have my blocks all arranged on my design wall I’ll have to sew sashing with cornerstones to the outside edges of all the blocks on the ends and sides of the quilt.

I often will sew the completed blocks together into four block sets and then assemble those blocks. I haven’t decided yet if I’ll do this or do it in long strips.

Can’t believe how much of this I got done today.

Most of the employees at my place of work will begin working from home on Monday until at least April 1. I’m looking forward to saving my commute time for dogs and sewing. It’s going to be hard to stay out of my sewing room during working hours.

I’m a raging introvert, so the idea of being at home all alone for a few weeks is kind of wonderful.


So Much Fun to See!

I was poking around on Facebook yesterday and went to check out what was new with the Kaffe Fassett Collective group, and I saw this…

Johanna Lovering bag

My brain sort of did a double take when I saw it — It’s my knitting project bag pattern made from my tutorial. But I’d never made it in these fabrics.

Then it hit me. Someone made a bag from my tutorial! It was such a surprise to see. Her bags look just like mine.

I asked her if it was ok for me to post her photo on my blog and use her name, and she said yes. He’s what she said about her bags:

Screen Shot 2020-03-07 at 9.55.32 PM

Someone even commented that these bags were the nicest ones yet. I’m guessing they assumed the same person had made all the bags.

I think it’s so cool that she adjusted my pattern to make a bigger version. That’s the kind of thing I would do! I just love problem solving in my sewing room. I’m so glad she shared the photo. It’s really fun to see that someone found my tutorial useful.


Sashing Indecision… Good Grief!

I can’t believe how much I’ve gone back and forth on how to finish my crumb blocks. I had originally wanted to use the colored spots as a border for the blocks, then some kind of black and white sashing.

With the help of a friend who didn’t like my original combo of white with black spots, I had pretty much convinced myself that I shouldn’t use it, and just go with the colored borders on the blocks.

Nope! Not after a couple of days to think about it.

After going back and forth many times and trying many different combos, I’ve landed on what I’m going to do!

IMG_0068

Surprise! I’m going to use the black and white jumble!!!

While I sat waiting for my car to be serviced this morning, I messaged a couple of friends, sent them photos, and asked for their opinions. Both of them liked this original layout using the white spots.

IMG_0065

So I had pretty much decided that this was going to be the final plan, until I got home and dug into my drawer of black and white fabric. I came up with a couple of possibilities.

I actually like this one, but there’s something about it that’s just too sweet. My friend that didn’t like the white spots really liked this one. She nearly had me convinced.

IMG_0062

And as I look at it now, I still like it. It’s just a very different feel than what I want for this quilt. I may use this for another crumb quilt in the future. Maybe use more pastels in the crumbs. Hmmm. Ideas blooming!

Here’s one combo that just didn’t work. While I just love this spotted fabric, it was just too blah with the crumb blocks.

IMG_0063

I even tried going with the original combo, but making the borders wider and the sashing narrower. I do like this one, but it still didn’t have me convinced.

IMG_0057

I keep trying to figure out what it is about the white spots that didn’t have me convinced, and I think it’s because all those spots are competing for attention. It’s like they’re all yelling at me. The jumble is a bit of a break from the spots, but it’s still exciting and fun.

So, I’m going to do some calculating to figure out if the jumble I have on hand is enough to finish this quilt, and I’ll cut some strips for the borders and the sashing and put them up on the design wall to make sure I like my plan for the width of the borders and sashing. I’ll buy more colors of the Kaffe spots next weekend. I only have a few and not the variety I want.

So I have a week to think about it. But I feel confident that I’ve made my final decision.

I hope…

Crumb Blocks done. Now what?

I finished up 63 crumb blocks in a matter of a couple of weeks. I’m pretty surprised I got them done this fast. I was really efficient and productive!

They’re all up on the design wall and now I’m trying to decide how to finish them.

IMG_0014

I’m going to do some kind of sashing or borders on each block using Kaffe’s spots in various colors. I originally thought I would use a wider white with black spots sashing with black spots cornerstones, like this:

IMG_0036

But I have to admit that I don’t love it. All I see is the white. I thought maybe part of the problem was that the photo was taken late at night, but it didn’t look any better in daylight.

But it still reads too white and the crumb blocks get lost in it.

So now I’m thinking I will do just a bunch of different color spots as a border on each crumb block, and will leave out the white and black. I’ll arrange them randomly rather than in a pattern or order.

IMG_0047

I like the way this looks, but I have to try out some different widths for the borders to get it right. I also need to buy more colors in the spots. I only have about a half dozen. I’m lucky that there is a store near where I take Rico for our sheep herding lessons that has a really good selection of the spots. I won’t be up there for another week, but will take some blocks with me to select another group of spots.

I have several large cuts of Kaffe fabrics that I bought, mostly on sale, to be used as quilt backs. But none of them really work with this quilt. So on an impulse I went online last night and found the fabric I wanted and ordered enough for the backing, plus enough to leave some for me to fold and fondle.

IMG_0046

I have this design in two color ways that would be large enough for backings. But this color is so amazing! And I think it will be perfect for the back of this quilt!

It will be hard to wait a week to get going on finishing up these blocks. I’m going to have to find something else to work on. Maybe I’ll finish the blocks for the Japanese X and + quilt for my guest room. That’s a crazy idea!

Deepening Crumb Quilt Obsession

UPDATED JULY 6, 2022 — CLICK HERE TO SEE MY CRUMB PIECING TUTORIAL TO LEARN HOW I SELECT FABRICS AND SEW MY CRUMB BLOCKS. INCLUDES A VIDEO TUTORIAL.

A little over a week ago on February 22 I thought I’d make a couple of crumb quilt blocks to sew into a drawstring pouch.

Now today, on March 1, I’ve made 57 eight-inch blocks and only need to make another six to have enough for a quilt top!

(Get in my time machine and see the finished quilt top here)

IMG_5881

I have a tendency to go in jags when I take on new projects or new techniques. I really get into it and have a lot of fun getting familiar with a new technique, and with exploring my own way of doing it. When I get on a jag like this I can be very obsessive and quite productive. . . often ignoring other things I should be doing.

I’ve had to dig into my bigger Kaffe Fassett Collective scraps in order to get the color balance I want in these blocks. I discovered a small drawer full of KFC scraps. It’s amazing to me how many scraps I generate and don’t feel I actually  make that many projects that would generate scraps.

That’s just the scraps that I pulled together to make these crumb blocks. There are many, many more where these came from.

When making quilt blocks, I love to do assembly line piecing to make it all more efficient and quick. So I’ve used a lot of my scraps that are cut into strips to make these blocks… sewing shorter pieces onto longer pieces, and pressing and slicing them into smaller pieces, which will then be sewn together into larger pieces. It’s really a crazy process!

IMG_5869

That’s a long string of pieces that have been chain pieced and are ready to press and cut apart. This string is probably at least forty feet long. Here they are lined up on the ironing board ready to be pressed open.

IMG_5796

Once these pieces are pressed, they’re then sewn together into larger pieces…

IMG_5797

Which will then be sewn together into even bigger pieces.

IMG_5799

IMG_5798

At this stage, I start putting together these blocks to make eight inch blocks.

IMG_5806

When I feel confident that each sets of blocks, once trimmed to have straight edges, will make a block that is a little larger than eight inches, I sew them into blocks. Here are six blocks that are all sewn together and are ready to be trimmed to eight inch square.

IMG_5880

I use a clear eight inch square ruler to lay over the top of each block so I can see the block underneath. I adjust the square until I have fabric extending beyond all four sides, and then I use my rotary cutter and trim away the excess. (click on each photo below to get a bigger view.

Any pieces that I cut off that are big enough will be saved and sewn into another block.

While trimming one of these blocks the other night, I got careless and had my finger sticking over the edge of the ruler. I ran over it with my rotary cutter. It bled like a stuck pig!

IMG_5804

Luckily, I didn’t get any blood on the blocks. I just bled all over the bathroom counter top. Sewing is not for sissies!

I’ve been giving a little thought to how I’ll put these blocks together once they’re all done. And I’m thinking I’ll sash them with the Kaffe black with white spots and white with black spots and will alternate every other block. I just love the graphic black and white with these bright colors!

IMG_5866

Once I get the six remaining blocks done, I’ll cut the sashing fabric and sew the pieces to the blocks assembly line style.

I have several pieces of Kaffe fabric that are large enough for a backing. I have one in mind that I’ll probably use, but I’m not completely decided yet.

I anticipate that I’ll have the remaining blocks done later this week.