Can I Paint?

I have a board on Pinterest called “Can I Paint?” It’s where I keep all kinds of things I think I SHOULD be able to paint, or that I’d really like to be able to paint.

I don’t have much talent for painting. But I’ve always wanted to do some watercolors. I’ve finally dipped my brush in the water.

IMG_0967 2

A few weeks ago, some friends and I had our “Second Thanksgiving,” something we do every year, typically between Thanksgiving and Christmas. We do a full thanksgiving meal with all the trimmings, and combine it with some kind of crafty activity, and a nice field run for the dogs after dinner.

This time we tried watercolors. We ordered some kits online that were complete with paint, paper and instructions for a painting. My kit was a landscape.

IMG_0733

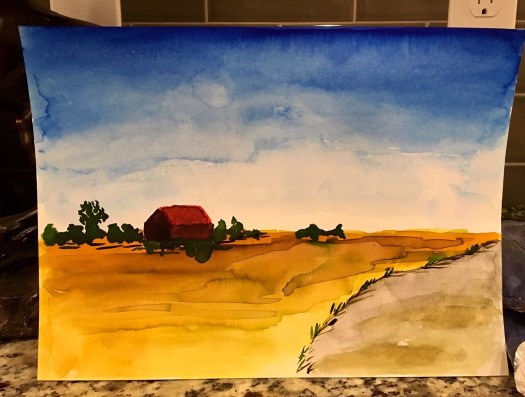
It was pretty simple and it wasn’t bad for my first time out. I did learn a few things. I learned that this is NOT my color palette.  I learned that it’s really hard to control where watercolors go on the page. They just sort of want to go all over the place! I learned that less is more.

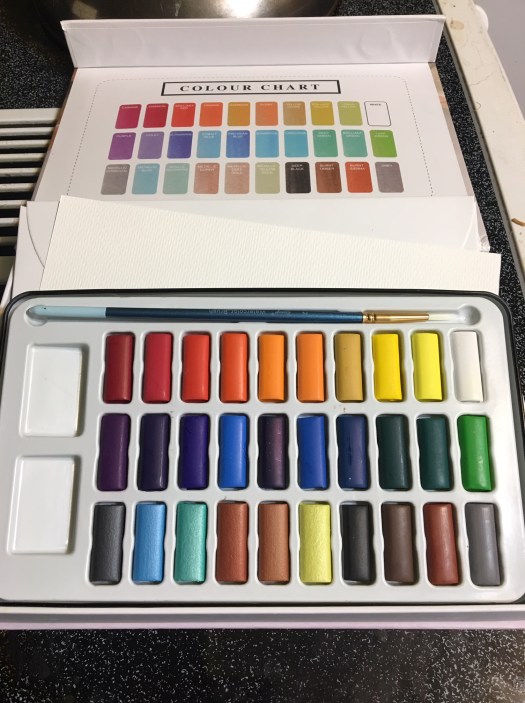
But what this did do for me was to solidify my desire to try some more painting. So I’ve been looking at watercolor instructions and tutorials on the internet, and I felt confident enough to strike out. So I went online a few nights ago and bought some paints.

The next day I realized that I didn’t have any watercolor paper. But I do have a LOT of blank note cars just begging for watercolor.

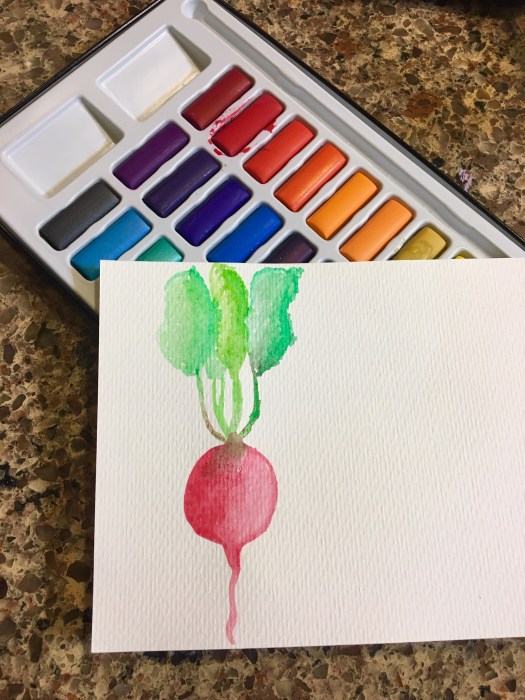
The paints arrived today, so after I got my chores done tonight I pulled them out and dug in. I wanted to paint something simple… something that I could do several of to help me build some skills. So I decided to paint a radish.

This is my second radish, painted on a note card.

IMG_0969

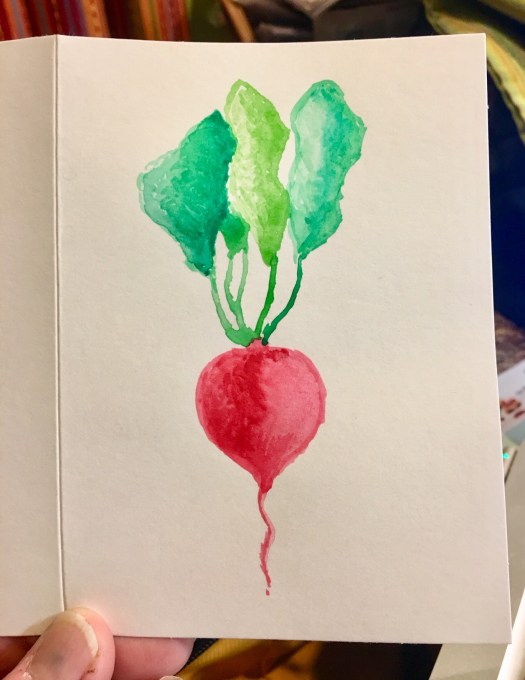
Not bad for someone who has never painted a radish with watercolor until tonight!

Here’s my first radish:

IMG_0968

And the first and second radishes side by side for comparison. I definitely did a better job on radish number two. I know which one I’d rather eat!

IMG_0970

I’ve already ordered some watercolor paper. I have a few ideas rolling around in my head for my next attempt. I can’t wait to get some fun color on the page!

Thinking About My Next Quilt

I took a few minutes this afternoon and pulled some of my Kaffe Fassett Collective fabrics for a quilt I’ve been wanting to make.

I have two unfinished quilts on my design wall so, of course, it’s time to start thinking about the next one.

IMG_0955

I saw a quilt posted on the Kaffe Fassett Collective Facebook page almost a year ago that was based on Brandon Mabley’s My Fair Lady pattern from the Kaffe Quilts Again book, but the fabrics had been changed. I’ve wanted to make this ever since.

The quilt in the book is made from rusts and tans, with pale turquoise colors. It’s very muted and understated, compared to a lot of Kaffe Fassett quilts.

The colors make up the hexagons, and the neutrals will make up the joining triangles.

IMG_0956

The photo above is from Kaffe Quilts Again and is the pattern for the quilt I saw on the Kaffe Fassett Facebook that inspired me to make this quilt. The photo below was made by Denise Blake and I loved it the minute I saw it.

hexis

To make the quilt, you make strip sets and then cut those into equilateral triangles. Then sew six triangles back together into a hexagon.


Then you sew a different and neutral triangle onto two ends of the hexagon, which makes a parallelogram, if I remember my limited education in geometry. Hmmm. Maybe it’s a diamond.

This makes it possible to sew the blocks together in rows, and means no Y seams! Yay for no Y seams!

And then there’s all kinds of triangles to even out the edges of the quilt.

IMG_0961

I’m going to make this a nice throw size. I’m tired of making huge quilts and need something quick.

I have to take my Bernina in for servicing. I found a place not far from me with a certified Bernina service person, and they said it would only take a week or so!

First Time’s a Charm – Coiled Rope and Fabric Basket

I’ve wanted to make one of these coiled rope bowls for some time now, so I figured this cold winter weekend was the time to start.

IMG_0856

We were supposed to wake up to several inches of snow yesterday, so I was ready to hunker down in the house for the weekend. I woke up to only a dusting of snow, so I decided to hit the stores and get the rope I needed for this project. I tried a couple of different craft stores, and no luck. I ended up at Home Depot and purchased 200 feet of polyester 3.8 inch clothesline rope. I was worried the polyester would make it difficult to sew, but it didn’t.

I started out this morning by digging into my stash, and went to my pre-cuts bin. I had batik fat quarters in bright colors, and decided to use them. I’m glad I went with larger pieced rather than scraps, because this took about 1.5 yards of fabric total.

I cut the fabric into one-inch strips, and decided what order I wanted them in the bowl.

IMG_0835

I decided to put the darkest fabrics on the bottom of the bowl, thinking it would hide dirt better. Then I went to the lighter greens, then into the oranges and pinks. I added the purple later when the bowl ended up too small with what I had cut.

I had watched several different video tutorials on making these bowls, so I felt pretty confident to just dig in. I started by wrapping the fabric around the end of the rope, then spiraled it down the length of the rope. then I coiled it pretty tight, and started sewing.

IMG_0837

I set the zig zag stitch as wide as I could make it, and started sewing from the center, turning the coiled rope as I went.

IMG_0838

Once I got the very center stitched into place, I continued to wrap fabric around the rope, and zig zag it onto the coiled piece.

I had set my zig zag stitch length too short at the beginning, and I was not happy with how much the thread showed. So after a few rows, I lengthened the stitch, and it looked much better as the thread was hidden a little more on the dark fabrics. Once I got into the colorful fabrics, the thread blended in really well.

IMG_0841

You can clearly see in this photo where I lengthened the stitch. The center is really showing all the stitches. It looked much better once I lengthened the stitch.

After the flat piece got to the size I wanted, I started to tip the flat piece as I sewed to start making the sides go up.

IMG_0845

The hardest part about making this was wrapping the fabric around the rope and joining the fabric pieces together. It took me a few rounds to get it figured out, but once I got it, it was smooth sailing.

IMG_0842

I wanted the wraps to be as smooth as possible, and I wanted to minimize overlap so that I could use less fabric. I used my fabric clips liberally… using one on top of each fabric join so that i would hold in place until I got it stitched into place. I would wrap several pieces of fabric around the rope, with each join clipped, so that I could sew more once I sat down at the machine. The sewing went really fast. The wrapping is what took time, so I wanted to be as efficient as possible and take fewer breaks to wrap.

IMG_0843

The clip above is holding the piece secure where the second piece of fabric was wrapped around the end of the previous piece.

Then I just continued to wrap and sew, wrap and sew, maintaining the slant of the side of the bowl.

IMG_0849

IMG_0850

IMG_0853

Until it was all done.

I’m really happy with how this turned out! I love all the bright colors, and I like the shape… even though it wasn’t quite what I was going for. It will take some time to figure out how to manage the slant!

But I will definitely make more of these!

IMG_0854IMG_0857IMG_0859IMG_0860