Copy Right Anne Ibach 2021
I made the front and back for another KFC Frankenbag Saturday afternoon. So I thought I’d take pictures as I made it to show you how I go about putting together the pieces and assembling these panels. For your reference, here’s a link to my Frankenbag tutorial.
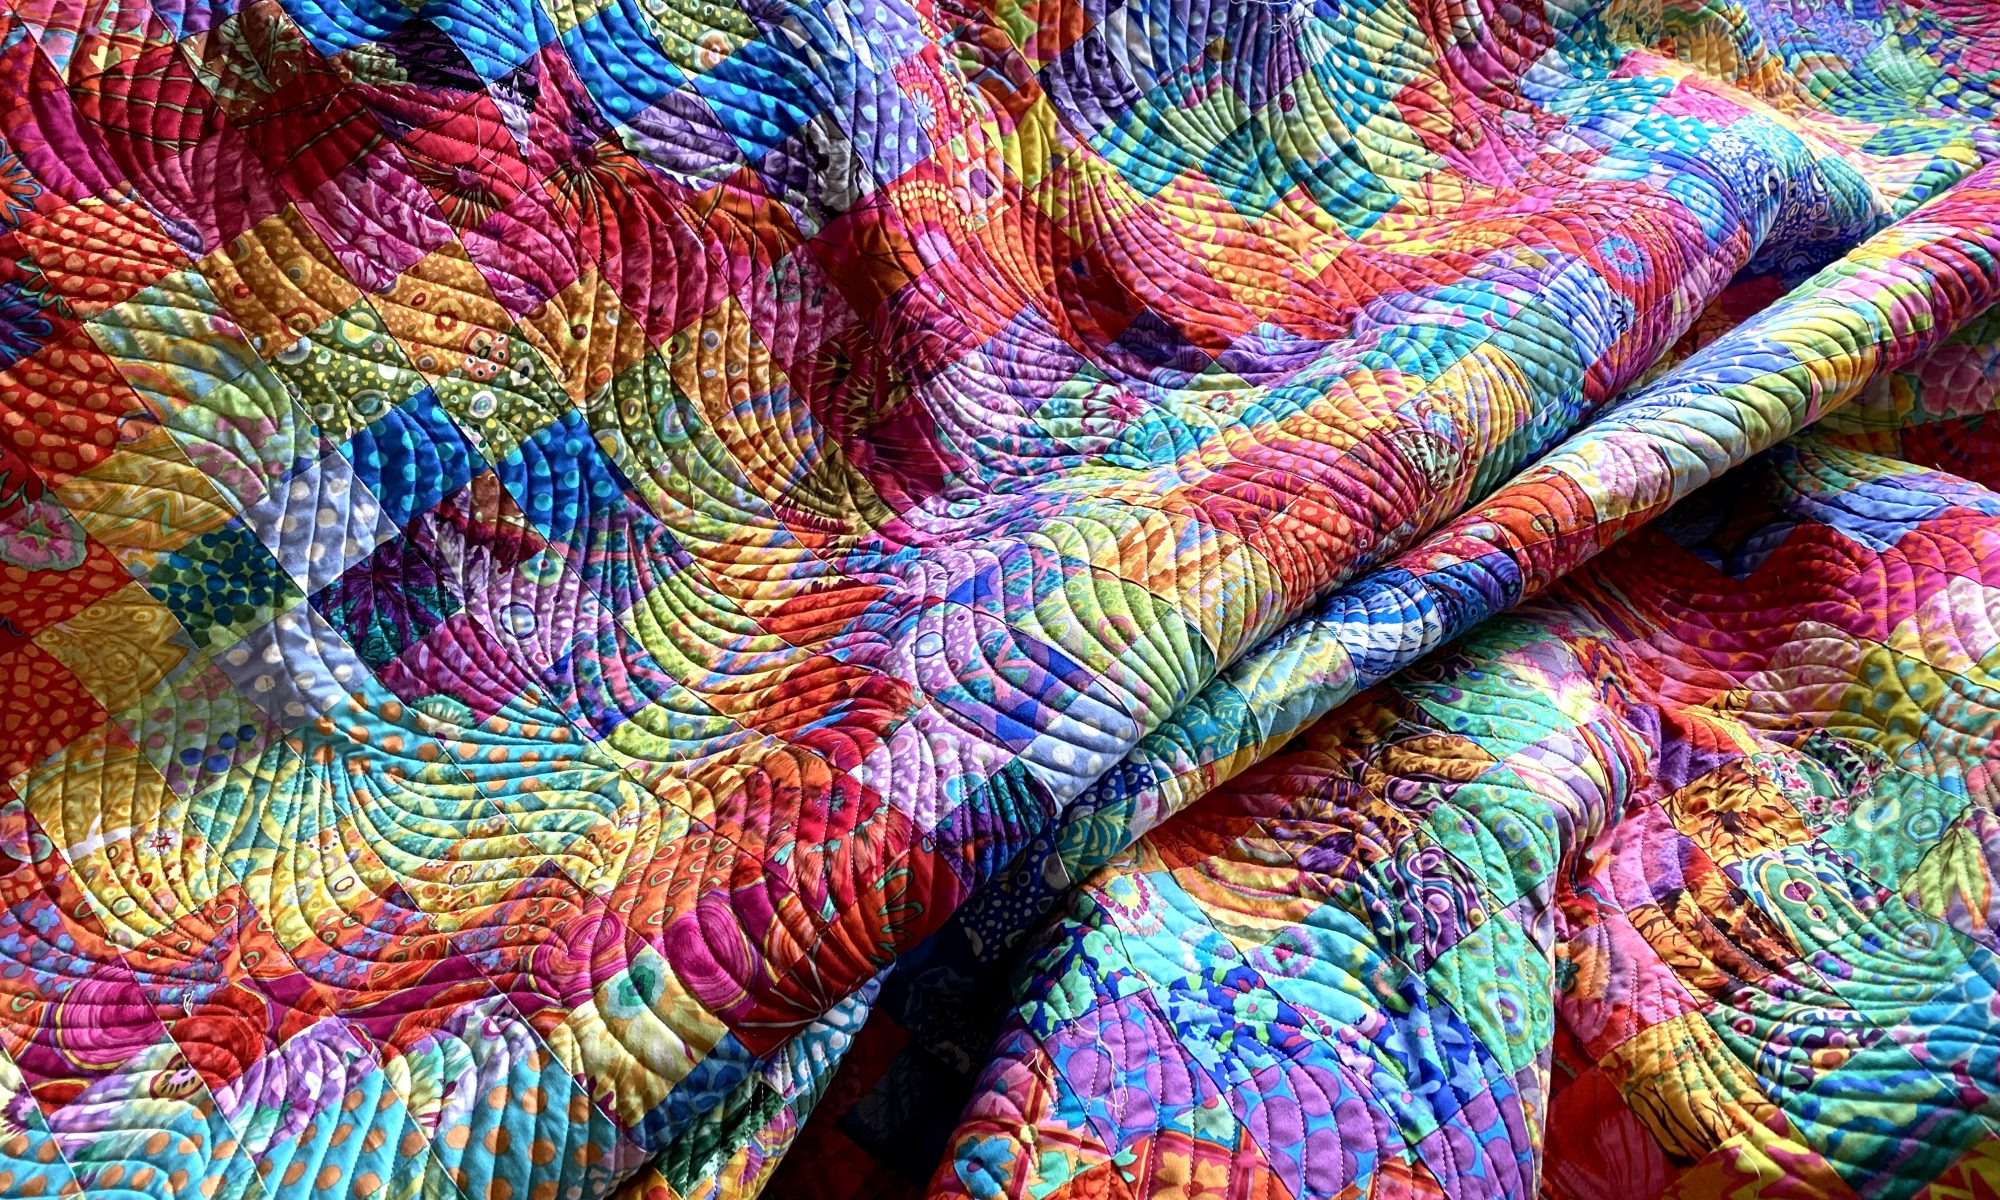
Here’s the final front and back that I’ll be showing you.

I taped off a 17×17 inch grid on my cutting table so it’s easier for you to see the size I want to make these panels. I don’t do this when I’m making my panels. Usually, I’m just using the measurements on my cutting table.

Here are the pieces I’ll use to make the front of this bag. There’s the larger flying geese block, the stacked block of strips on the right, and some crumb blocks at the bottom.

I think about putting these panels together a little bit like putting a puzzle together. Except that instead of finding a puzzle piece that has to fit the hole exactly, I MAKE a puzzle piece to fit that hole. If the puzzle piece is too big, I’ll cut some off. If it’s too small, I’ll add some fabric.
I assemble the top section of these panels first. The first thing I want to do is line up the pieces and get a general idea of how much space I’m going to need to fill to make it 17 inches wide. In this next photo you can see that I have about 4.5 inches of space that I need to fill. And remember that when you’re laying out these pieces you need to keep seam allowances in mind — you need to add extra width for the seam allowances. That’s an additional 1/2 inch of width for every vertical seam across the width. The more pieces you have horizontally, the more you’ll lose in seam allowances once it’s all sewn.

So I want to determine how I’m going to fill that 4.5 inches. I could add a crumb panel, or another block. But I like wide sashing on these pieces. So I start out by trying out different fabrics for the border on this larger block.

I’m pretending that I might actually use something here besides this Jumble. Haha. Nope. It will be Jumble! So I cut some two inch strips and sewed these borders onto that flying geese block. I like to use two inch strips because it makes a bold border, but it also gives me enough fabric that I can trim a little if I need to in order to make these pieces come out to 17 inches.

Before I get too far along I trim the big block so all the edges are straight.

Now I can figure out how I’m going to fill the space around that vertical stripped block on the right. I trimmed a little off that block so that I could use a wider border on it.

In the next photo, I’ve overlapped the two existing blocks to mimic my seam allowance. You can see that I have about 3 inches to fill to make these two blocks 17 inches wide.

So I selected some red Guinea Flower to border this block, cut it into two inch strips and sewed it to all four sides of this block.

When I got to this point I realized that I has going to be less than 17 inches when I sewed that vertical seam between these two blocks because I hadn’t allowed enough for the seam allowance. No worry. Just select a fabric to sew between those two bordered blocks to get you the width you need.

I love that red Strata fabric! It’s fun in a narrow strip. I sewed the Strata strip to the block on the right and checked my width again. See how I’ve overlapped the two blocks to mimic the seam allowance?

So it looks like I will have plenty of width when I sew these two blocks together. In fact… too much. So I trimmed a little off of that strata strip to account for the excess.

And when I sewed it all together I only had about a quarter inch to trim off of the right side. That’s pretty good.

I’m going to leave that quarter inch and move onto finishing the bottom of this panel. It’s nice to have a little extra that you can trim off at the end of the assembly. You don’t have to have it all perfect at this stage.
So next, I selected some of the crumb blocks that I made previously. I chose blocks that are similar in height, and selected enough to add up to more than 17 inches wide once they are trimmed and sewn together. At this point I’m just eye balling this. And it looks like I’ll have plenty of width with these four crumb blocks.

So next, I trim the edges of the blocks where they’re going to be sewn together so I’ll have a nice straight seam.

I do this on each seam and sew the crumb blocks into a strip, keeping the top edge of the blocks as even as possible.

Then I trim off the edge that will be sewn to the top part of this panel.

And when it’s lined up, I can see that it’s not tall enough to get me to 17 inches in height. So I needed to add in some more fabric. I could add more crumb blocks, but I decided to add a strip of fabric. So I pulled out some fabric to see what I liked in that space.
First I tried Crease.

Then I tried this little zebra print I have in my stash.

Then I tried Brandon Mably’s Vibrations. This is the one I decided to go with.

So I cut a 2 inch strip and sewed it in place.

And now that those two seams are sewn, you can see that I have a little more than 17 inches in height. So I trimmed off the little bit of excess at the bottom. And that means that this front panel is now 17 inches square. Yay!

Now let’s move onto the back panel. I’ve been making the back panel less involved than the front panel. So these bags definitely have a front and a back. You could certainly do something more involved for both sides if that floats your boat.
So, I’m using mostly crumb blocks on the back. I start by lining up some of my pre-made crumb blocks across the width of the space I taped off.
I had a choice to make on this first row. I could either add some crumb pieces to fill in that space, or I could make a little block to fill that space. I decided to use black and white KFC fabrics to fill that space.
When I eye balled these two strips to fill that space, I didn’t feel positive that I had enough width once I trimmed the blocks and sewed the seams.

So I added another strip of black and white fabric to make that piece wider and it looks like we’re good to go now.

So I sewed it all together and It’s plenty wide now.

So I trimmed the bottom and top off straight and moved on to adding fabric to the bottom of this piece. I don’t trim the sides until I have this whole 17×17 piece put together.

I continued adding strips of fabric and crumb blocks, making those puzzle pieces and putting them in place… trying out different things as I went along.

Trying out different combos of fabric….

… and different arrangements.

And when I liked the arrangement, I sewed all the elements together and trimmed it to 17 inches square.

And that’s how I make my Frankenbag panels. With whatever blocks I decide to use in a panel, it’s all just a matter of making the pieces of the puzzle fit together.
Give it a try! This is really the fun part for me. Leave me a comment if you have any questions.
Love your choice of fabrics and posts, thank you for sharing.
You’re welcome! I’m always happy to share.
Anne
OMG — just found this on pinterest — I love using scraps from material to make bags! This is on my list — thank you for sharing.
Have fun with it!
Anne
You are so smart and that makes total sense. Thanks again for the great info. Have a great Monday!
Thanks! I thought it might be helpful to illustrate my process. Have a good week!
Anne
Oh my goodness, this is so helpful. I am getting ready to start a version of this. This will soooooo help. Goes right along with your tutorial. Aren’t you so sweet to teach all of us. I can’t wait.Thank you so much.
Thank you Rebecca! I’m always happy to share what brings happiness to my life. If you make a bag I’d love to see a photo!
Anne
One thing good teachers have in common is the ability to share their thinking. You do this so well! Thank you for adding this tutorial to the collection, I am so appreciative of your generosity! Just finished my second bag, gave it to my mother in law for her 88th birthday .❤️
I saw your new bag on Instagram. Love all those rich colors. I’m sure your MIL will love it! I hope it’s ok for me to share your photos on my blog.
Anne
Really helpful and great advice!
And just like that, the brain fog clears and it all makes complete sense. Trying now to make a free date in my work diary when I actually have time to make this bag – without interruptions – is this possible??
Many thanks
See! This is why I wrote this blog post. What is really clear in my mind and easy for me is not clear and easy for others. I’m glad you found it helpful! I hope you find some time to make one of these bags!
Anne
Thank you for taking the time to do this for us. The visual is so much more helpful for me.
Great! I’m glad you found it helpful.
Anne
Those black and white strips add so much visual fun, they’re perfect. I finished my 17″ crumb panel (took me forever, but I like it), and am now playing with block ideas for the front. Thank you so much for this added tutorial, and for sharing your pattern with us.
Aren’t those black and whites just fantastic!?! When you get your bag done I hope you’ll send me a photo. I’m having fun sharing them on my blog!
Anne
Thank you for sharing. I’m will give this a go in a week or two. Are you using that fusible bag material inside (Bonsel I think)?
Always happy to share Barb. I wanted these bags to be soft and comfy rather than structured. I picture them after wear being like a comfy quilt. So I used a fusible poly batting rather than a more structured material. But you could certainly use that more structured material if you like.
FABULOUS illustration of showing how to create made fabric to work as you want it to!
Thanks! I realized that what comes easy to me is not easy for everyone. It’s always good to give some thought to your process as well. And, of course, I find it really fun to see what others are making from my tutorial! Plus, thinking about and writing down my process generates all kinds of new ideas… which is the really fun and exciting part for me!
Anne
Really love your Frankenbags and your tutorial is just what we audio/visual learners need. Not just the words, but the photos. I’m so far behind in my projects now, I may never catch up, but that’s ok with me. It’s not a race. I’ll work at my own pace and just keep cutting and sewing. Can’t wait to see what strikes your fancy next!
I’m so happy to hear from you! I was getting ready to email you to see if all is well. It’s been so long since you commented. So glad you’re up and at ’em!
I have a lot of ideas for new bags. People are sharing their bags made from my tutorial with me and there is some really fun stuff happening!
I keep thinking of you when I see my Ice Storm quilt hanging on my design wall… I need to finish it!
So good to hear from you!
Anne
Thank you for putting together this tutorial email showing your process for your beautiful totes!!! Gorgeous fabrics make fabulous gifts!!! Just beautiful 😻 Donna
Always happy to share. And just so you know, I have a blog online and you get the emails because you’ve either followed or subscribed to my blog. The emails are automatically generated when I put a new post on my blog. If you go directly to my blog online you can scroll through old posts, look at photos, read comments, etc… heck out http://www.agilejack1.com
Should we be concerned that after quilting the panel might “shrink” a bit and be less than 17 inches? Thanks a bunch for all your sharing of knowledge.
It likely will be a little smaller, but mine haven’t varied more than 1/8 or 1/4 inch at the most. You can just adjust the size of your lining, or make your panel 17.5 inches square and trim it up after quilting.
Anne
Thank you for the tutorials. The bags are fantastic and I love to see the process. You have given me inspiration to make a bag or three ;).
I’m glad you like my bags! I hope you do make one or three! I’m really having fun actually finishing some projects!
Do you sell your franken bags I am interested in buying.
I do.
Beautiful! Great instructions and photos! You have inspired me to make one! I’ve been making bags for some time now but these are truly different and challenging. It is encourages me to be more creative and that is such a good feeling. Many thanks for all your challenges and inspirations and taking time to blog and share. Betty
Thank you!!! I hope you have fun with this! I’d love to see what you make!
Anne
What a wonderful idea and presentation Thanks for sharing!
Thanks! I hope you make one!
Anne
Thank you for sharing this great tutorial. I have just joined your newsfeed and look forward to learning heaps more. Hello from Australia.
Suzi;
thanks for reading!
Anne
I am blown away by your use of eye candy fabric, your design elements are incredible. Your tutorial is exceptional for the explanations and the pictures. I cannot wait to enjoy more of your projects. You make my heart happy. I am an 82 year old past Fashion Director and College Professor and am so excited to have found you. Much love on your future projects!
Well, Sandra, welcome!!! Thank you so much for your amazing comments! It’s been so much fun to share what I make with others. I hope you dig in and join me!!!
Anne
The fabrics are truly awesome. Are you in Australia?
During Covid lockdown I ordered fabric online. Got lots of wild and wonderful colours that play together but don’t “match”. So glad to find this idea. Raining today and I’m going to give this a try! Thank you.
Judy Canada
I’m in Portland, oregon, USA! Nowhere near Australia, but you’re not the first to ask me that!
Have fun creating!
Anne
Too funny. Thanks for letting me know! We are almost neighbours, I’m in Vancouver.
Working on my first ever bag🙏
Judy
Hahaha! So close and so not Australia!
Anne
Hi! I love your Frankenbag. I think that it is just a beautiful piece of art. I am working on one myself now, and purchased the faux leather you recommended for the handle. My sewing machine won’t sew it. It’s a new needle, and the needle goes through the leather easily, but isn’t putting a single stitch into my handle. Do you have any hints about what could be wrong? Thank you so much for your tutorial and ideas.
Hmmm. I’ve never had any issue. There are a few things you could check:
1. Try using your walking foot.
2. If this is happening at the beginning when the front of the foot is above the back of the foot, try folding up some fabric scraps and putting them under the back of the foot to make it level. this video shows what I’m talking about: https://www.youtube.com/watch?v=RD2HyZ4zqog
3. It seems to me that if it’s not making a stitch at all it’s an issue with the angle of the needle. If the needle is going in at an angle rather than straight up and down, that could be the issue. Maybe you’re trying to sew too fast?
4. It’s possible that your machine just can’t handle that thickness. Do you have a fried with a machine you could try? if you can’t make it work, you may have to use a different material for the handles. Maybe a nylon webbing.
Good luck, I’m not much of an expert in sewing machine trouble shooting! Try searching the web for videos or help.
Anne