Ok, I messed up my previous post and since so many people read my posts through email I wanted to make sure this info was clear and get it into people’s email boxes.
So here we go… again.
I happened across the video linked below today. It’s a really cool method that the Quilted Chicken on Youtube came up with for cutting fabrics for paper piecing the Wensleydale blocks. And it looks really great to me.
I will definitely try this when I make my second Wensleydale quilt, but I’ll probably make one block with the fabrics cut with this method before I commit to cutting a bunch, just to make sure the pieces are generous enough to make paper piecing efficient. But it looks really promising to me.
And now I have a place to send people when they ask me how to cut the pieces for paper piecing Wensleydale blocks!
I made the front and back for another KFC Frankenbag Saturday afternoon. So I thought I’d take pictures as I made it to show you how I go about putting together the pieces and assembling these panels. For your reference, here’s a link to my Frankenbag tutorial.
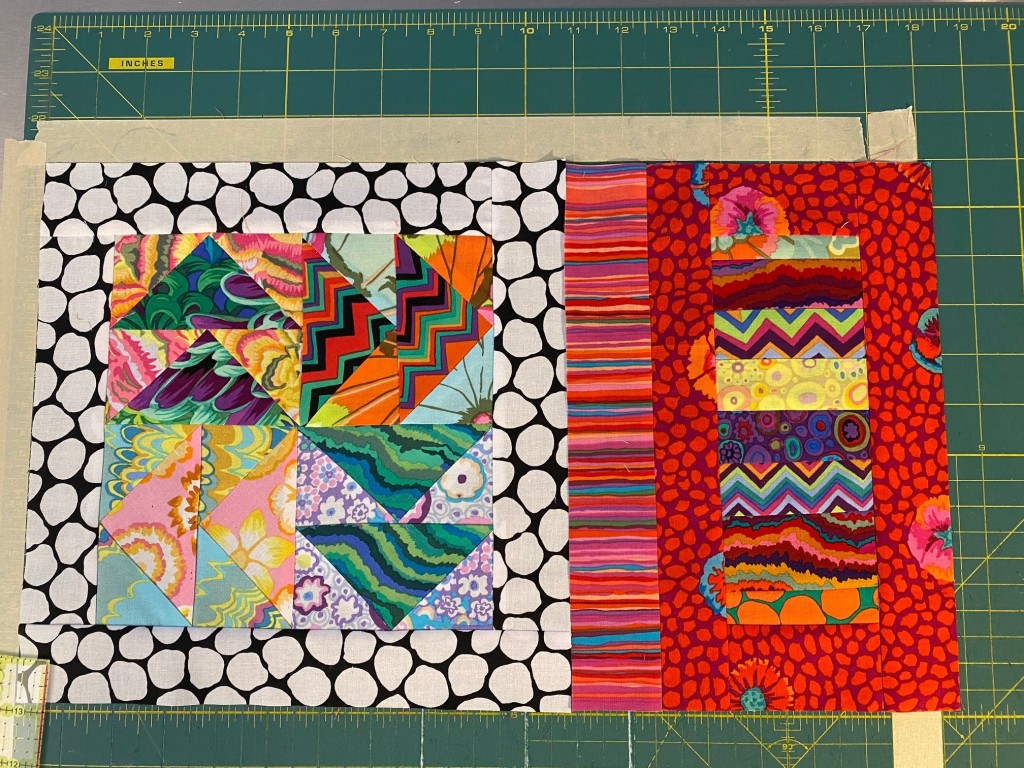
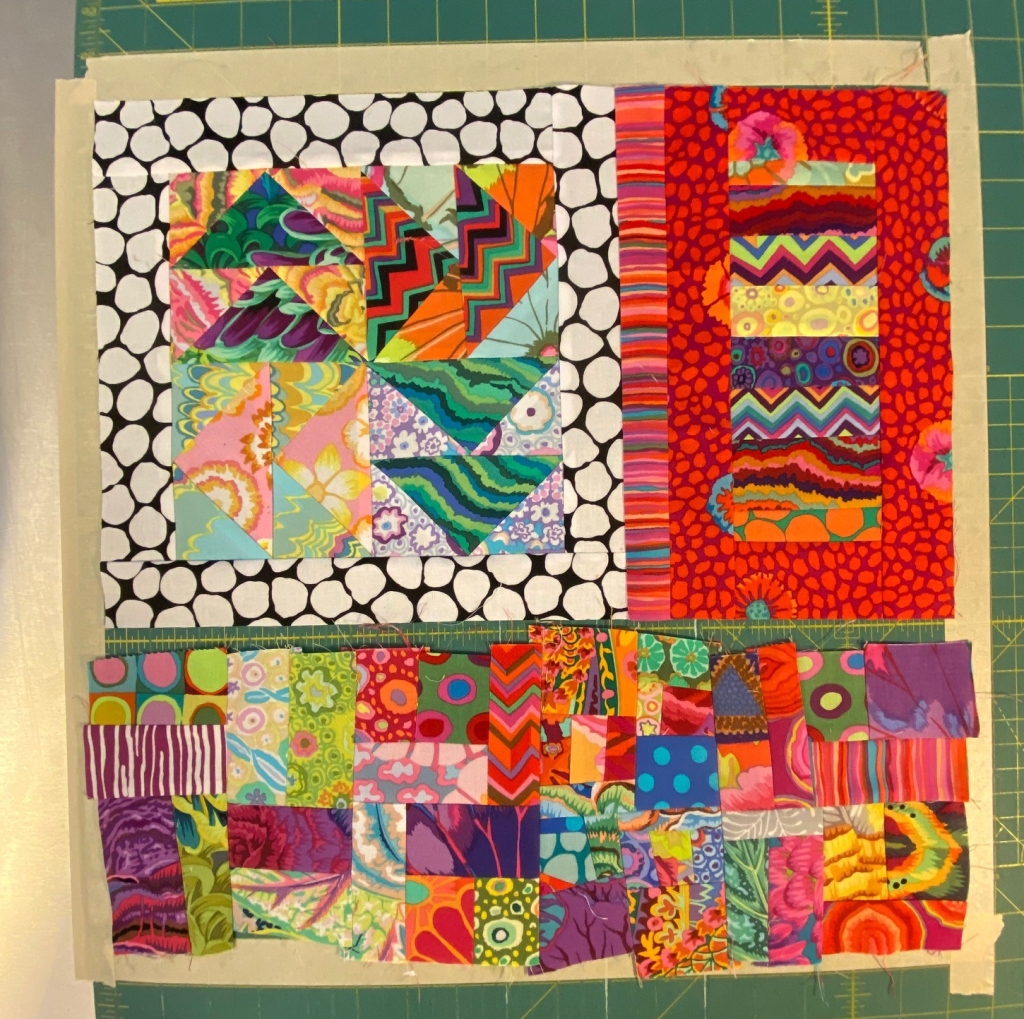
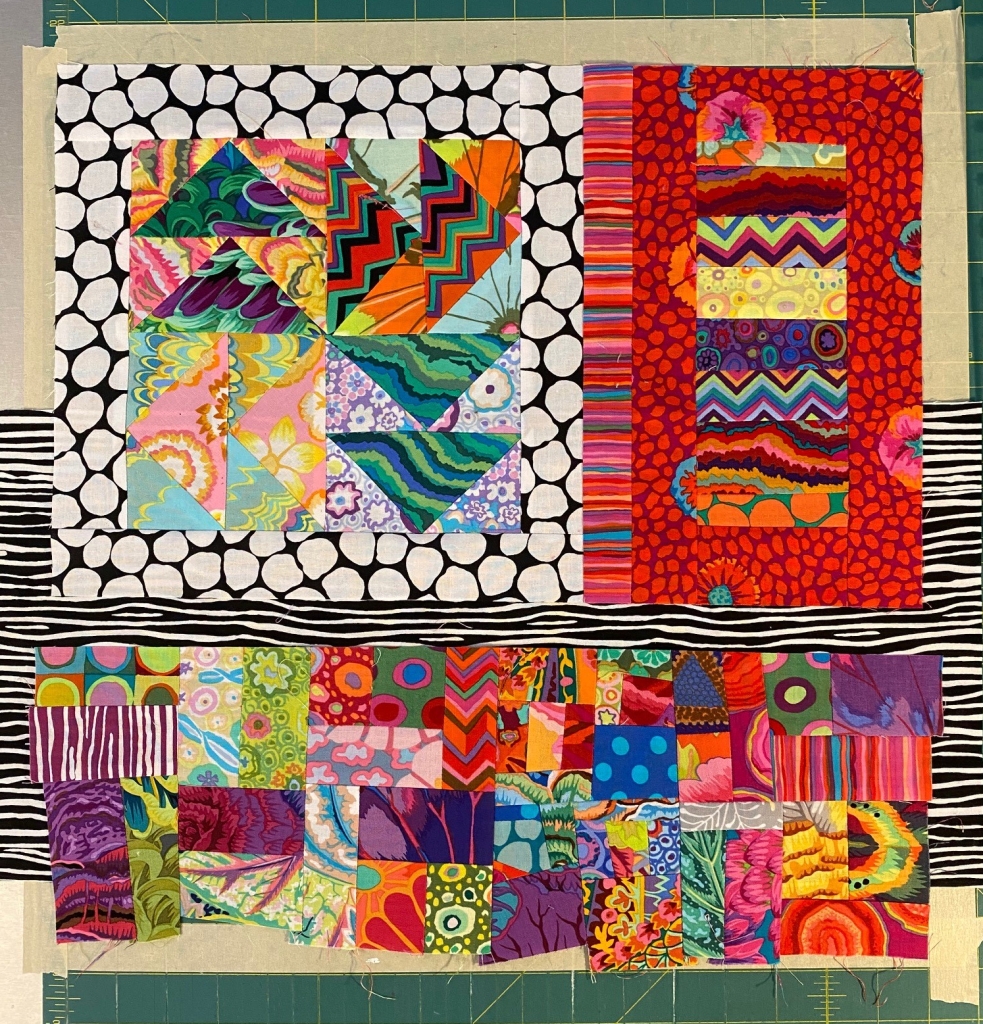
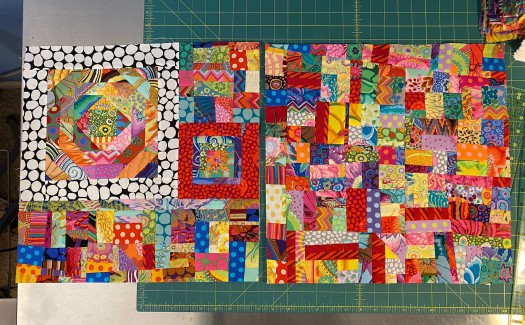
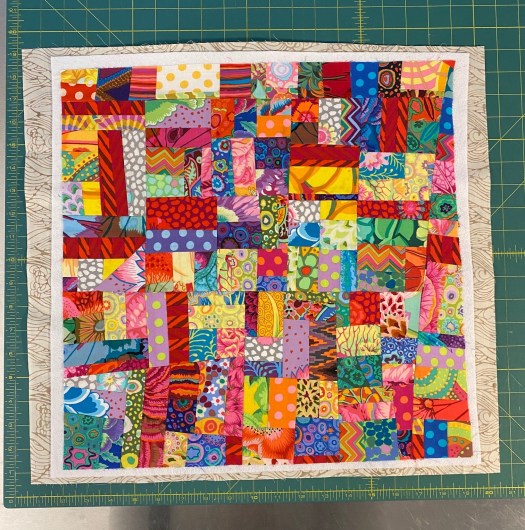
Here’s the final front and back that I’ll be showing you.
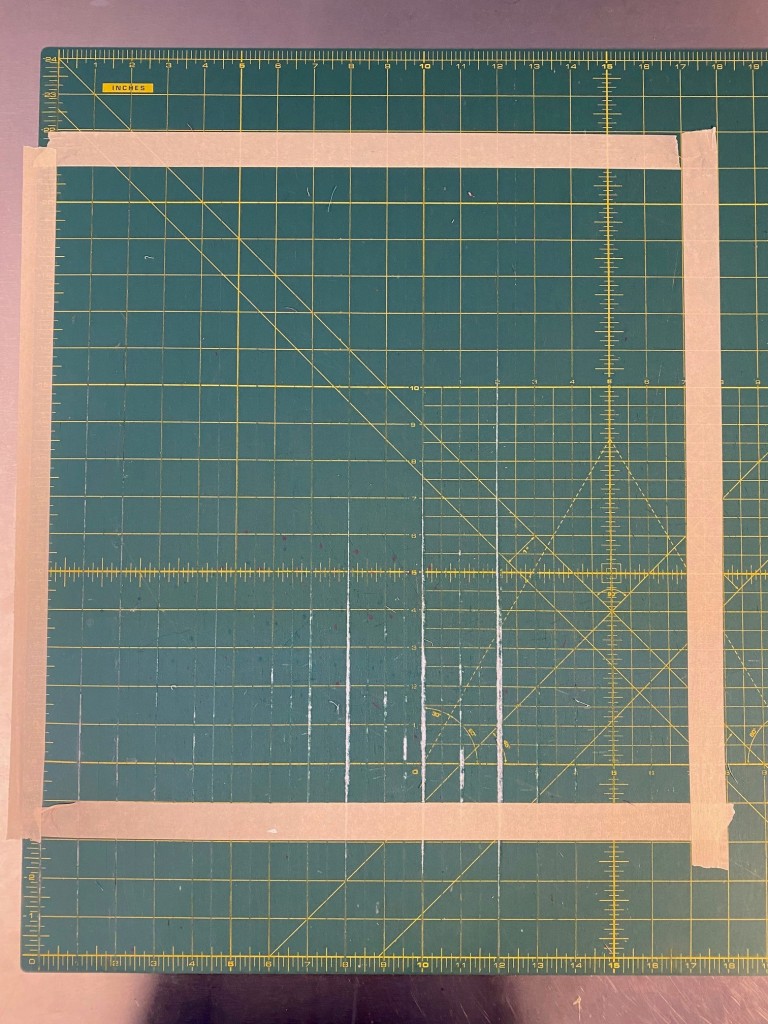
I taped off a 17×17 inch grid on my cutting table so it’s easier for you to see the size I want to make these panels. I don’t do this when I’m making my panels. Usually, I’m just using the measurements on my cutting table.
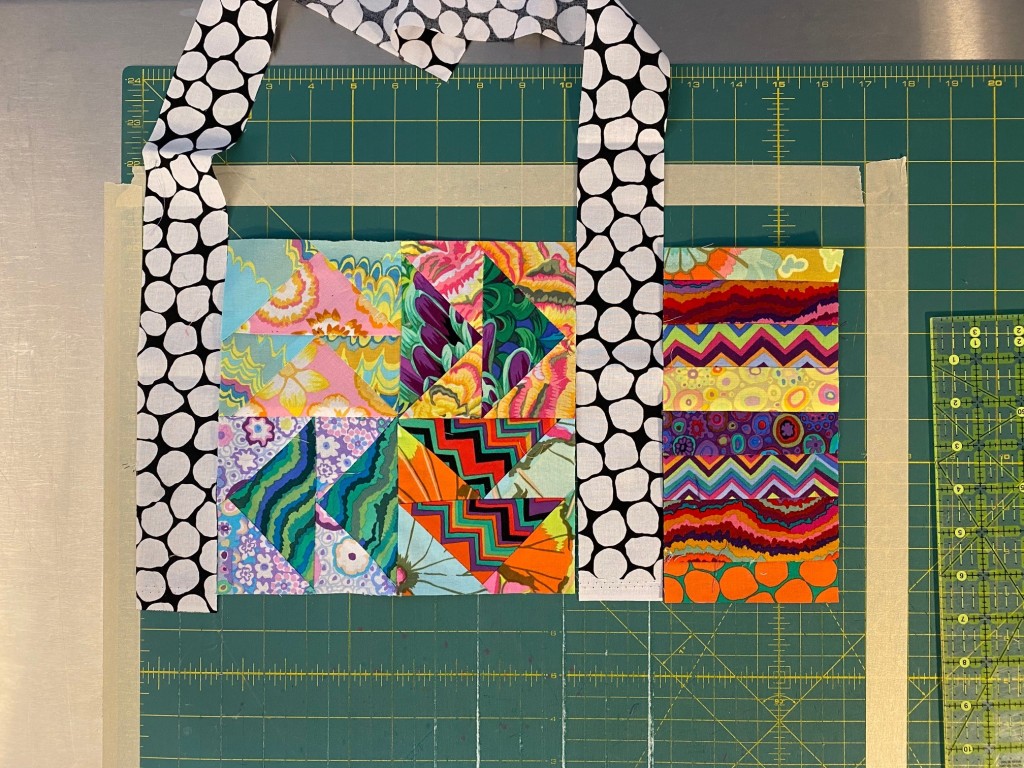
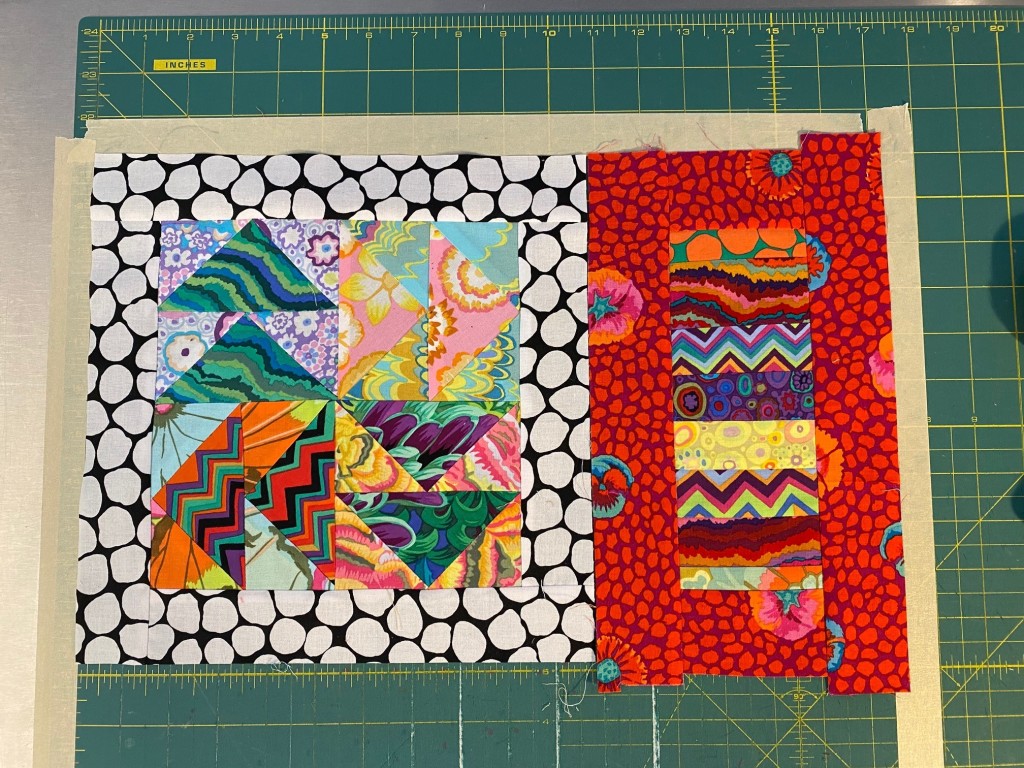
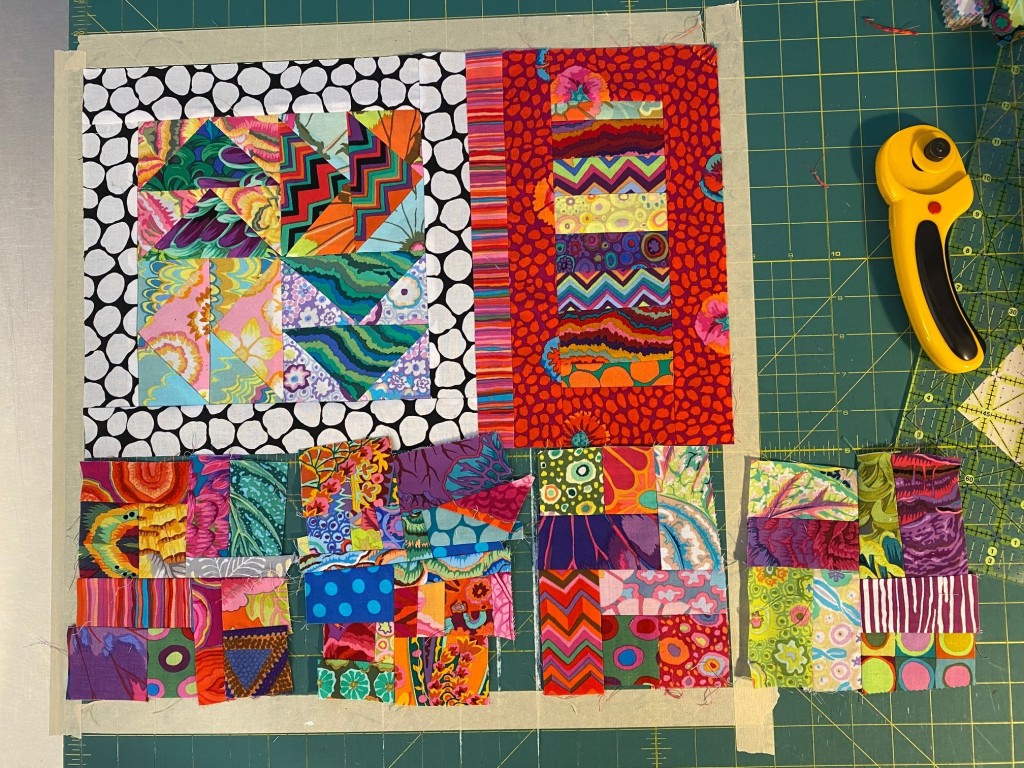
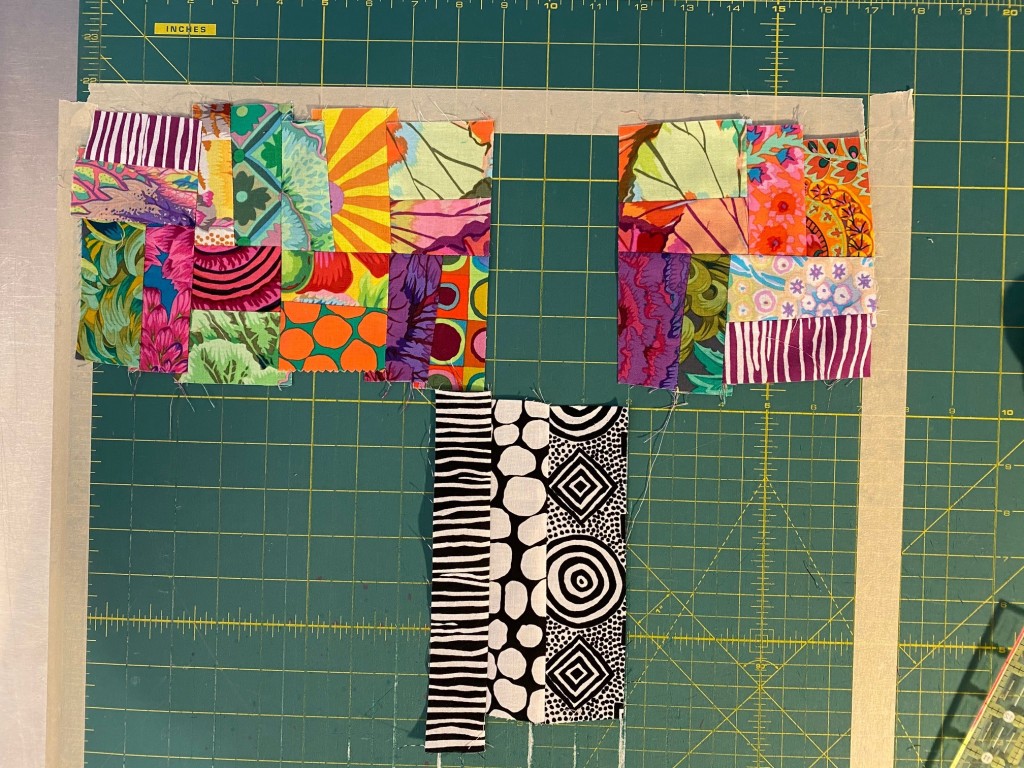
Here are the pieces I’ll use to make the front of this bag. There’s the larger flying geese block, the stacked block of strips on the right, and some crumb blocks at the bottom.
I think about putting these panels together a little bit like putting a puzzle together. Except that instead of finding a puzzle piece that has to fit the hole exactly, I MAKE a puzzle piece to fit that hole. If the puzzle piece is too big, I’ll cut some off. If it’s too small, I’ll add some fabric.
I assemble the top section of these panels first. The first thing I want to do is line up the pieces and get a general idea of how much space I’m going to need to fill to make it 17 inches wide. In this next photo you can see that I have about 4.5 inches of space that I need to fill. And remember that when you’re laying out these pieces you need to keep seam allowances in mind — you need to add extra width for the seam allowances. That’s an additional 1/2 inch of width for every vertical seam across the width. The more pieces you have horizontally, the more you’ll lose in seam allowances once it’s all sewn.
So I want to determine how I’m going to fill that 4.5 inches. I could add a crumb panel, or another block. But I like wide sashing on these pieces. So I start out by trying out different fabrics for the border on this larger block.
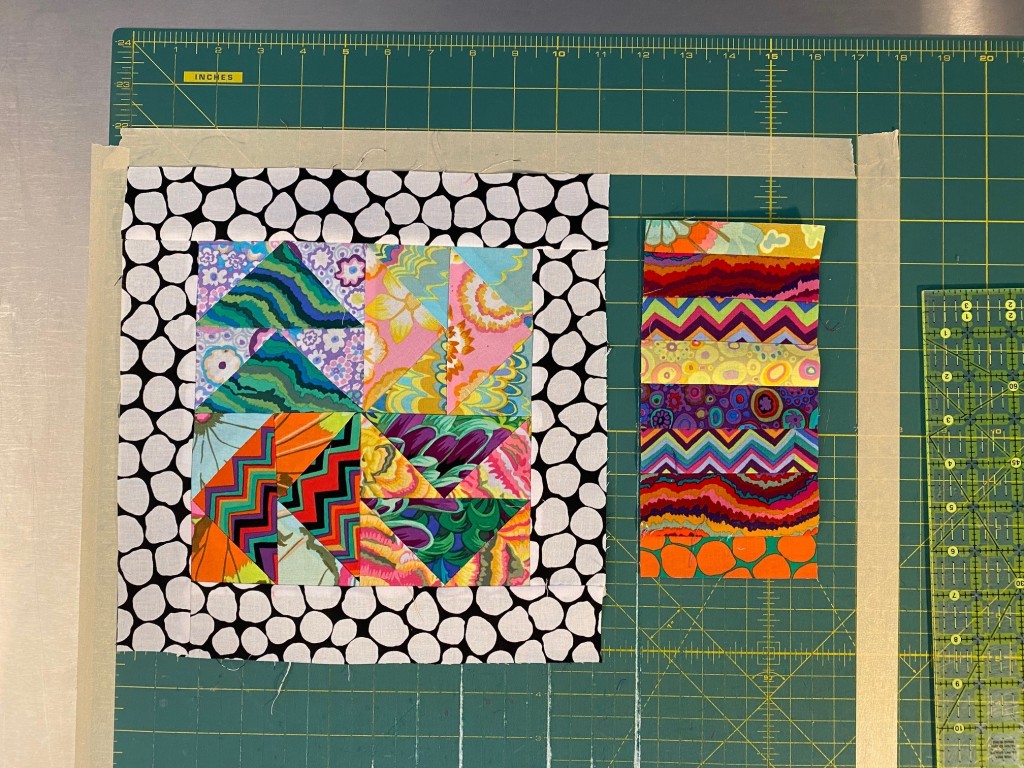
I’m pretending that I might actually use something here besides this Jumble. Haha. Nope. It will be Jumble! So I cut some two inch strips and sewed these borders onto that flying geese block. I like to use two inch strips because it makes a bold border, but it also gives me enough fabric that I can trim a little if I need to in order to make these pieces come out to 17 inches.
Before I get too far along I trim the big block so all the edges are straight.
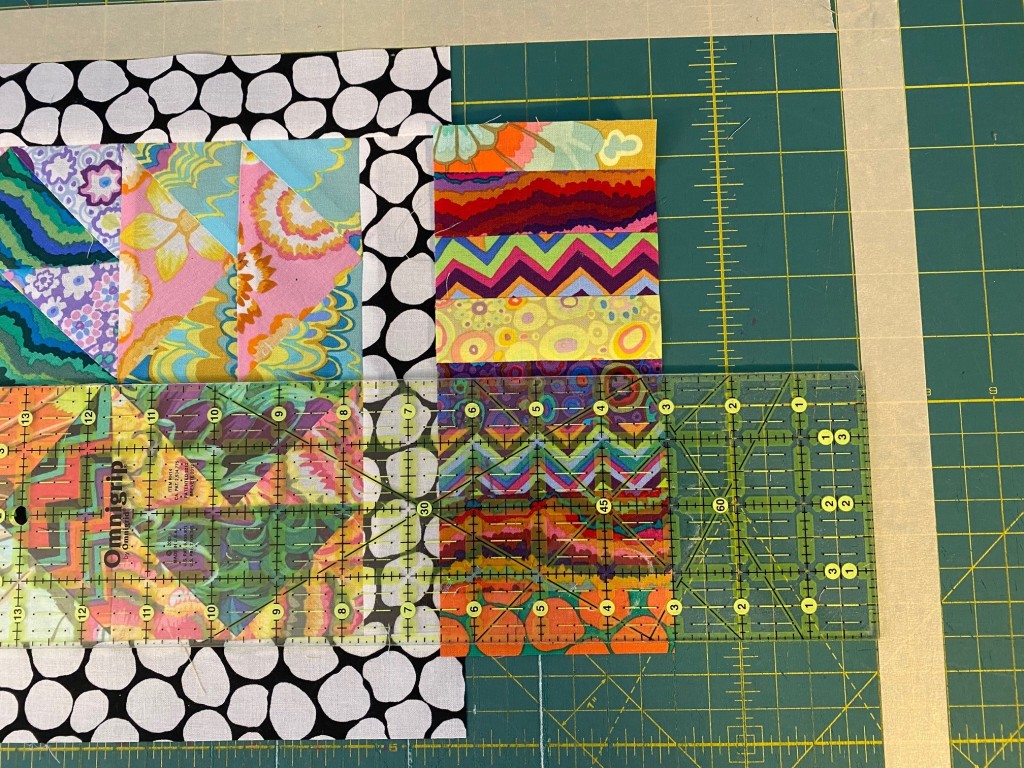
Now I can figure out how I’m going to fill the space around that vertical stripped block on the right. I trimmed a little off that block so that I could use a wider border on it.
In the next photo, I’ve overlapped the two existing blocks to mimic my seam allowance. You can see that I have about 3 inches to fill to make these two blocks 17 inches wide.
So I selected some red Guinea Flower to border this block, cut it into two inch strips and sewed it to all four sides of this block.
When I got to this point I realized that I has going to be less than 17 inches when I sewed that vertical seam between these two blocks because I hadn’t allowed enough for the seam allowance. No worry. Just select a fabric to sew between those two bordered blocks to get you the width you need.
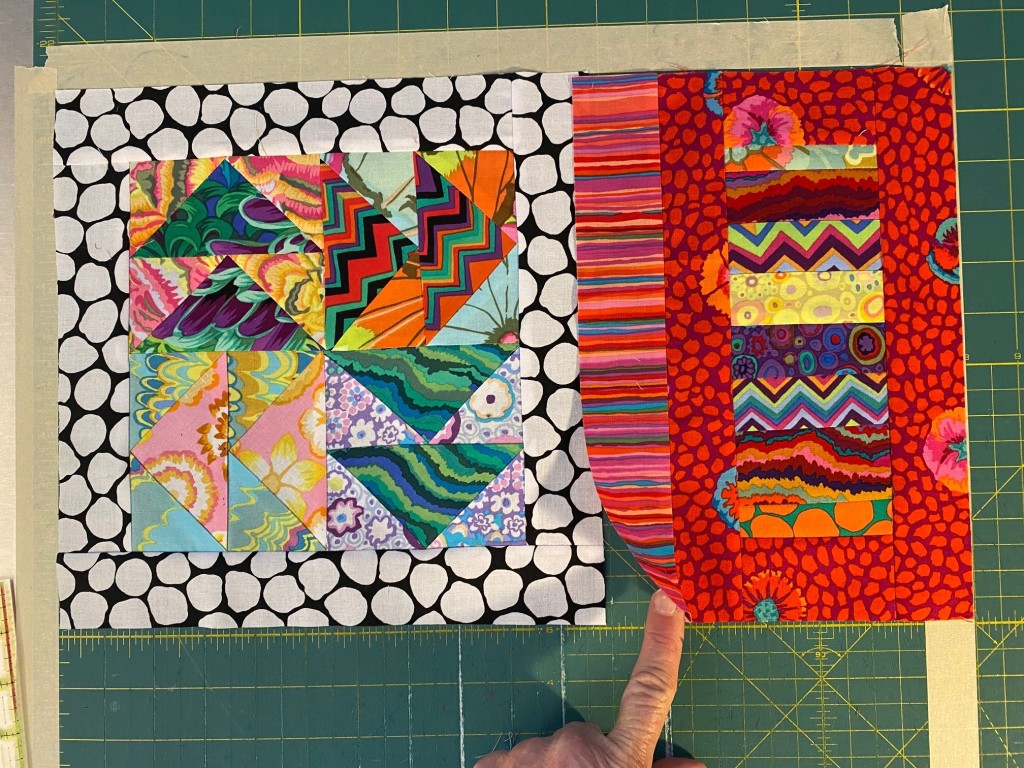
I love that red Strata fabric! It’s fun in a narrow strip. I sewed the Strata strip to the block on the right and checked my width again. See how I’ve overlapped the two blocks to mimic the seam allowance?
So it looks like I will have plenty of width when I sew these two blocks together. In fact… too much. So I trimmed a little off of that strata strip to account for the excess.
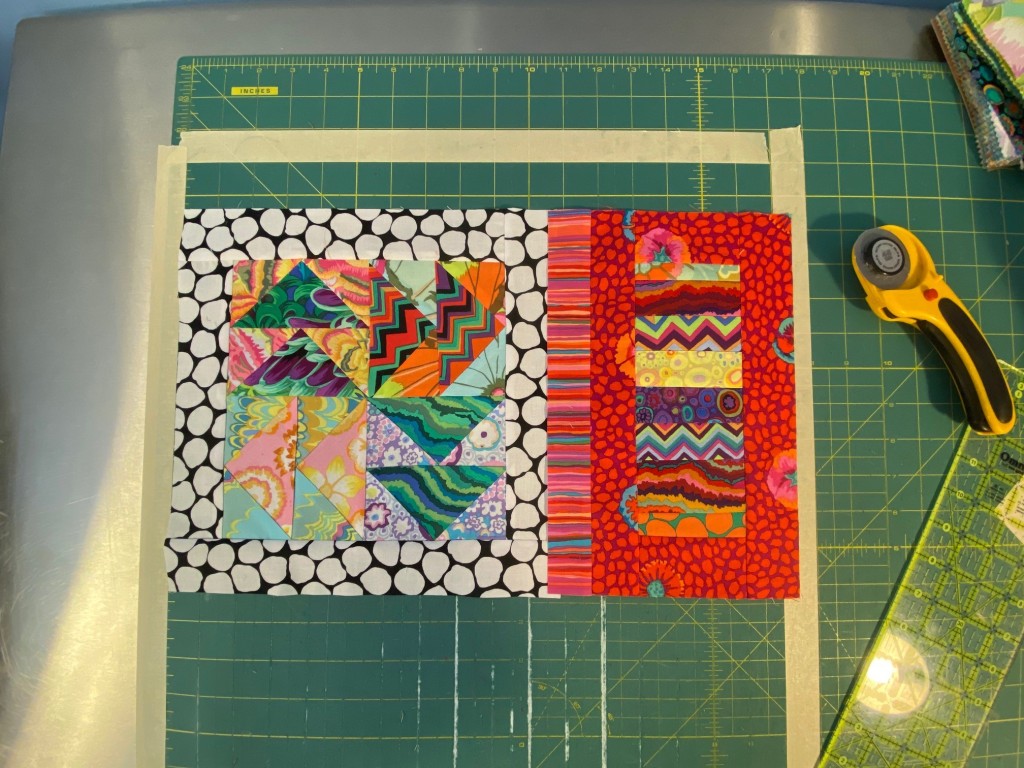
And when I sewed it all together I only had about a quarter inch to trim off of the right side. That’s pretty good.
I’m going to leave that quarter inch and move onto finishing the bottom of this panel. It’s nice to have a little extra that you can trim off at the end of the assembly. You don’t have to have it all perfect at this stage.
So next, I selected some of the crumb blocks that I made previously. I chose blocks that are similar in height, and selected enough to add up to more than 17 inches wide once they are trimmed and sewn together. At this point I’m just eye balling this. And it looks like I’ll have plenty of width with these four crumb blocks.
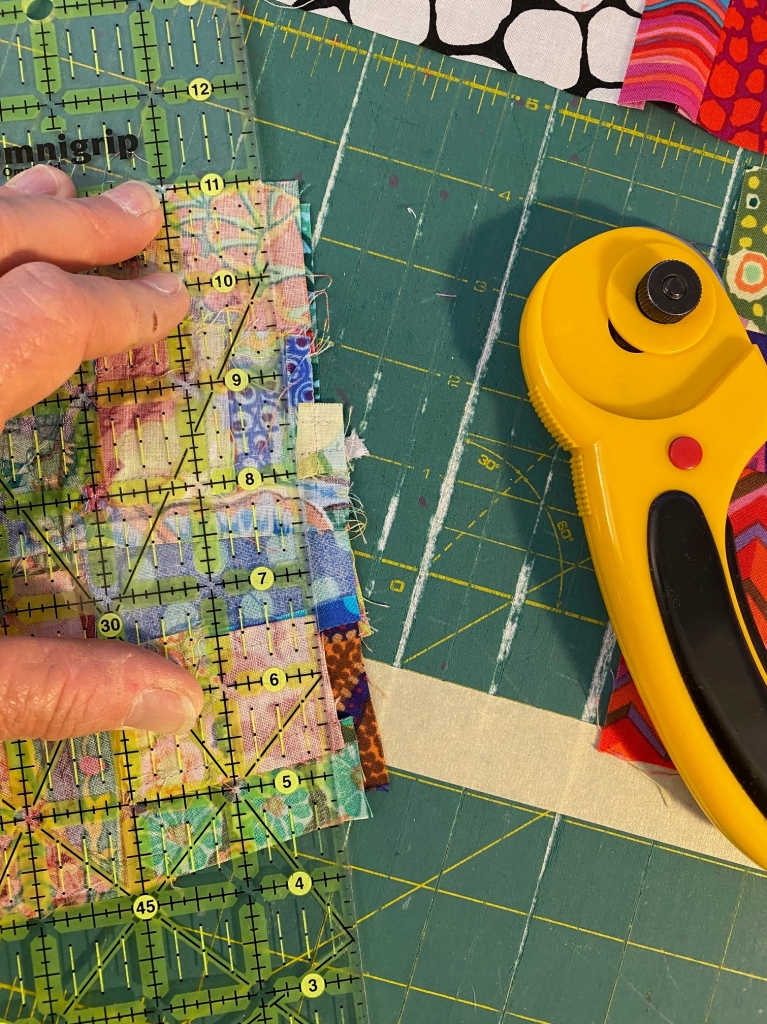
So next, I trim the edges of the blocks where they’re going to be sewn together so I’ll have a nice straight seam.
I do this on each seam and sew the crumb blocks into a strip, keeping the top edge of the blocks as even as possible.
Then I trim off the edge that will be sewn to the top part of this panel.
And when it’s lined up, I can see that it’s not tall enough to get me to 17 inches in height. So I needed to add in some more fabric. I could add more crumb blocks, but I decided to add a strip of fabric. So I pulled out some fabric to see what I liked in that space.
First I tried Crease.
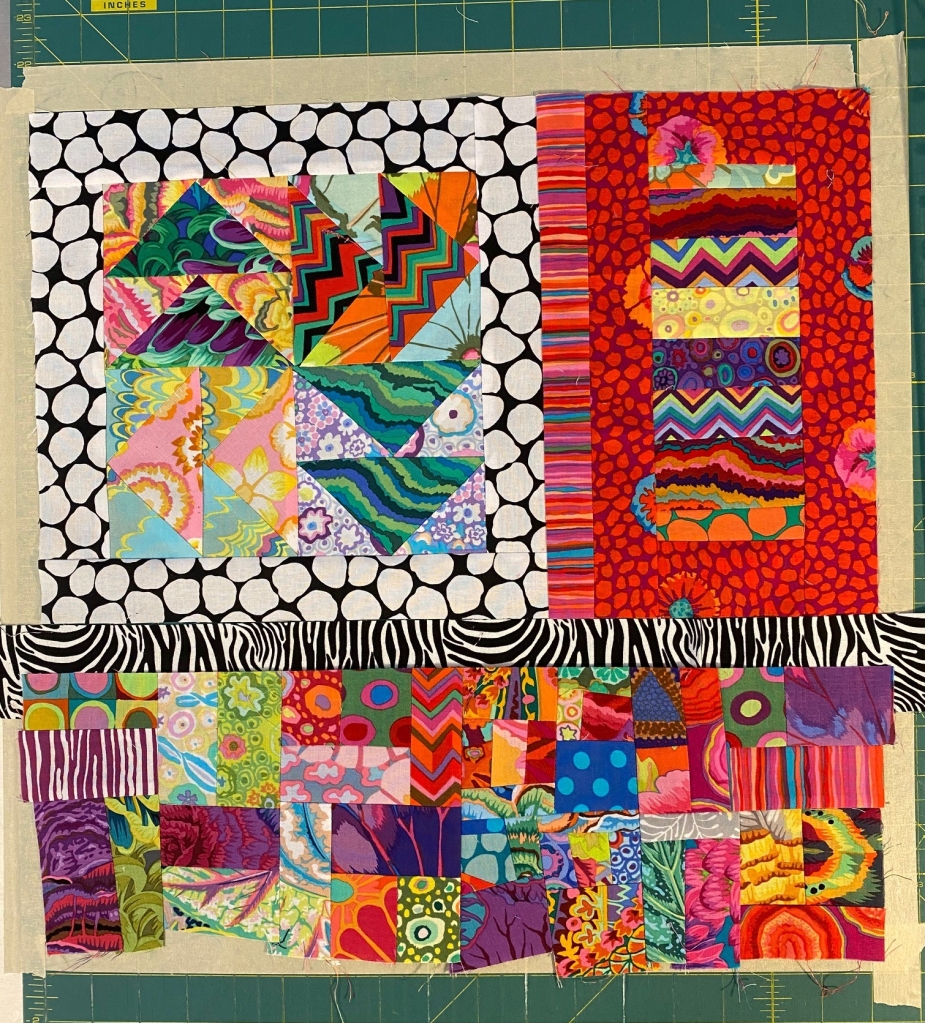
Then I tried this little zebra print I have in my stash.
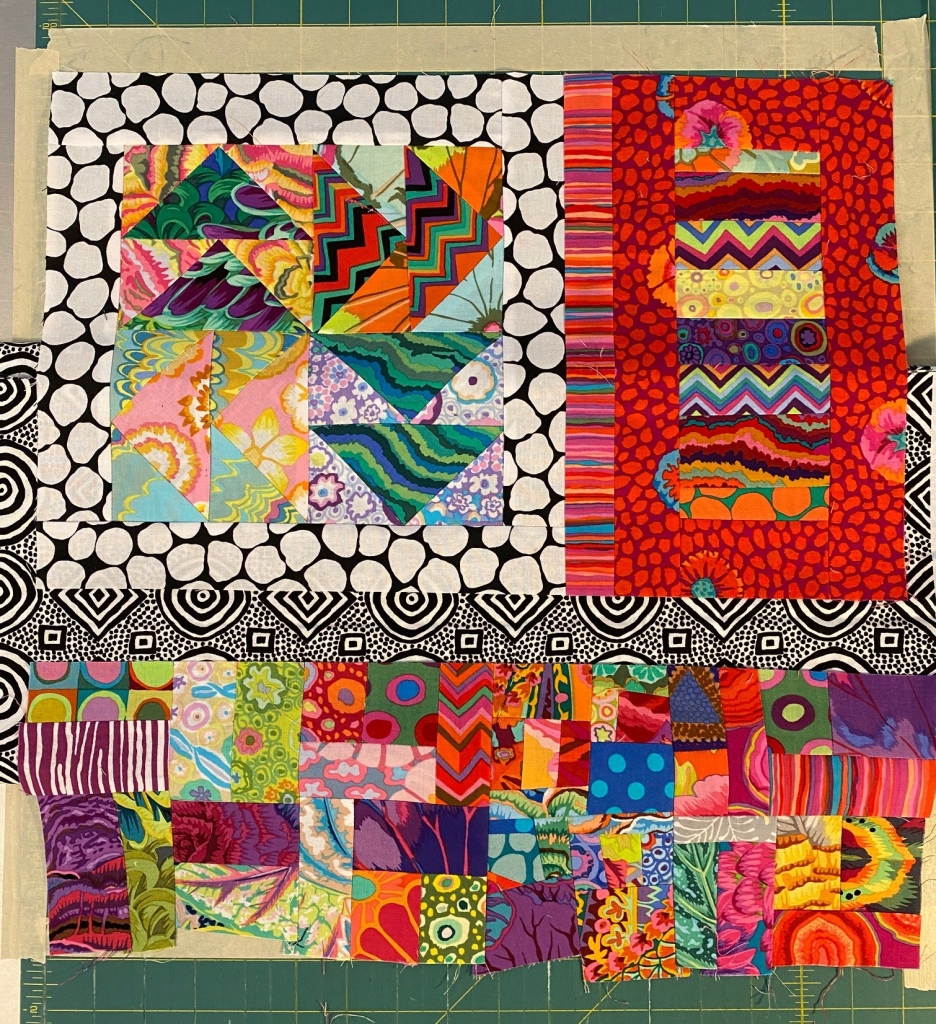
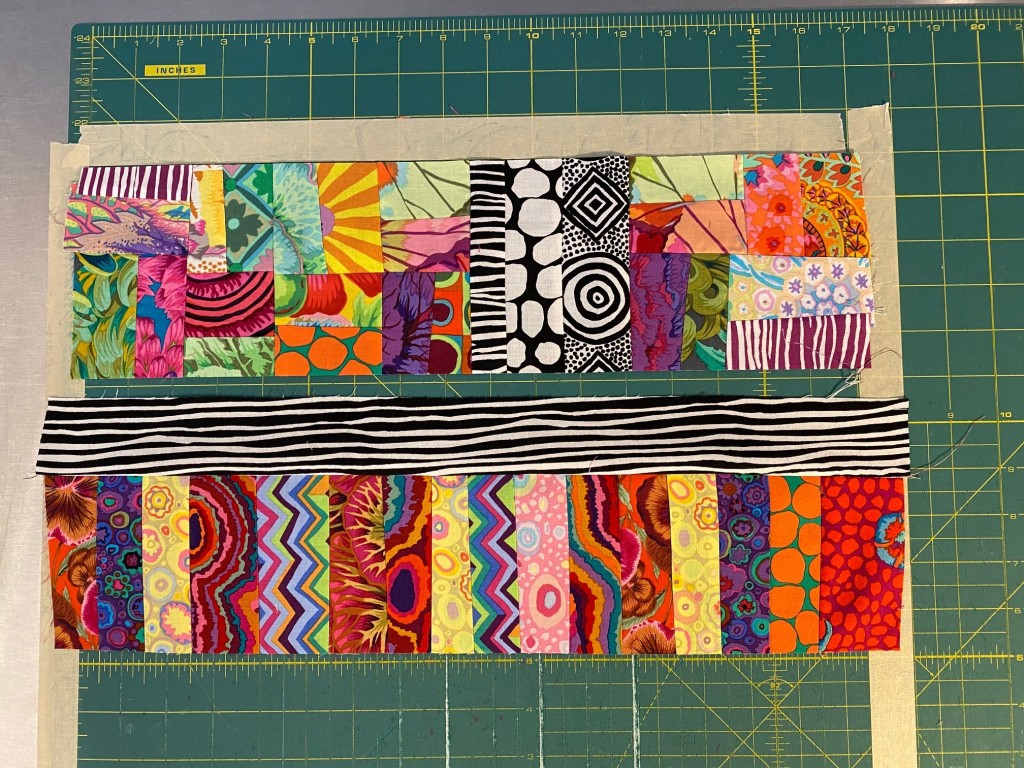
Then I tried Brandon Mably’s Vibrations. This is the one I decided to go with.
So I cut a 2 inch strip and sewed it in place.
And now that those two seams are sewn, you can see that I have a little more than 17 inches in height. So I trimmed off the little bit of excess at the bottom. And that means that this front panel is now 17 inches square. Yay!
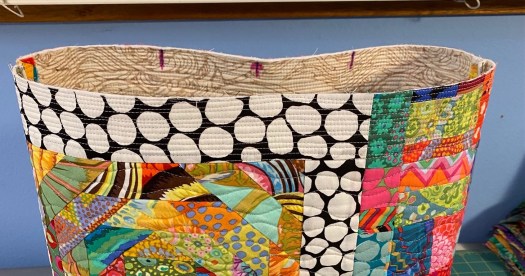
Now let’s move onto the back panel. I’ve been making the back panel less involved than the front panel. So these bags definitely have a front and a back. You could certainly do something more involved for both sides if that floats your boat.
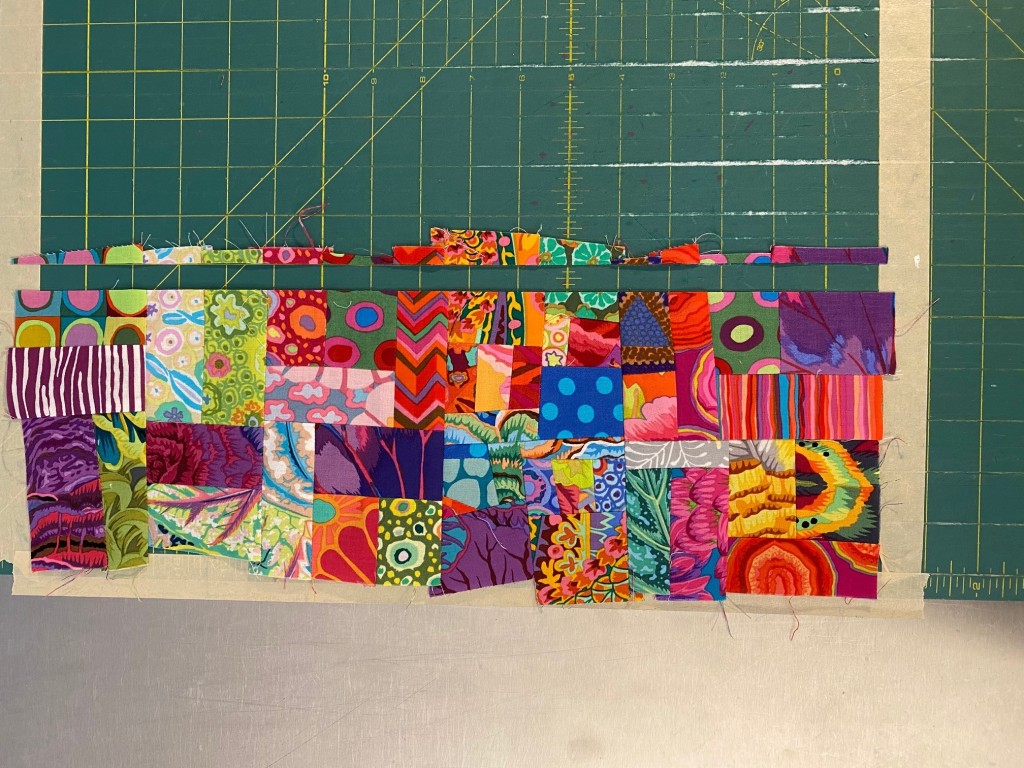
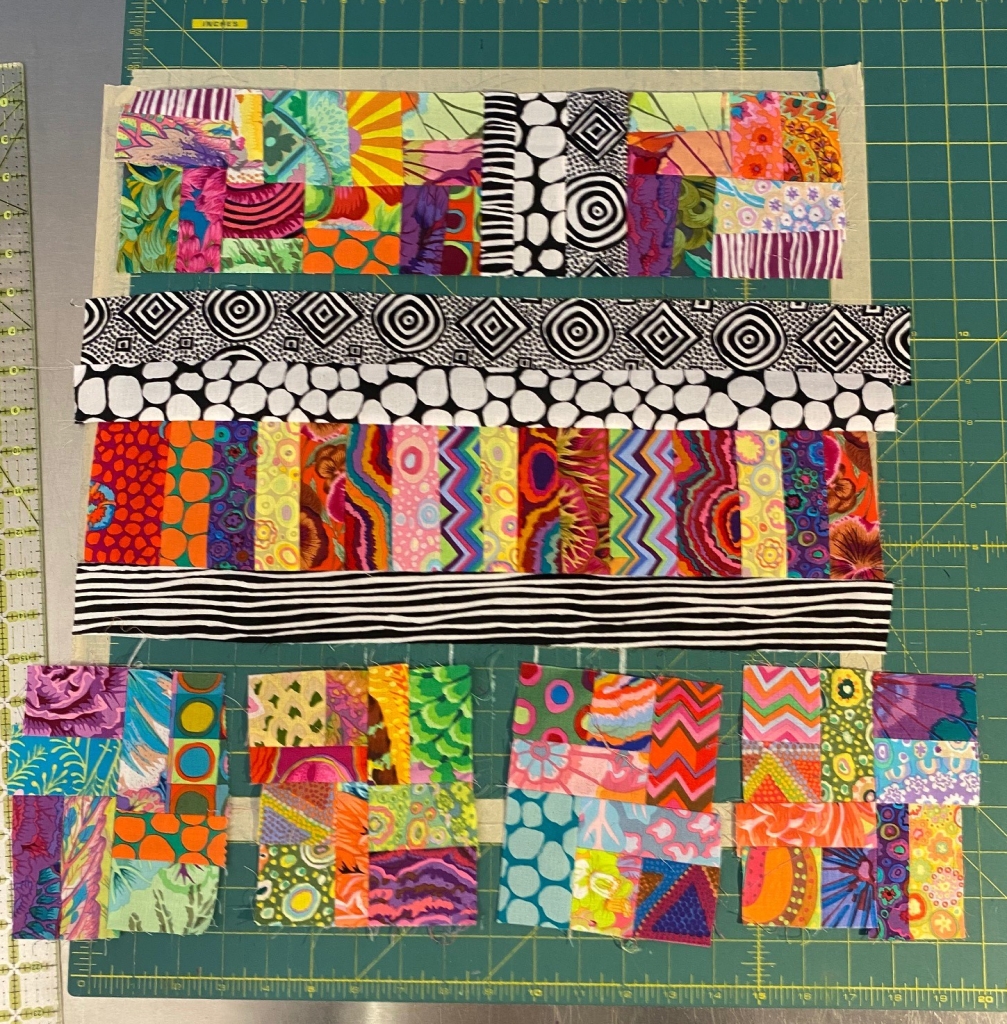
So, I’m using mostly crumb blocks on the back. I start by lining up some of my pre-made crumb blocks across the width of the space I taped off.
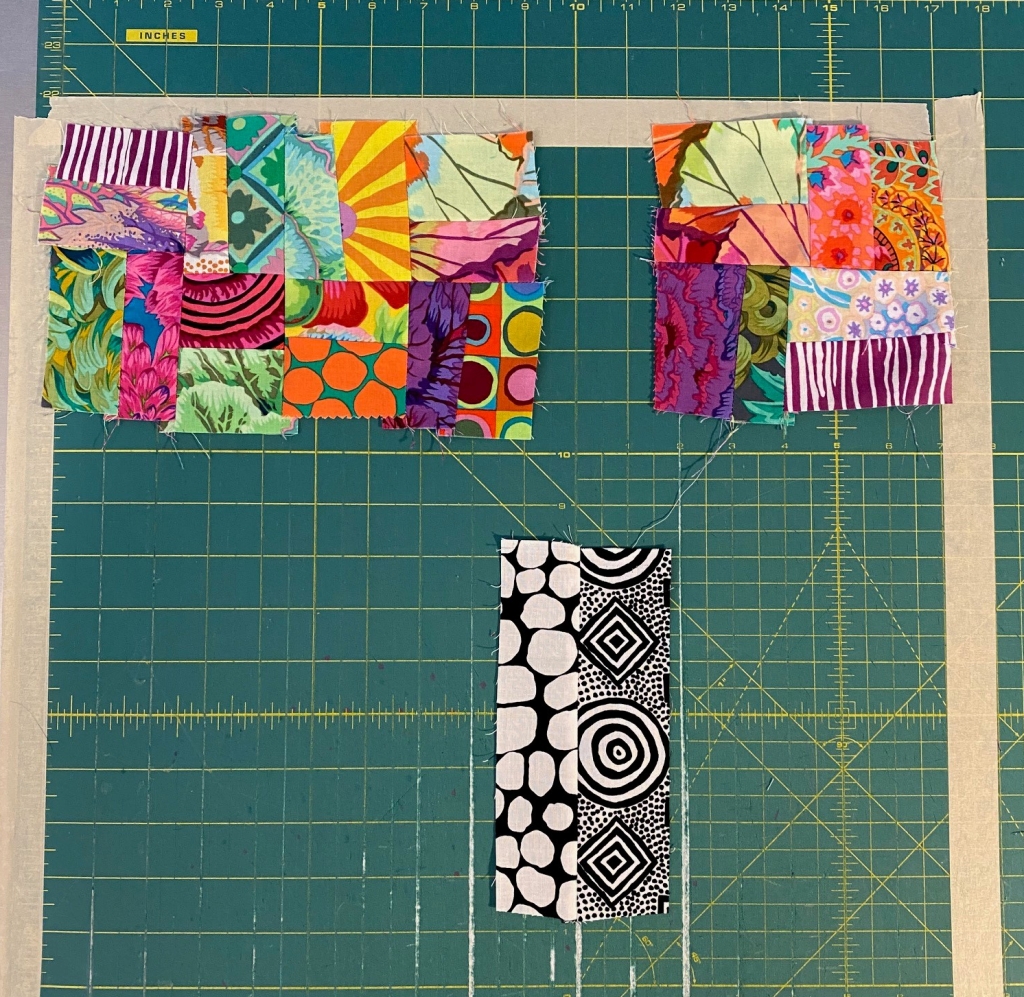
I had a choice to make on this first row. I could either add some crumb pieces to fill in that space, or I could make a little block to fill that space. I decided to use black and white KFC fabrics to fill that space.
When I eye balled these two strips to fill that space, I didn’t feel positive that I had enough width once I trimmed the blocks and sewed the seams.
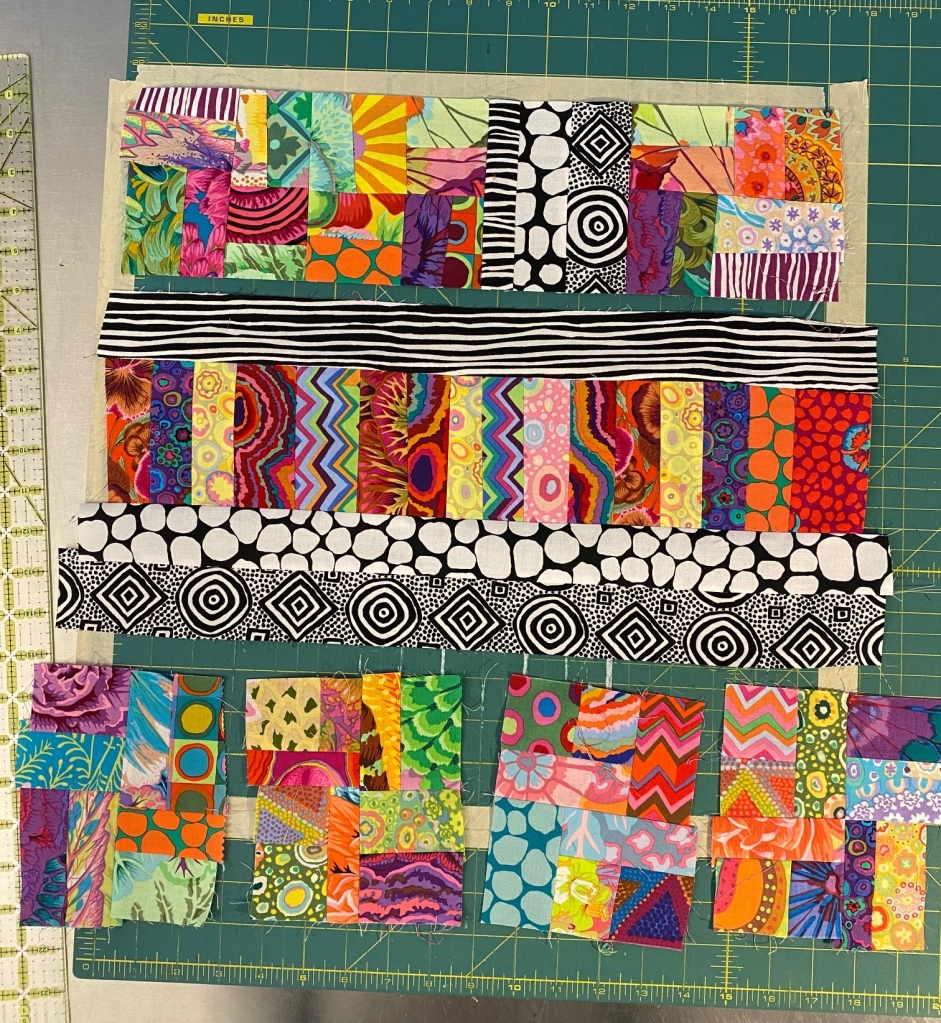
So I added another strip of black and white fabric to make that piece wider and it looks like we’re good to go now.
So I sewed it all together and It’s plenty wide now.
So I trimmed the bottom and top off straight and moved on to adding fabric to the bottom of this piece. I don’t trim the sides until I have this whole 17×17 piece put together.
I continued adding strips of fabric and crumb blocks, making those puzzle pieces and putting them in place… trying out different things as I went along.
Trying out different combos of fabric….
… and different arrangements.
And when I liked the arrangement, I sewed all the elements together and trimmed it to 17 inches square.
And that’s how I make my Frankenbag panels. With whatever blocks I decide to use in a panel, it’s all just a matter of making the pieces of the puzzle fit together.
Give it a try! This is really the fun part for me. Leave me a comment if you have any questions.
PLEASE DO NOT SHARE THIS TUTORIAL FOR COMMERCIAL/BUSINESS REASONS WITHOUT MY PERMISSION. CONTACT ME AT anne@agilejack1.com FOR PERMISSION.
(I’m really happy that a lot of people are making this bag! Since it’s free, when you post a photo of your bag on social media, please credit me, use the hashtag #frankenbag, and provide a link to this tutorial so others can find it.
Regarding selling bags you make from my tutorial… I’d rather that any sales are limited in number and are done locally and not through internet stores. Any sales should acknowledge my tutorial. Simply: Pattern by http://www.agilejack1.com. If you have questions about sales, please email me at anne@agilejack1.com. Thanks!!!)
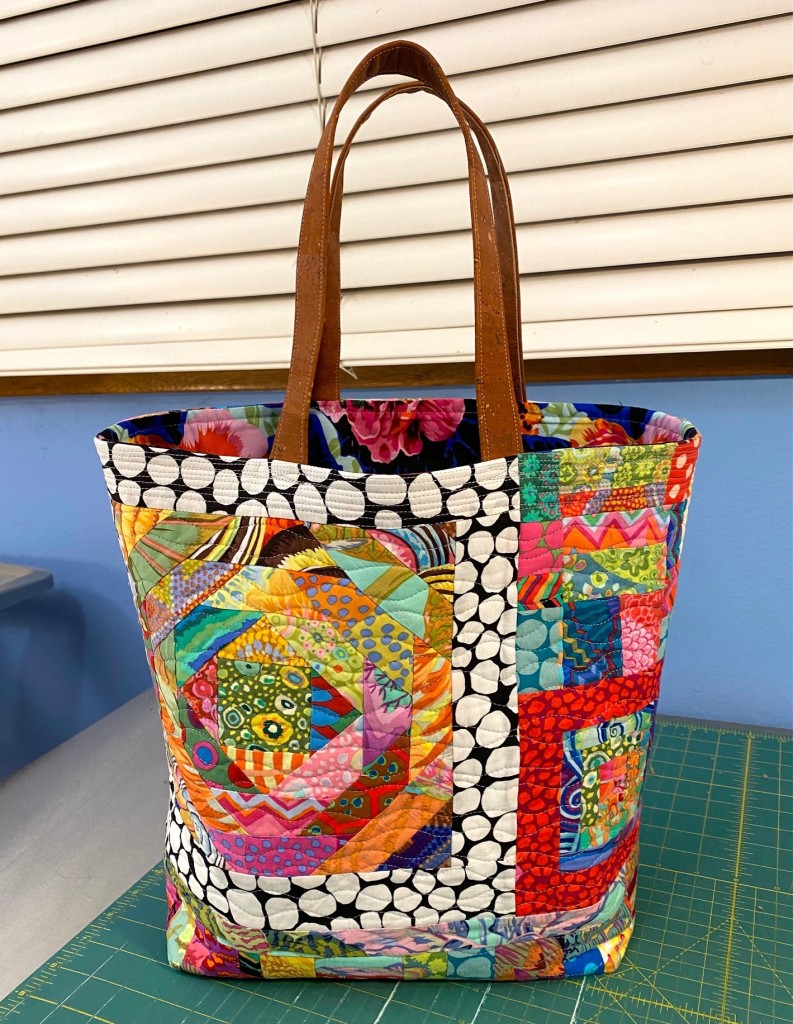
I had so much fun making that quilted bag last night that I decided to make another one. I decided to document how I made it and share it here so you can make one of your own.
I’m calling this my Frankenbag because it’s made from a lot of spare parts! I dug into my orphan KFC blocks and crumb blocks to incorporate them here.
I think I like this one better than the first one I made! It’s about 13 inches high and 15 inches wide at the top edge. It’s a generous bag, but not TOO big. And it has a nice deep gusset. It will hold a lot of stuff.
Let’s dig in and make one! And a note to you… I’m writing this assuming you know basic sewing and construction techniques. But hopefully it will work for sewers of all skill levels.
Please read through this entire post before starting because I’ve added notes, updates and tips as I’ve made more of these bags.
Scraps or fabric to make the front and back of your bag. I made mine with crumb quilting and orphan blocks. You can use any technique you want to make your scraps into a panel, or use blocks you already have. You could even cut up a quilt to make one. This is a good opportunity to try something new!
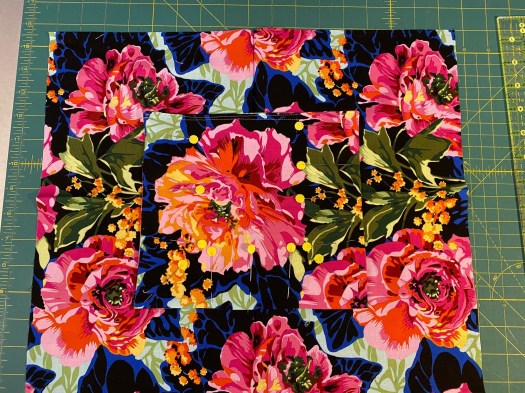
1/2 yard of fabric for the lining. I love a lining that does my pieced panel justice! A nice pop of color or print in a lining is so much fun! Don’t skimp on the lining!
1/2 yard of fabric for the backing for your quilt sandwich when you quilt the front. This can be essentially any fabric as it will be hidden inside the bag. It’s a great way to use up larger scraps or fabric that you can’t imagine what made you buy it five years ago.
1/2 yard of fusible fleece or batting. (I’m currently using Pellon TP971F)
Cork fabric that is large enough for you to cut 2 pieces at 3×18 inches each. For handles long enough to use as shoulder straps, you’ll need to cut your pieces 3×24 inches. (UPDATE: after I used the cork I had on hand, I had a difficult time finding cork that was the quality I wanted. So I switched to faux leather and am making the handles longer. I really like the faux leather much better than the cork. Scroll all the way to the bottom of this post for a link to the product I’m using and info on making the handles longer so they can be used for a shoulder bag.)
Make the Handles
Fold the cork fabric in thirds lengthwise and clip.
Stitch a line of top stitching along the long edge on each side of the handle.
Make the pieced panels for the front of the bag:
(Note: I used my time machine and went into the future and made a bit of a tutorial showing how I make these pieced panels. You can find it here.)
Make a pieced panel of your choice. I used crumb piecing and some orphan blocks, bordered them with fabric and combined them in a really random way. You can use blocks you have on hand, or make some new blocks for this. You can do improv piecing, paper piecing, anything that floats your boat. This tutorial is written for a 17×17 inch square panel.
If you want to do some crumb pieced blocks, check out my blog post that includes some info on how I make mine. Or go to Youtube and search for “crumb block tutorial” and you’ll get some good options.
These panels are really the fun part for me! It’s a great opportunity to make something that you’ve always wanted to try. Just make sure that yours end up 17 inches square.
For my Frankenbag, one panel was all crumb pieced and the other one included some orphan blocks with crumb piecing. Here’s both panels:
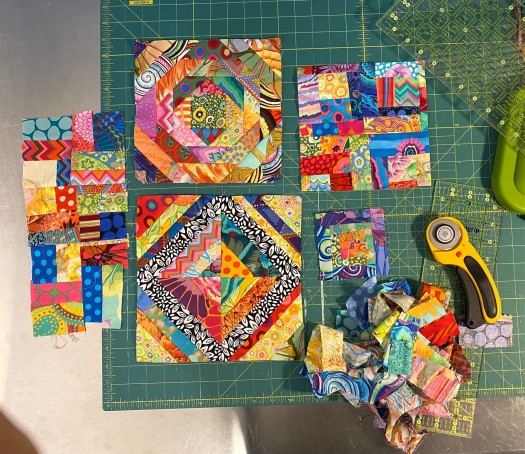
The panel on the right is all crumb piecing. The one on the left includes two orphan blocks. Here’s all the pieces I had available to use in this orphan panel:
I chose the pineapple block and the small log cabin block. I put the black and white jumble border on the larger pineapple block, and a red guinea flower border on the smaller log cabin block.
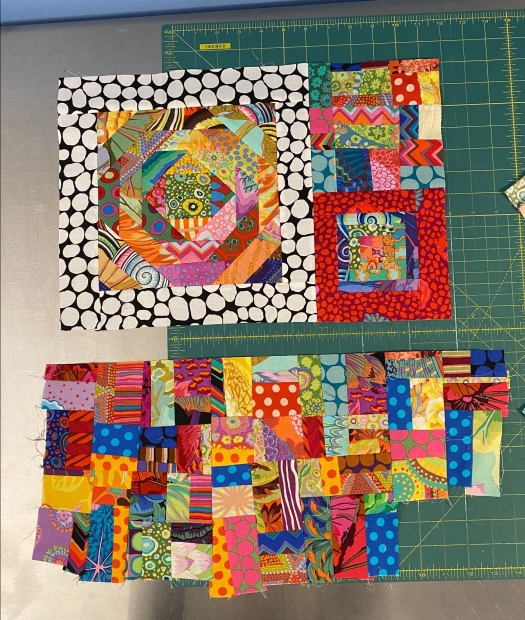
This picture shows part way through putting this panel together. The next step was to sew the crumb piece at the bottom to the top part. As I put these together I kept in mind that 17 inch square I needed and put these pieces together with that in mind.
Once it was all sewed together, I trimmed it to 17 inches square.
Quilt your pieced panels
I used fusible fleece for my bag, but you can use any batting you like. The fleece was cut to about 18×18 inches and fused to the back of the pieced panel. If you’re using fusible fleece, be careful when using your iron on this. Keep your iron on the panel fabric and don’t get too close to the edge and melt the glue exposed glue on the fleece.
Then I cut a 19×19 piece of the fabric for the back of the quilt sandwich. I used two batik fat quarters that I’ve had laying around forever. Remember, the print on this fabric doesn’t matter because it will all be hidden inside the bag. It just adds some stability to your quilting.
Make your quilt sandwich with the backing fabric first, then the fleece and panel on top. I like to have the backing a little bigger than the fleece/batting, and have the panel a little smaller. This helps make sure that things don’t shift away from the edge as you’re quilting and you can be confident that all of your quilting will have batting and backing behind it.
I used some spray basting to adhere the backing to the fleece.
Quilt your panel in any way you like. I used my walking foot and did some matchstick quilting on the top 1.5 inches of each panel, and then used wavy horizontal lines for the remainder of the panel.
Use your favorite method, or try something new! It’s just a 17×17 inch piece of fabric! Nothing to lose if you mess it up!
Once you get your two panels quilted, trim away the extra batting and backing. Keep these as close to 17×17 as you can.
Next, cut out a 2.5 inch square from the bottom corners of both panels. This will become the gusset which makes the bottom of the bag flat.
Attach the handles to the quilted panels
I actually did this after I sewed the side seams on my bag, but it would be easier to do this prior to sewing the sides together.
On the wrong side of the panel, locate and mark (on the wrong side) the center of the top edge of each panel. Then measure 3 inches over on each side of the center and mark with a pen.
For shoulder length straps, measure over 4 inches from the center line.
With the handles on the right side of the panel and the ends of the handles facing up, line up the handle inside the 3 inch mark (inside the 4 inch mark for longer handles). Leave about 1/4 inch of the handle edge sticking up beyond the top of the bag, Pin the handle securely in place. I use two pins.
Make sure your handle isn’t twisted. The same side of the handle should be against the panel on both sides. If you have the front side touching on one side and the back side on the other side, your handle will be twisted. Take some time to flip your handle up after you pin it to see if it looks right. I also put the two sides of the bag to make sure I have the handles placed the same on both sides. It’s a lot easier to fix it now than it would be after you stitch it!
Stitch the handles onto the panels. I just sew one long line from one handle to the next, making sure to go back and forth across each handle end a few times to reinforce it. Make sure that all of this stitching will be inside your final top stitching seam allowance so it won’t show.
Sew the sides and back of the panels
Put the two panels right sides together and pin the sides and bottom, and then sew along all three edges. I used a seam allowance of about 3/8 inches. You can use any seam allowance you like… quarter inch, or something larger. Just be sure to use the same seam allowance on all of the bag seams so your lining will fit the outside of the bag.
Press these seams open. I like the 3/8 inch seam allowance because it’ makes it easier to press these seams open. These panels are pretty thick, so pressing the seams open helps reduce bulk at the top of the bag.
Make the gussets
Push the side and bottom of the outside of the bag together until the side and bottom seams match and voila! You have a gussett! Make sure you have right sides together.
Line up the seams and pin the gusset. Sew it with the same seam allowance you’re using elsewhere. Be sure to back tack at the beginning and end, and be careful sewing over the seam allowances. It’s bulky and can be a needle breaker! Go slow!
Look at that beautiful gussett!
Make the lining and pocket
Take your half yard of lining fabric and cut the whole thing to 17 inches wide. Cut off the selvedge, cut a 17 inch square, and leave the section on the fold intact — this will become the pocket.
*******Lining update added 4/22/21*******
After making ten of these bags, I’ve found that the lining fits better if I cut it 16 & 3/4 inches wide and 16.5 inches high. The assembly is the same.
To make the pocket press the fabric to remove the fold. Fold the piece in half the other direction with right sides together.
Sew around three sides of this folded piece, leaving an opening large enough to turn the pocket right side out. Clip the corners and turn the pocket right side out. Gently push out all the corners and press the pocket, making sure to fold the seam allowances under at the opening. Topstitch across the top of the pocket. You get to choose the top! Your pocket should be close to square, or it may be a slight rectangle. Just decide which side you want to be the top.
Now cut a 2.5 inch square out of the bottom two corners of the lining pieces.
Take one piece of the lining and mark the center. Place the pocket on the right side of this fabric. Make sure it’s centered, and place it about 3 inches down from the top of the lining.
Pin it in place and stitch around the sides and bottom of the pocket. Back tack at the two top edges. (you can also sew an additional vertical line to divide the pocket, or make a thinner slot for a pen.)
Honestly, no one will ever know if your pocket is crooked, but you’ll feel better knowing it’s not on a slant.
Place the two lining pieces right sides together and pin. Sew the bottom seam and the two side seams, LEAVING A SIX INCH OPENING IN THE MIDDLE OF ONE SIDE SEAM. This is very important! This opening will allow you to turn the bag right side out after you attach the lining to the bag front. (It’s a good idea to press back the seam allowances on that opening now while the lining is flat. It will make closing it up later much easier.)
Press the seams open. Then make the gussets the same way you made the gussets on the outside of the bag.
Attach the lining to the bag front
You’re so close to being done!
Turn the bag front wrong side out and the lining right side out. Place the lining inside the bag. Your pieces should be right sides together at this point. Match and pin the side seams, and then pin all the way around the top edge of the bag, matching the top edges. (I have found that pinning with the pins facing the opposite direction from what the photo shows — with the points facing into the bag body — makes sewing this easier… I don’t get poked as much and it makes the pins easier to remove as I’m sewing.)
You can see the ends of the handles sticking up above the top of the bag. Don’t freak out. This is supposed to happen.
Your handles should be BETWEEN the outside of the bag and the lining. If they aren’t, stop now and figure out what the hell is going on!
Sew a seam all the way around the top of the bag. Back tack at the beginning and end of this seam. Be careful of all that bulk where the side seams meet and at the handles. . Speed kills at this point. And it eats needles!
Reach through the hole in the side of the lining and gently turn the bag right side out. Put your hand inside and push out all the bottom corners.
Line up the sides of the opening in the lining and pin it carefully. Stitch the opening closed very close to the edge, making sure you’re catching both sides.
Push the lining into the bag, smoothing and pushing the corners into the corners of the bag front.
Press the top of the bag so the seam is at the very top. Take a few minutes here to make sure this looks nice. This careful finishing makes a big difference in your bag.
Top stitch about 3/8 inch from the top of the bag. You can go back and forth at the handles again to reinforce them. it’s also a good idea to be mindful of all that bulk at this stage. Back tack at the beginning and end of this top stitching.
AND YOU’RE DONE!!! I hope you end up with a bag you love! I’d love to see a photo of your bag if you make this. You can email me at anne@agilejack1.com and when you post photos on social media, use the hashtag #frankenbag.
Leave me a comment if you have a question, or if you find an error.
NOTES ADDED ON 4-4-2021 TO ALTER THE HANDLES, and where to buy faux leather.
The first four Frankenbags I made had cork handles. And that was all the cork I had. So I went online and found some at Fabric.com. When it arrived I realized it was really thin and didn’t feel like it would hold up with use. So I went online and looked for other options.
On this border collie bag linked above I made the handles longer so they would comfortably go over my shoulder but they still work to carry with your hand. I altered the handle instructions included in this tutorial in two ways:
I cut the faux leather 3 inches wide and 24 inches long.
I marked four inches from the center of the bag to place the handles, rather than three inches.