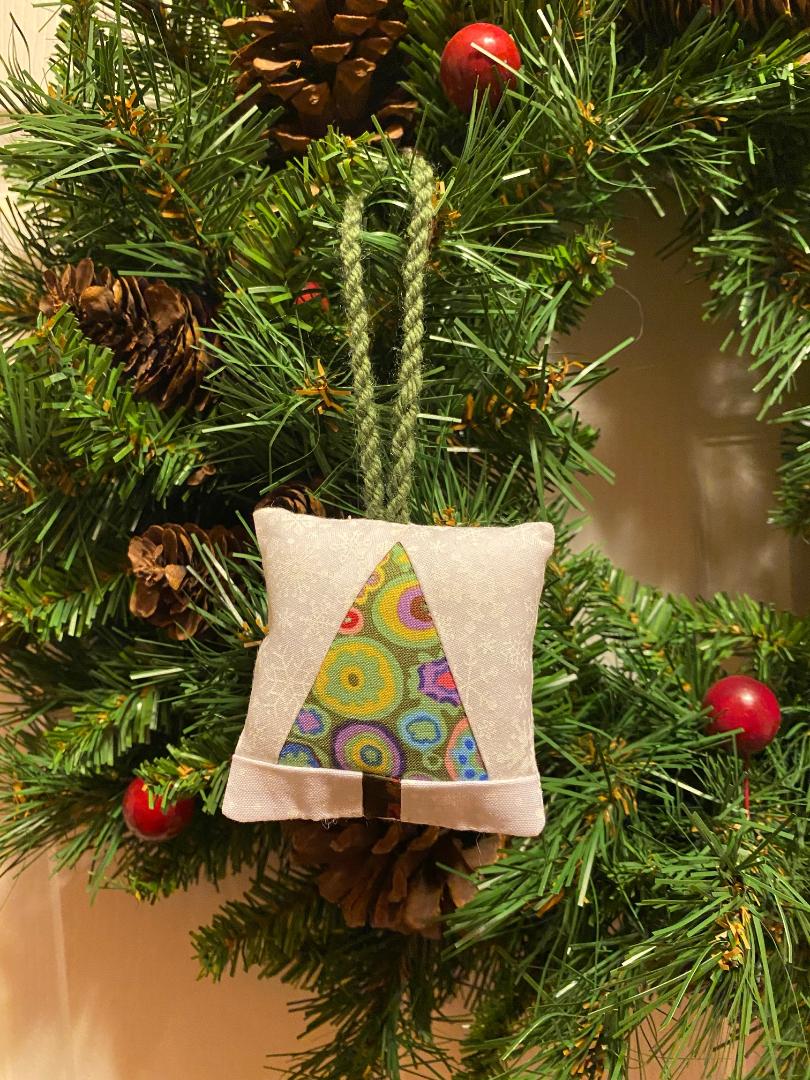
I was looking at a ridiculously large number of really cute little fabric ornaments on one of my Pinterest boards last night and decided that I wanted to figure out how to make my own take on them. Here’s one of the final ornaments that I made tonight after I worked out some kinks in the first few I made.

After work tonight I drew up a paper piecing template on graph paper and made copies. This “tutorial” assumes you know the basics of paper piecing. Here’s a tutorial on Youtube for basic paper piecing.

It measures 3 1/2 inches square before you add the 1/4 inch seam allowance. It’s a pretty simple bit of paper piecing.
Here’s a pdf of my template in case you want to give this a try.
The first thing I did was dig through some KFC and batik scraps for fabrics that would work for trees. That triangle in the middle of the template (#1) is where you put your tree fabric.

And I saw this brown batik that would work well for the tree trunks.
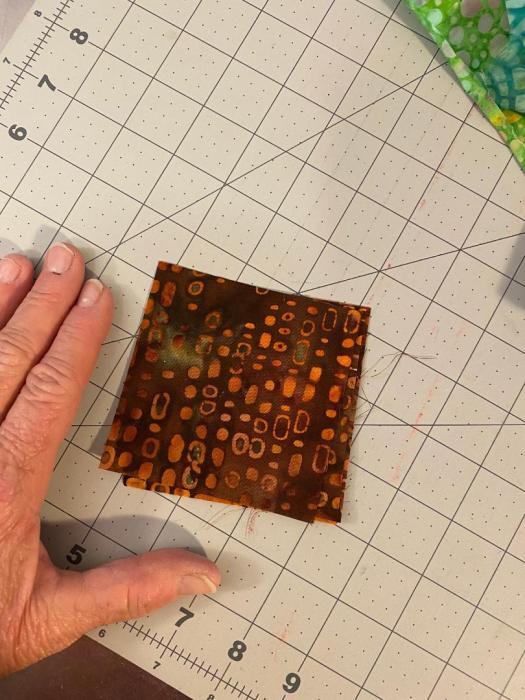
I also pulled out a bin of white-on-white fabrics to use for the background fabrics. There were two perfect ones — one with polka dots that look like a snow fall and one with cute little snow flakes.

Before I started working on the template I made the tree trunks. I cut strips of the brown fabric to 3/4 inch wide. Then I sewed this strip between two 2-inch wide strips of the background.

I pressed the seam allowances toward the white so there would be less bulk.
Then I trimmed off the edges and cut these strips into pieces.

I originally cut these to 3/4 inches wide, but after the first one I made, I adjusted these cuts to 1-1/4 inches wide. I did this so that I could make a 1/2 inch seam allowance on the bottom where I left the opening to stuff the ornament. A 1/2 inch seam allowance makes it easier to close the opening on the bottom and have it look nice. 1/4 inch just isn’t enough to work with.
Then I pieced the tree and two side background pieces. The tree trunk was sewn on last. You’ll want to make sure the tree trunk is centered. Ask me how I know this…

Good grief that’s annoying!
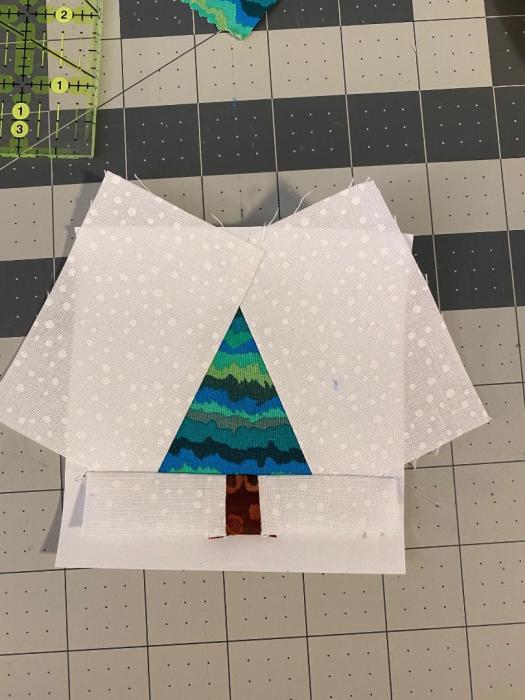
Once you’re at this stage you’ll want to trim this piece from the back, making sure to add a 1/4 inch seam allowance on the top and sides, and a full 1/2 inch seam allowance on the bottom. MY TEMPLATE DOES NOT INCLUDE THE SEAM ALLOWANCES. Just line up your ruler, leaving 1/4 inch of the ruler extending beyond the line on the template, and cut. Be sure to leave 1/2 inch on the bottom.
Next, I basted a length of thin ribbon to the top of this piece. You can position the two ends of the ribbon any way you’d like… right next to each other, or with some space. But get them as close to centered as you can. Make sure the line of basting will be inside your seam allowance so it won’t show from the outside.

You can also make this ribbon to the length you like. Six inches is a pretty good length. I made some too long and ended up knotting the top to shorten them.
I don’t have a lot of colors in that ribbon so I made the string on the first photo from yarn. You could use twine or yarn or whatever floats your boat.
Next, cut a solid piece of the background fabric to the same size as your little block. It should be 3.5 x 3.75 inches. It’s not a bad idea to measure your block to be sure. Pin these two pieces right sides together and stitch around the outside — 1/4 inch seam allowance on the top and sides, and about 1/2 inch seam allowance along the bottom. Be sure to leave an opening on the bottom so you can stuff the ornament with batting.
Here’s an image showing how I do the stitching.
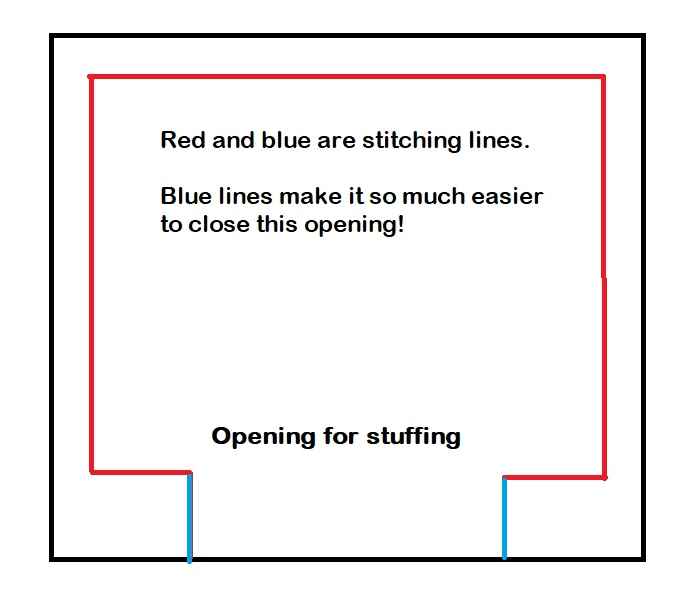
Those blue lines at the bottom are the best thing I’ve learned during the pandemic– they’re just little lines of stitching that go from the seam line out to the edge of the fabric. I first saw this technique on a mask pattern that I tried. Those little lines of stitching make it so much easier to close an opening. I use this technique any time I have to leave an opening and close it later.
When sewing, I start with the blue line on the lower left, stitch around the red line, and finish with the blue line on the lower right.
Once your block and back are stitched together, clip the corners, then gently turn it inside out. Carefully push out the corners, give it a press, making sure you carefully align and press the sides of the opening before stuffing.
Next, stuff it with some batting or fiber fill. You can stuff it as full as you like. Mine are moderately stuffed.
On the first few I made I just closed this opening by machine. But the fourth one I made was closed with hand stitching, and it turned out much nicer. It’s worth the three minutes it takes to close it by hand.
Here’s some more photos of the four that I made tonight. They would make nice little gifts or would be great tied on a package.
I will make more of these. I might do something fun with piecing the tree section to make it really interesting. Maybe some crumb piecing, or wonky strips. Maybe some quilting. Maybe some decorative stitching. All kinds of ideas!



I had a pretty productive Sunday. I made three feed bag tote bags for a friend who wants some for her husband for a holiday gift.


I also managed to get my holiday lights and decorations up in my front yard. I just love all the white lights.

I also whipped up four dog toys that will be mailed to a family member for their dog’s Christmas gifts.

My boys do not understand why they can’t play with these perfectly good toys.
I love your ornaments! Thank you for sharing the directions to making them. Could you share how you make your dog toys too?!
LikeLiked by 1 person
Maybe I’ll do a post on dog toys this weekend.
Anne
LikeLike
I was also going to ask about directions for the dog toys. I have made braided tug toys with fleece strips for my dog, but how do you add the tennis ball? Do you have to put a hole in a regular ball, or can you buy them with holes? The ornaments are great, too!
LikeLiked by 1 person
I use tennis balls that I get from a friend who plays tennis. I cut two 3/4 inch holes across from each other on the ball using utility scissors and then use a crochet hook to pull the fleece through. Leave enough length of unbraided fleece so you can tie a knot after threading it through the ball. Probably at least 8 inches. then trim off the fleece ends to be even. That’s it.
Anne
LikeLike
Thanks Anne for the tutorial. You took the time with everything else you do!
LikeLiked by 1 person
I like things to be efficient. that’s part of what I like about paper piecing.
Anne
LikeLike
Great photos, as usual! Thank you for the ornament tutorial-Would you share how yo make those fabulous dog toys?
LikeLiked by 1 person
I might do a post on the the dog toys this weekend.
Anne
LikeLike
Cute, cute little trees! Your friends are going to love those feedbags and dog toys! I love the Bender photo 🙂
LikeLiked by 1 person
You know, everyone who sees those feed bag totes wants some! I’m really glad they’re quick and easy to make… and that I have about 50 feed bags in my garage!
Anne
LikeLike
As always, love your projects! For a more rustic feel, burlap or unbleached muslin with twine hangers. Hoping I can make time to make a couple.
LikeLiked by 1 person
Oh yeah! All kinds of options! Have fun making some!
Anne
LikeLike
Thank you for the pdf. Loved seeing all your creations, your house decorations and the wee chappies being teased with those toys 🙂
LikeLiked by 1 person
Those poor dogs. they just didn’t understand why they those toys weren’t for them!
Anne
LikeLiked by 1 person
Thank you for sharing. Great instructions.
LikeLiked by 1 person
thanks for reading!
Anne
LikeLike
thank you for this….and for all your posts which are so full of beautiful things and inspiration (including the sweet doggies)
LikeLiked by 1 person
thanks for reading! I’ve had fun sharing what I make with others.
Anne
LikeLike
Love the sweet ornaments! Could you share instru tons for the doggie toys?
LikeLiked by 1 person
Maybe I’ll do a post about dog toys this weekend.
Anne
LikeLike
Such sweet little Christmas trees! And I do love your totes – I hope to make some with our chicken feed bags soon. Those doggy toys will be loved by their new owners! Jan in MA
LikeLiked by 1 person
Thanks! You should make some feed bag totes. All my friends who see them want some. They’re really fun and I can whip one up in about 20 minutes.
Anne
LikeLike
Timing is everything! I spent the day today trying to make a stocking ornament and the directions were faulty. These trees will do the job nicely instead! Thanks. And I, too would like dog toys instructions for my grand dog.
LikeLiked by 1 person
Maybe I’ll do a post about dog toys this weekend.
Anne
LikeLike
I might do a post about dog toys this weekend.
Anne
LikeLike