
My friend and I decided to head out to McMinnville, Oregon, today to visit Boersma’s Sewing Center. They sell and service sewing machines and have a lovely quilt shop. I wish I had taken photos because they have a TON of quilts displayed in the store and in their windows that provide all kinds of ideas for upcoming projects. I love quilt stores that are pretty and give you all kinds of ideas and inspiration.
I only bought a few light gray batiks and a couple of Australian Aboriginal prints to replace some that I used recently. My friend bought a lot more fabric than I did! She’s been out-pacing me in the fabric buying frenzy this visit.
I did buy a pattern for a leaf quilt.

I had seen one very similar to this recently that was made from bright Kaffe Fassett Collective fabrics on an indigo background and I just loved it. But that pattern requires a $30 special ruler to make the blocks. The pattern I bought today has paper piecing templates and doesn’t require a ruler. I will probably use the paper piecing method to make blocks but will arrange them in a looser manner than in this pattern. This feels a little tight and restricted. The other one feels more airy and has more movement. So if I ever actually do make this quilt I will mix it up and not follow the pattern exactly to get the look and feel that I like.
As we were leaving town to head back to Portland we stopped at a convenience store and bought some potato chips like we always do. Then we hit the back roads and wandered our way back home through beautiful rolling hills dotted with farms, wineries and small towns.
Once we got home we set a timer for 30 minutes to be lazy and then we forced ourselves to get our butts moving and took my boys out for a nice walk. They had been in the car during our trip to McMinnville so were very happy to stretch their legs and get some fresh air.
After a dinner of some home made chili verde we dug in and started sewing the rows of my friend’s quilt together.
The first thing we had to do was put the sashing onto the bottom row blocks. You can check out this blog post to see how we did that.
We sort of switched rolls this evening and I did all the pinning and most of the pressing and my friend sewed.
I tried to keep everything in the right order as I pinned.
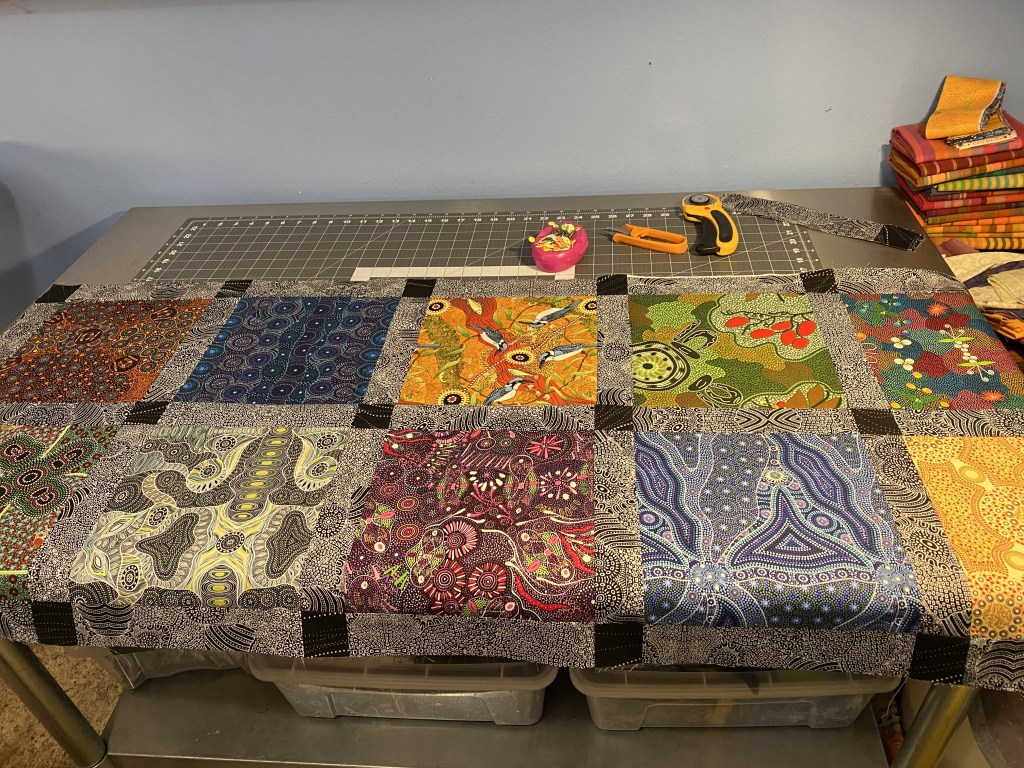
Here’s Linda pressing two completed rows.

Once we got the sashing pieces sewn onto the bottom row this went really fast. And in no time we had four rows of blocks all sewn together and pressed.

Once this completed section was back up on the design wall we felt pretty good with finishing half the top and stopped there for the evening.

I just love the way blocks look when they’re sewn together. So orderly, so crisp, just lovely!

So that leaves just four rows for us to finish tomorrow. I’m thinking we might dig in and finish this quilt top first thing tomorrow. Then maybe we’ll find an adventure for the day.
Or…
We were just looking at the weather and the tides and think we might actually head to the coast tomorrow. We had decided to go later this week because of the weather, but now the weather tomorrow looks like it’s going to be good… so much indecision. We will decide tomorrow morning if we’re going to the coast or if we’ll go later this week.
Bender and Rico are going to be so excited to have a visit to the beach!!! Don’t tell them because they will be so hard to live with if. we end up not going!

I love the black that is being used between the blocks. Is that a Kaffe fabric?
LikeLike
It’s an Australian Aboriginal print by M&S Textiles called Water Hole. it’s a fantastic fabric!
Anne
LikeLike
oh boy beach day! the boys will love it. and more fabric shopping I’m sure. is there a Kaffe store along the way?
LikeLike
There is a lovely little quilt store in Cannon Beach. They have a fantastic selection of batiks, and a handful of Kaffe fabrics and a bunch of other stuff. Very friendly staff. I always stop there when I go to the coast. Unfortunately, a couple other stores we used to love to go to have closed.
Anne
LikeLike
Love this quilt! I am struggling with a design wall holding my blocks, what do you use on your wall? I can’t wait for you to start your new leaf pattern quilt, that block is on my to do list!
LikeLike
I have a double retractible design wall that I purchased many years ago. It hangs over my closet door. The fabric is plastic backed heavy flannel. It works well.
Anne
LikeLike
Great way to spend time with a quilting buddy. This quilt is evolving rather quickly. Can’t go wrong with Aboruginal fabrics. I’m sure you have a tutorial on creating this pattern with the sashing strips and cornerstones. Where may I find it?
LikeLike
I never made a tutorial. it’s just 9 inch squares with 2 inch sashing. In a blog post earlier this week I linked to an old post that showed how I make my sashing with cornerstones efficiently and quickly. Not really much to write a tutorial on!!!
Anne
LikeLike
just beautiful!!😻 yes, go to the beach 🏖️ 🥰
LikeLike
Well, the beach isn’t happening today. Weather isn’t great. We’ll go later this week.
Anne
LikeLike
Wow! That aboriginal quilt has that Wow factor 🥰. I hope y’all get to go to the beach today. I miss the coast so much. I was revisiting your zippered Franken bag tutorial- it seems I can’t get some of the pictures to show up. I will try my laptop. Maybe my phone is the issue. Looking forward to some beach pictures ♥️
LikeLiked by 1 person
the tutorial would be much better on a full size screen. And the issue with your photos could be your email provider or a not great connection.
Anne
LikeLike
Wow! Beautiful aboriginal quilt!
LikeLiked by 1 person
thanks! it’s a tried and true way to use the Aboriginal fabrics. I’ve made two of these. So this one is #3 and they are all lovely… the same yet completely different with different fabrics.
Anne
LikeLike
I love all the patterns and colors in your friend’s quilt, but I especially love the grey sashing. It really sets the fabrics off without taking over at all. Have fun on your adventurers and eat a few chips for me. : )
LikeLiked by 1 person
that sashing is actually black with white on it, but there’s so much white that it reads gray. it’s a really lovely fabric !
Anne
LikeLike
Hello! new member here.I love your choice of fabrics as they are my choices too, but you are so much more creative in their lacment. i already learned a few new things, so will definitely keep reading.
thanks
Kathleen S.
LikeLiked by 1 person
I just kind of wing it and see if it works! That’s my terribly complicated method!!!
Thanks for reading!
Anne
LikeLike
I appreciate that you have started including shop names in reference to your fabric purchases. I live near Portland and it’s nice to come across new (local) shops. And as usual your quilts are amazing!
LikeLiked by 1 person
I hesitate to list shop names because I feel like I’m giving free promotion and testimonials. It just makes me uneasy. But people always ask. So…
Thanks for reading!
Anne
LikeLike
Is the other leaf quilt “Third Weekend in October”? That one caught my eye, and it didn’t say anything about a ruler. (An expensive, special-purpose ruler for one quilt is a bummer!)
LikeLiked by 1 person
Oh no. I’ve seen so many people commenting on what a beast that quilt is I’d never attempt it. It’s sounds like a nightmare!
Anne
LikeLike
Thank you. I didn’t know about those comments. I guess I’ll look for a different one!
The pic of Autumn Leaves isn’t doing it for me. Perhaps I should try a test block with a background that’s a mélange of subtler squares/rectangles. Then again, I can just wait and get some inspo from your version! 😉
LikeLiked by 1 person
the pattern I like is Wind Blown by Christine Quilts. I actually broke down and bought it tonight. I’ll just have to make the blocks without that ridiculously expensive ruler!
Anne
LikeLike
That Windblown pattern is lovely! I have a set of fall-colored fabrics just waiting to make a quilt for my neighbor and this is perfect. I am ordering this pattern today!
Since I don’t have the pattern yet, I can’t be sure. But it looks like that ruler only makes the center tip of the leaf. Once you get the pattern, you can check that. If that is the case, you can hand draw the kitty corner design – in the 3 sizes needed – on foundation paper. It’s just a square the same size as the adjoining pair of rectangles with two straight lines! Why in the world would you pay $30 when it’s that simple? Egads and Harrumph!
… I ordered the silly ruler. 😉
LikeLike
I think you’re right. There are ways to make that block without the ruler. I did not buy the ruler. I will probably doing exactly as you suggested… drawing my own paper piecing templates instead.
Anne
LikeLike
I forgot to mention I just finished a FPP quilt (All Sorts Quilt with Eclectica fabrics combined with blacks and a spotted cream). I used a glue stick instead of pins. I’ve done this with two quilts now and I highly recommend it. It’s faster than pinning and holds really well. (I can’t/won’t wait for the fairly fast-drying glue to dry, but my needle doesn’t get gummed up.) And my fingers no longer look like I’m a volunteer glucose device tester.
The only trick to it is to keep the glue within the seam allowance. If you apply it outside the seam allowance, it’s not a disaster. However, you want to take care to pull the fabric layers apart to the seam before you press and trim for the next piece.
LikeLike
Are you using glue to sew the seams, or to do the FPP?
Anne
LikeLike
I’m using it to hold the pieces in place until I sew the seam. Since FPP seams are always pressed out rather than open, the glue within the seam allowance is not an issue.
LikeLiked by 1 person