Contact me at anne@agilejack1.com
I'm a long-time fundraiser for public media. I'm a news hound. I think politics is fascinating and horrifying at the same time. I love my dogs more than I can tell you. I love the challenge of learning and making new things. My favorite part of a new project is the planning and learning! I'm not afraid to fail! I LOVE color!
You might not know this about me, but I tend to go on creative jags. I find a new project that is fun and I get completely obsessed with it. And when I’m obsessed, I tend to think I want to make whatever I’m making forever.
I once made a little fabric wallet that had one snap on the closure. Instead of buying a package of five snaps. I went out and bought at least 50 snaps in various colors because I was sure I would need them at some time. I think I made five of those little wallets. And I’ve never used another snap.
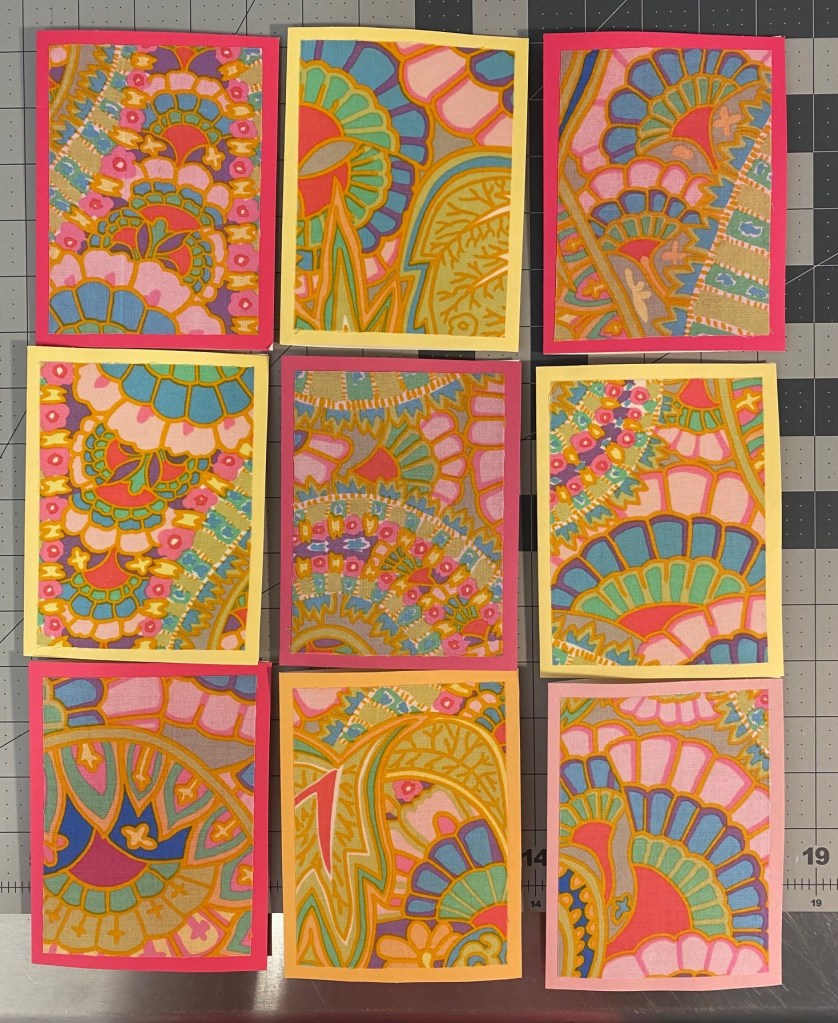
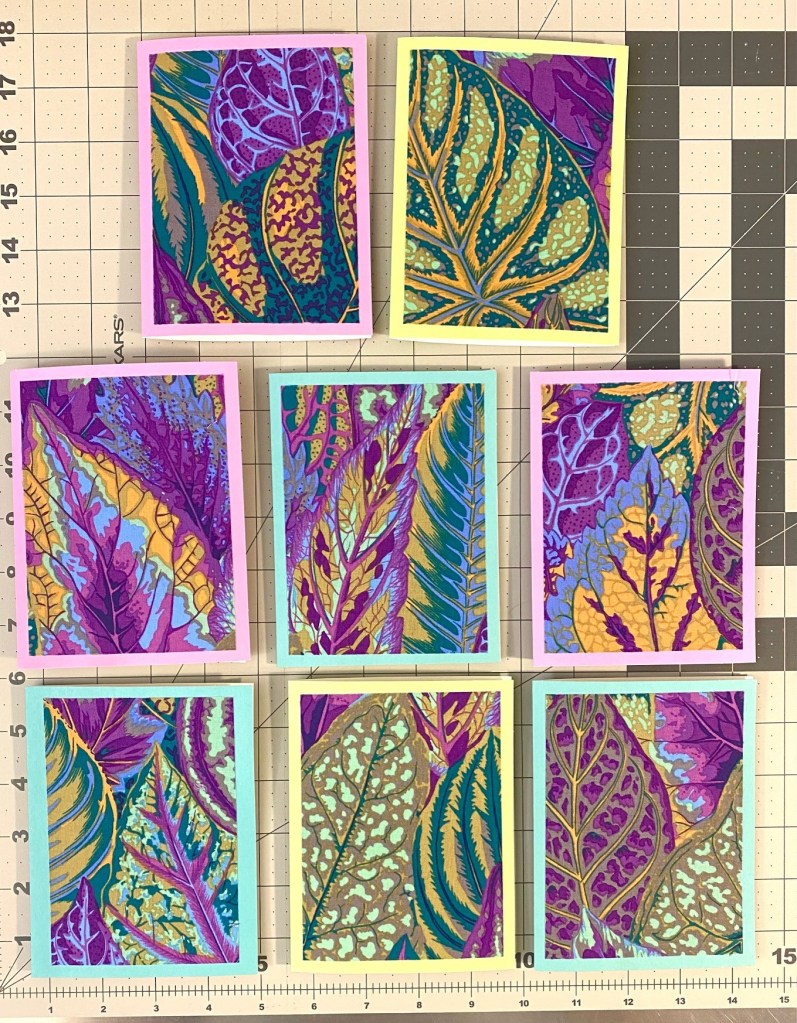
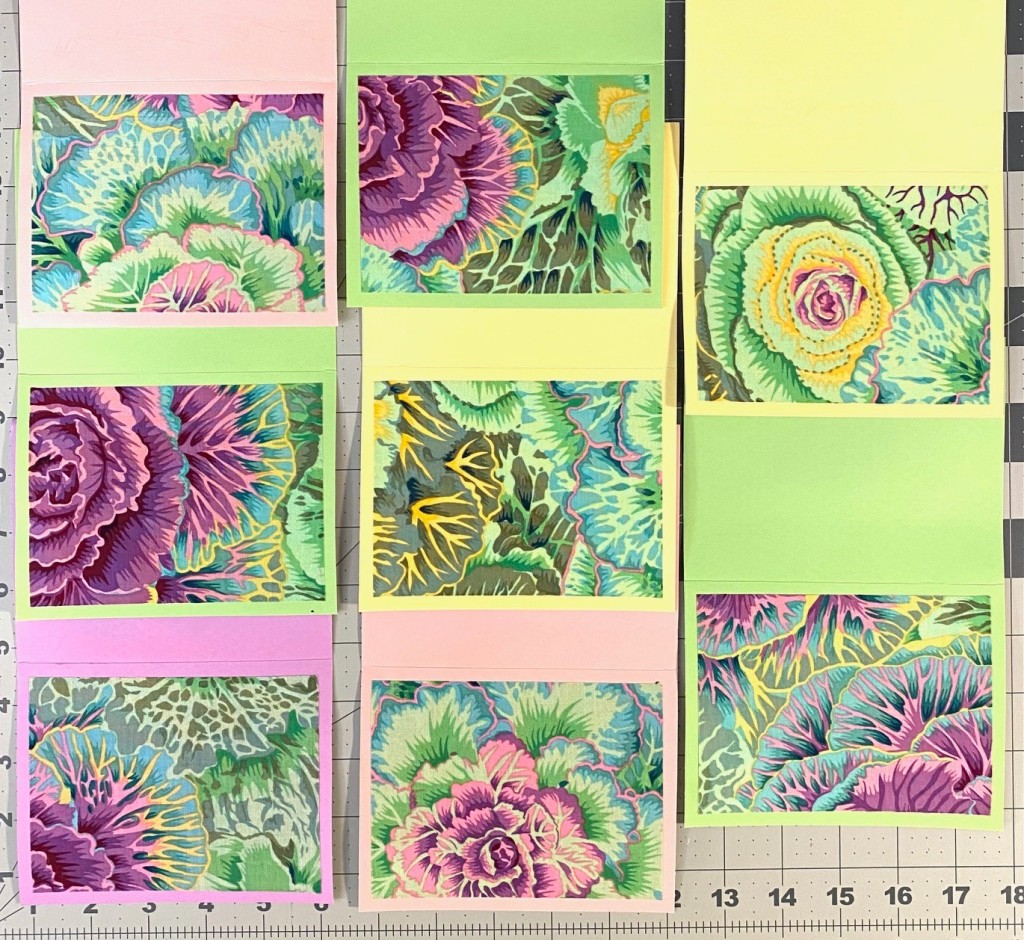
Right now, I’m on a fabric greeting card jag. Over the last few nights I’ve adhered a piece of beautiful KFC fabric to around 120 colored cards that I bought a few years ago. I finished up the last 30 cards tonight.
That’s all 120 or so cards. I need to count them more accurately.
But regardless of how many there are, they are really amazingly pretty for something so simple.
Here’s the last few sets that I made this week.
At the end, I wound up with about 20 blank cards that were pink, yellow and orange. So I dug into my stash and found a piece of fabric that worked with those colors: Kaffe’s Belle Epoch in yellow. Look how different all these cards are! It’s so amazing!
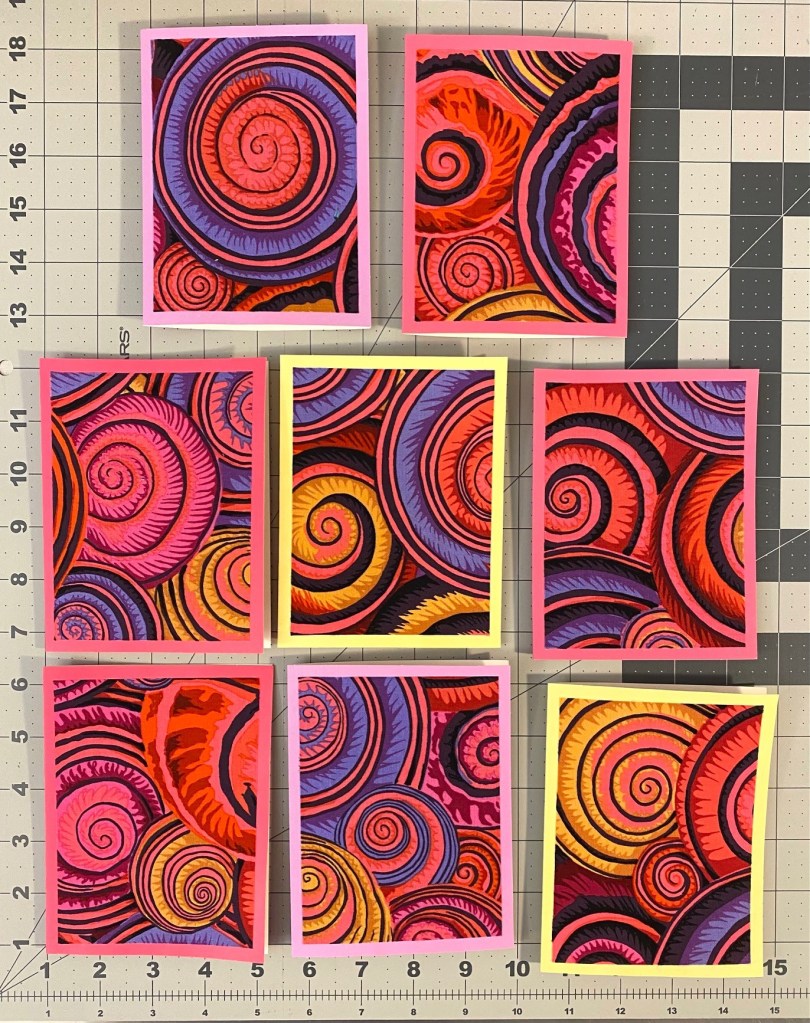
Here are the cards I made last night.
I just love them! Now I do need to get an accurate count so I can divide these all up into sets and get them into packages.
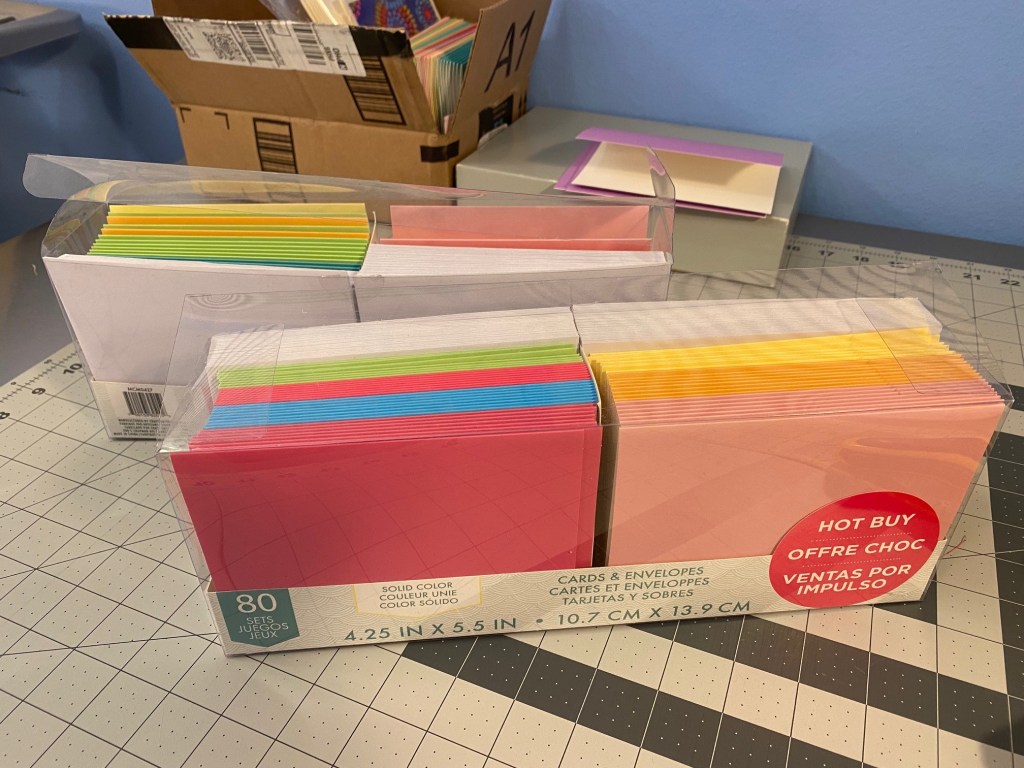
So, true to how I operate when I’m on a jag, I was sure I would need many more blank cards so I did some online shopping and had 300 more cards delivered.
I ordered 100 blank white cards and envelopes, 100 blank craft cards and envelopes, and 100 photo frame cards with envelopes.
And as I was cleaning out my sewing room, I found a bunch of blank off white cards that I’ve had for a while.
My quick math in my head tells me that I have around 400 blank cards. That should be enough to satisfy my jag.
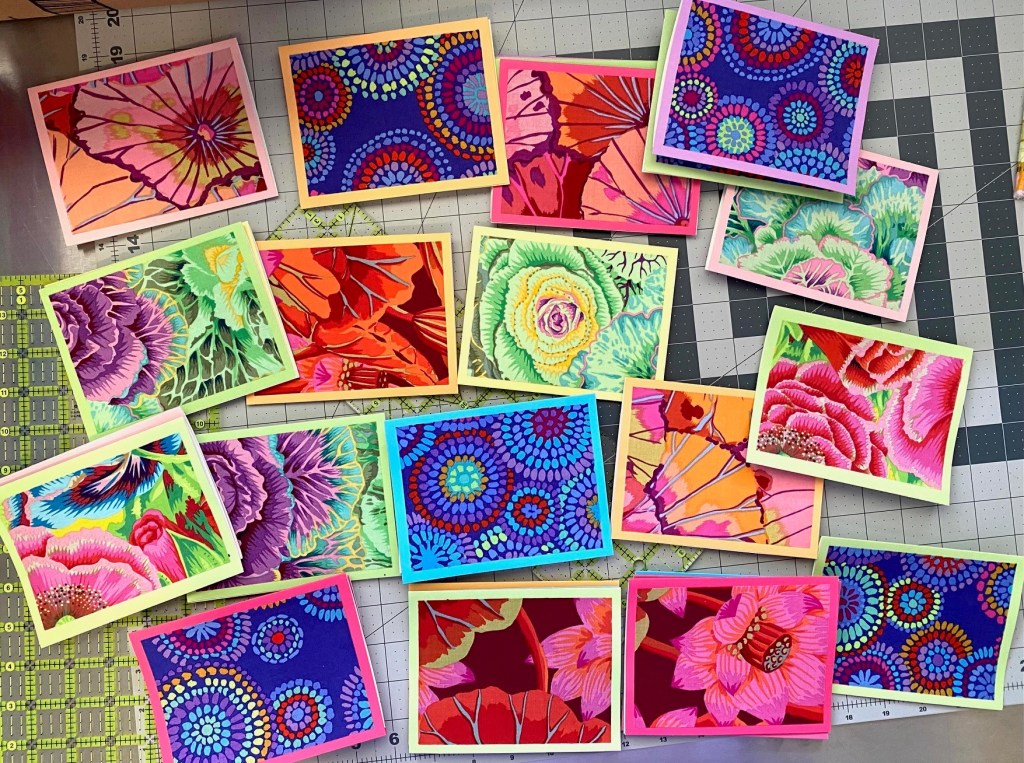
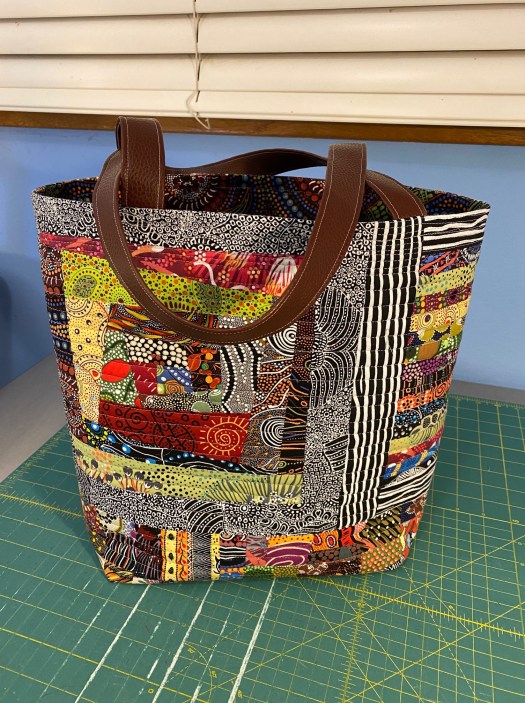
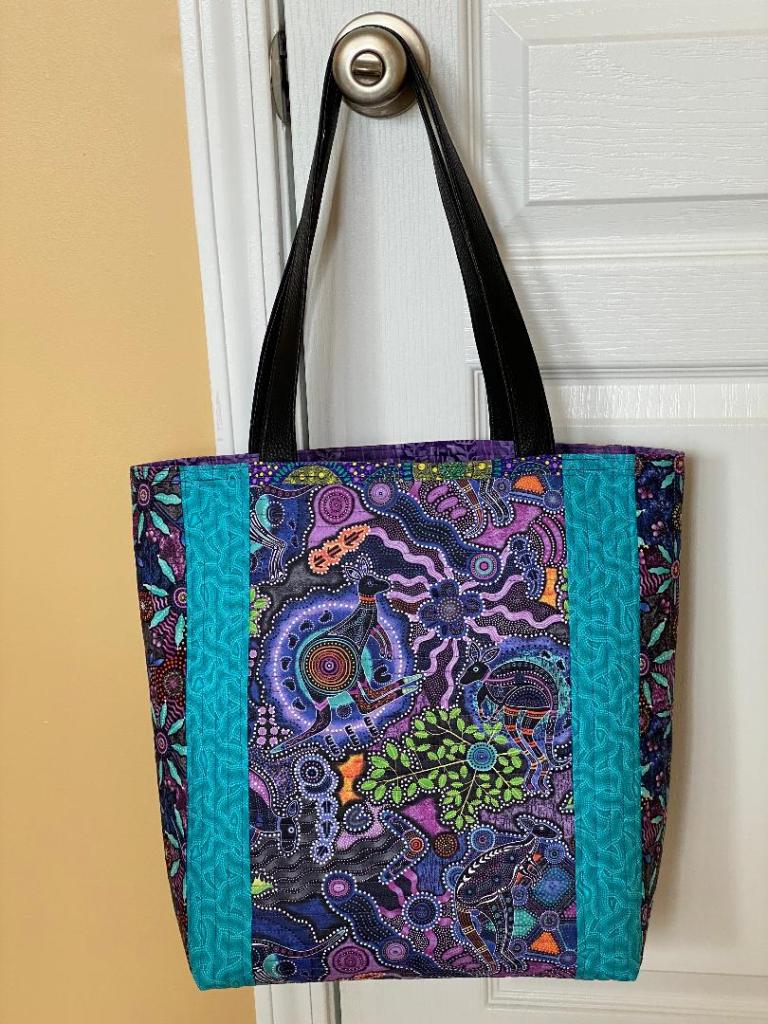
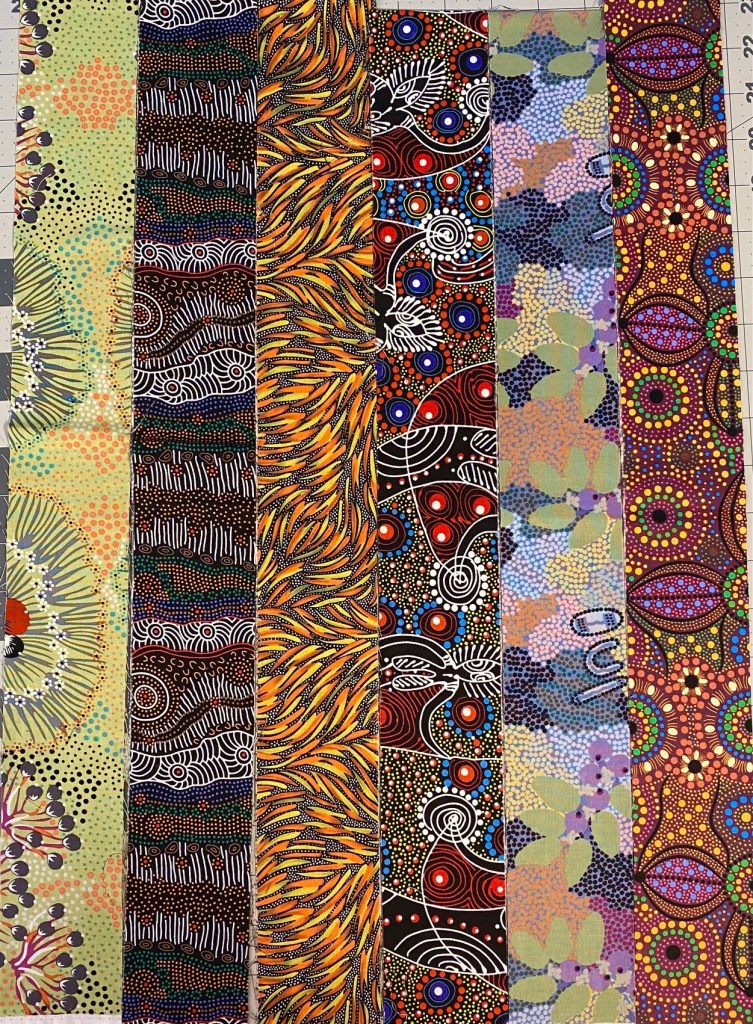
I did actually buy the craft cards because I was thinking they might look really cool with some Aboriginal fabrics.
But not all my Aboriginal scraps will look good on those brown envelopes. So I’m guessing you’ll see some of those fantastic fabrics on white envelopes. I’ll probably whip up a few tomorrow night.
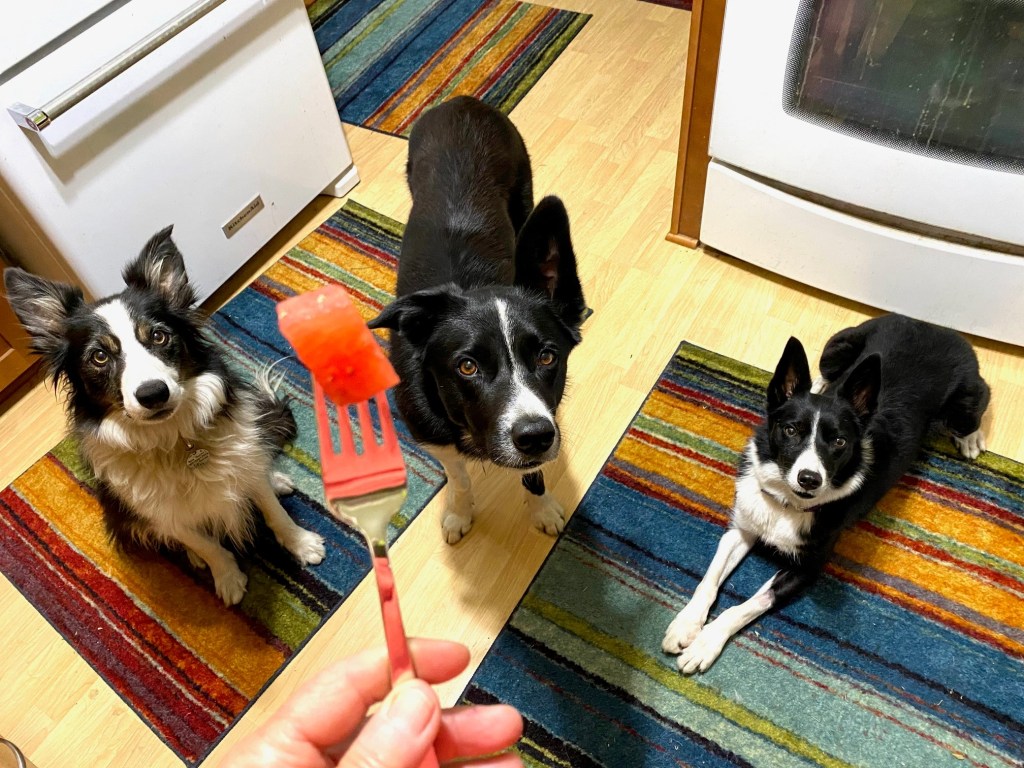
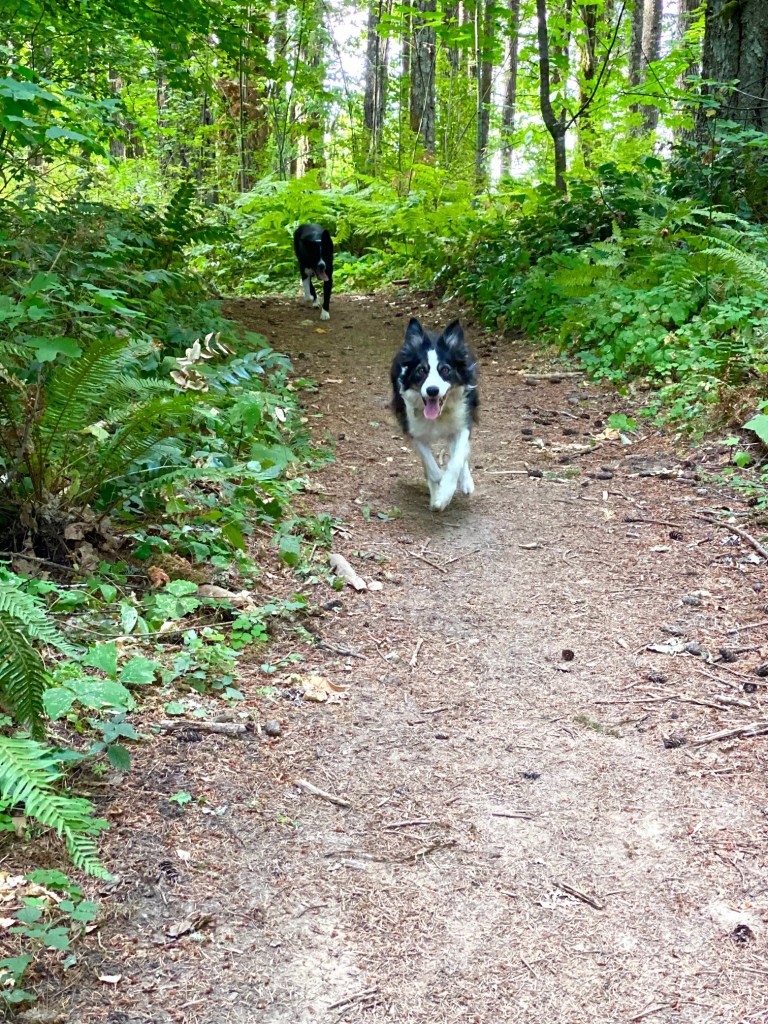
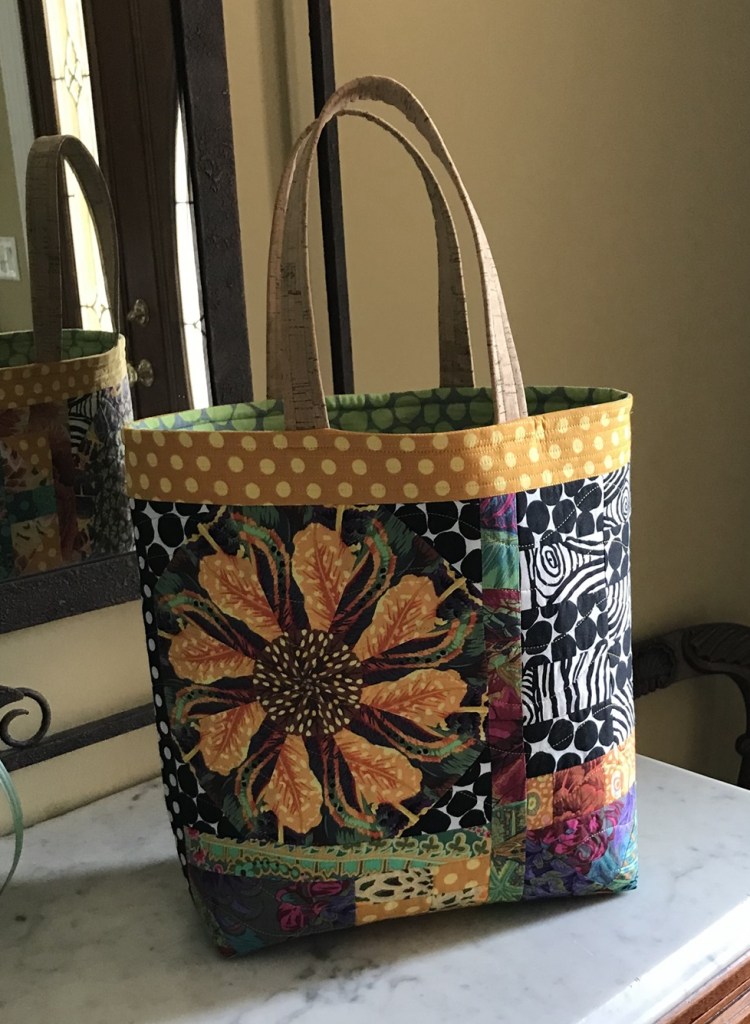
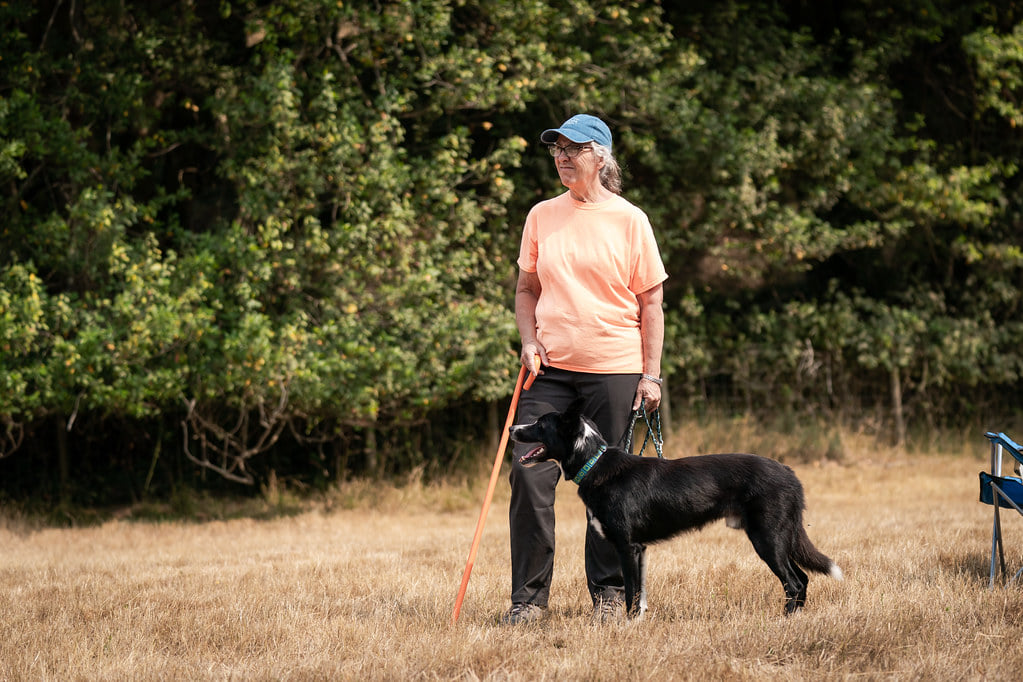
We have a little pupper visiting this week. My friend’s dog Jolene is keeping my boys entertained while her people go on a driving vacation around Oregon for a week.
Jolene is a teeny tiny border collie and is a very nicely trained sheep dog. She looks like a chihuahua next to Rico! She gets along amazingly well with my boys since they do know each other quite well. They all enjoyed some watermelon after dinner.
Jolene has been joining us for our walks and she has blended in really well. She’s a good walker and, for the most part, we manage to stay pretty untangled… although the three leashes do end up braided as we walk.
I’m on a bit of a greeting card jag. I’ve made 45 4×5 1/2 inch cards in the last few days.
I had purchased these blank cards a few years ago thinking I would paint some designs on them. I lost interest in that project pretty quickly so I had a lot of cards left over — two packages of 80 cards each!
I did paint a few cards initially, b ut not very many and I have around 80 cards left. I’ll probably make a few more of these. I plan to package them in sets and give some as gifts and probably sell a few.
I just love the way these KFC fabrics cut up into smaller pieces. Each card is unique.
It’s interesting to see how each fabric looks so different on different colors of cards.
I love that spiral shells fabric in that color way. It gives me chills!
And this coleus. Ooh. It’s like a cold and deep lake!
These cards are really quick and easy to make. I’m using up scraps and am adhering the fabric to the cards using Heat and Bond. I cut the fabric so that I’ll have a 1/4 inch border on each card. So if the card is 4×5, I cut the fabric to 3.5×4.5. I had purchased the medium weight Heat and Bond to make my sea glass wall hanging. I thought it was too thick and stiff for that project so purchased some light weight. This is a good way to use that up.
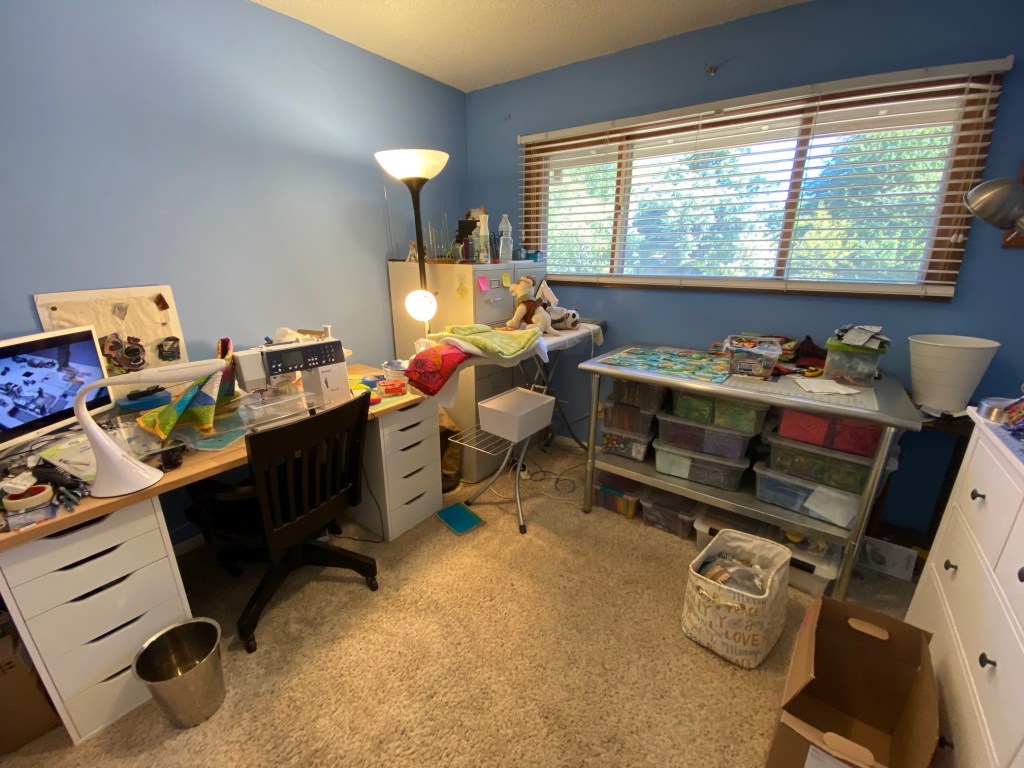
The final thing I did during my vacation was to organize and clean my sewing room. My neighbor is moving and has been getting rid of a lot of stuff. I’ve snagged a couple of storage pieces that helped in this organization project.
I’ve been wanting to clean out the closet in this room for a long time. It’s been full of boxes that I brought here when I moved 11.5 years ago. It’s been bothering me that I haven’t been able to use that closet for my sewing supplies.
So when my neighbor offered me a large stainless steal shelf unit, I jumped on it. I moved some stuff from a smaller shelf in the garage and put it on this larger shelf and got some other stuff up off the garage floor. That freed up the smaller garage shelf so that is now holding all of these boxes …
The next thing I snagged from my neighbor was an Ikea stacked wire drawer unit. And then I moved the same smaller unit from the closet in my guest room.
These drawer units are holding quilt tops, all my interfacing products, some blocks for quilts that are in progress, and some sets of fabrics that I’ve set aside for eventual quilts.
With this closet freed up I’ve been able to get a lot of stuff up off the floor and off the counter tops.
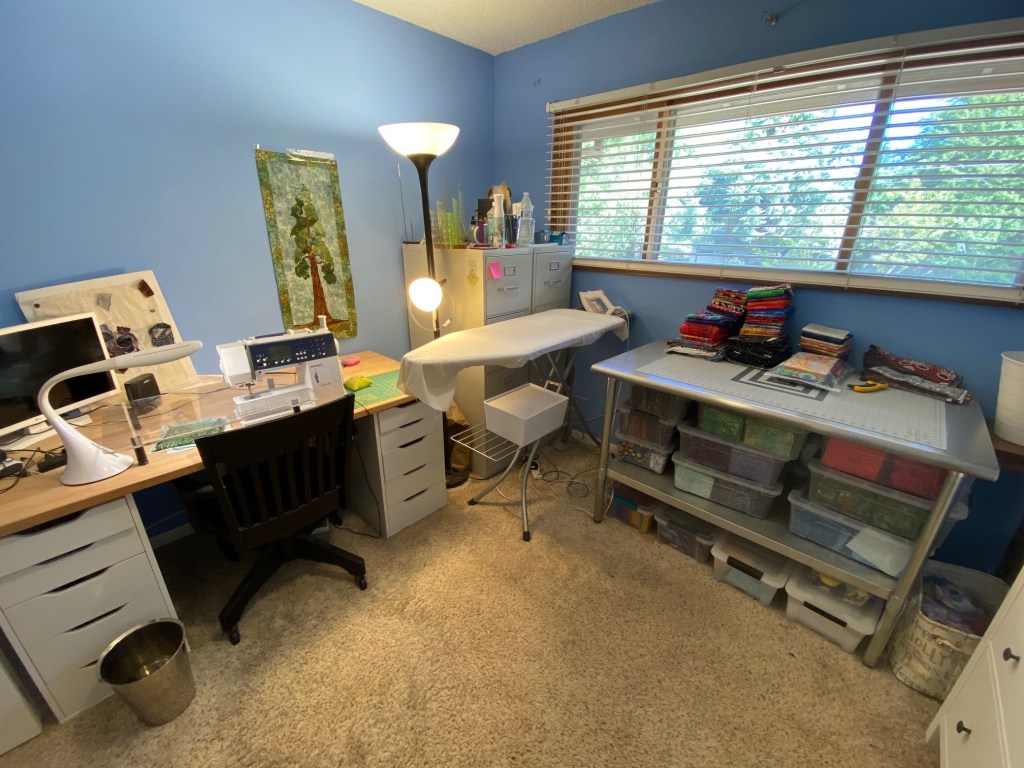
I also cleaned off my sewing table, my chest of drawers and my cutting table. Here are some before and after photos…
This chest of drawers is full of fabric. Mostly KFC fabrics. It feels so good to have all that crap put away!
Here’s the sewing table and cutting table.
M cutting table is a stainless steel restaurant counter. It was such a great buy. I’ve gotten so much use out of that. The bins underneath hold mostly batiks, with a couple bins of Aboriginal fabrics and some odds and ends.
It feels so good to have this room cleaned and organized. I actually feel like I want to be in there.
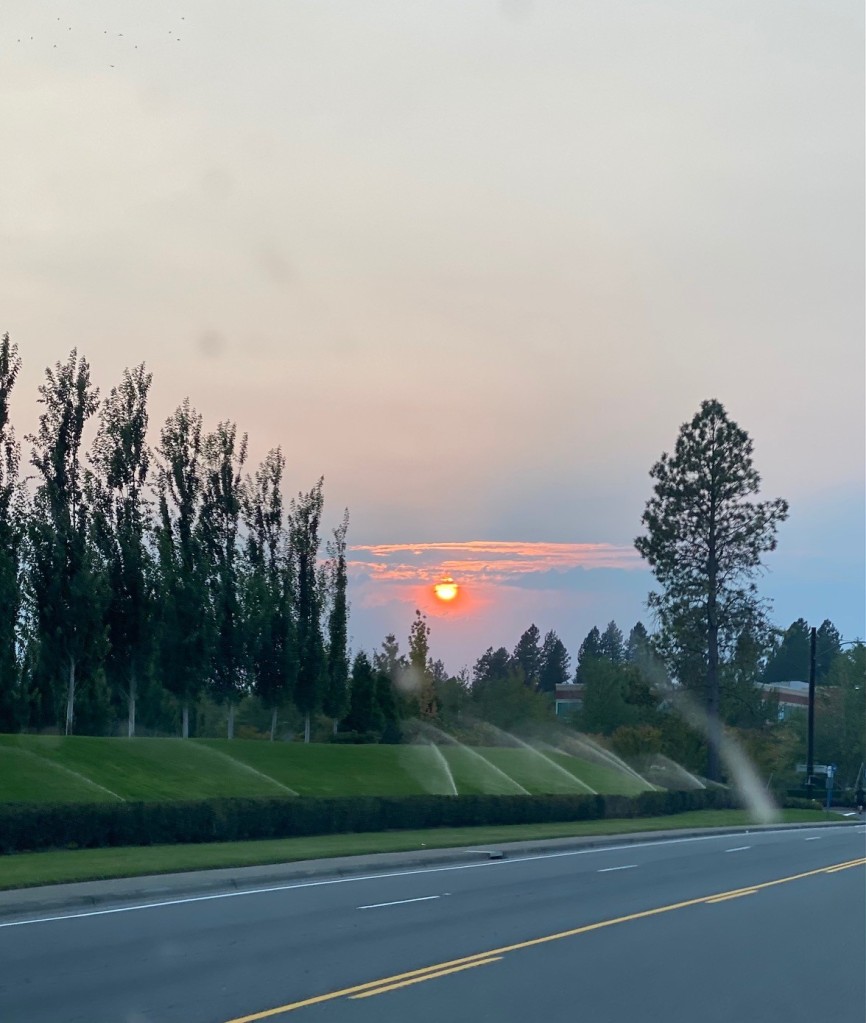
After two weeks of vacation, the boys are wondering why we’re spending so much time at home. We joined some friends in Oregon City last night for some dog agility and saw this amazing sunset!
Facebook reminded me yesterday that Bender was freaking cute when he was five months old!
I’m so glad it’s the weekend. Tomorrow, my plan is to move my office from the guest bedroom to the dining room. I need a different view as I work so I’m going to give this set up a try.
I received a message yesterday from an old friend who had purchased some KFC fabric greeting cards from me a couple of years ago. She had used up all her cards and wanted more. So I dug into my supplies and had enough cards to make her 17. I quickly got them all done and packaged up for shipping.
And then today I started thinking about different ways to make fabric greeting cards. These insert cards are pretty expensive and I feel like I lose so much of the image of the fabric since the border is so wide.
So an idea came to me… What about using Heat and Bond to fuse pieces of fabric to blank 5×7 inch greeting cards. I immediately dug in and made a quick four cards and I LOVE how they turned out.
I just love this fabric cut in a random way like this. Someone on Facebook commented that it would be great to fussy cut the fabrics for the cards. But I really like the random and abstract look of these cards! I find the random cuts much more interesting than a fussy cut.
I was so happy with how these turned out that I hit the sewing room again tonight and made more of these 5×7 cards… until I used up all the blank cards I had on hand.
Then I remembered that I had some smaller colored cards that I had intended to paint on. These had been sitting in the closet unused for at least two years. These are about 4×6 inches… and I LOVE these fabrics on the colored cards!
Look at all the variation in this one fabric!
And oh my god… THIS ONE!!!!!
How amazing is that??? GAH!
I finished up with some pretty pink.
I’m definitely going to be making more of these!
It’s been year since the terrible fires we had last summer. We’ve been so lucky this summer and have not had to deal with fires close to Portland. We’ve also avoided all the terrible smoke that others are suffering around the west.
There was some smoke in the air today, however, and the light looked odd all day. But it didn’t seem to affect the air quality index. But it did make for a pretty sunset tonight.
We’re all keeping our fingers crossed that we don’t see fires again this year.
And wow! I’ve received so many Frankenbag photos since I headed out on vacation. I’m going to slam through them here so I can go to bed!
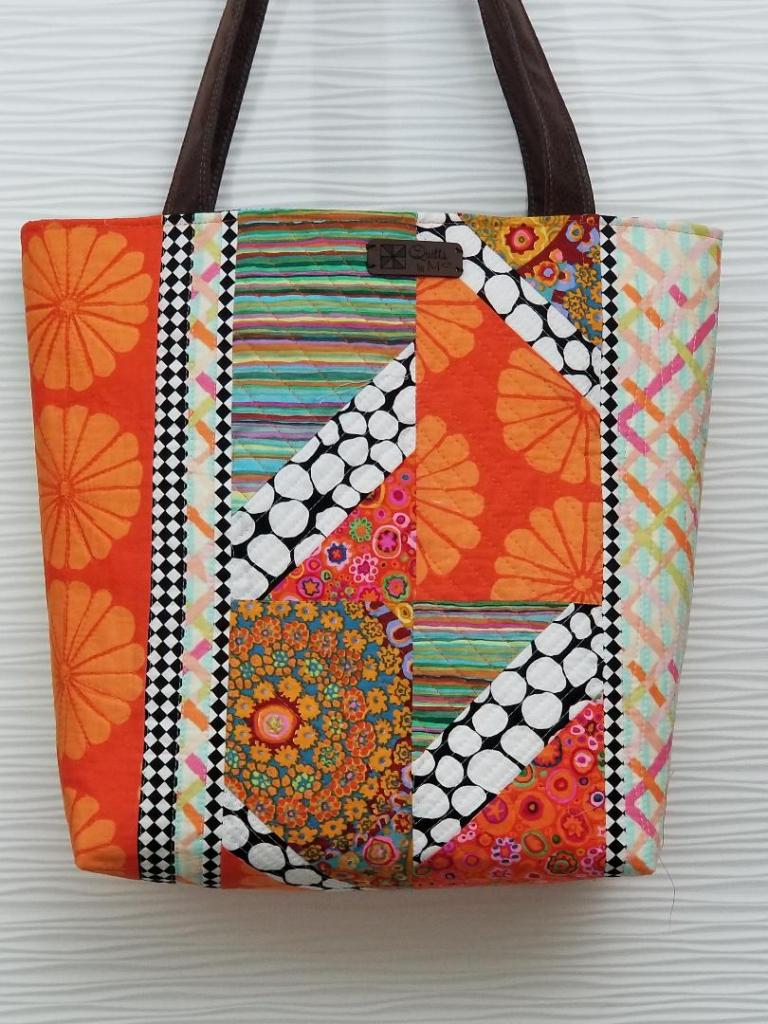
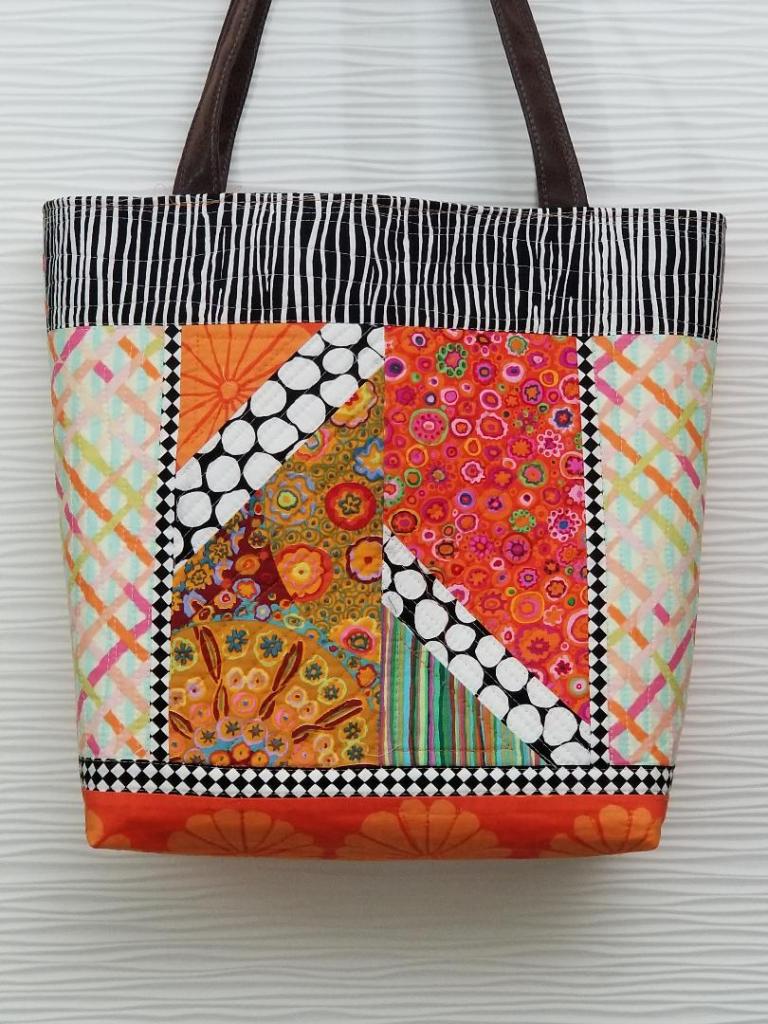
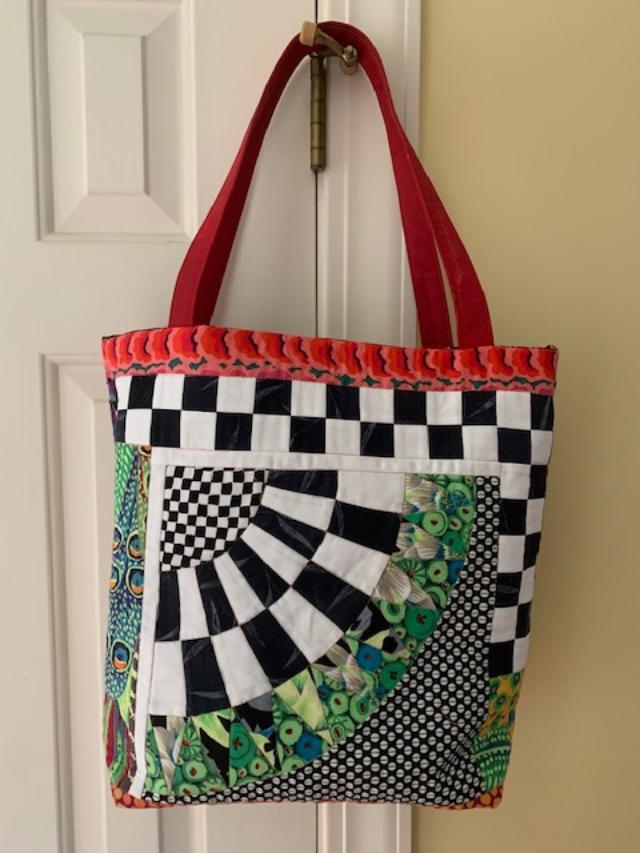
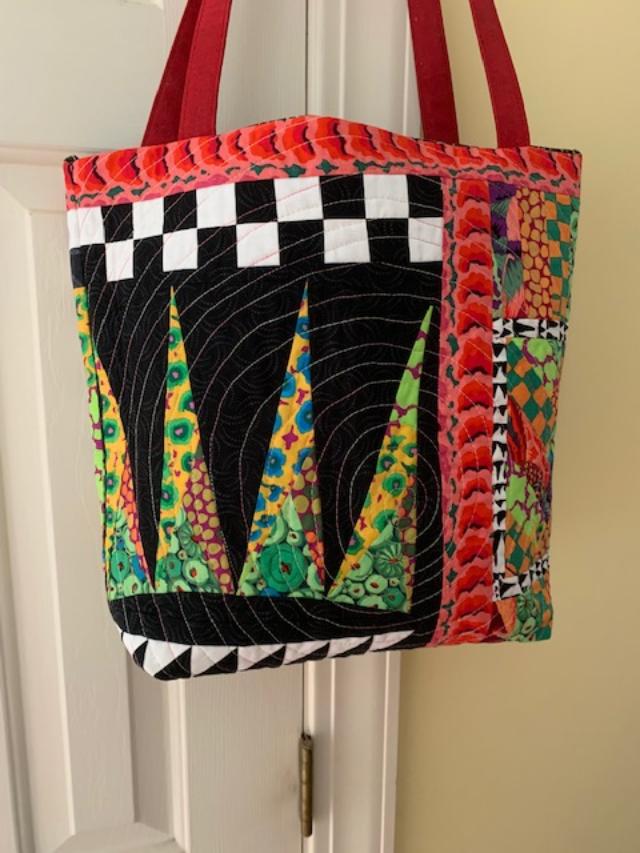
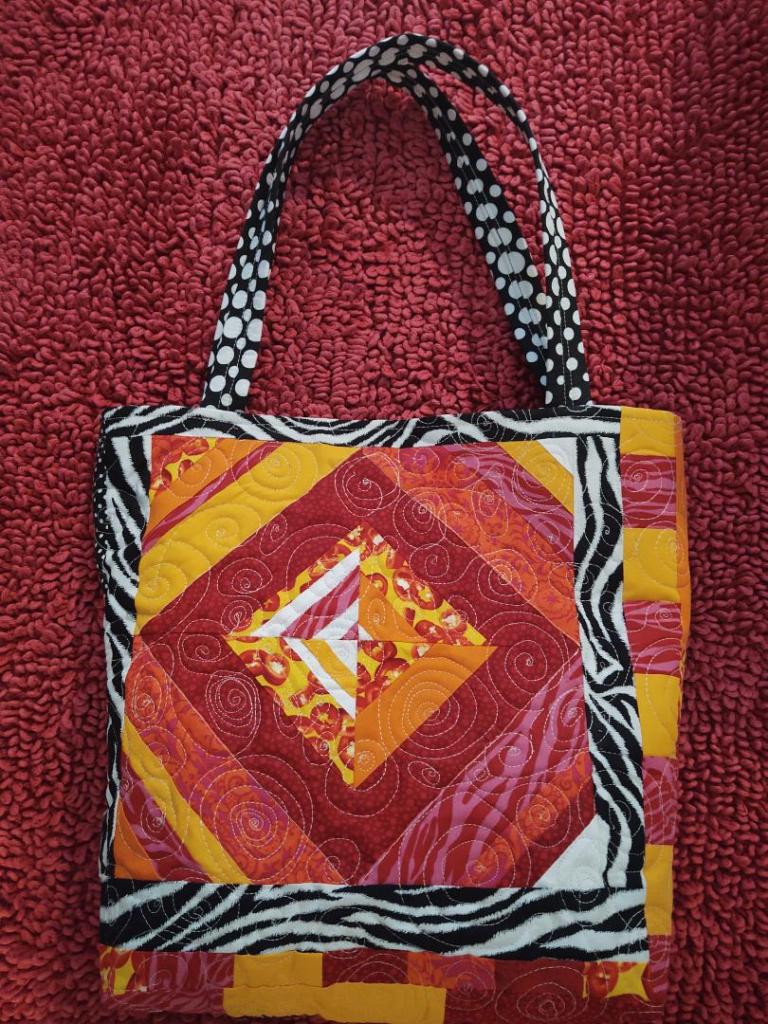
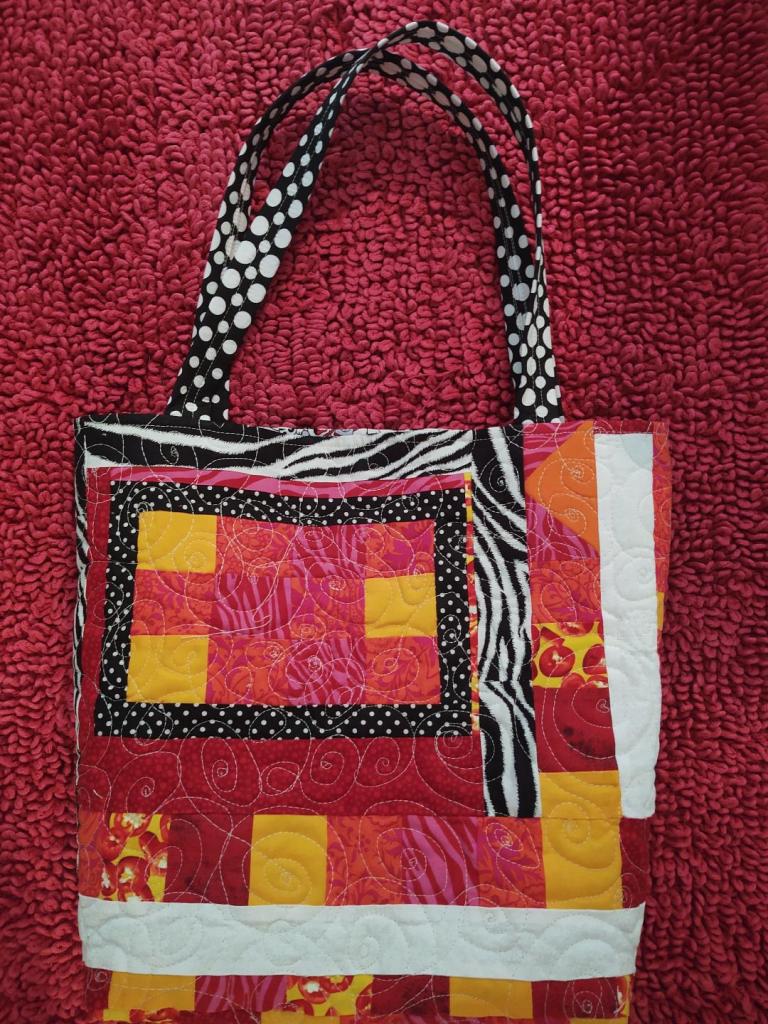
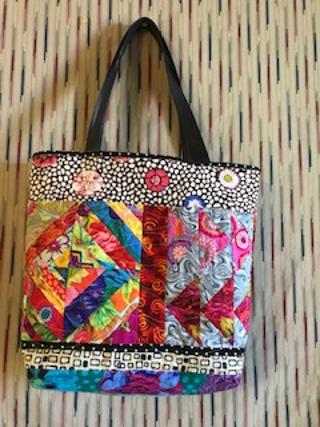
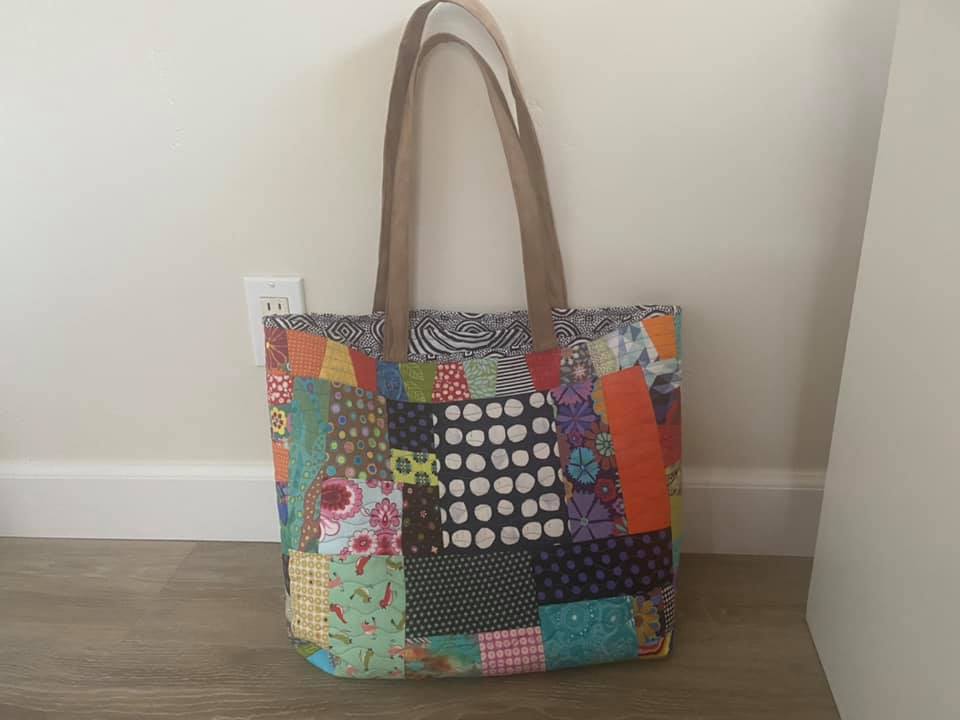
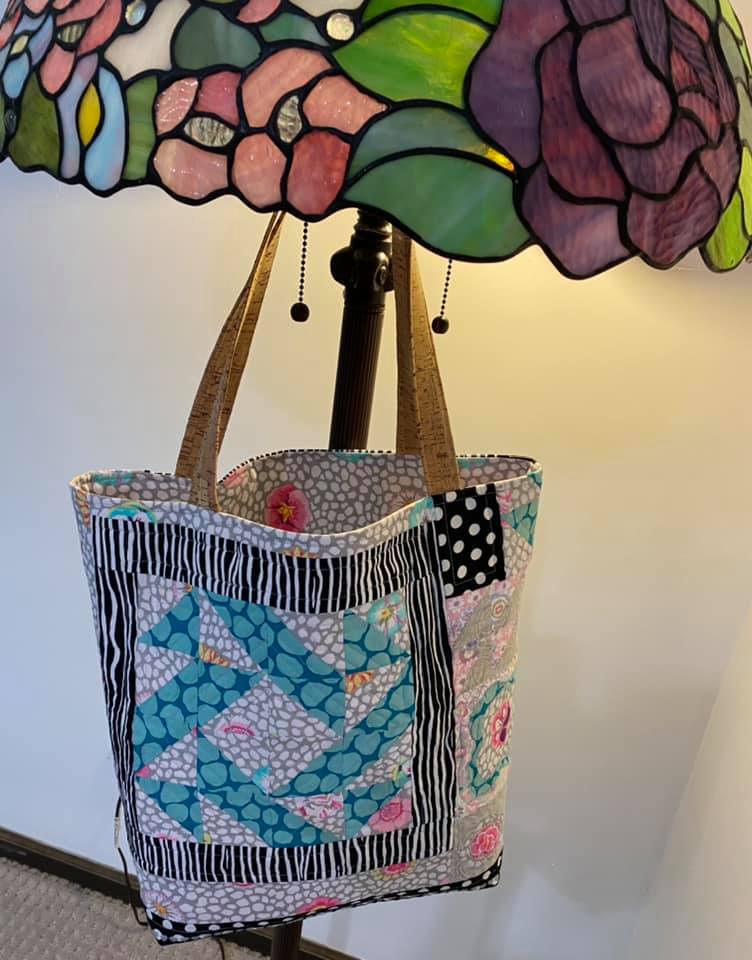
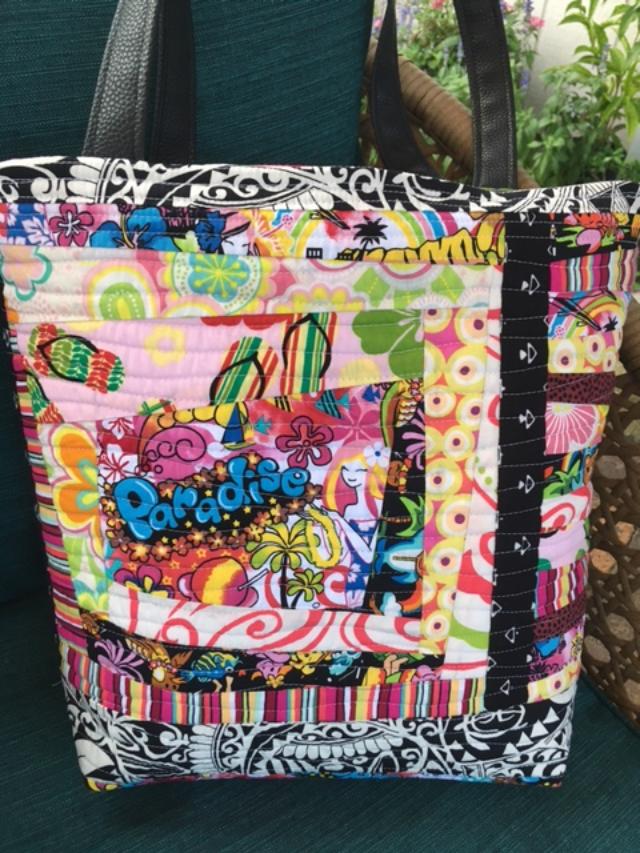
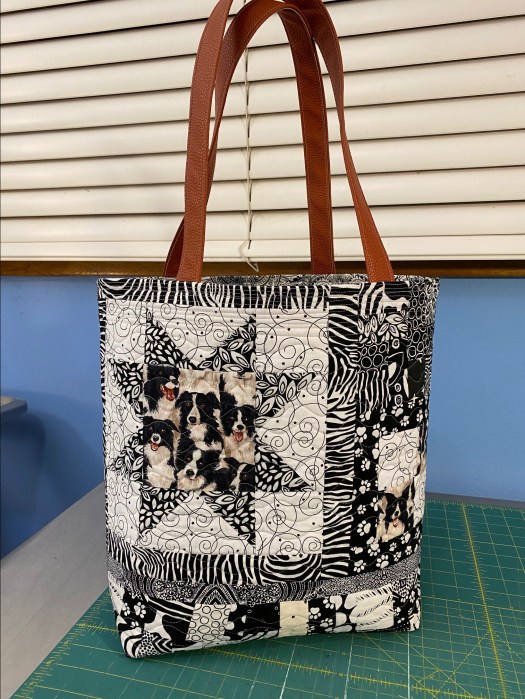
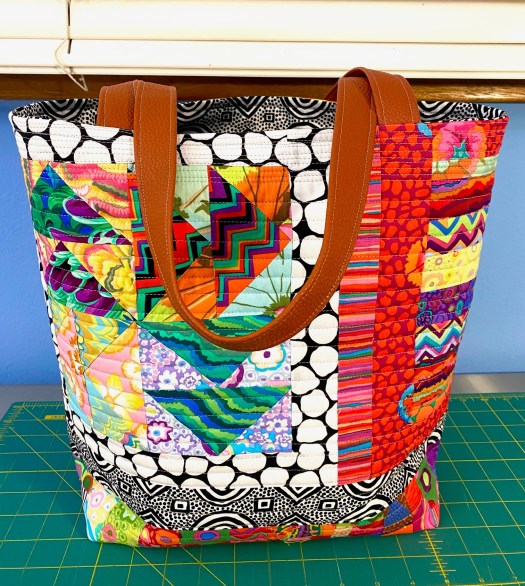
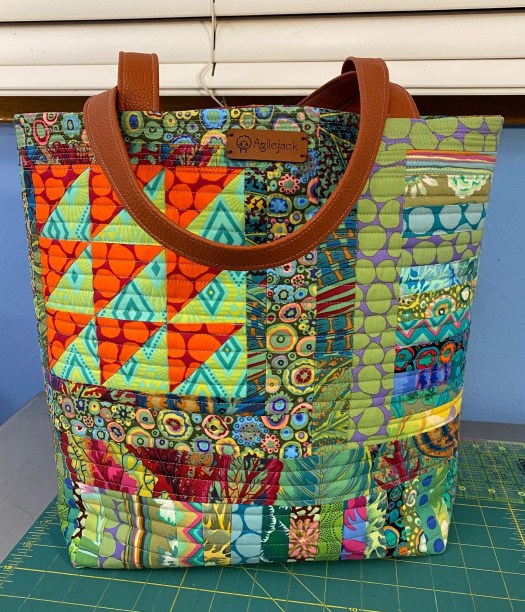
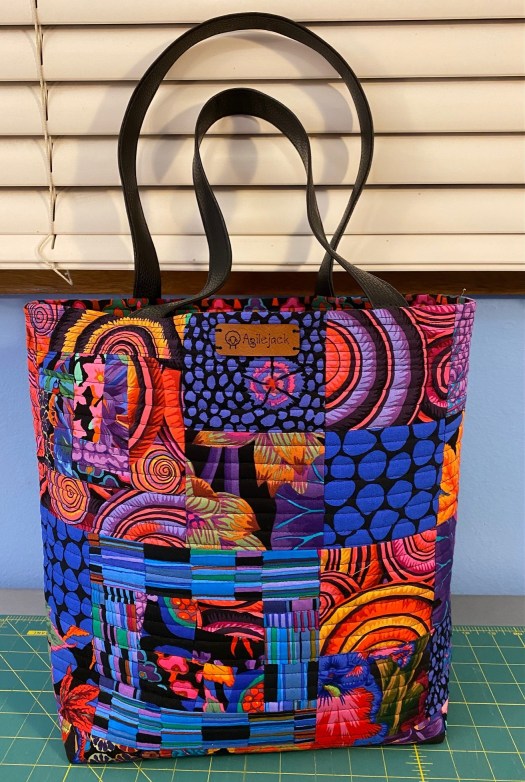
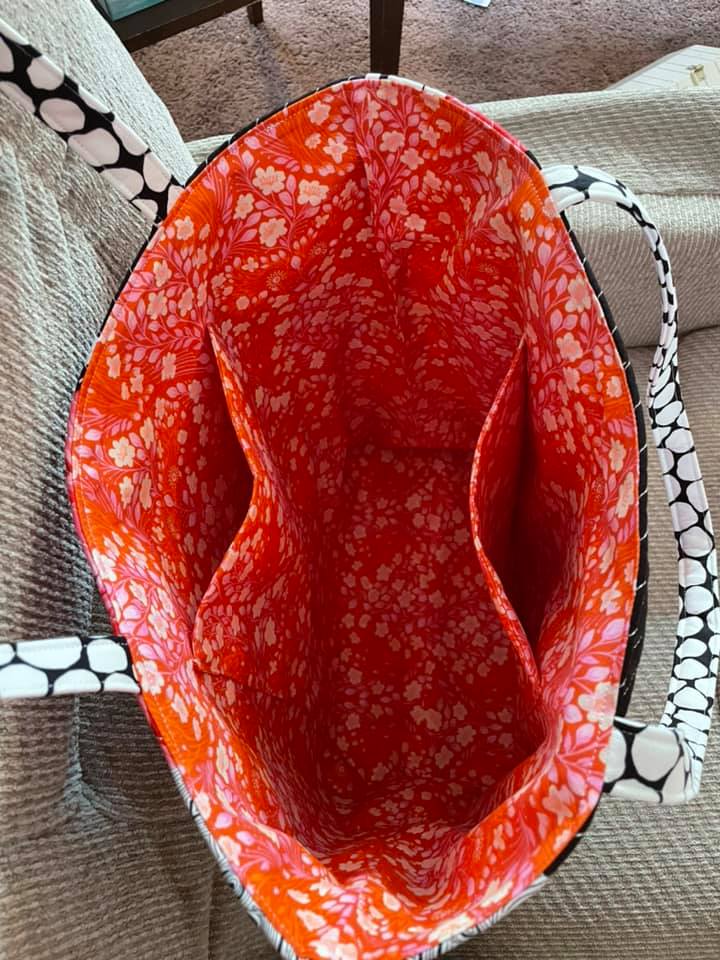
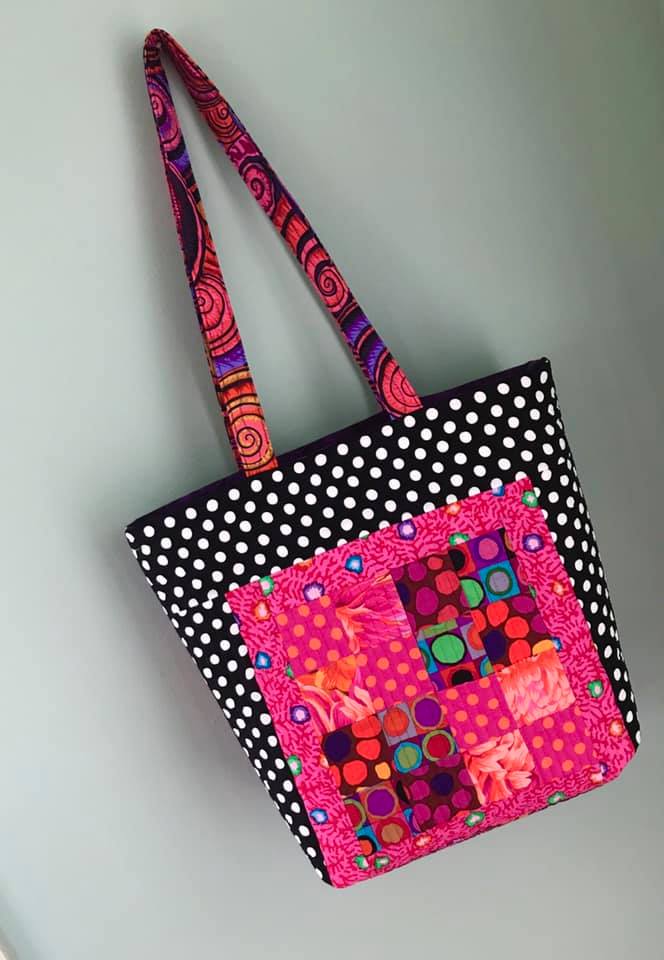
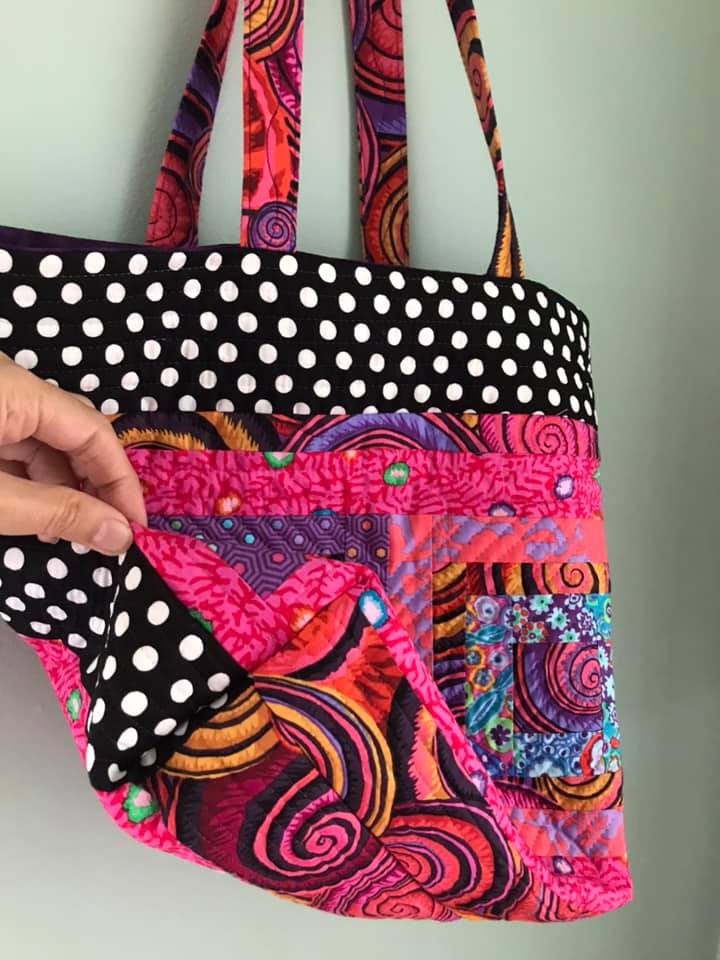
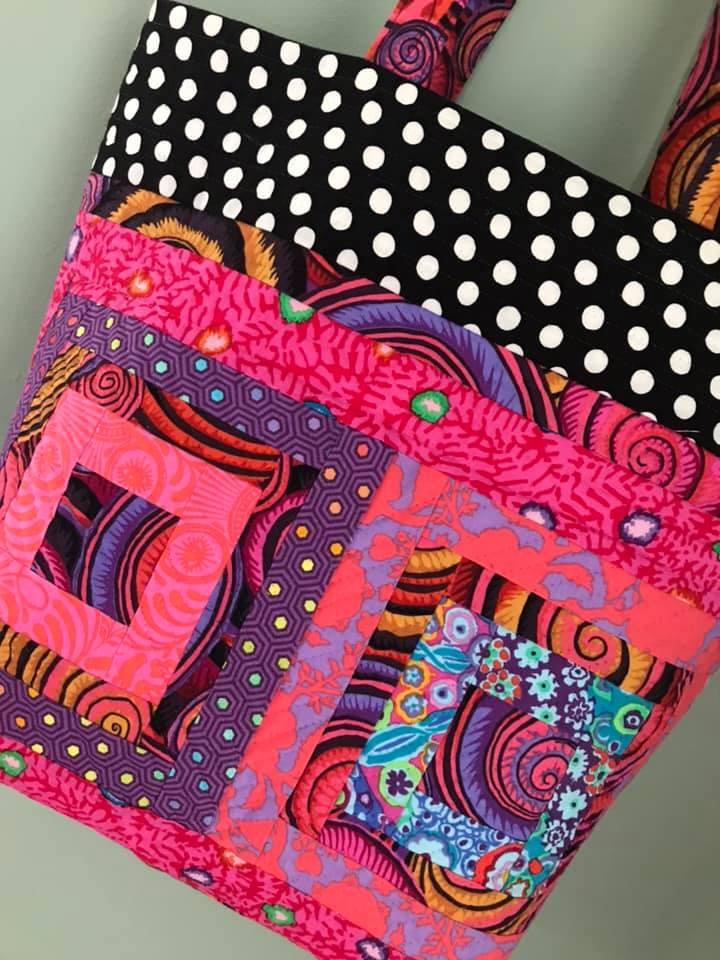
This first bag is from Maddy Pepe. And I have to say that this is one of my most favorite of all the Frankenbags made by my readers. I just love orange and think it gets a really bad rap. It’s an amazing color. I love how Maddy combined her fabrics. This makes me want to make an orange quilt. It’s just soooo good!
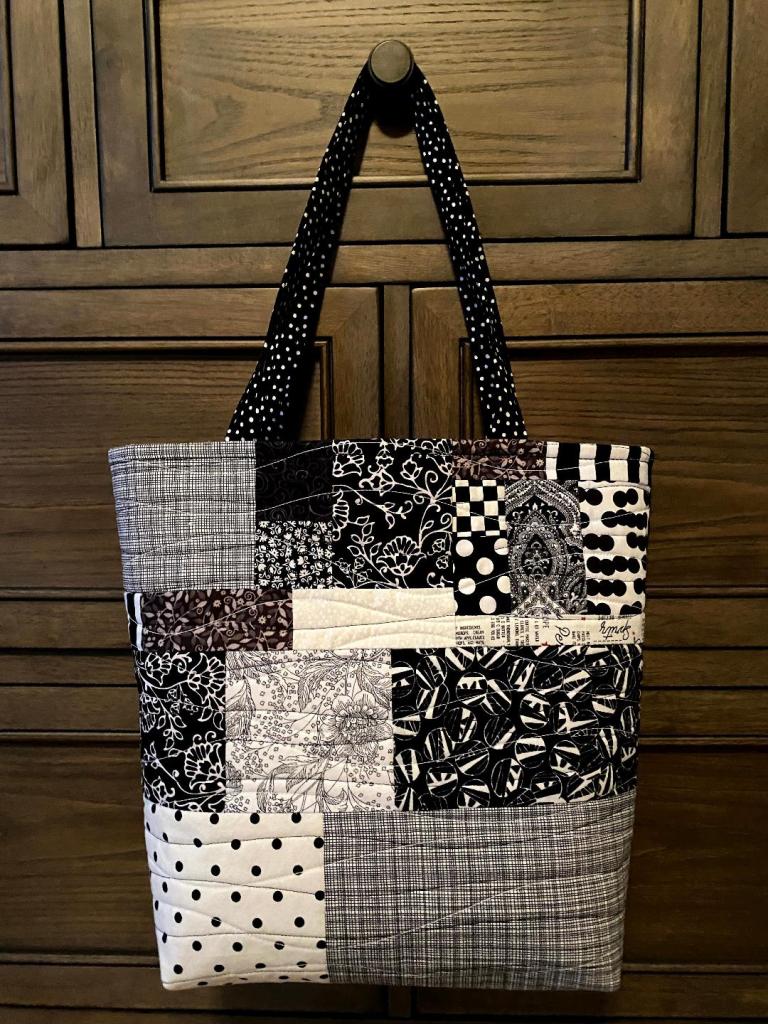
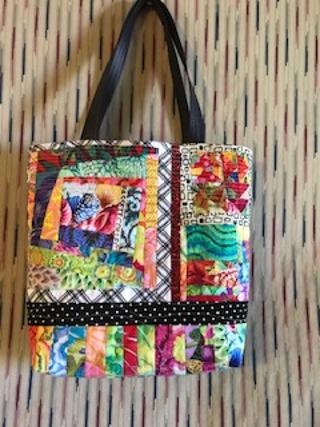
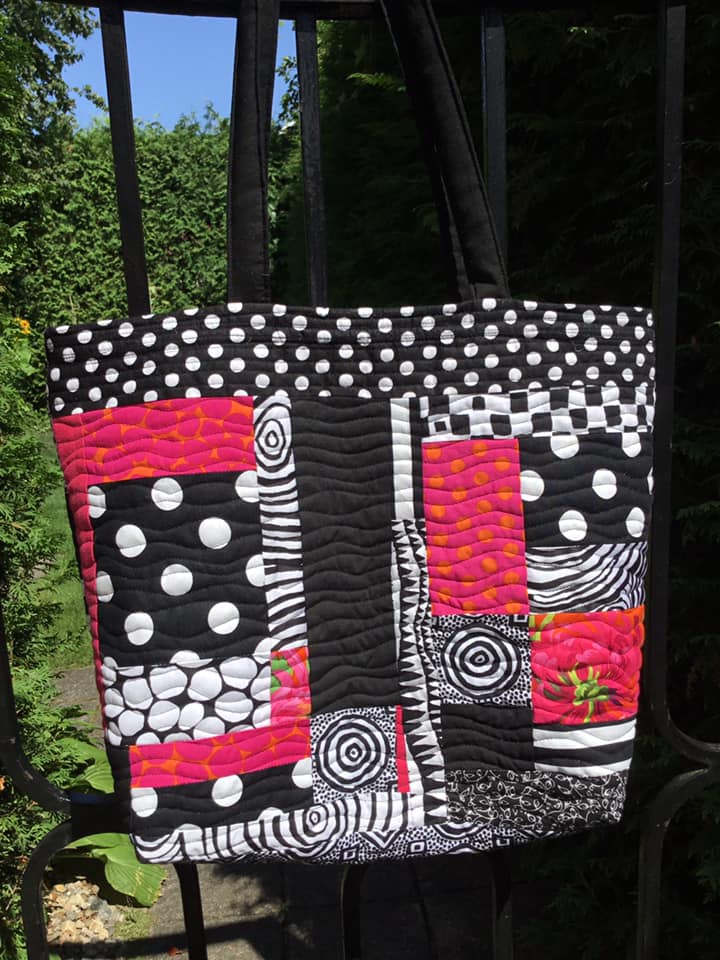
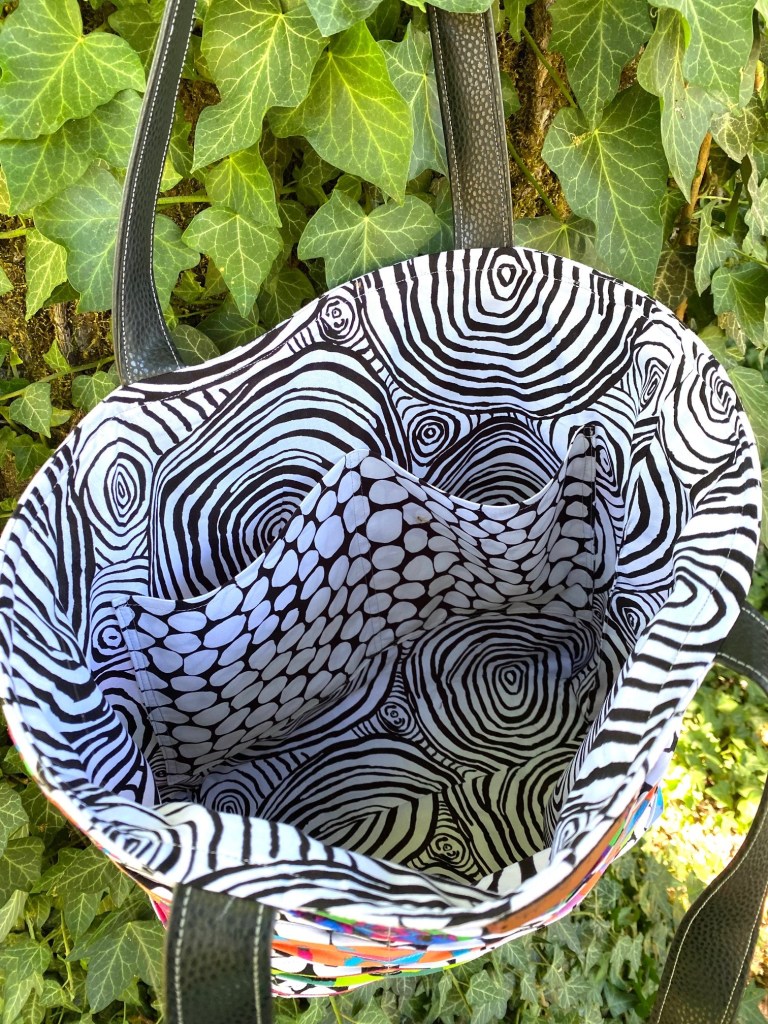
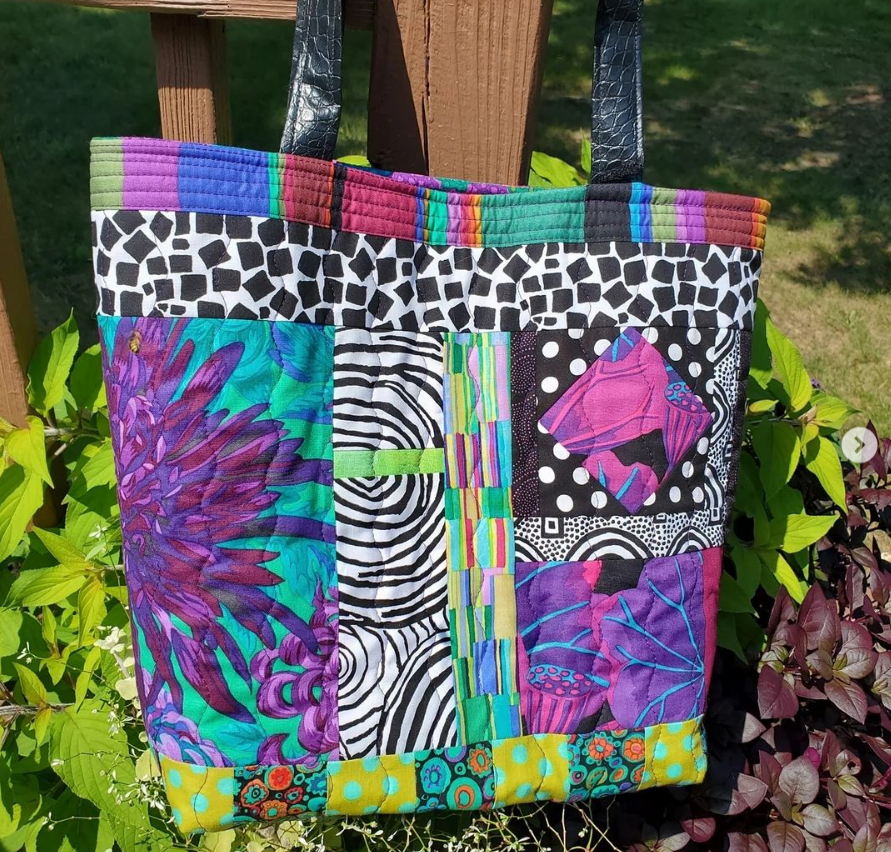
This next bag is from Andrea Cline. I just love her bold black and white piecing! And I love those peaks on the bag. Wow! Love this one!
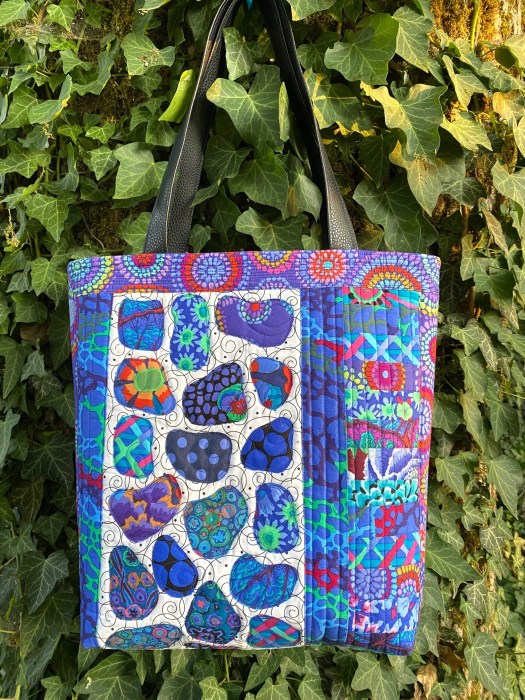
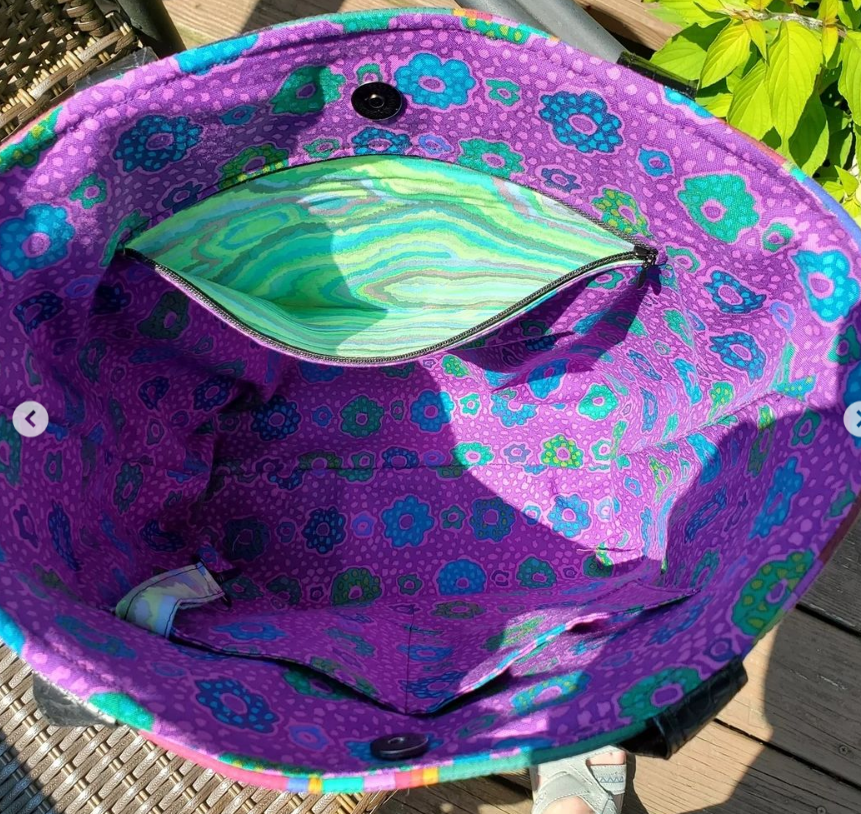
This next two bags are from Anita Goodson. I love the purples and turquoises together and have been wanting to try this combo. I also love the doggie lining on the second bag!
Next up are these two bags made by Eileen Kane. I love that all black and white bag. I’ve been wanting to make an all black and white one. And the pop of color on the lining is fun. And I love the black and white checkerboard on the second bag… especially on the back of the bag.
Next up is this bag from Del from Hawaii. It’s so scrappy and comfy!
This next bag was made by Susan Stewart. I love all the red and the pops of black and white are great!
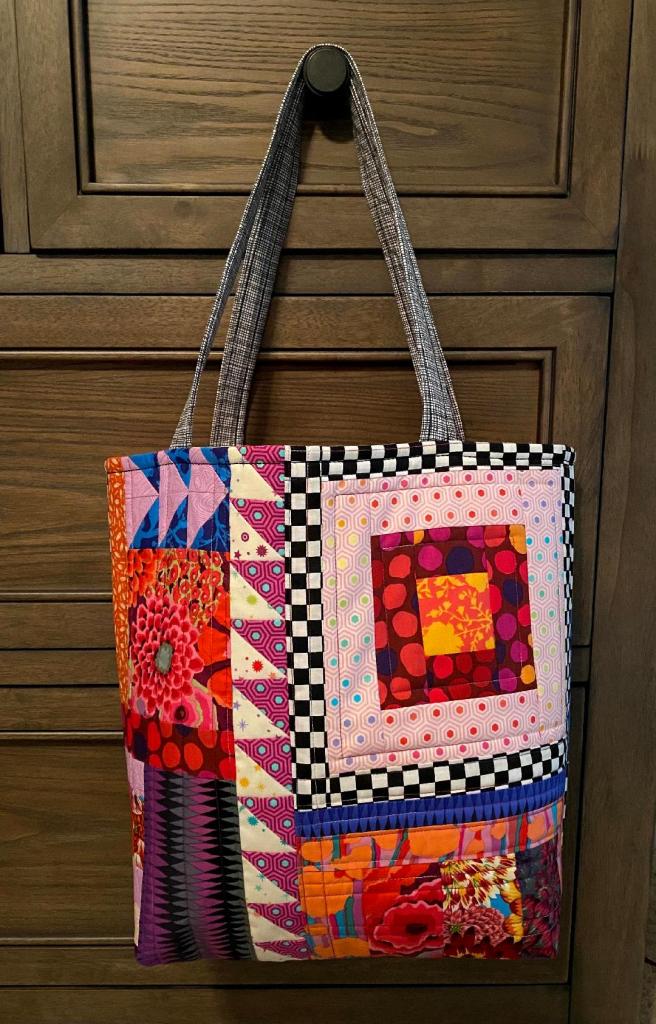
Next up is this bag from Jacqueline Frances. I just love the diagonal lines on this bag and the colors are so bright and fun. And that lining is one of my favorite Kaffe fabrics.
These next two bags were made by Sharon Galli. I love the dark fabrics in the first bag. And I love how Sharon incorporated her hexis in the second bag. She also did some fun quilting on both these bags.
This next bag was made by Mary Beth Henke. I love the limited fabrics she used on the wavy design. And that tag on the lining is just so good! I can’t stop laughing about it! I always say that I weave a little profanity into everything I make!
This bag was made by Britt Inger Johnsson. She’s made a few bags before this one. I love the dark tones in the first photo. And her reds are so bold an saturated. She’s also added more pockets and a zipper placket. I need to make more with zipper plackets!
This next one was made by Laurie McClennon. I love how scrappy this little bag is. What a great use of scraps!
This one if from Cherry Naylor. She’s been a Frankenbag making machine! This one is really fun! I’m seeing that green floral all over the place right now. Quilters are using it in some amazing ways!
This is another bag made by Birthe Aust. She’s been really productive too. I love the fabrics she’s used here. She’s probably able to make these in her sleep now!
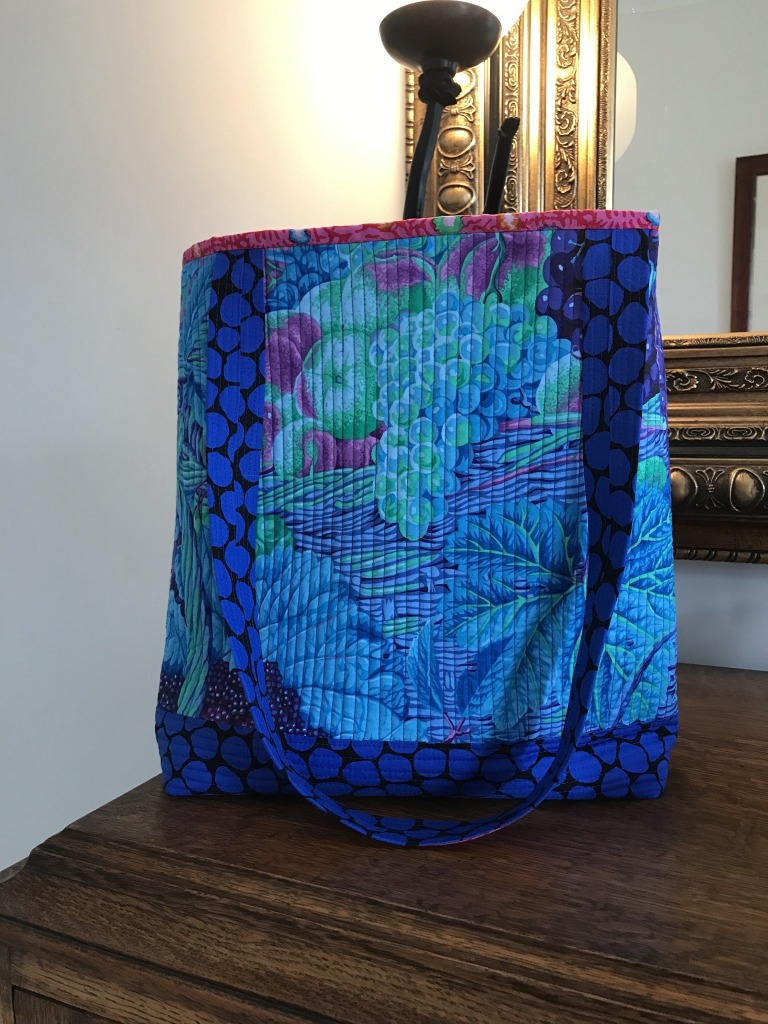
This next one was made by Ingrid Cruz. She used one piece of fabric for the body of the bag and constructed it according to my tutorial. It’s really nice to see that gorgeous print all in one piece!
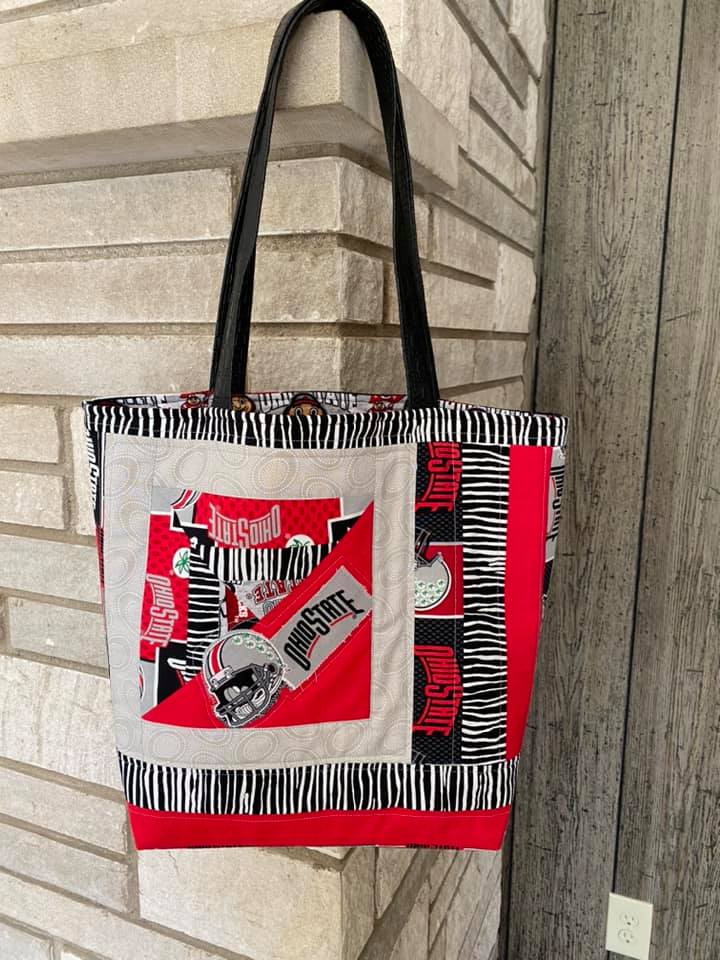
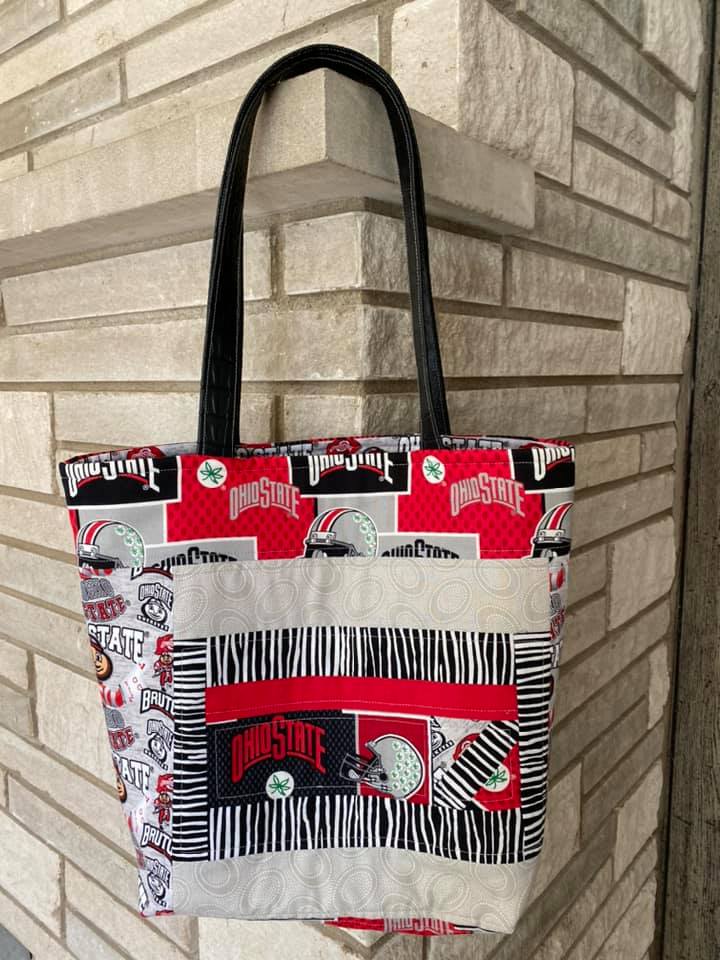
Next is a bunch of sports fan bags made by Sharon Marcum. What a fun approach to team fabrics. Someone is really going to love these!
This next one was made by Debbie Adding. This is just so cool! It feels like a moonlit night. It’s so dark and moody. And that NY beauty block is pretty spectacular! Love this bag!
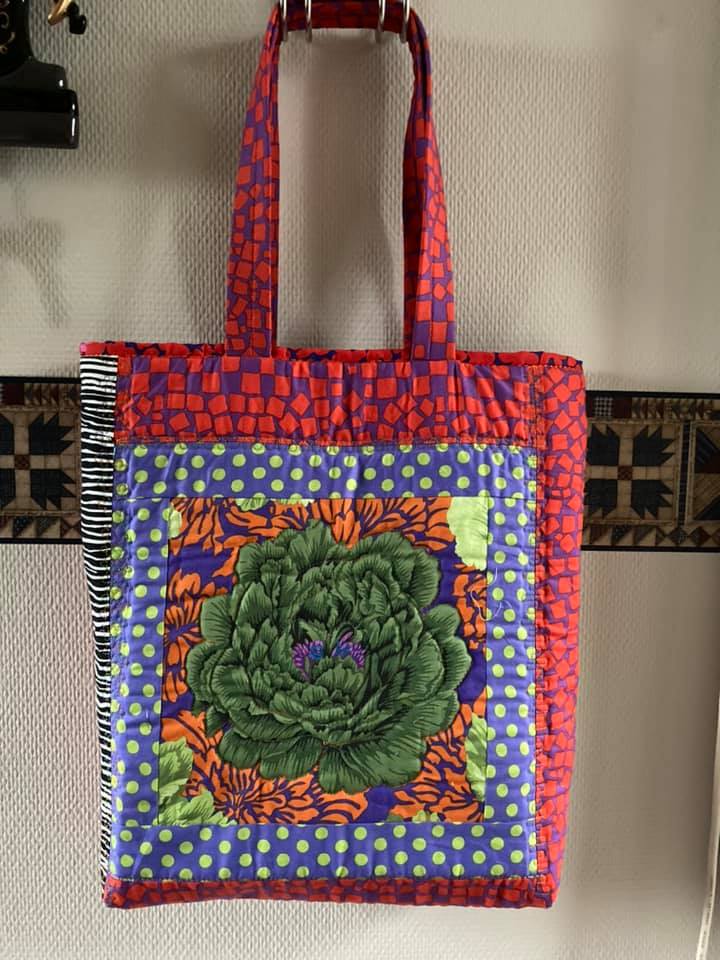
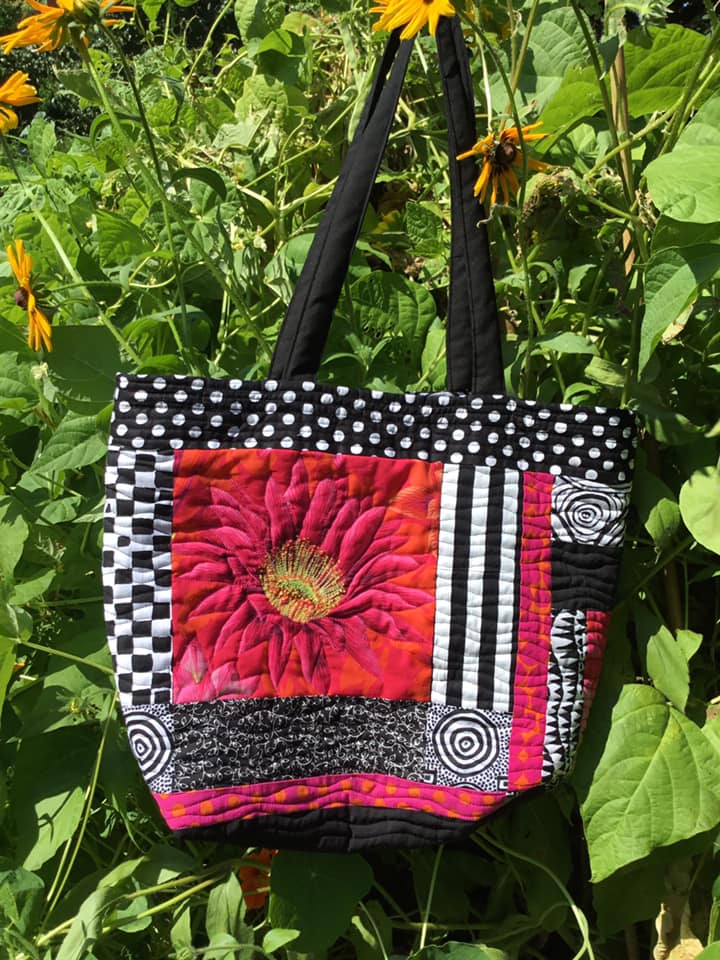
And finally, this last one was made by Sylvie DuPont. And I love it. The deep reds combined with those graphic black and whites is really striking. And a little fussy cutting of that onion rings is pretty good!
Thanks to everyone who sent me photos of their bags. Phew! It feels good to be all caught up!
I’m writing this on the last night of my vacation. I’m back at work tomorrow morning.
I had a great vacation for a vacation where you don’t really go anywhere. I did mostly day trips and didn’t do any sewing to speak of… until yesterday.
I did manage to finish my Ice Storm quilt top this afternoon. It went together nicely and I’m really glad to have it done.
Here’s a couple close ups so you can see the fabrics in more detail.
I am a bit annoyed that I didn’t just take my sewing machine in for servicing while I was on vacation since I didn’t do much sewing. I really did think I’d get more sewing done, but I was busy enough that I didn’t have the inspiration.
Here’s how I went about my stay-cation.
The first day, I took the boys for an 8.5 mile walk on the Banks Vernonia trail. The weather was perfect… cloudy and in the mid 60s. It was a great way to clear our minds and dive into vacation.
The next day, I actually had to work a couple hours because I had committed to a meeting with a couple dozen people from across the country before I set my vacation. But later in the day I took five finished quilt tops and backs to my long arm quilter. They will all be holiday gifts.
They’re all pressed and bundled up nicely with their backings and binding. My long armer was impressed with how organized I was.
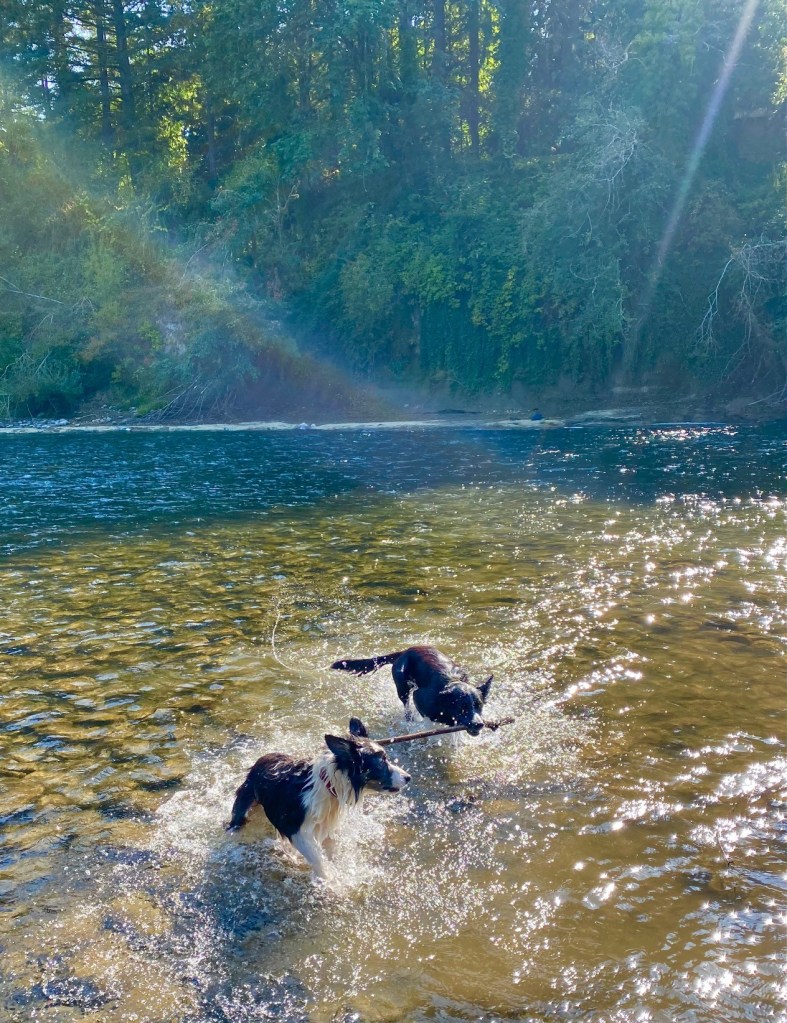
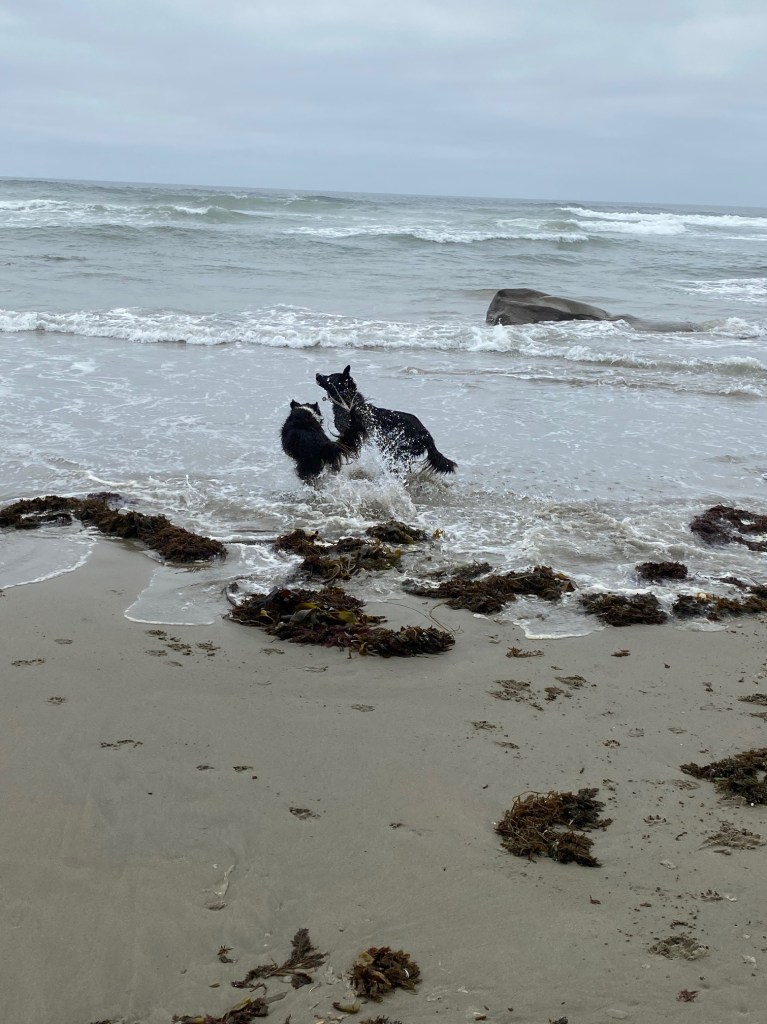
Since I was out in that neighborhood, I took the boys for a quick dip in the river. They were not expecting this outing and had a blast!
There were so many good sticks at the river!
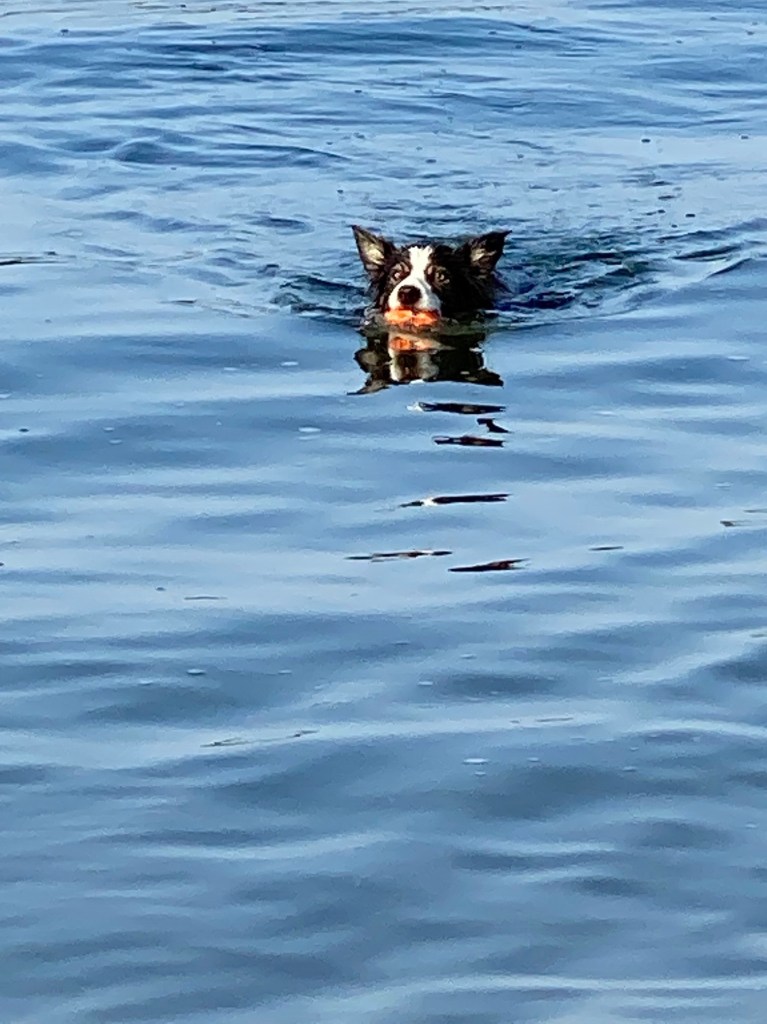
The next morning I met a friend of mine and her dogs on the Washington side of the Columbia River. The weather was gorgeous and the dogs had a blast! We were there early to beat the crowds. And after the swim I walked the dogs for three miles on a path on the dike along the river.
they just love swimming and this beach on the river is a great spot for that.
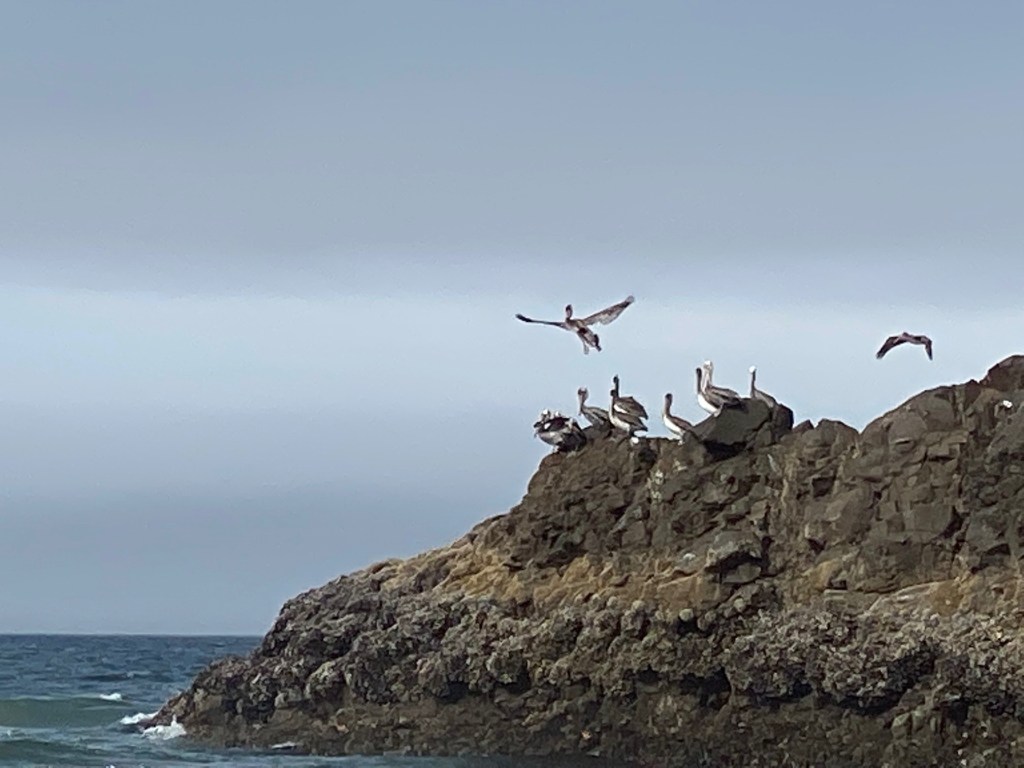
The following day we headed out early for the coast and it was a fantastic day! We got to the beach about a half hour before low tide, and it was so low that we were able to walk north onto Cannon Beach… a beach that we don’t always have access to. We walked a mile onto that beach before we headed back south to our regular beach.
There are some really amazing rock formations on that beach. And with the low tide we were able to get really close to them.
There were a lot of pelicans in the air and diving into the ocean. And there was a group perched on one of the rock formations.
We walked about seven miles on the beach, and then headed south to find some ice cream. About an hour later, we drove past the same beach and the parking lot was nearly empty so I decided to take the boys for one last run before we headed home. It was a little rainy so I put on my rain coat. It was a little blustery on the beach.
At the left of that photo, just of Rico’s right shoulder, is a line of tracks that were really big. Here’s a close up photo of one of them next to my foot.
My brother is pretty sure that’s a black bear track. And bears have been seen on that beach in the past. I was thinking it was the rain that cleared off the beach, but maybe it was actually a bear!
Friday found us back on the Banks Vernonia Trail. We tried a new section of trail and found a great swimming hole for the boys. They were so excited!
In the evening I met some friends to do some dog agility training.
Saturday was sort of low key. I took Rico up to Battleground, WA, for his regular herding lesson. Then we came home and did some stuff around the house.
With everything I was doing, I was still feeling a little bored and a little stir crazy and didn’t want to fritter away my second week of vacation and feel like I had done nothing. So I called my brother to see if it was ok if I made another visit, since I was just there in July. They were on board, so I hit the road after lunch on Sunday and headed out on the four-hour drive to Southern Oregon.
I got to my brother’s place at around 5 pm and we celebrated my arrival with a nice cold beer in the cool sunshine. The dogs love it at my brother’s place. There are sheep to bother, and several securely fenced acres where they can run and run.
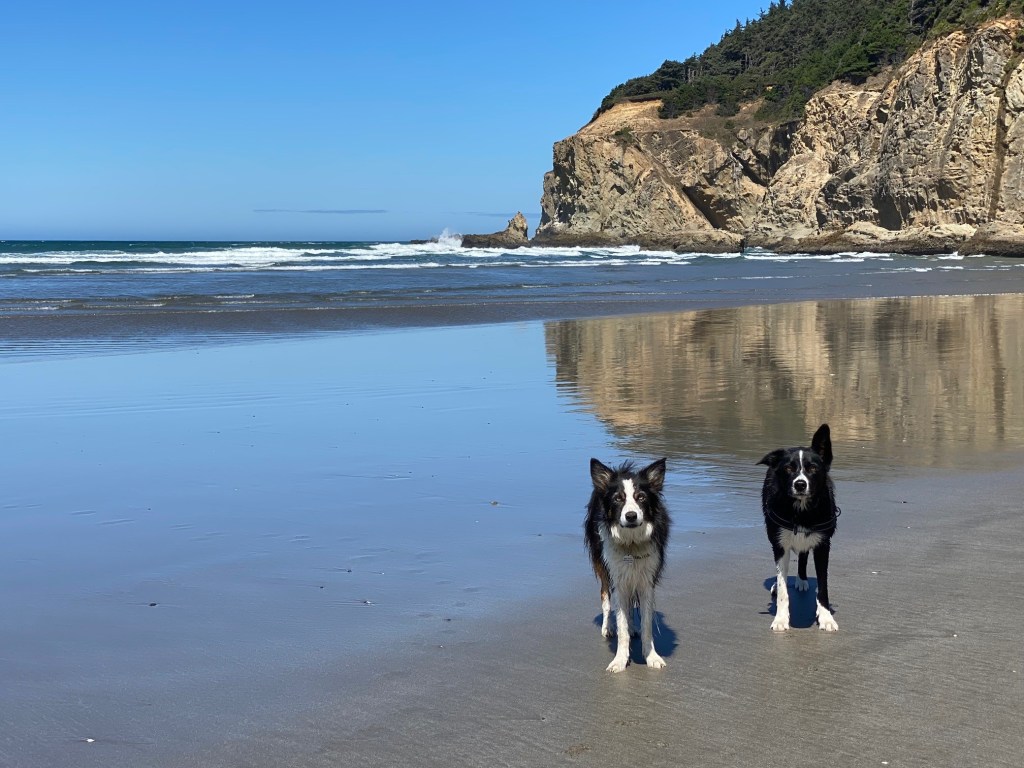
On Monday we had an easy morning and then headed out to the coast. It’s only about a 25 minute drive from my brother’s place to the beach. And the beach was perfect! Only about 6 cars in the parking lot. the sky was blue with a few clouds, and the temps were prefect with just long sleeves.
Here I am with my boys. It’s nearly impossible to get them to look at the camera!
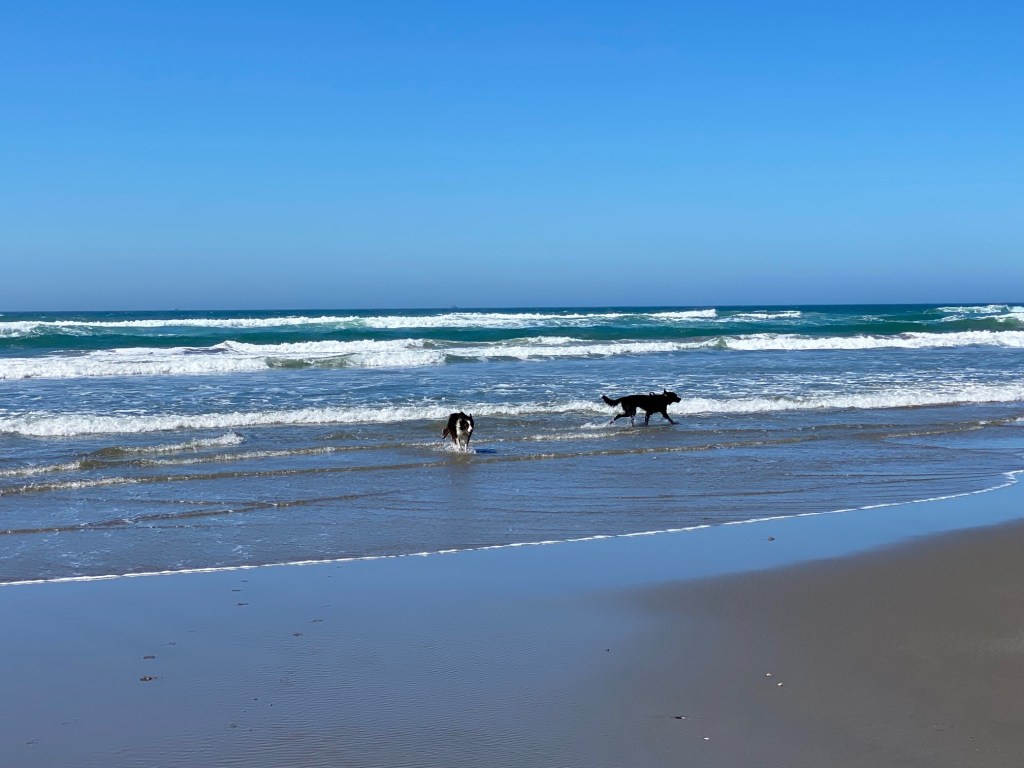
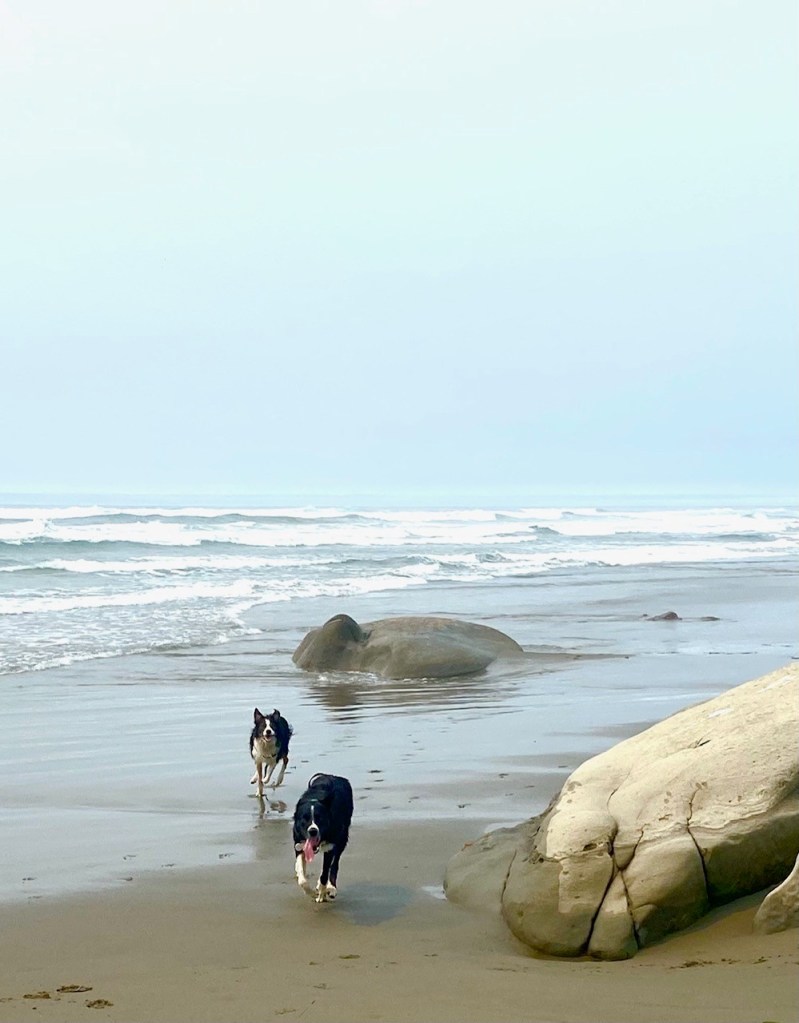
The water was the most amazing color of blue! We had another nice low tide and were able to walk nearly three miles north on the beach. We decided to turn back before we hit a cliff to the north because the tide had turned and we didn’t want to get stranded.
It was so gorgeous! And it does my spirit good to be at the ocean. And the boys just love it. We walked over six miles and they must have run twenty!
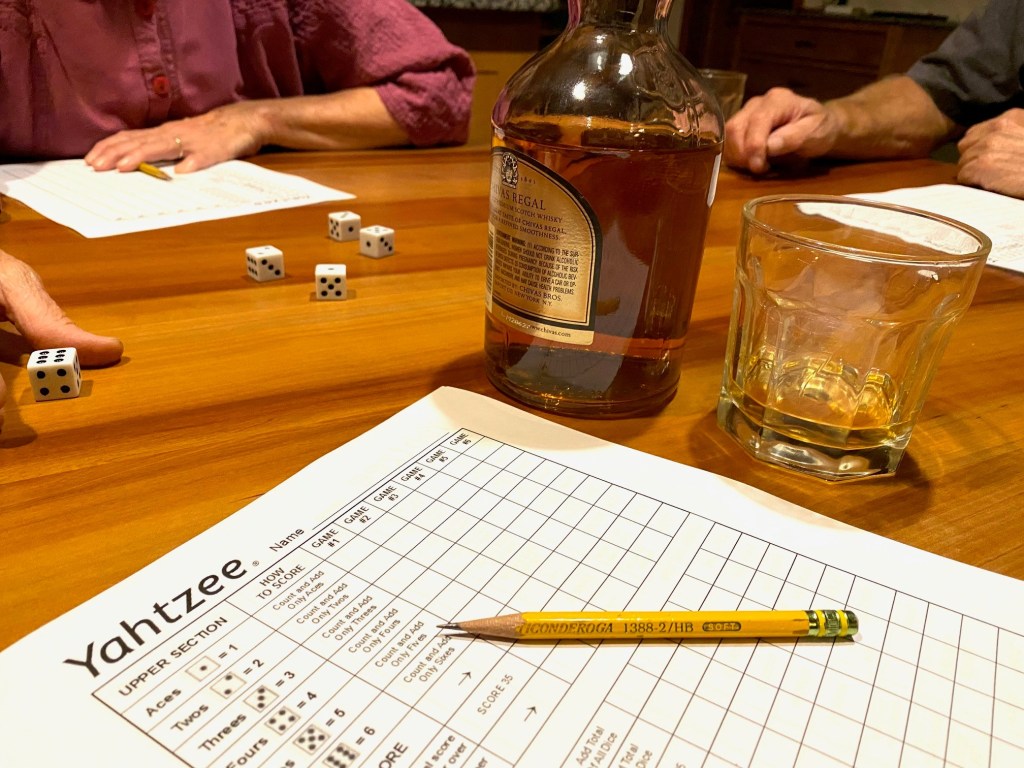
After our beach trip we had a beer in the sun before dinner. And after dinner we celebrated with a family tradition… Yahtzee and Scotch!
I know you’re probably thinking I live a pretty exciting life!
The next day we decided to hit the beach again and found a tide that was even lower than on Monday. So we walked all the way to the cliffs on the northern end of the beach.
By this point, we had walked about 3.5 miles and Bender and Rico were slowing down! I was so surprised that they just stood here and let me take a bunch of photos. That never happens!
Here’s a photo of me with my brother. He’s the middle child of five, and I’m the youngest. He’s one of the main things that convinced me to move to Oregon 11.5 years ago.
Those boys spent a lot of time in the water on this beach visit.
After the beach we headed south to Port Orford which is a deep water port where they use cranes to put fishing boats into the water. We were hoping that we might see some whales, but weren’t so lucky. It was really windy there, but so gorgeous!
On the way home we stopped and picked up some fresh rock fish for tacos. Once home, my brother started working on his home made corn tortillas and we started all the prep work for the fixings.
Here’s my first taco and my sister in law, who is also Ann Ibach, but without the “e”. I won’t tell you how many tacos I ate, but they were so good!
On Wednesday I hit the road for home. I’m so glad I decided to take that short trip. It was so good to be around my brother and his wife and another couple of ocean trips did me good.
Thursday was spent running errands and getting a few things done at home, and meeting friends for dog training in the evening. Friday found us back on the Banks Vernonia trail for a 7.5 mile hike.
On Saturday we had our regular herding lesson except that it was in a different place. So while we were there, we took the opportunity for a nice hike on some land owned by a logging company.
It’s not actively being logged now. These logs all came down during last winter’s ice storm. They were blocking the trail in several spots earlier in the summer. In the last month or so the land owners went in and cleared the entire trail.
I love getting out on a trail like this and being the only person out there!
On Sunday I hung out around home, took the boys for a walk, did a little sewing on my Ice Storm quilt, and met some friends for a pot luck BBQ in the evening. It was so nice to be around friends and enjoy some really good food and drink. And with my friends, we’re always encouraged to bring our dogs.
Rico fell in love with my friend’s elderly pug.
Look how happy Rico is, and look at that pug’s face! Poor thing.
Rico couldn’t keep his eyes (or his tongue) off that poor pug.
Today I took the boys for a nice long walk after breakfast, and then dug in and finished the Ice Storm quilt top. After dinner we took a nice long walk while we talked to a friend on the phone.
Back to work tomorrow. Vacation is never long enough.
Today was our first official day of vacation. It feels so good to step away from my desk!
We got up today and had a leisurely breakfast and then hit the road for a nice long walk on the Banks Vernonia Trail, about 30 miles west of Portland. We tried a section of the trail that we had never walked before.
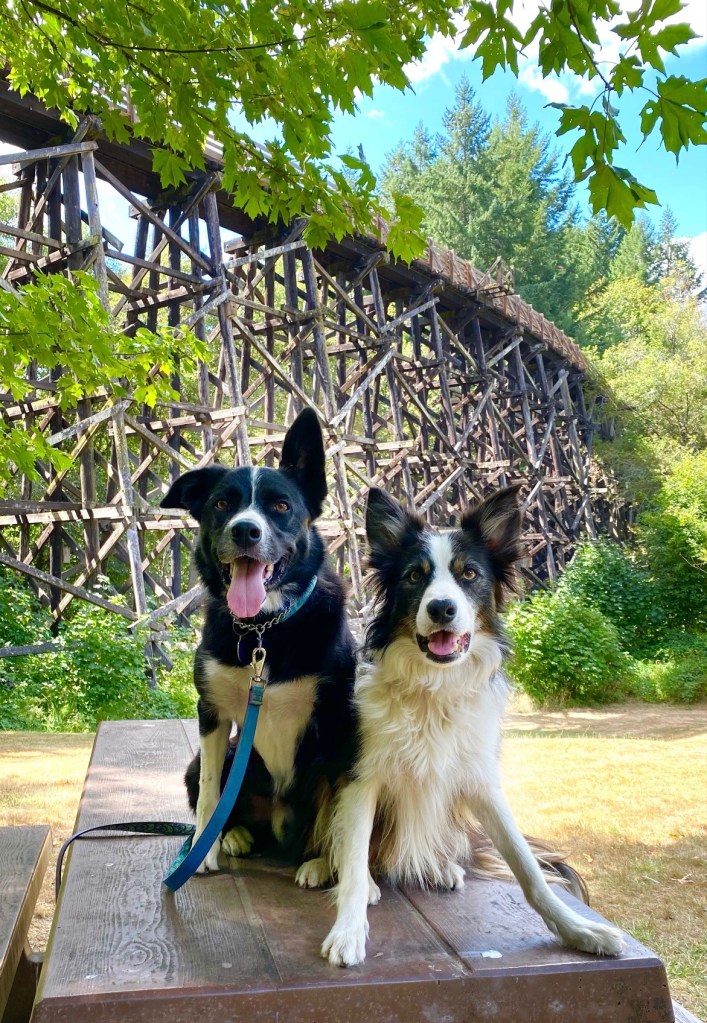
That’s a huge railway trestle behind my dogs. It must be a quarter mile long. I knew there was one on this section of trail and saw some informative signs along our 8 mile walk, but no trestle. And when we got back to the trail head… there was the trestle! So we walked a little past the car to traverse this high and long bridge. Then got a quick photo from below.
It was a perfect day for a walk. Mostly cloudy and the temps were around 65. It was fun to walk a section of the trail we haven’t walked before.
It’s hard to believe it’s still so green with the hot and dry summer we’ve had.
It was late afternoon by the time we got home, so I sort of took it easy and did a few errands around the house. Then after dinner I hit the sewing room to get a few things done.
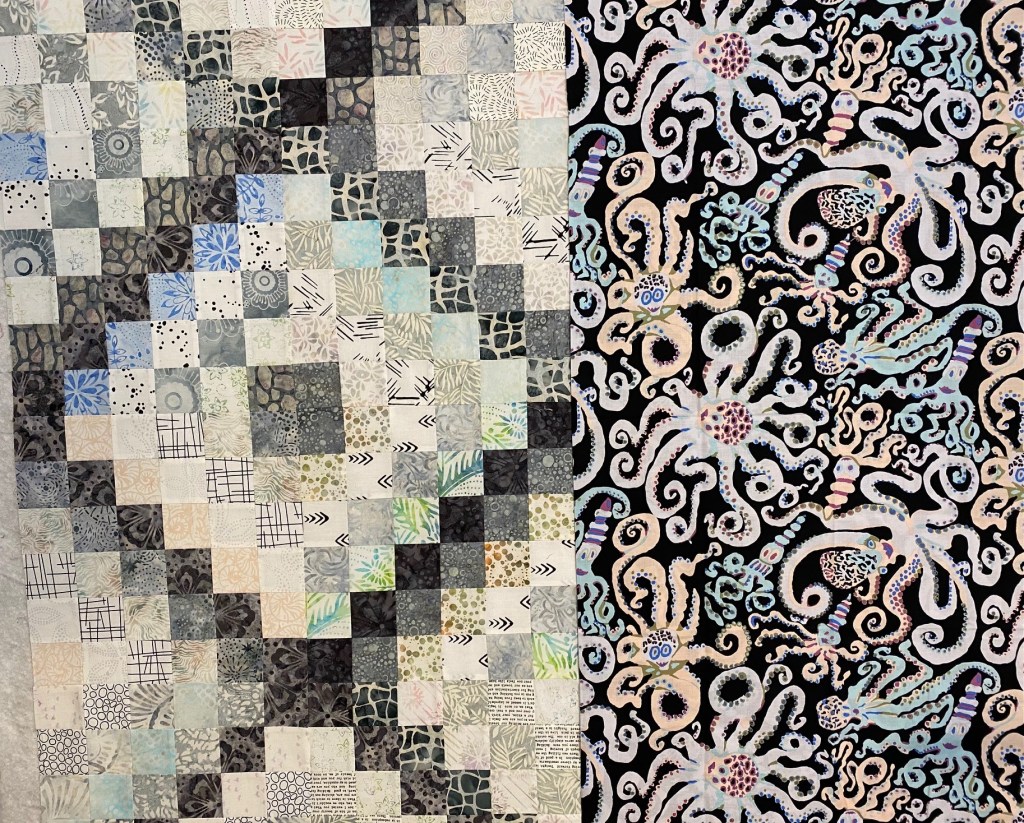
I sewed another row of my Ice Storm quilt together and sewed it to the first row. A friend of mine suggested that I use the black octopus fabric I bought recently as that backing for this quilt. What do you think?
Well, I just love it! I posted a similar picture on the Kaffe Fassett Collective Facebook page and I’m guessing that over 95% like this combo. And I do too. I’m definitely going to use this octopus fabric to back this quilt.
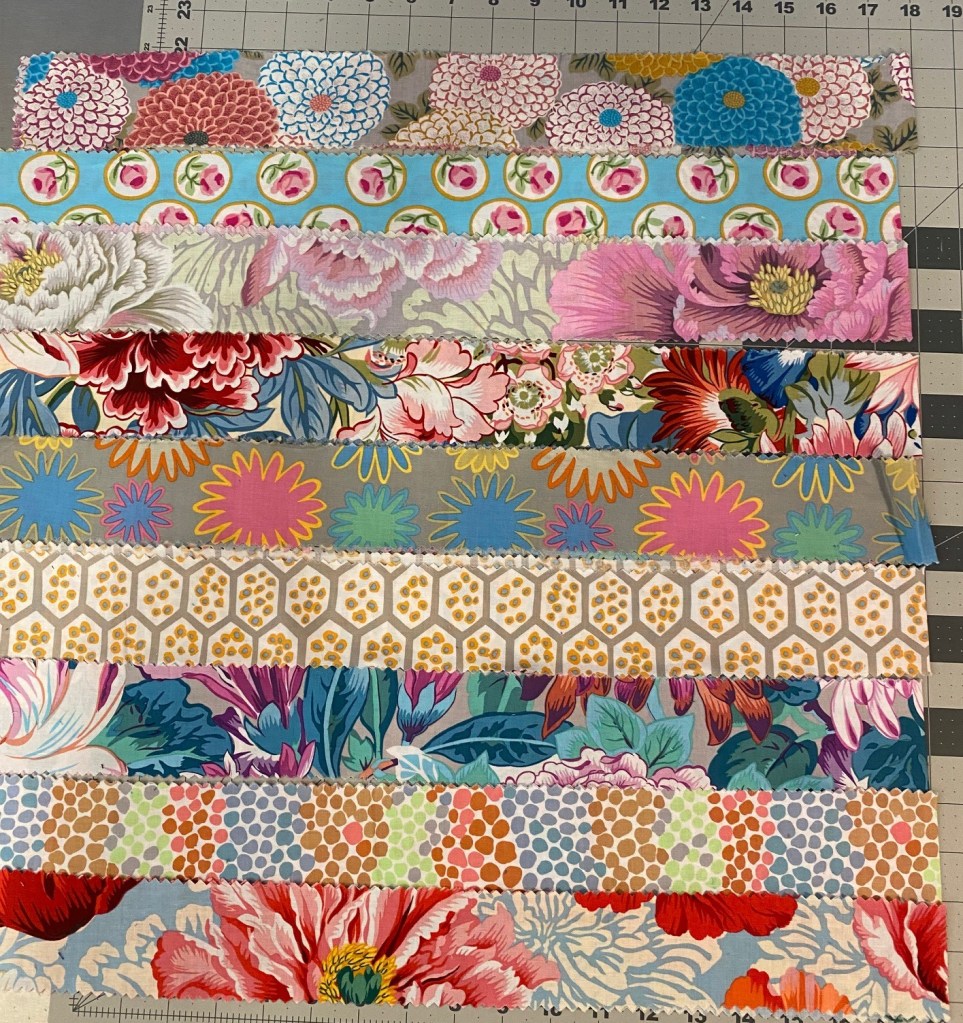
I also made two more Aboriginal trip quilt strip sets and finished up two blocks. Look at these gorgeous strips on my ironing board!
These fabrics are so amazing! And I’m starting to see the pattern emerge.
Boy, it can be really challenging to decide which fabric in the set of six is the most bold and will be used as the center diagonal. For the block below, I had originally though the lighter yellow was the one that stood out. And then I changed my mind and sewed the block with the darker center line. And then I decided that was wrong, so I picked out one row and switched it to the other side of the block to make the yellow the center diagonal.
It’s funny how much rumination some of these combos take. And I’m thinking I’m going to need to cut some different fabrics for this before I’m done. I think I’m going to get down to a selection of fabrics that are all just too similar.
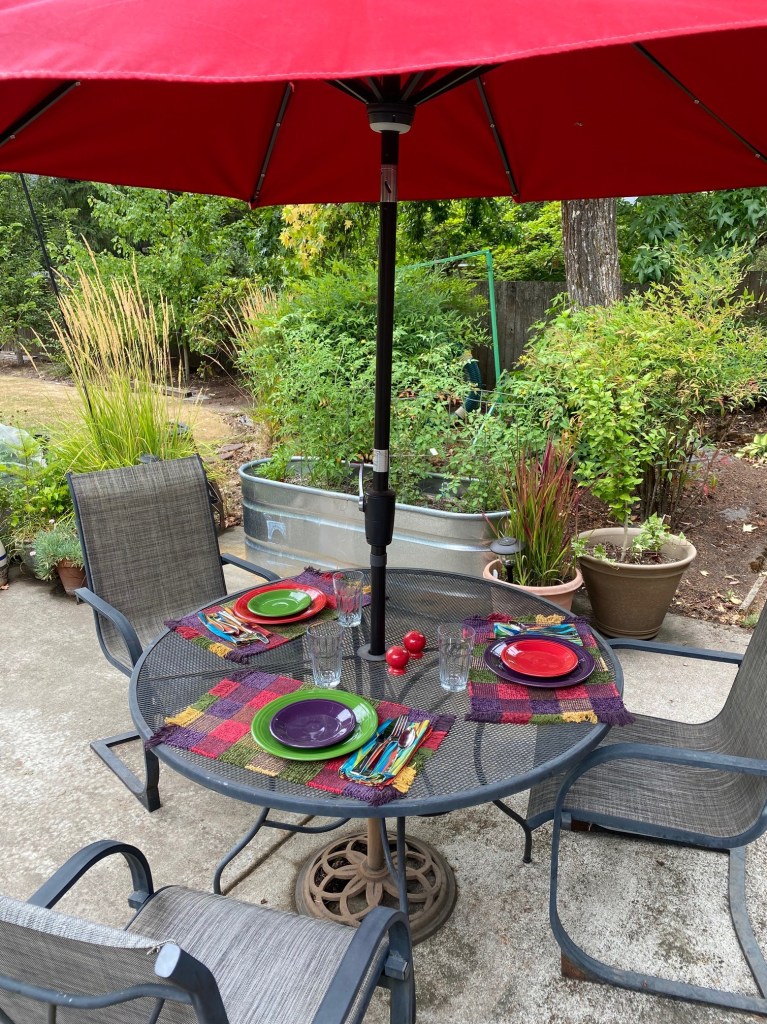
I had a couple of friends over for dinner yesterday to celebrate the wife’s birthday. She’s the one I made the sea glass wall hanging for… and she LOVED it!!! Phew. I’m so relieved!
This was the first time I’ve had people over to eat since the pandemic started! I even set the table!
We had a really tasty dinner of baked salmon, corn on the cob, crispy oven potatoes, and a Waldorf coleslaw. Then we had ice cream with fresh peaches for desert. I have a lot of leftovers that I’ll be enjoying for a few days.
Lots of Frankenbags from blog readers since I posted last. The first one is from Sharon Markum. And it’s so cool! I’ve seen the quilts with those sort of blobby floral applique and I love them. the cool colors on this one are really lovely! I just lvoe those turquoise and grey fabrics together!
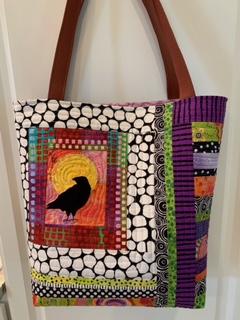
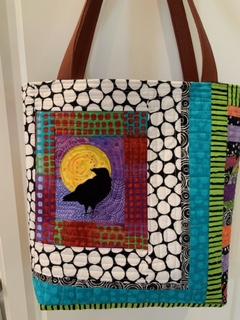
This next one is from Alice Smith and it’s so fun!!! I just love those raven blocks. So much that I went online and found some raven silhouettes to make my own blocks. the colors in this are so fun and different. I really like this one!
Next up are two bags from Anna Wright. The colors on all these tiny squares are just wonderful! And I love that green feathers lining. These are such fun and bright bags!
the next bag is another one by Birthe Aust. She’s made a good number of these bags. And I love that big shaggy bloom on the front of this bag. And the red polka dogs are so sweet. She’s also put a really strong lining in this bag… which makes me so happy!
This next bag was made by Cherry Naylor. I love the blacks and greys. I think this may be the first Franknbag done is this color way. And look at that fun lining! Love it!
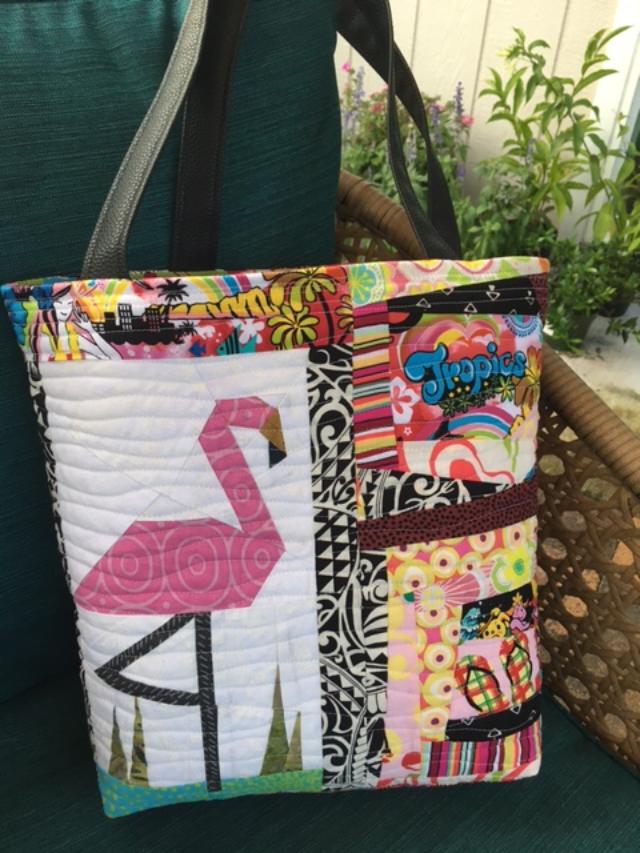
The next bag is from Rebecca Caisse. I just love that little paper pieced flamingo. Makes me think I may need to use up some of the bird blocks I made a number of months ago. And all her scrappy fabrics are really fun and vibrant!
The next bag was made by Jane Knaub. I just love her combo of fabrics. There’s such fun value variation throughout the bag. It makes it all very interesting.
The next bag is another one made by Sharon Marcum. Another great use of a big old bloom! I love the saturated blues in this bag. I also love the limited selection of fabrics. It’s a good look!
This next bag was made by Jody Soberon. She calls it her Murphy’s bag. Because like Murphy’s law, everything that could go wrong did go wrong! It looks to me like it turned out pretty well! I really like the cool, watery colors on that block on the front.
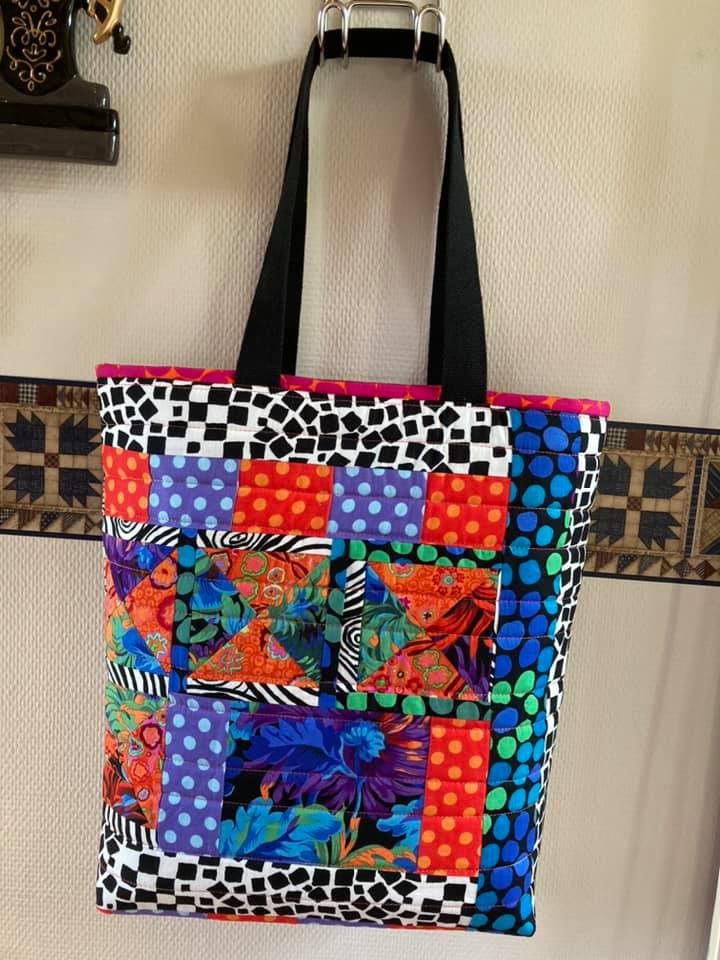
The last bag tonight is from Ann Baird. I love the way she used the wide vertical stripes of fabric. It’s a simple construction but it’s graphically strong.
I actually have to work tomorrow for a couple hours. There’s a meeting I committed to prior to scheduling my vacation. So no fun day trip on the docket for tomorrow.
I keep trying to count how many Frankenbags I’ve made and I have a hard time keeping track of them all. So I’ve posted below a photo of each of the 27 I’ve made. I was sure I must be over 30 by now. If I hadn’t slowed down in recent weeks, I might be at 50!
These are posted in the order that they were completed.
I was anxious to see more Aboriginal trip blocks done so hit my sewing room after our evening walk and made two strip sets and completed two different blocks.
It’s interesting to me how these fabrics play together. I think the first block with the green diagonal line is pretty successful. The one on the right with the yellow bird center diagonal is pretty muddy and it’s hard to see the diagonal line. I think the fabrics in this one are just too similar in tone, pattern and color. There just isn’t enough difference from one fabric to the next.
Here’s the first three blocks all together.
I think they look pretty good when they’re all together, and when more blocks are added I think it may all work. But I’ll be paying closer attention to the fabrics that I’ve selected for each strip set before I start sewing. And I have a feeling I’m going to have to cut more strips when I get down toward the end and have a pile of fabric strips left to choose from that are all very similar.
Here’s one of tonight’s strip sets as I was pressing it.
You might wonder why I have the metal ruler on my ironing board. Check out this video on how I use this tool to keep my strip sets straight. This trick has really helped my blocks made from strip sets go together nicely.
Another stressful day at work today. I’m really looking forward to my vacation! Just a few more days…
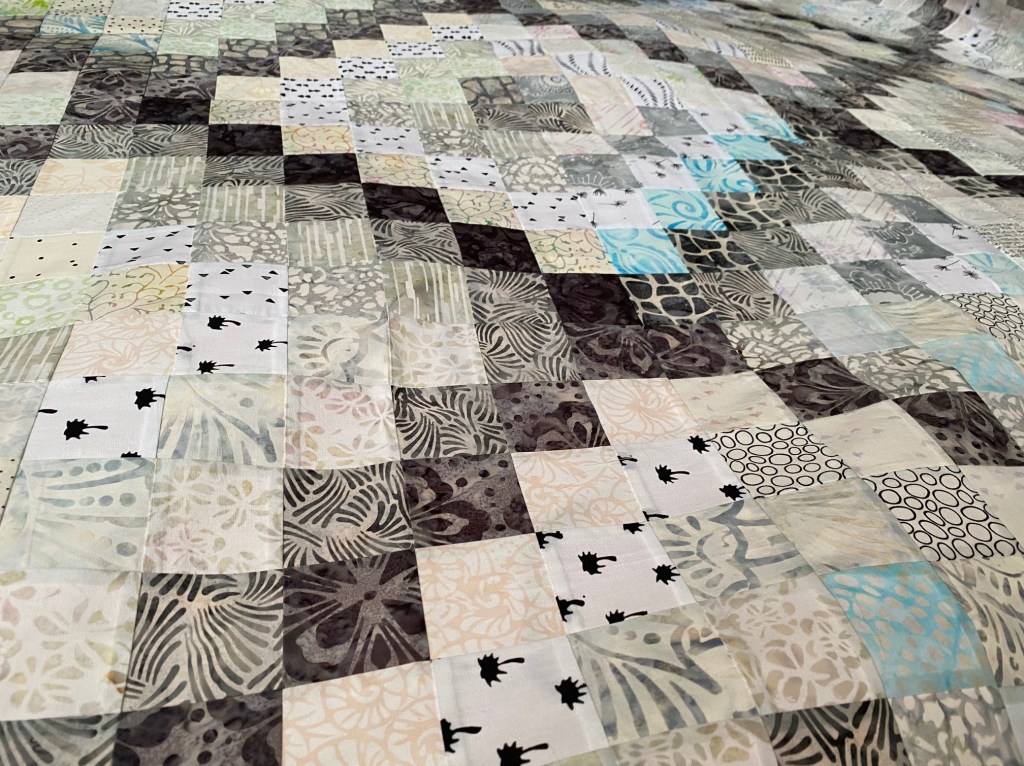
I’ve been organizing 2.5 inch strips of Aboriginal fabrics over the last few weeks in anticipation of making a scrappy trip quilt, and I’m loving how these fabrics look together.
And tonight I just wanted to see one scrappy Aboriginal trip block worked up. So I did it! Here’s block number one.
I’m making this according to Bonnie Hunter’s free tutorial. It tells you that you should choose the most bold fabric of your six to be the center diagonal line. The boldest fabric can be light, it can be dark, it can be a strong pattern. It all depends on how it relates to the fabrics it’s combined with.
When I put this set of six fabrics together, I was thinking that the red in the center of the photo below was the boldest fabric in the set.
But when I started putting the sliced strip sets together for the block, it was clear that the turquoise was actually the boldest fabric. This makes me think that I’m going to need to play each block by ear. I’m selecting what I think is the boldest fabric when I’m putting each set of six strips together, but it may look completely different as I get further along with each block. So I’ll evaluate how the fabrics read as a set as I’m making each block.
I’m pretty happy with how this first block looks. I think this will be a really fun quilt.
It was a stressful day back to work. So many meetings and so many emails to catch up on. I worked until after 7 pm tonight! I was so tired that this one block was all I could muster.
I received some more photos of Frankenbags made by blog readers. These first two were made by Susan Ermer. And wow! Two really cool bags. I love how she combined the aboriginal fabrics… using that one larger piece of a print on the front, and doing the wavy piecing on the back. I just love this bag. And take a look at her sea glass bag! It’s just so cool! Now I’m going to have to make one or seven of those! What a fun and bold bag!
This next bag was made by Katherine Wingate. She made this bag for a dear friend and used the friend’s husband’s college colors. Katherine said she’s never made any bags or purses or anything before. She’s only been quilting less than 2 years. I just love this!!! I really love seeing people making something they’ve never made before and just boldly jumping in! I love your bag, and I love your story even more.
And here’s another bag Katherine sent me a week or so ago and it got lost in the shuffle. She used blocks leftover from a one block wonder quilt she made. And this bag is a great use for those fun blocks. I love the warm fall colors in this bag. My mom would have loved this bag. Those fall colors were her absolute favorite. And the bold black and whites are so good! And that green jumble lining… you must know how I feel about that!!! Gah!
Thanks to Susan and Katherine for your photos and your enthusiasm!
Three more really hectic days of work before I’m officially on my two week vacation!
Oh wow! It felt so good to have a nice long weekend away from home! I left Portland on Thursday afternoon and headed down to my brother’s place near Bandon, Oregon. I returned home today and I feel so much better! I really needed some time off.
Here are Rico and Bender on the trail on my brother’s property on Thursday. We celebrated our arrival with a nice brisk hike and then settled in for a cold beer before dinner.
Friday my brother and his wife accompanied me and my boys to the beach for a nice long walk and romp in the water. It was almost perfect weather for the beach. We were in our shirt sleeves. It’s been so hot here in Portland and the weather on the coast was so cool and wonderful.
Saturday and Sunday Rico was entered in a sheep herding clinic outside Bandon, Oregon. It was a really fantastic weekend, doing something we all love to do in a really beautiful place. Here are all the border collies entered in the clinic waiting patiently as they’re leashed to the fence. Rico is closest to the camera… hiding in the grass.
Here’s Rico watching another dog take her turn as he waits patiently. There is a lot of waiting involved in sheep herding clinics. It’s important that dogs learn to wait calmly.
The sheep we were herding had never been worked by dogs, so on Saturday there were sheep and dogs flying all over the place. By Sunday, everyone had it all figured out and we saw some really nice work. Here’s a video of me and Rico in his final run on Sunday.
A friend of mine who is an excellent photographer was also at the clinic and took some great photos on Sunday. Here’s a few of me and Rico. Click on each image to see it larger. (All photos by Heather Christenson)
We were all exhausted at the end of the clinic, but decided to hit the beach on the way back to my brother’s… and I’m so glad we did. I’m always sad to leave the coast and I really enjoyed my time on the sand with my boys.
And they were completely worn out when we got home.
Before we left for home this morning, Bender helped my sister-in-law pick strawberries. So to reward him, she gave his own bowl to eat.
We got home to Portland around 3:00 this afternoon. I got the car unloaded and got everything put away and did some laundry before grabbing dinner and heading out for a walk.
After our walk I spent a little time in my sewing room. I opened a package of some fabric that arrived while I was gone.
I bought a big piece of Brandon Mably’s Octopus in black with the plan of using it for a quilt backing some day. I just love this fabric! I also bought a yard of the Damask Flowers in five color ways. A lot of shops have been having pretty substantial sales on the previous collection’s fabric. A new collection is coming out soon and they are clearing out their inventory. It’s a great time to buy KFC fabric!
I have no idea what I’ll make to go with the Octopus fabric, but I have a few ideas. Look at all the soft and muted colors in this close up.
Hmmm. Ideas.
I also cut a few more strips of Aboriginal fabrics for my upcoming trip quilt then. Then I put together fabric combos for six strip sets that will be made into blocks.
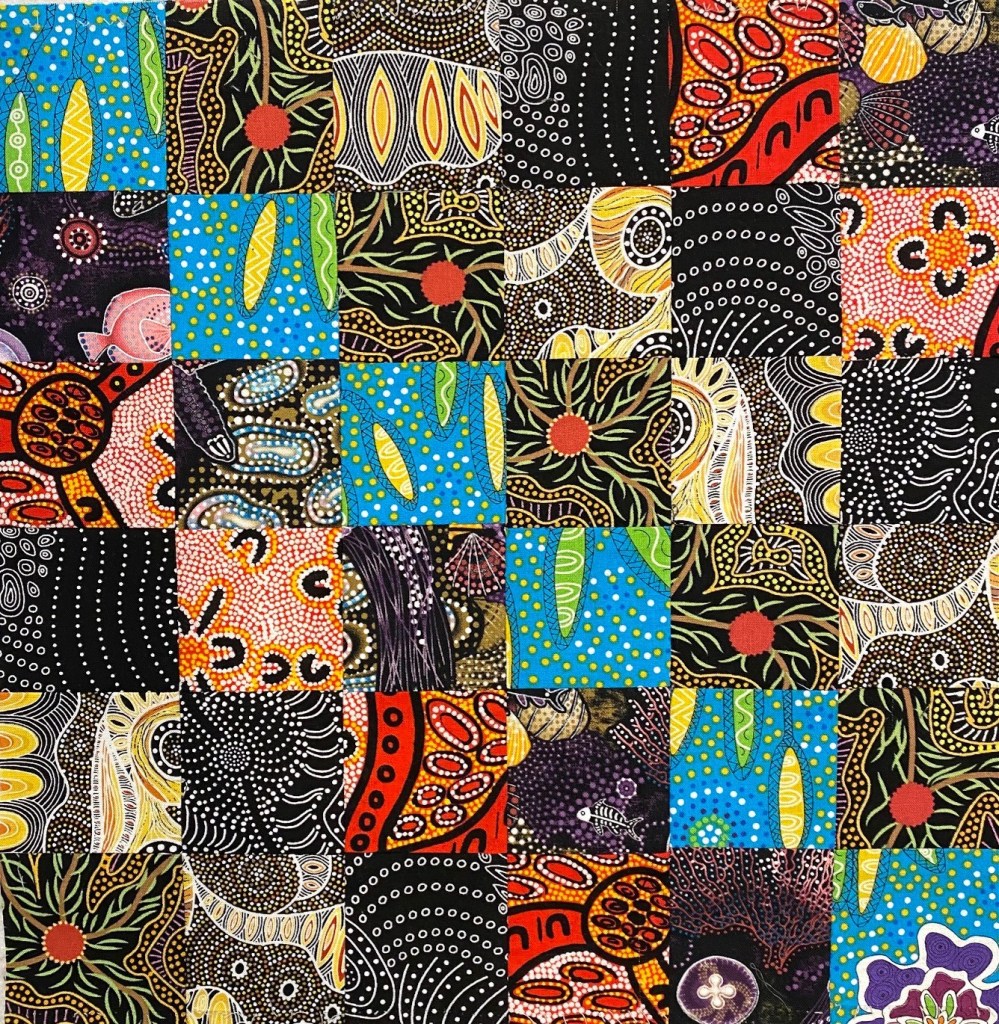
I always tend to think of Aboriginal fabrics as being dark. But look at all that color! It will be interesting to see how this one comes together. I’m looking forward to making another trip quilt.
I wrapped up my evening in my sewing room by sewing together one row of my Ice Storm quilt. I’m determined to finish this thing this week!
I’ve received a few more Frankenbags from blog readers over the last week. This first one was made by Sue Phillips. Sue said she is very new to sewing… only got her first sewing machine during lock down! She had never heard of crumb quilting, and now she’s hooked. Isn’t that fantastic!!! And what a fun bag! It looks like a well loved family quilt. So cheerful and pretty!
This next bag was made by Diane Lyons. I just love that big blue bloom on the front of the bag. And all that wonderful color on the other side with that strong blue band around the top. Really pretty!
The last one I received this week is another lovely bag made by Jodi Smith. I really like her limited palette and the strong black borders. And the diagonal quilting is really fun! All wrapped up with a pretty lining.
Thanks to Sue, Diane and Jodi for sending photos.
I have a short work week coming up and then I’ll be on vacation for two weeks! I’m really looking forward to it.
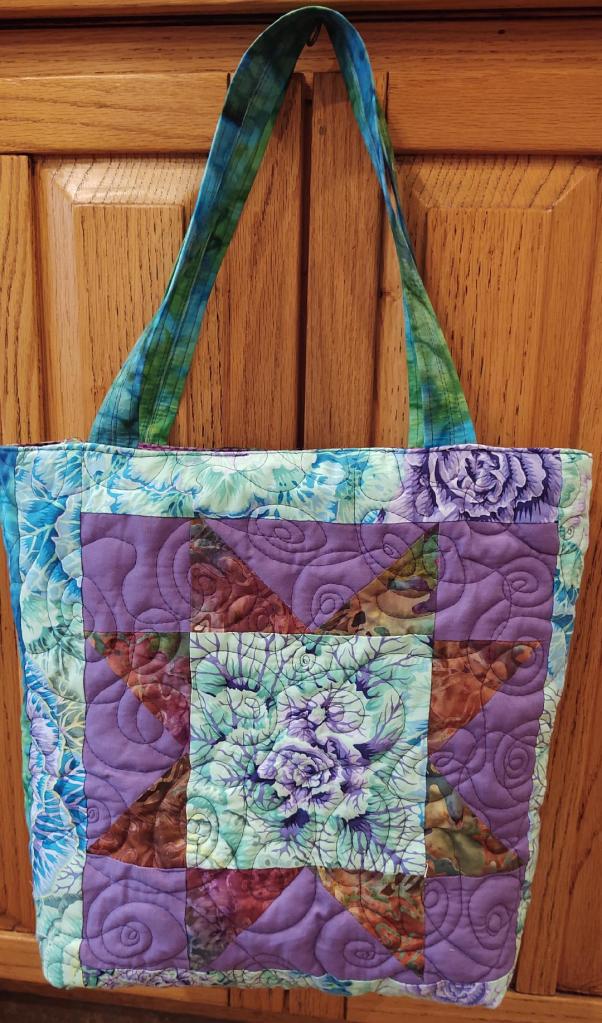
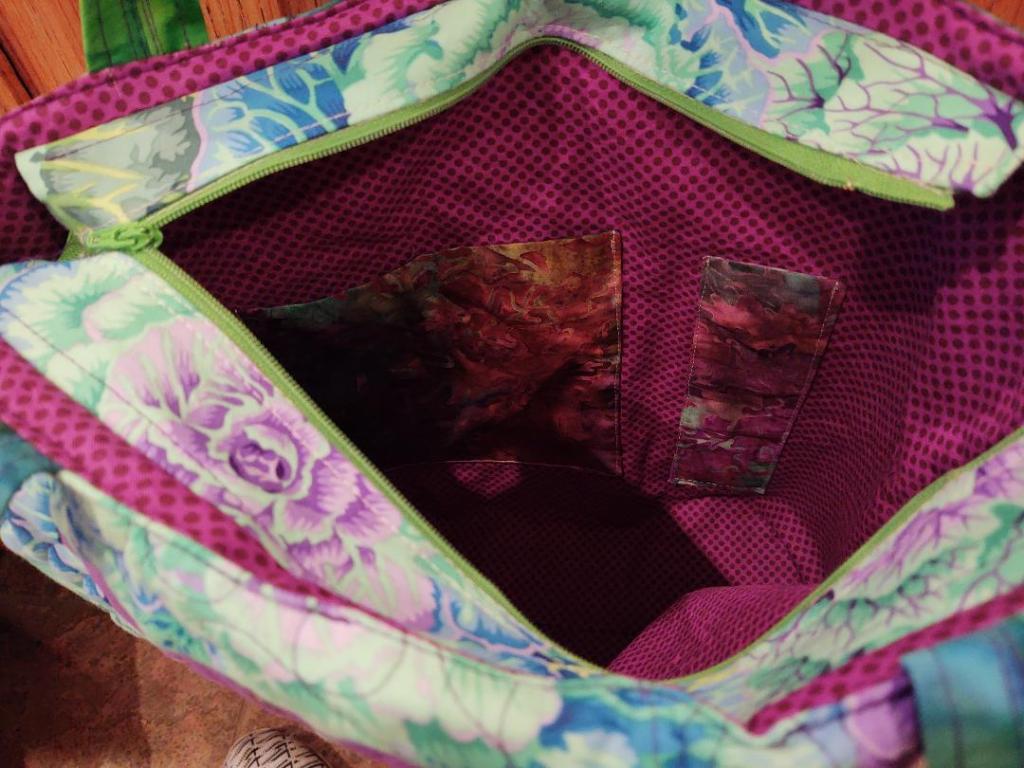
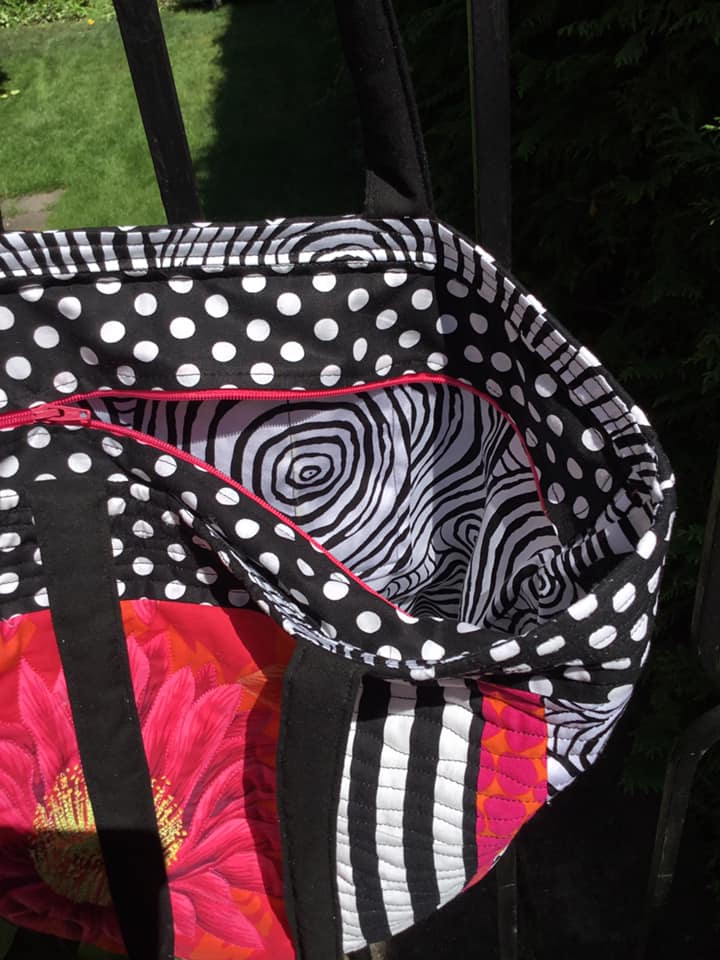
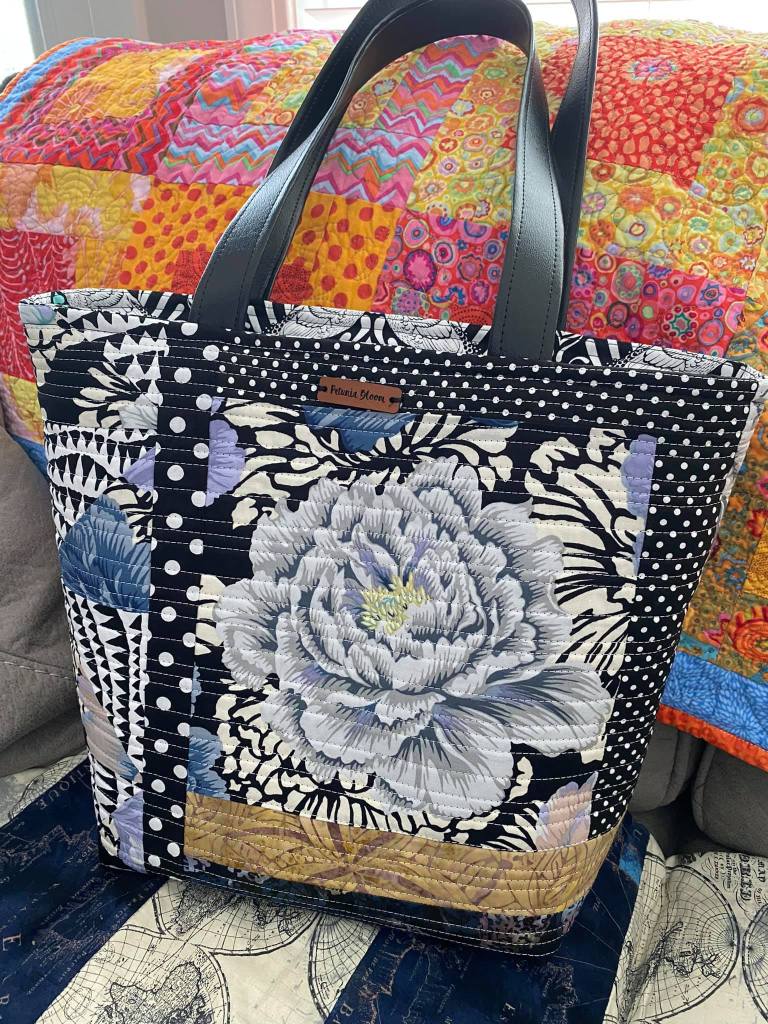
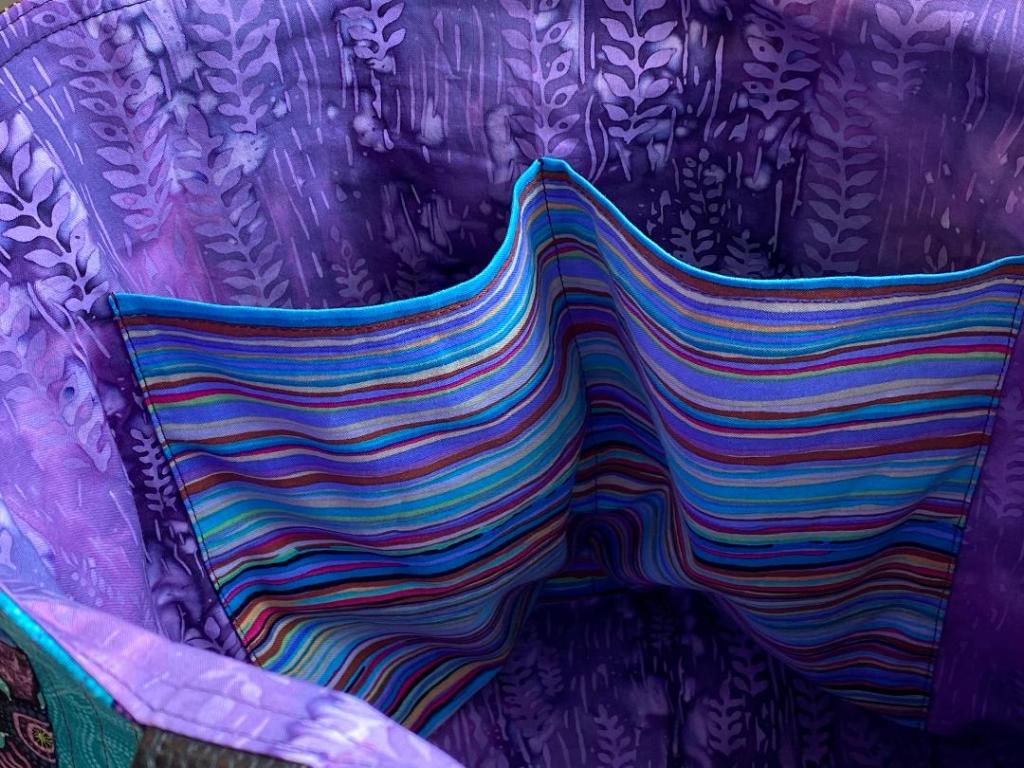
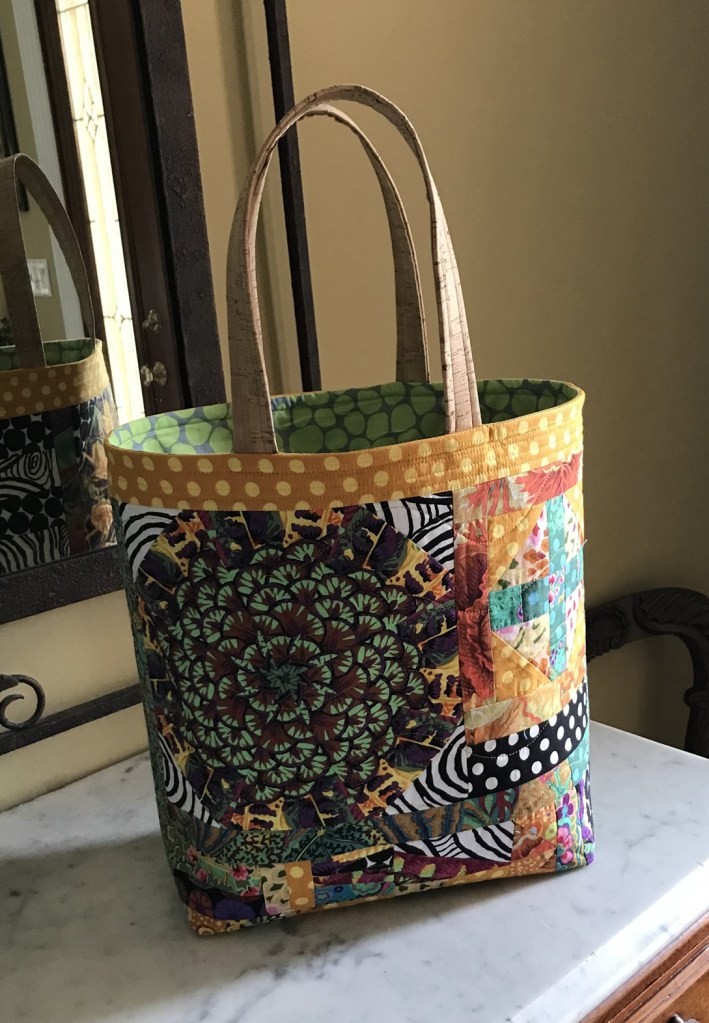
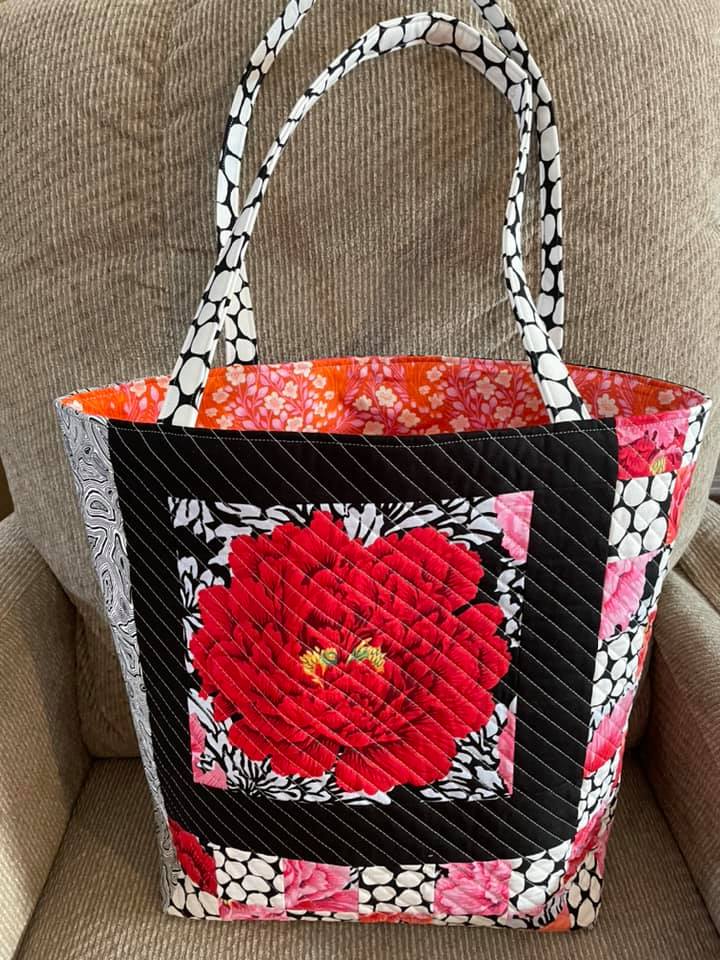
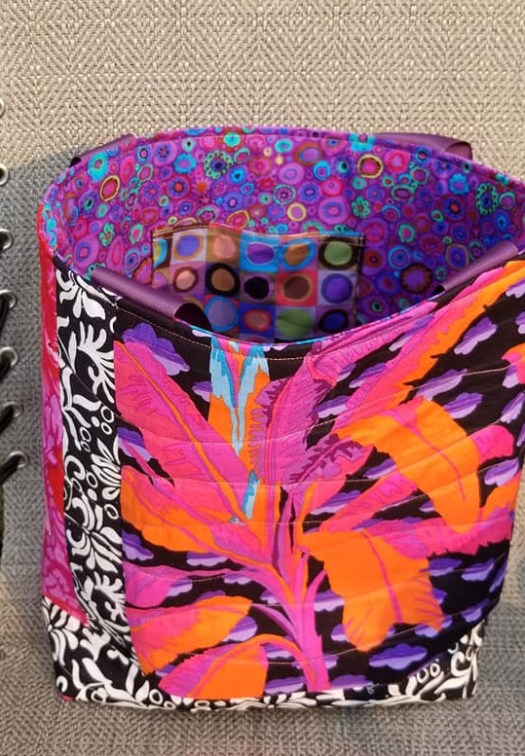
I finished this bag last night. It’s basically a Frankenbag but with a different approach to the piecing. So I’m going to count it as a Frankenbag,
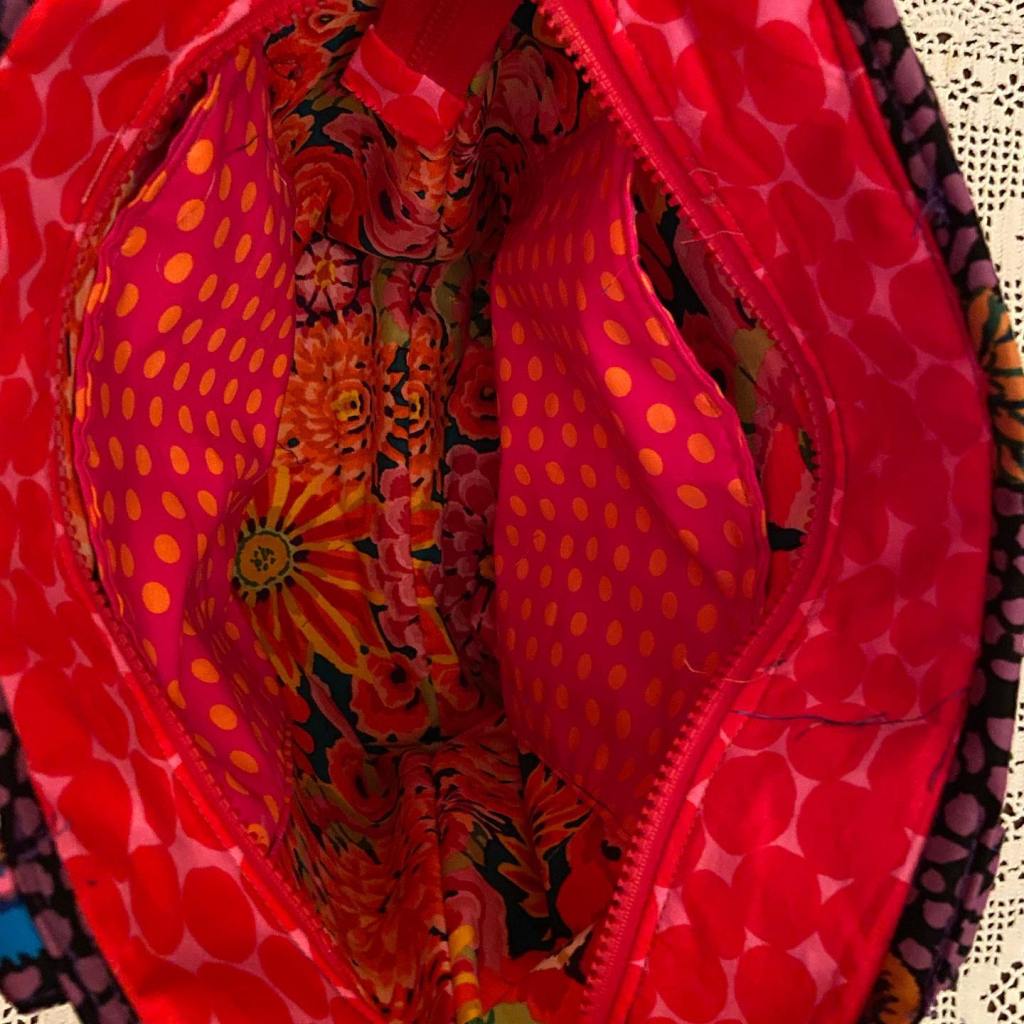
One of my favorite things about this bag is the lining. How good is this Onion Rings???
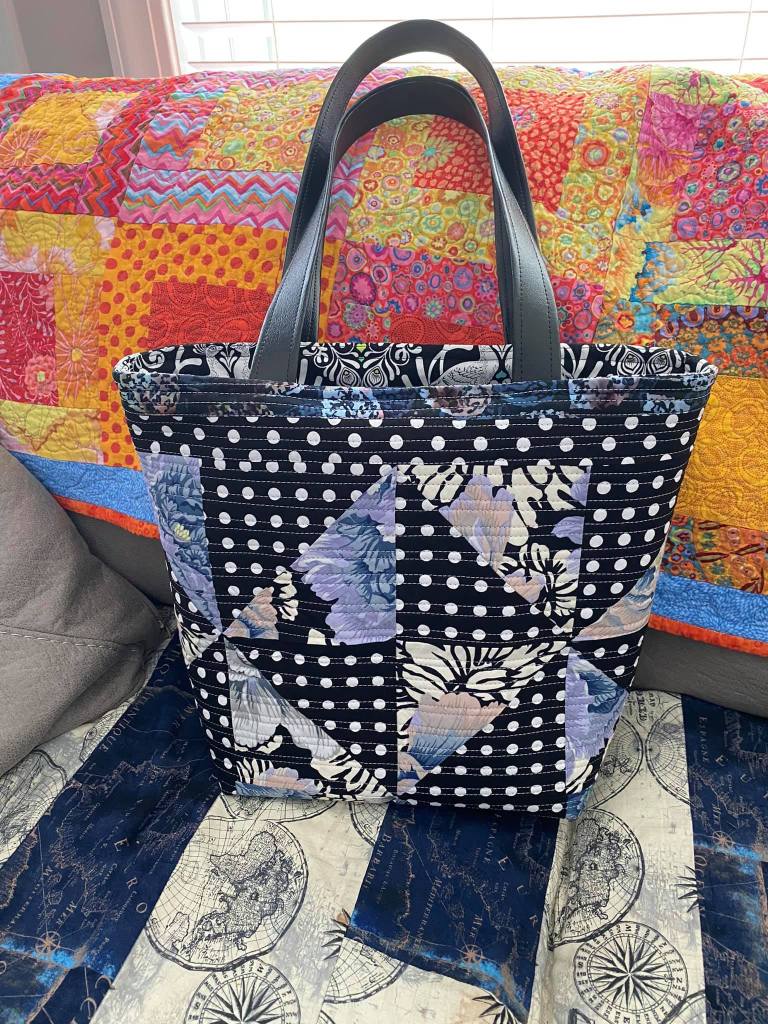
Here’s a snippet view of the bag front with a little lining showing.
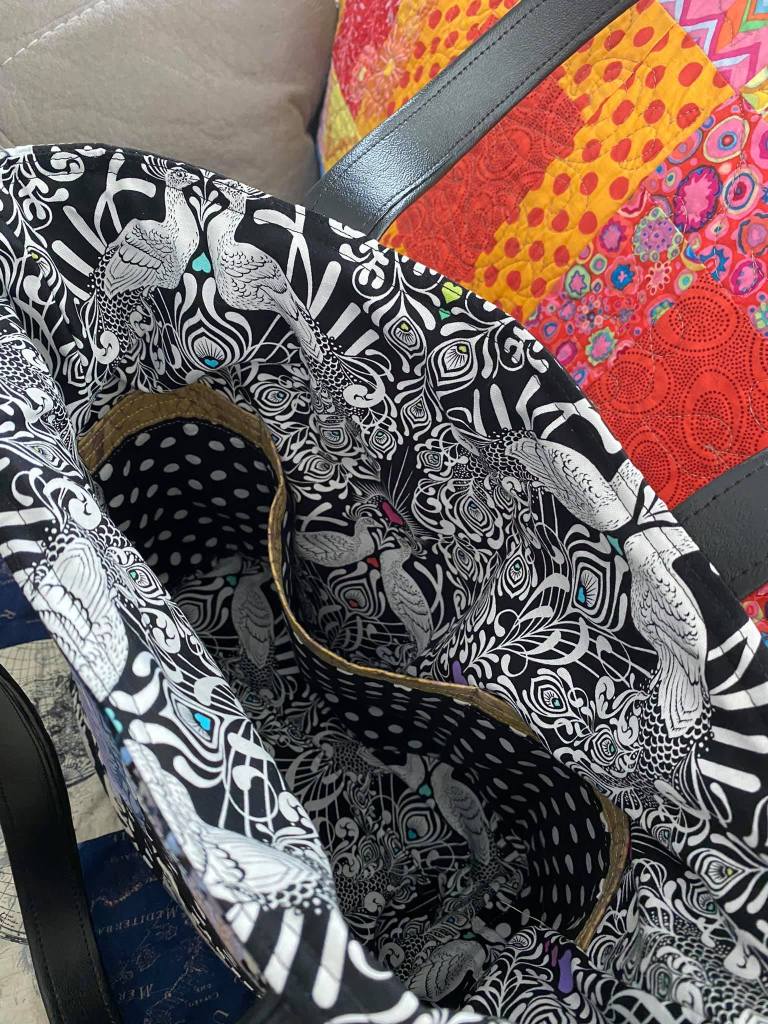
I tried a lot of different options for the lining before I pulled the onion rings out of the drawer. I was thinking something colorful, definitely another Brandon Mably design. But none of them spoke to me. As soon as I draped the onion rings on the inside of the bag, it spoke to me.
And of course, here’s the tag I love so much.
I will definitely make at least one other bag with this same treatment to strip sets. I pulled out some of the KFC strips a friend gave me a couple years ago to see what would work. I used some of the strips to make this bag a couple months ago:
I still have quite a few strips left. Probably enough to make three of the wavy bags. So I put some fabric combos together tonight to see how I liked them. This is the first one.
I like this combo. It’s very random, but has darkness and brightness across the strips. I might make a bag using these strips next. I would not include a fabric like I used the jumble in the first one. I want a completely different effect in the next bag.
It’s interesting to me how taking a photo of a set of fabrics really helps you see it differently. This next set felt really good to me until I looked at the photo, and I see a couple pieces that must be swapped out.
But I do like the sort of muted pastel feel. It feels vintage and romantic to me.
More Frankenbags have flowed in the last few days from blog readers. This first one was made by Jody Walton Soberon. It’s her first Frankenbag and she said it only took her three days longer than she expected! I think she did a great job. I love that big banana leaf on the back, and the lining is really good!
The next bag is another one from Cherry Naylor. I think Cherry has made nearly as many of these bags as I have! She’s definitely got it down. She’s great at choosing fabrics, putting them together in great designs, and her bags look really well made. I can feel her on my tail!
The last bag tonight was made by Shirley Riddle. I just LOVE her fabrics. And her combo of wavy and straight line quilting on this side of the bag is really great! Hmmm. More ideas! And look… a cute little pupper in the photo! Wow. The more I look at this photo the more those fabrics make my brain tingle!
I still need to start sewing the blocks of my ice storm quilt together. They’re all pinned into rows. Just sitting there… looking at me all disappointed.
If you’ve been thinking about picking up some Kaffe Fassett Collective fabrics, there are a lot of shops with good sales right now. I’m guessing they’re trying to liquidate current inventory in preparation for the new collection that is imminent. It’s a great time to dive in! I picked up a few pieces the other night that I’ll share when they arrive. One piece in particular has me vary excited… and I have no idea what I’m going to do with it!
I was looking at Pinterest last night and saw a bag that I thought was interesting. So I followed the link and eventually found a free pattern for the bag. I was pretty sure I had figured out how to make this happen, but downloaded the pattern just to see if I was right. And I was.
You basically sew 2.5 inch strips together, then press the seams with the wrong sides of the fabric together and stitch 1/4 inch from the edge. You’re basically making French seams.
Then you just fold the little tabs up or down and stitch them to make the scallop pattern.
I looked through my stash and selected a group of fabrics to use, and it’s funny that they’re all Brandon Mably designs. It wasn’t intentional to select all Brandon fabrics, but the look I wanted was definitely in the Brandon area.
I need to make the second panel tomorrow and then construct the bag. I’m just going to construct it like I do my Frankenbags. Thinking about some options for the lining. Might be Brandon’s onion rings. It definitely HAS to be a Brandon fabric.
I’m looking forward to executing this technique with different fabric and color combos. Different fabrics would give different and really cool effects.
One of my blog readers, Jody from Brookings, Oregon, left a comment earlier today asking me how long it takes to make a Frankenbag. She’s working on her first one and has found it a lengthy process.
The part that takes the longest is definitely making the two panels. This typically takes me anywhere from two to four hours, depending on how many orphan blocks I’m using and how complicated the other piecing is. Then it’s pretty quick to make the quilt sandwiches. Straight line quilting for two panels probably takes about 45 minutes. I can whip up the handles in ten minutes (I cut quite a few handle pieces while I’m cutting, so all I have to do is grab two pieces, fold and stitch). Constructing the body of the bag goes quickly. That might take me 15 minutes or so. Then making the lining, sewing it in and finishing the bag probably takes another hour.
So if I add it all up, it probably takes me four to six hours to make a bag, depending on how complicated and involved the panels are.
Jody also wondered if I’ve gotten faster after making nearly 30 of these bags. And I’d have to say that I probably have. I’ve learned a lot of tricks along the way that make the process quicker and more efficient. Things like the best way to pin the lining in the bag body so I don’t stab myself 15 times while I’m sewing it in.
I got photos of some really wonderful Frankenbags made by blog readers in the last few days! I’m having a blast seeing what others are making. There’s so much creativity and amazing sewing skill out there!
The first one was made by Susan Dunn, and it’s a wowzer! Look at all that amazing color! And that black and white spot is so bold and substantial. And the whole thing looks like it’s really well made. Quite inspirational!
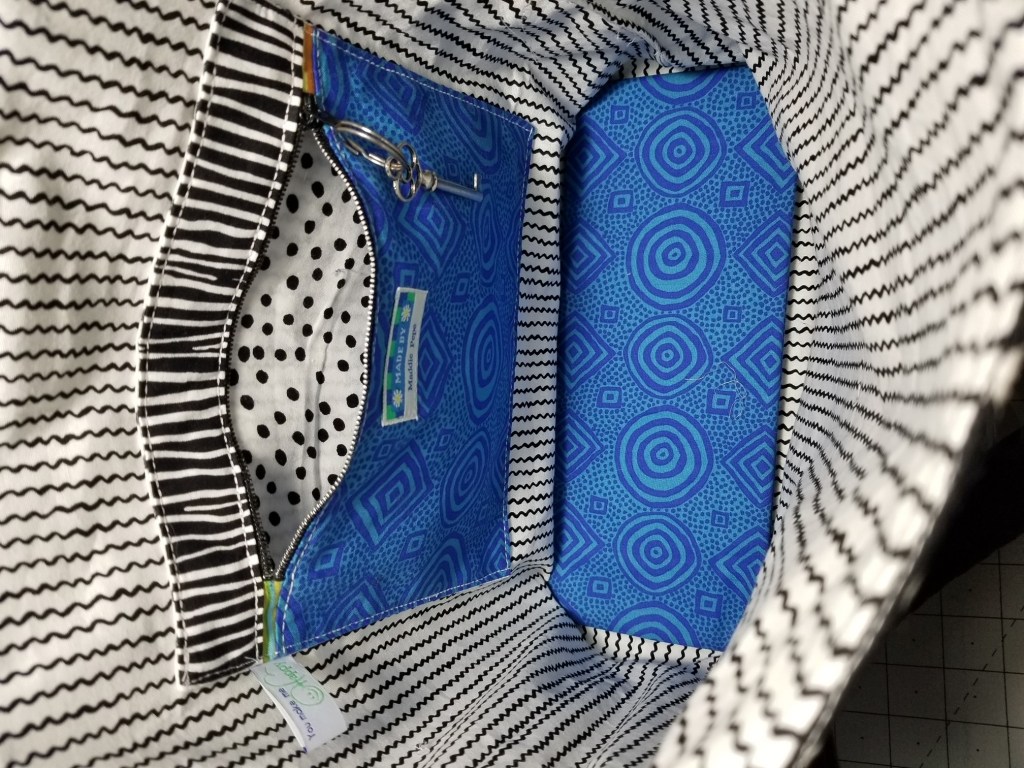
The next one is from Maddie Pepe. I love the cool colors in this bag. And I have a soft spot for stars. And take a look at that lining… it’s pretty spectacular! Maddie used a more substantial batting type material inside the bag and added a rigid piece in the bottom. And I really like how she made her zipper pocket. I’m going to have to look closely at that and see if I can figure that out. I love a good zipper pocket.
The last one up tonight was made by Michele Pintarch. She’s made other bags that have been posted here. I really like this bag. I love the colors, love the bold black and whites and I just love that purple lining with the surprise pocket lining! I just love details like that pocket lining! It’s amazing how much impact a little thing like that can have. And look at that big purple bloom on the side of the bag. Brilliant!
Thanks to Susan, Maddie, and Michele for sharing their photos! Beautiful bags, every one of them!
It’s going to be a relatively cool weekend compared to the heat spell we have coming up next week. I’m going to enjoy a couple of cool days before I have to hunker down in the house next week.