
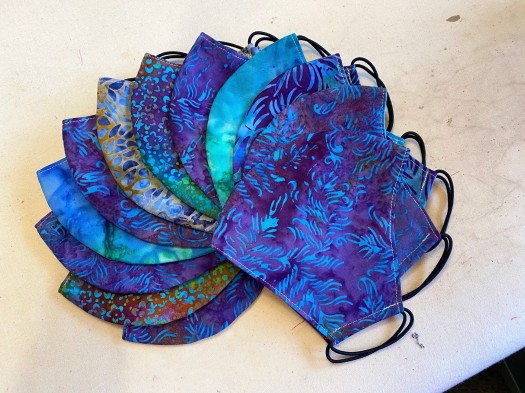
I’ve tried at least six different mask patterns — pleated masks, fitted masks, drawstring masks. And I’ve landed on my favorite. It’s really easy and quick to make up, and it fits really well. It has a nice amount of space between your mouth and nose and the front of the mask, so it’s really comfortable and doesn’t get too hot and stifling. I’ve worn this mask several times in public and am really happy with how it works.


A friend of mine is a dog groomer in southern Washington, right across the Columbia River from Portland, and her county was getting ready to start opening back up. She needed a dozen masks to get her through a week of work.
I had made her a couple different style of masks, and neither one worked well for her. Then she got one from someone she knows and she said she loved it. She took a picture for me and I looked through mask patterns online and didn’t have any luck in finding it.
So she loaned me one of hers, and I traced it, added the seam allowance, and made up my first prototype. It was really close. After a few minor adjustments I ended up with a pattern that works really well. I’ve also created a larger version. Both patterns are available below.
Occasionally I have a friend ask me if I’m making masks, so it’s nice to have some on hand to give away. I’ve also made some for family and for people at work. I currently have 27 that I’m making production line style. All I have to do is finish the top stitching and add the ear elastics.
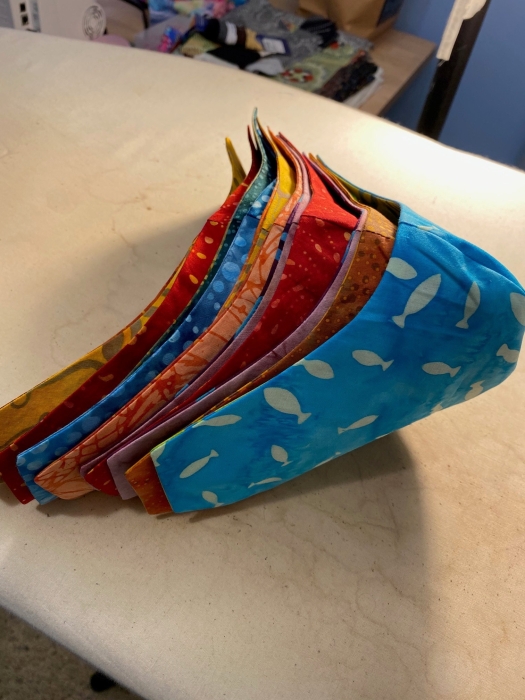
I’ve made all my masks out of batiks as they have a higher thread count and offer a little better protection. I also use a light weight non-woven fusible interfacing, which is getting harder and harder to obtain. It’s supposed to add another layer of protection. I’m expecting more in the mail at the end of this week. We’ll see if it shows up.
Here are two PDFs of the pattern:
Anne’s Mask Regular Size Pattern. This would fit most women.
Anne’s Mask Large This would fit most men and women who want a little more room.
I would love to know whose pattern it is so I can give them credit.
It can be tedious cutting out pattern pieces, so I cut two of these patterns out of freezer paper and was then able to press the pattern right onto the fabric. The wax on the freezer paper makes it stick to the fabric, so cutting it out with a rotary cutter is really easy and accurate. And then the pattern peels off easily and leaves no wax behind. I’ve even had luck cutting four layers of fabric with these freezer paper patterns. You have to be careful as you rotate your fabric for cutting so it all stays lined up. You could easily put one pin in the center of the pattern to keep it all together.
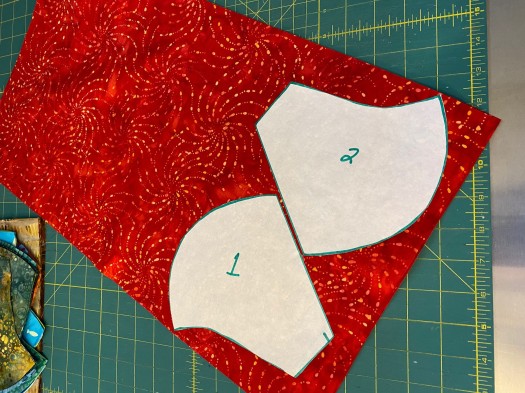
I made two of the freezer paper patterns so I could fit them more efficiently on my fabric, and produce less waste.
The assembly is really easy. Simply sew the curved center seam of the mask front and lining, clip along that curved seam, and then do a little pressing. I actually don’t open and press the lining, because it will fit inside the mask as it is prior to pressing.
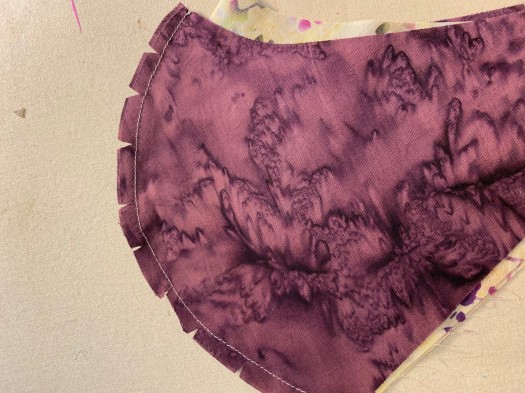
Then nest the outer mask part inside the lining, pin it all together, and sew around the edges with a 1/4 inch seam allowance, leaving an opening on one of the straight edges to turn it right side out.
One of the many mask tutorials I watched (can’t remember which one it was) had a really great tip for making the opening easier to close. You simply sew a line from the end of the seam out across the seam allowance on each side of the opening. This makes it really slick to line up the fabrics along the opening and press them in preparation for top stitching. From now on I’m going to use this little trick every time I need to leave an opening in a lining.
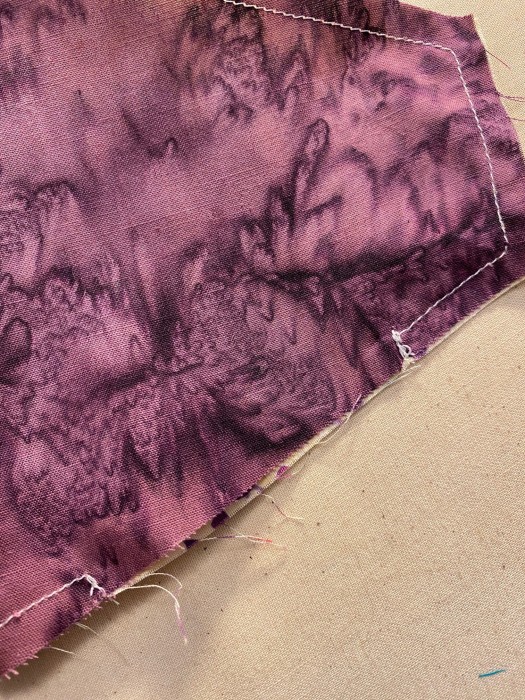
Then clip the corners, turn it right side out, finger press all the edges in place, and then press with an iron. Then I run a line of top stitching all the way around the edges of the mask, making sure to catch both sides of fabric where you left the opening.

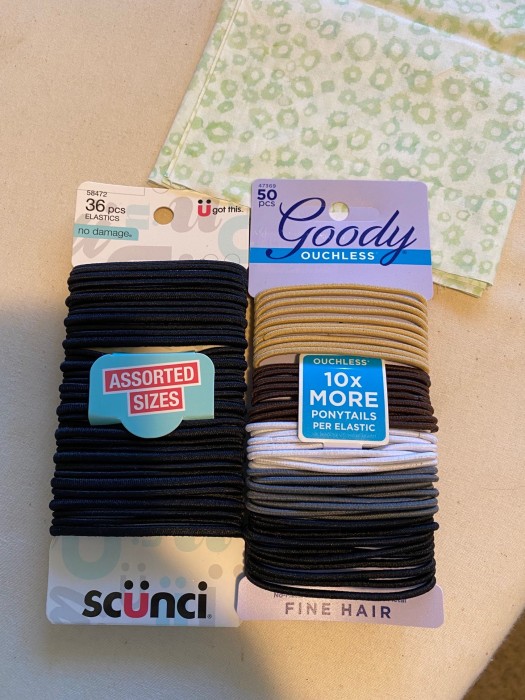
I’m using thin pony tail bands instead of elastic. The sides of the mask go back toward the ears far enough that these bands are really comfortable. Here’s the bands that I’ve found on Amazon. I have purchased enough to make over 100 masks. I anticipate that I’ll be making a lot of masks over the next number of months and am thinking that they will become hard to get.
To add the elastic, turn under about 3/8 of an inch on each end and press. Lay the elastic on the fold line and fold the fabric over. I use a zipper foot to sew the seam to secure this as my regular foot kept getting caught on the band and I made a couple of messes. I back tack at the beginning and end of this line of stitches to secure it.
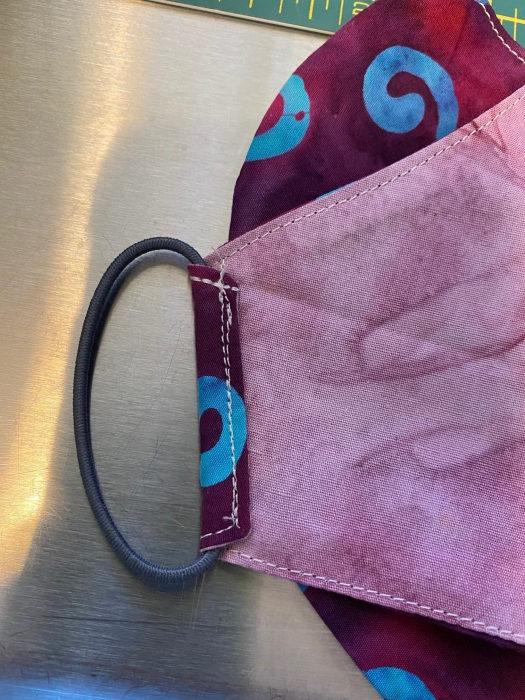
If the elastic fails, it would be easy to pick out this line of stitches and sew in a new set.
I haven’t had much motivation for sewing the last few weeks. Work has calmed down but is still pretty crazy. I did take a couple days off two weekends ago and then got another long weekend last week. The days off were really wonderful!
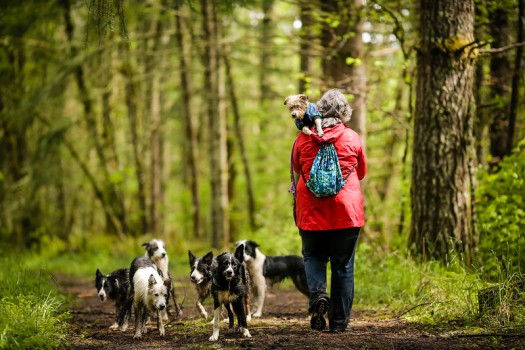
May 23 was Forrest’s birthday. Can’t tell you how much I miss that dog. He’s been gone now for 2.5 years… so amazing that much time has passed. I will never love another dog the way I loved Forrest. All future dogs will be compared to him and none will measure up.
Look at how magnificent he was!
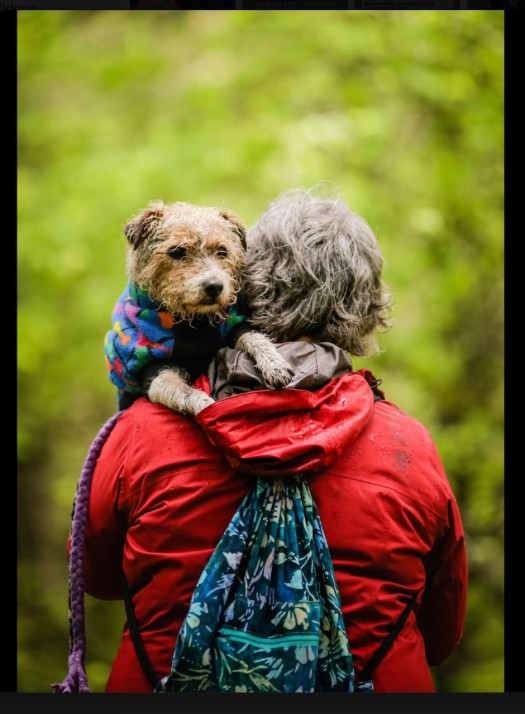
This picture was taken by my friend Heather Christenson on a cold rainy May hike three years ago. I wasn’t going to take Forrest with me because he was old and it was cold and rainy. He absolutely refused to let me leave the house without him, so I grabbed his little blue coat with the dog bones on it, and brought him along… knowing that I would have to carry him for a good portion of the hike. I am so glad I took him along. He had such a wonderful time with all those border collies!
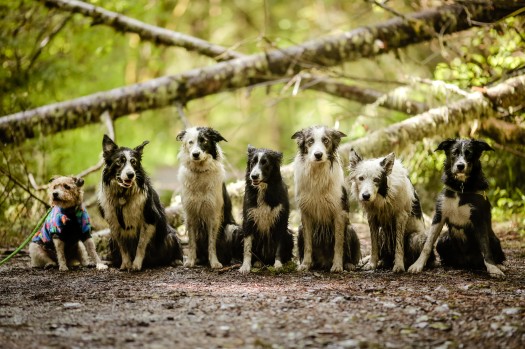
Heather is an amazing photographer. You can see her photos here photos on Flickr.
So funny that I never realized that Rico’s ear hadn’t gone up full time yet when this photo was taken. He would have been about 7 months old here.

I like your mask pattern – thanks for sharing. I’ve made loads of masks already and I’m still getting requests now that the state of VA requires a mask if you want to go into a business . I’m still finding people who think this pandemic is a hoax and the number of deaths is hyped by the news. I guess we’re all free to believe what we want to, but I’ll still wear my mask and make them for folks who want them.
LikeLike
Wearing our own masks is sometimes all we can do as individuals. It’s a good thing to do as a decent human being. And making a mask here and there for someone who needs one is also a good deed. Thanks for being a decent human!
LikeLike
Where is this pattern? I need to make another one for me.
Diana.
daligonet@gmail.com
LikeLiked by 1 person
There are links to PDFs of two patterns in the blog post. They are labeled “Anne’s Mask” and “Anne’s Mask Large”.
LikeLike
I so appreciate your reinforcing your directions with photos along the way. They are always clear and spot on the topic.
Thank you for your carefully written/clear instructions.
LikeLiked by 1 person
Awww, thanks! I always assume people reading have some knowledge about sewing, so don’t do these for a complete beginner. I like to share tips and tricks that make it work easier and better.
LikeLike
Are you cutting the elastic to make it a bit longer? Or are you just leaving it as a loop?
Sent from my iPhone
>
LikeLike
I don’t cut them. They are just a loop. I find them comfortable. The sides of the mask come to the front edge of my ears, so the elastic isn’t stretched too far. You may need to adjust the length of the sides if it doesn’t work for you as the pattern is.
LikeLike
Thank you for this pattern. I have tried several myself and have yet to find the “perfect” one, so I’m got my fingers crossed that this is the one! Forrest sure looked like he loved that rainy walk in May. No matter how old our pets get, they yearn to spend time with us. Carrying one is the smallest gift we can give in exchange for all of their love. You are blessed!
LikeLike
I hope the pattern works for you. I’ve given several away and so far everyone loves them. Well, as much as you can love a mask. And yes… I was happy to carry Forrest that day. I’m so glad I took him along!
LikeLike
Forrest looks like a wonderful dog! Thank you for the mask pattern and tutorial. I will try the pattern. I find it is hard to make masks fit for family & friends far away.
LikeLiked by 1 person
I’ve shared this with several people and they all like the way it fits. It would be interesting to see how it fits more varied people.
LikeLike
Hi! *wave wave wave*
Your post was on my Reader recommended posts so congrats to that!
Like you, I’ve been searching for the perfect mask pattern. The challenge I’m facing (well, a number of them actually… like 1. I have very novice sewing skills) is I want to have a “pocket” so I can add a filter in between the two layers of fabric.
Mine haven’t turned out very well and I’m a little embarrassed. I guess I just need to keep practicing.
LikeLike
The best way to get better is to keep practicing. Masks are a good way to build your skills in sewing. Soon you should try something more difficult!
LikeLike
your mask materials are so cute! I’ve made tons of masks. your pattern reminds me of this woman. https://www.craftpassion.com/face-mask-sewing-pattern/#face-mask-pattern
LikeLiked by 1 person
That’s actually one of the fitted ones I tried and it didn’t work for me. The top end of the mask was at the bottom of my ears, so when I tried to tie it or use elastic, it pulled the mask completely out of position. I think my ears are higher than most people’s ears!
LikeLike
Hi!! What are you using to pinch the top of the mask to your nose? I have sewn half a coffee closing thing-a-ma-jig which works very well, but don’t see that in your instructions. Thanks, and love your blog!! Especially our shared love of Kaffe Fassett; you have created some remarkable and beautiful quilts using his lines. I even have the warm triangles bordered with black and white as my screen saver to inspire me everyday!! ❤
LikeLiked by 1 person
I’ve purchased some self adhesive aluminum flat wires on Amazon that you stick to the outside of the mask. I’m not sewing them in because I’ve had issues with wires that are sewn in not lasting very long and then you have a mess on your hands. Find the aluminum flat wires here: https://www.amazon.com/gp/product/B088M1XW6F/ref=ppx_yo_dt_b_asin_title_o06_s00?ie=UTF8&psc=1
LikeLike
Thanks so much , it’s lovely and easy to follow. I will try another this week.
LikeLiked by 1 person
I’ve made a lot of masks on this pattern. It is truly my favorite. I just made four more for myself last night! I’m glad it’s working for you.
LikeLike
I too am looking for a mask pattern that fits better than those I have tried. I see the pattern but can’t find a “print” button. Don’t know what I’m missing.
LikeLiked by 1 person
You might need to download it or save it before you can print it. Make sure it prints at 100%.
LikeLike
Thank you. I finally got it. Will try it over the weekend. Do you use 4mm loops?
LikeLiked by 1 person
the ones I’ve used are all 2mm. I got some of the 4mm and they are a little thick around the ears.
LikeLike
Forrest looks like a sweetheart. I miss my furry kids too. I’d like to give your pattern a try but my .pdf download only has one pattern piece. How can I get the lining piece? I see two pieces in the photo with the red fabric laid out on it.
LikeLiked by 1 person
You use the same pattern piece for the two front pieces of the mask, and the two lining pieces. They’re all the same.
The two pieces on the red fabric are just two copies of the pattern so I can fit two on the fabric at one time.
Forrest was a sweetie. I miss him more and more every day.
LikeLike
Forrest looks like a sweetheart! I miss my furry kids too. You are a very talented sewer!
I’d like to give your pattern a try but my .pdf download only has one pattern piece. How can I get the lining piece? I see two pieces in the photo with the red fabric laid out on it.
Could you please email the patterns for both linings? Thank you so much!
LikeLiked by 1 person
I’m happy to email them to me but I’ll need your email address. Your comment has shown up on my blog post and doesn’t include an email address.
LikeLike
Forrest looks like a sweetheart! I miss my furry kids too. You are a very talented sewer!
I’d like to give your pattern a try but my .pdf download only has one pattern piece. Is this the only piece for both fronts and lining pieces?
Thank you so much!
LikeLike
I would like a mask pattern if anybody would send me one. My hand have arthritis and I can’t cute but I have some one do it for me here is my address 5290 n. Verde ln. Prescott fly. Az 86314 I would appreciate it if I could have one sent s/m and leg. Thank u
LikeLike
Hi. Giving this a try. But when I download the regular and then the large one they are the exact same large pattern. I thought one was smaller than the other? Can you email me the small one?
LikeLiked by 1 person
They aren’t vastly different in size. The biggest difference is along the curved front edge. Try printing them, and then cut them out and put one on top of the other to see the difference. The straight edge along the bottom is almost exactly the same on both masks.
LikeLike
Hi, love the pattern. How can I get it will like to print it.
LikeLiked by 1 person
There is a link to two different PDF files in the post. you can click on the link to open the pattern and print it from your computer.
LikeLike
the links to the pattern say: “Anne’s Mask” and “Anne’s Mask Large.”
LikeLike
woh I like your posts, saved to bookmarks! .
LikeLike
Thank you for the pattern. Of the many I tried, this one fits/feels the most comfortable for me although I did have to tweek it a little by creating a couple tucks for better grab under my chin so it wouldn’t ride up each time I bent over. Again, thank you.
LikeLiked by 1 person
I’m so glad it worked for you! I’ve made a lot of these and I use them all the time. I love that you added your own tweak to make it work better for you!
LikeLike
I cracked up reading this. I am not a seamstress by any means. I have a machine but I can never even get it threaded right. The very first mask I attempted to make was a pleated one. That one was a hot mess. Couldn’t figure it out. The second one, I put a piece of paper over my phone & tried to trace it & make it larger. Ended up with somewhat fair mask. Only thing was I made it wrong & ended up with something resembling your mask. I used the hair holder for my ears however they didn’t fit right. After all that, I ended up with one slightly resembling yours. Made me smile to see that.
LikeLiked by 1 person
Yup. You have to kiss a lot of frogs to eventually find a prince!!!
LikeLike
What are the other measurements on Anne’s Mask besides the 5 1/4 bottom line. ?
LikeLiked by 1 person
I don’t have other measurements. I just added the measurement at the bottom so you could verify that you printed the pattern correctly.
LikeLike