
A lot of people have been asking me how I made my feedbag tote bags, so I decided to make a quick tutorial. These bags are really quick and easy to put together, so this shouldn’t take too long.
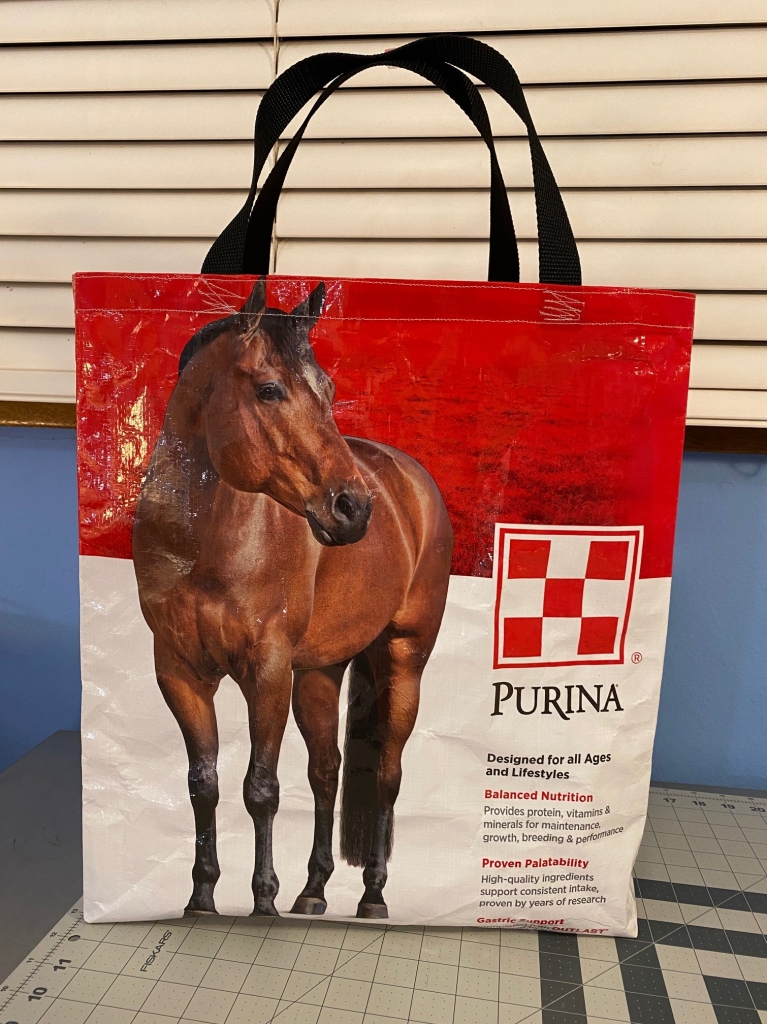
Here’s the bag I made for this tutorial.

Here’s another one I made last night.
It seems like the size of the bag corresponds with the size of the animal.
The first thing you want to think about is selecting your feed bag. You can use any bag (chicken feed, goat feed, bird feed, horse feed, etc…), but I like the ones that are made from a woven synthetic fiber, coated with plastic, rather than just plastic. This picture shows the inside of the bag. I like bags that have fun and colorful images.

If you have friends with chickens, you may be able to get feed bags from them. I have a good number of friends who have various livestock, so I’ve gotten a lot of bags… sheep, horses, cows, goats, etc… If you don’t know anyone with animals, you might want to check with your local farm store and see if they know of a source. One of our local farm stores has a recycling area for feed bags. I’m guessing they would let people just take what’s been put there. I even saw some for sale on Etsy the other night.
Once you have your bag, you’ll want to make sure it’s clean. If the bag was for a dry food and clean food, I find that a wipe down with a damp cloth is enough. Some feed is dirtier and stickier and stinkier… these bags will require more cleaning. You might want to cut off the top and bottom of the bag, turn it inside out, and run it through your washing machine if it’s really bad.
Once you have a nice clean bag, the first thing you’ll want to do it cut off the top and bottom of the bag to make sure it’s all even and square. The size is up to you. I like to have mine cut a little taller than they are wide. The bag I made for this tutorial started out at about 15 inches wide by 21 inches. I’m not including the width of the sides of the bag. Just the actual front/back section.

Most of these bags have a pleat or fold on the side.
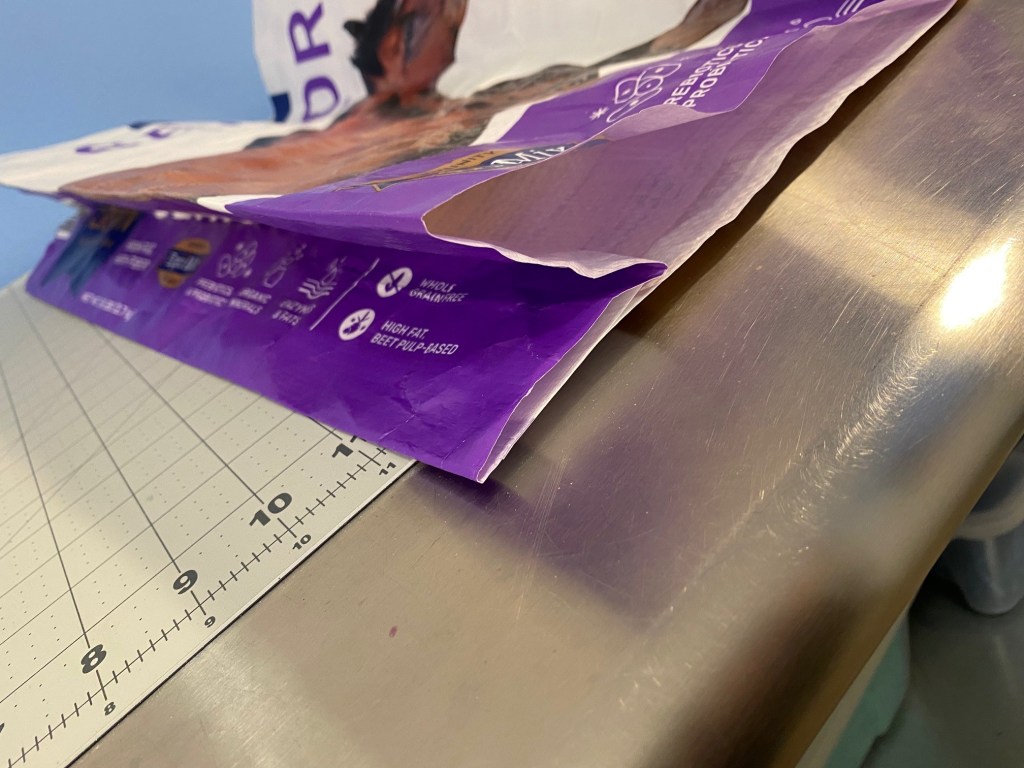
I have the sides folded in, as in this photo, when I’m measuring and trimming the bags.
The width of these folded sections varies from bag to bag. This bag has a really wide folded section.
Also important to know… use the bag at the full width and then there’s no need for side seams — don’t cut the sides. You’ll use the folds in the bag to form the gussets and sides of the bag. It’s like magic!
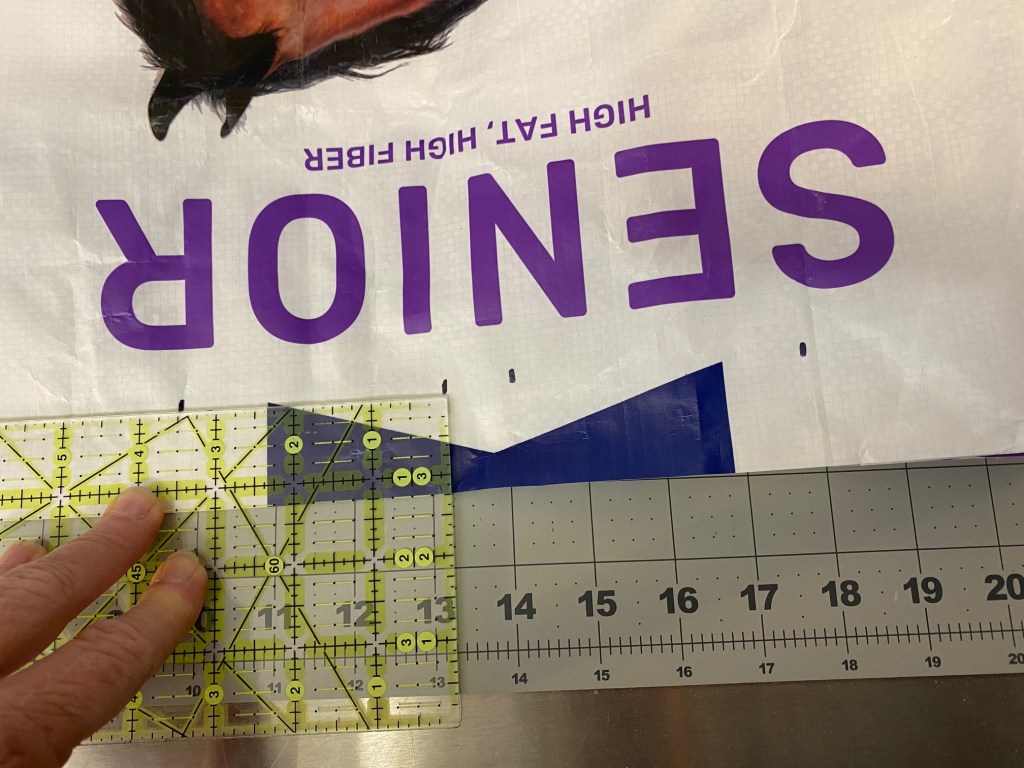
So once your bag is all trimmed and even, mark the top of the bag to place your handles. On a large bag like this horse feed bag, I measure over 7 inches from each side and mark (I do this because it’s easier than folding the bag to find the center!). Then I make a mark between that mark and the side of the bag, 3.5 inches away from the mark. Do this on each side of the 7 inch mark. I make these marks about 1 1/4 inch from the top of the bag. That way I can see them when the top edge is folded over. Mark each side of the feed bag.
This photo shows the 7 inch mark from the folded edge, and the 3.5 inch mark to the right of it. The mark at the right is where you will place the handle.

This next photo shows all the marks on this side of the bag: the two 7 inch marks in the center, and the 3.5 inch marks on either side.
Next, with the bag right side out, you’re going to fold over about 3/4 inch all the way around the top of the bag and finger press. These bags take well to finger pressing. Which is good because using a hot iron would be a hot mess. Get it? A HOT mess!
Once you’ve finger pressed this first fold all around the top of the bag, fold that top edge over again, finger press the fold, and clip in place. Slip the handles up under the folded edge at the handle marks (centered on the mark), and clip them in place. Make sure your handles aren’t twisted.

I’m using nylon webbing that I bought online, cut to 22 inches long. You’ll need two handles. You can make handles from the sections of bag you cut away. I prefer the nylon handles.

These handles are not long enough to serve as shoulder straps. If you want shoulder straps, you’ll want to cut longer straps.
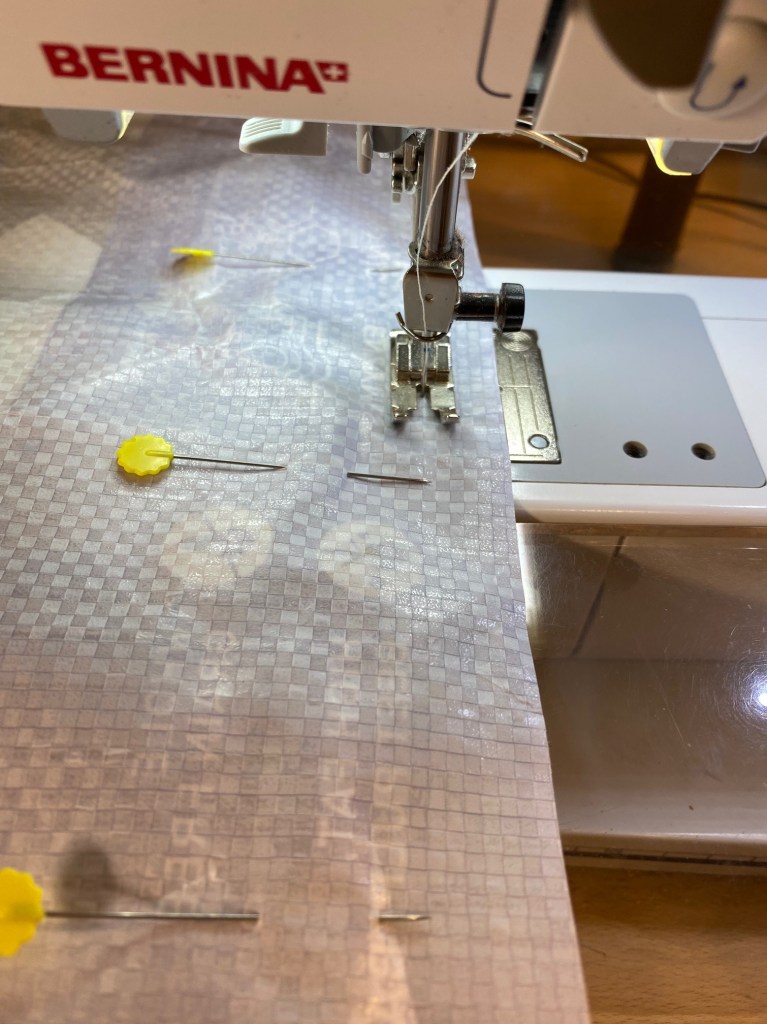
Next, you’re going to run a line of stitching all the way around the lower edge of that folded section, catching the handles in the fold as you go. I’ve stitched pretty close to that edge, but you can certainly sew your line 1/8 inch from the edge.

Once I’ve sewn all the way around, I lift my needle and presser foot and move the bag so that my needle is lined up with the top edge of the bag, and run another line of stitching all the way around, making sure you fold the handles up and stitch over each one as you come to it.

I also use my reverse button and twist the bag a little to do zig zag lines across the bag handle to reinforce it, making sure that I end up with my needle back on the right edge so I can continue my line of stitching around the top of the bag.

Once you’ve gone all the way around and have reinforced all four handle attachment points, you’re ready to sew the bottom of the bag closed.
Turn the bag inside out and lay it flat, opening up the folds on the sides. You don’t want to sew the folds in place. You want it all flat. Pin along the bottom edge and sew a line of stitching about 1/2 inch from the edge. Then sew another line of stitching about 1/4 inch below that first line. This will reinforce the bottom of the bag.
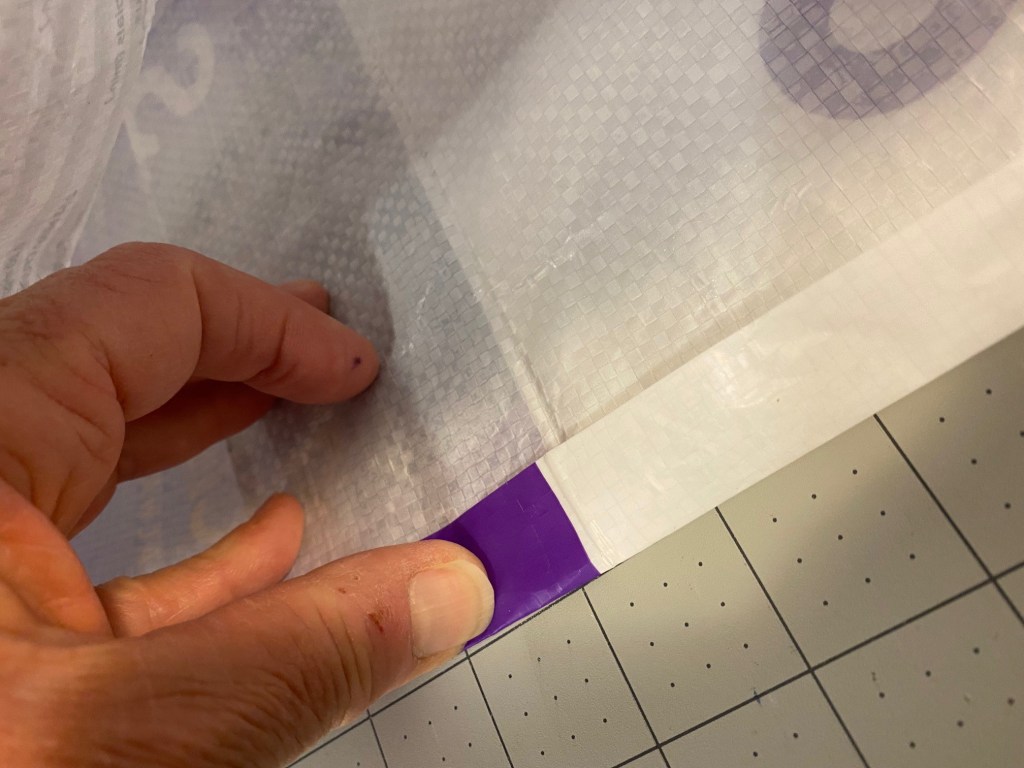
Now it’s time to make the gussets. Leave the bag inside out and put your hands inside and finger press the bottom seam you just sewed.

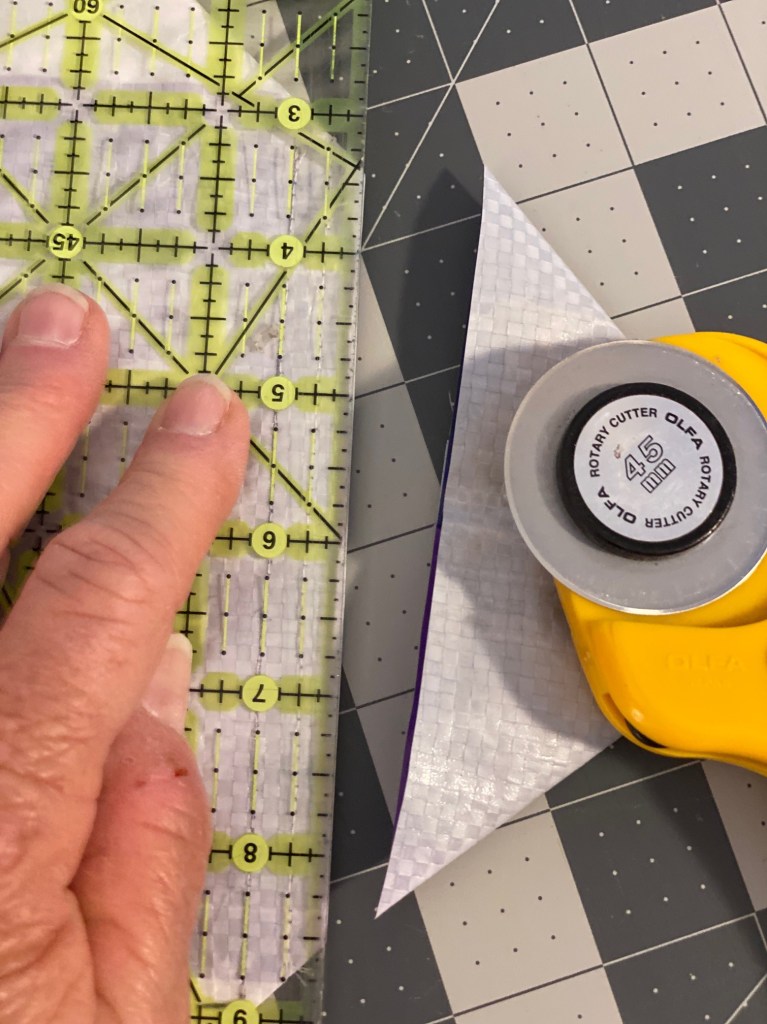
Then with one hand inside the bag and one outside the bag, start forming the gusset. you basically want to line the center of the side fold with the bottom seam. This photo shows the fold on the left and the seamed bottom on the right. You can see that they are lined up.

Holding the seam and the fold together from the outside, flatten out the gusset point, finger press the edges, and pin in place. Then, you’re going to draw on your seam line for the gusset. In this picture, I’ve marked the folds in the side of the bag so you can see them. You’ll want to run your line of stitching from where the fold lines on each side meet the folded edge of the gusset. This will ensure that your bag is square.

Sew one line of stitching along the marked line. Then sew another line 1/4 inch from this line on the point side of the line. This will reinforce the gusset.

Once you’ve sewed two lines of stitching on each gusset, trim off the excess fabric corners.
Then turn your bag right side out, finger press the gusset seams and you’re done!
Feedbag Tote bag!!!

Do you sell your finished bags? I love the senior horse bag!
Virginia Hunter 706.784.4553 (H) 770.530.0079 (C)
>
LikeLiked by 1 person
I have a friend who already asked me about purchasing that bag, but I have more of that same style of feed bag so I can make more. Would be happy to sell one. haven’t decided on a price yet.
Anne
LikeLike
Can I use the same thread and needle that I use for quilting?
I love following your blog, and have learned so much! Thank you from Port St Lucie FL
LikeLiked by 1 person
I’m using a denim needle and a basic Gutterman cotton/poly thread. I don’t think the denim needle is necessary, but you do get some thickness sewing over the handles.
Anne
LikeLike
Love the tutorial, thanks for sharing. Where did you buy your webbing? How wide is it?
Could we set up a feed sack swap? I have sunflower seed bags with a bird pic on front.
Anita
LikeLiked by 1 person
I got the webbing on Amazon. It’s heavy duty bug not difficult to sew through two layers. I bought a higher quantity because I knew I’d go through it. Here’s the one I bought: https://www.amazon.com/dp/B01KTVEDGG?psc=1&ref=ppx_yo2_dt_b_product_details
Anne
LikeLike
Oh, and a swap is a great idea. I have acces to A LOT of horse feed bags. And I can get enough chicken bags for myself. But it’s harder to get goats, pigs, sheep, and other farm animals. I also have limited access to sunflower or other bird seed bags.
Anne
LikeLike
Thanks. I’ve made several of your other bags and have found your tutorials easy to follow. I’ll try this one as soon as I get my hands on a feed bag! Love the photos of your furry companions too.
LikeLiked by 1 person
Good luck finding feed bags! That’s probably the hardest part!
Anne
LikeLike
Thanks so much! I just ordered some bags on Etsy so I can try this!
LikeLiked by 1 person
Cool! I hope they turn out well!
Anne
LikeLike
Great tutorial! And all the photos. Than you.
LikeLiked by 1 person
Thanks! I hope you can get some feed bags and give it a try.
Anne
LikeLike
Good quality bird seed bags work well too.
LikeLiked by 1 person
I collected feedbags and was so excited to get started. No matter what I try, I still have a problem with thread tension and messy bobbin thread. 😢
LikeLiked by 1 person
Yeah, I’m not sure how you could get away from that. It’s an issue. Mine don’t come out loopy, but it’s not my typical beautiful Bernina stitches. I wonder if you could change it by adjusting the pressure on your foot feed. Worth a try.
Anne
LikeLike
love making these feed bags, but I have trouble with my thread balling up underneath. I use polyester thread and a heavy duty needle. Any advice would be greatly appreciated!
LikeLike
I didn’t have any issue with thread balling up but I have read that others have issues with it. I used regular thread and needles on mine. The stitch wasn’t as pretty as my Bernini usually makes but it was fine.
Anne
LikeLike