
I finished up my Ice Storm left over Frankenbag tonight at about 11:30. I almost put it down before finishing, and then decided to push forward and sew the lining into the bag, do the top stitching at the top of the bag, and stitch down the zipper plackets. I even took a minute to sew on my tag.
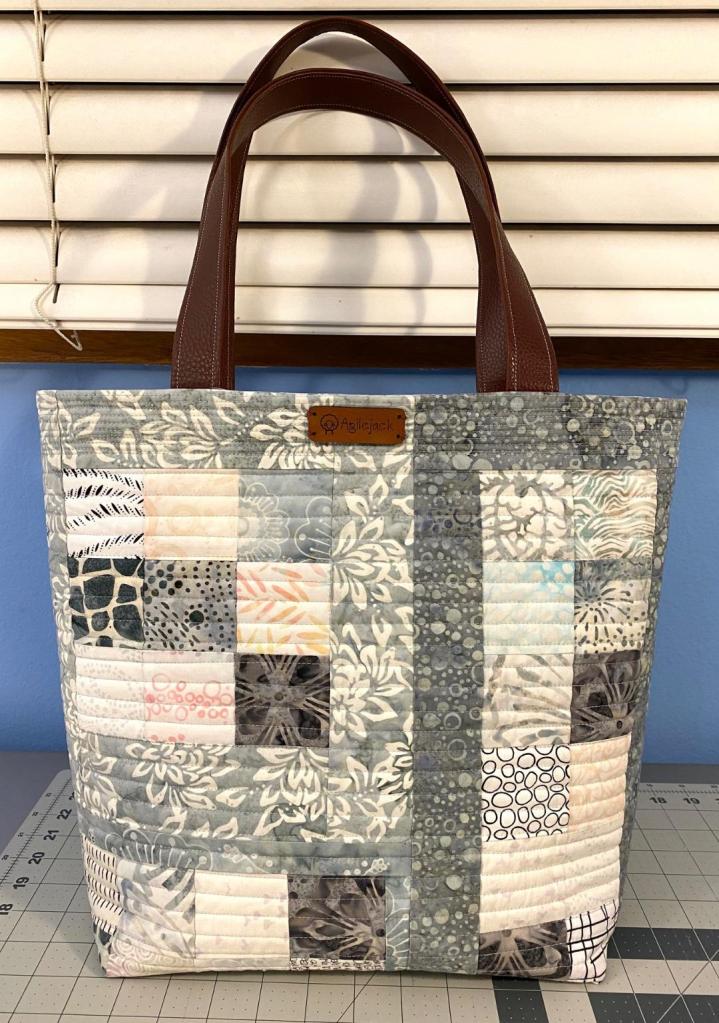
I really like this bag. It couldn’t be further away from my normal color palette. A friend of mine said there’s something really soothing about it. And it’s probably true that most of the stuff I make is far from soothing! But I’m ok with that. It’s been fun to make something so different.
And at the rate I’m making bags, I am averaging about two per week. I doubt I’ll keep that up for long. But that is a leisurely pace for me. I don’t feel like I’m spending every spare minute in my sewing room obsessively producing.
Here’s the other side of the bag.

And the finishing touch I love.

The lining and pockets feel absolutely creamy to me. I love the lighter batiks I used there.


This probably won’t be a terribly practical bag with all those light fabrics. It’s not one you’d want to put on the floor of the bus!
I tried using some fusible webbing instead of pins to attach the zipper to the pocket opening while I sewed it all together. I like the way it held the zipper in place nicely and I didn’t get the puckering you get with pins. I only had the webbing in a big sheet. I’ve already ordered some of the kind that comes in a roll that you stick to your fabric and then peel the paper off.
And I’m happy that after doing about 8 of these zipper pockets, I’m getting better and better at them.

Look at that beautiful opening!
For me, the best way to learn is to do. And the more I do something, the better I get at it. I like that!
I love this view of the lining all in one flat piece. It’s somewhat complicated and the placket always feels so wrong, but it’s so right!

I’ve made quite a few changes to how I make these bags since I made the tutorial. I’m giving some thought to how to share those improvements. I don’t want to make another tutorial, but I like the idea of sharing how my design has morphed over time. I might just make one post with the changes, and then link to it from the original tutorial.
So what’s different:
- I now use a fusible interfacing on the lining. I like the way it adds body to the lining and makes the bag feel more substantial. I also think it will be more durable and the pockets won’t stress the fabric as much.
- I’ve increased the size of the slip pocket and I’ve made it into a divided pocket. I also use fusible interfacing on the slip pocket. Again, it’s more substantial and should be more durable.
- I’ve added the zipper pocket and would like to provide a link to the tutorial I used, as well as info on how I place the pocket on my lining.
- I’ve changed how I put the placket in place. Rather than measuring awkwardly to place it, I draw a line on the lining once it’s fused that will later be used to position the plackets. So much easier to do it this way! And the drawn line is hidden when you stitch the placket down at the very end.
I think that’s all the changes I’ve made. But I’ll give it some thought to be sure.
It was another cold day here in Portland on Wednesday, but we didn’t have the wind that we had yesterday. I don’t mind the cold when we have the sunshine. Here I am after our walk tonight. Bundled up like I was last night, but not nearly as cold on our walk.

You know it’s cold if I’m wearing a knit hat. I’ve made many, many, many knit hats over the years. But I tend to run warm and it’s rarely cold enough for me to be comfortable in a knit hat.
I got a call from Bender’s neurologist this afternoon. She wants me to give it a little more time before we increase Bender’s Potassium Bromide. So we will move forward and hope he doesn’t have another seizure. If he does have another one, she will likely increase his dosage. I’m keeping my fingers crossed that he’s done with seizures for a good long time. But I’m guessing he’ll have another one in a week or two. Damn.

Another lovely bag ! Thank you so much for your generous extra tips on the lining, zipper install etc ,the photo is a huge help! I have been thinking about how am I going to accomplish that, as I have ” never” sewn a zipper in anything ! Hug’s for Bender and hoping his seizures will subside. Niki
LikeLiked by 1 person
I’m a really visual person. Photos help me understand how things go together. In fact, I love looking at things and then noodling out how they’re made. It all just makes sense in my head.
Thanks for your hugs for Bender. He would LOVE an extra hug!
Anne
LikeLike
💖💖💖💖🤪
LikeLiked by 1 person
Hugs to Bender and fingers crossed. Your veterinarian sounds like a jewel of a doc!
Thanks for the extra construction tips. I learn by doing too. I’m glad you’ve discovered the bonding tape. I started using it for zipper pocket applications even before I knew about your blog. I think it makes things so much easier and neater.
I’m grateful for the photo of the lining laid out with the zip placket. I haven tried one yet but the photo gives me courage 😊
LikeLiked by 1 person
I think I will use the adhesive tape from here on out. It’s a lot easier to get it all set up nicely that when using pins. Plus, you don’t have to remove the pins as you sew and have the zipper shift.
The zipper plackets are really easy. The tip of drawing the line on rather than using the method I put in my tutorial works much better too. I’ll probably go in and update that tutorial to include this better method.
anne
LikeLike
HAVE YOU DONE A BAG WITH SOME SORT OF LOCK INSTEAD OF A ZIPPER ON TOP? THAT WOULD BE INTERESTING!
LikeLiked by 1 person
I haven’t. I find the lock or snap to be less functional. To me, they don’t seem to stay closed as nicely when the bag is full, and they aren’t as good at keeping smaller things from falling out.
Basically, I just really like the look and functionality of the zipper.
Anne
LikeLiked by 1 person
Exquisite💕 Thank you for sharing your tips! I also am working up the courage to put a zipper in! Stay warm and positive vibes for Bender 💕 with hugs to both Bender and Rico 💕
LikeLiked by 1 person
Do give the zipper a try. You first one might be wonky, but you’ll learn a lot!!! And then your next one will be better! I used to be afraid of zippers, but I’ve found and developed some approaches that make them not so scary.
Anne
LikeLike
🤗
LikeLike
I really love your work. The batiks for your bag are awesome. I especially appreciate all your super helpful tips.
LikeLiked by 1 person
Thanks Dori. I’m really having fun working with batiks the last few bags. It’s been a while since I’ve sewn much with batiks. It’s nice to dig into my stash and find some fun options.
Anne
LikeLike
As much as I love all the bright bags, this subtle, monochromatic bag is simply beautiful.
Fingers cross on Bender’s seizures.
LikeLiked by 1 person
I like the light colors too. It’s unusual for me, but it makes me happy.
Anne
LikeLike
Lovely bag! You have probably addressed this before and I have missed it but what do you do with all the bags you’re making? I love how much you inspired me and so many others!
LikeLiked by 1 person
Some of them are given as gifts, I donate one occasionally to some cause, and I do sell some. Although I don’t make them with the intention of selling them. I make them because I like making them. They are a chance to try out a new idea without committing to a larger project. And I can actually finish them quite easily.
Anne
LikeLiked by 1 person
I can relate to that- I’m all about doing projects because it pleases me!
LikeLiked by 1 person
Yep. That’s also why I don’t do commissions. I want to make things I want to make. And if you like it, I might sell it to you. Commissions are too stressful for me.
LikeLike
I’ve used a stick of fabric glue, running a line of glue on the zipper tape, when putting in zippers for years. It holds the zipper precisely and in the time it takes for the glue to dry, I can make and drink a perfect cup of refreshing tea!
LikeLiked by 1 person
I thought about that, but thought I’d try the webbing first. I have used glue to hold a binding in place before hand sewing.
Anne
LikeLiked by 1 person
Me too, especially when sewing a binding on corners of fabric baskets where two edges come together to make a rounded corner.
LikeLiked by 1 person
I use double stick tape for installing zippers any place. Dollar tree carries the 1/4 “:size or you can order multiple rolls from Amazon at a good price
LikeLiked by 1 person
Regular double stick tape? Or something that’s made specifically for sewing?
LikeLike
I would call this one Winter, so pretty! Thanks for the picture of the lining and the updates, the zipper placket really adds to these bags. Cute picture of you! Sending hugs for the boys 🙂
LikeLiked by 1 person
I agree about the zipper placket. It really elevates each bag to a different place. I wish you could put your hand on one of these. Especially the batik as they feel really substantial. I just love them! I love looking at them and feeling them and thinking, I MADE THAT!!!
Anne
LikeLike
The picture of the lining laying flat is such a good idea. It helps think through the sewing process. Love the lightness of the bag but you are right definitely no one to set on the floor of the bus.
LikeLiked by 1 person
It’s nice to see what it should look like because as you’re making it, the zipper placket feels so wrong!
Anne
LikeLike
What do you do with all the amazing things you create?
LikeLiked by 1 person
Some are gifts. I do sell some, but I don’t really make them to sell them. I sell them so I don’t end up under a huge pile of bags!
Anne
LikeLike
They are awesome!
LikeLiked by 1 person
Such a calming bag. Seems you could use a bit of calm with all of Bender’s issues. Poor guy. Fingers crossed.
LikeLiked by 1 person
Yes. Calm is good!
Anne
LikeLike
It would be awesome if you did a zoom teaching class instructing us how to construct one of your wonderful bags! I would definitely sign up!
LikeLiked by 1 person
OMG! It would be fifteen hours long!!!
Anne
LikeLike
Lol! I’m ready!!
LikeLiked by 1 person
I don’t think I am!!!
LikeLike
Your bags are so beautiful – you use color with abandon! This one has hues I usually work with and now can see how fabulous they are too. I have never made a bag – your tutorial and tips have convinced me that I can do it! Thank you for being so generous with your ideas.
LikeLiked by 1 person
Thanks! It’s all about the color for me! That’s really the part that gets me the most excited.
You should try a bag! you might be surprised at what you can accomplish!
Anne
LikeLike