
I had a great Sunday… much of it spent with friends.
I met a couple of friends at noon to to play pickleball. It rained up until the time I left home, but we lucked out that it stopped raining and a nice breeze dried off the courts quickly. It was a perfect temperature to be outside doing something physical. So comfortable. The wind did make the ball do some crazy things so we had to be on our toes.
After pickleball I followed one of my friends to her place and we did a little dog training. I also let the boys run in her field.
After a quick run to Costco I took the boys for their evening walk and it was so nice out. Nice and cool and we had the neighborhood to ourselves. While we were out I let them run loose in the park for a few minutes.
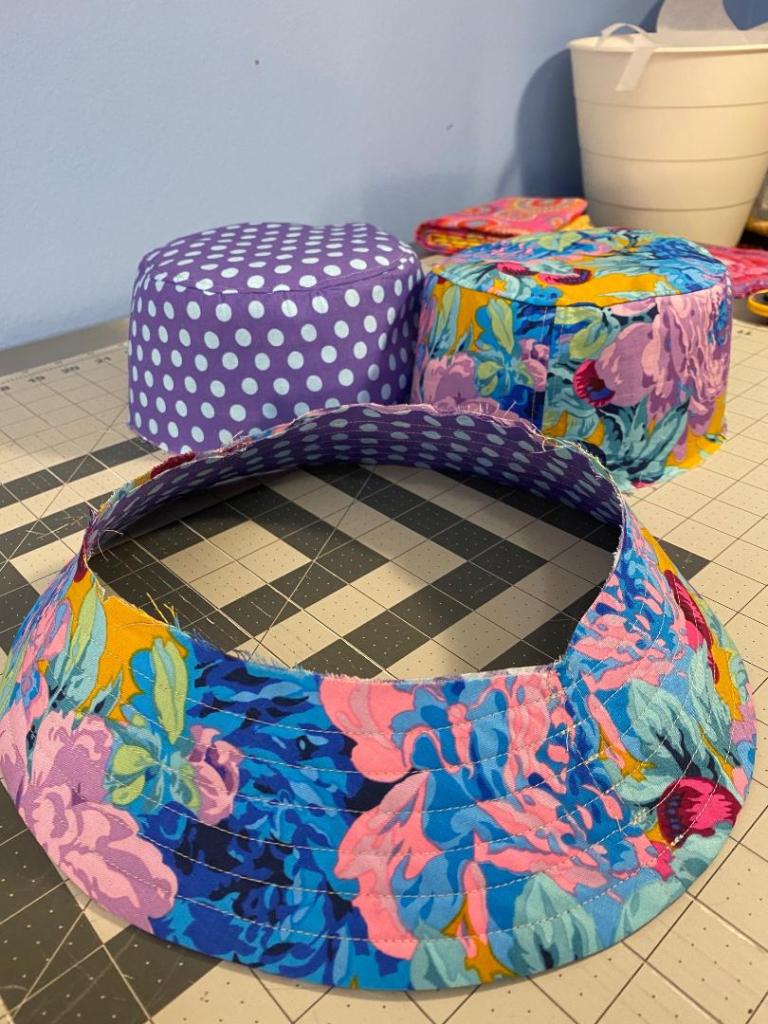
After dinner I hit my sewing room and got one hat sewn together.

You’d think after making a few of these I’d be better at it. But this one really gave me fits. It all went together pretty well until I was sewing the two crown pieces to the brim. I managed to sew a couple of tucks into the brim, so had to pick out two areas and sew them again. The tucks were minor, but they would have driven me crazy if I hadn’t fixed them. So I thought it was better to fix them before I sewed the opening shut and did the final topstitching.
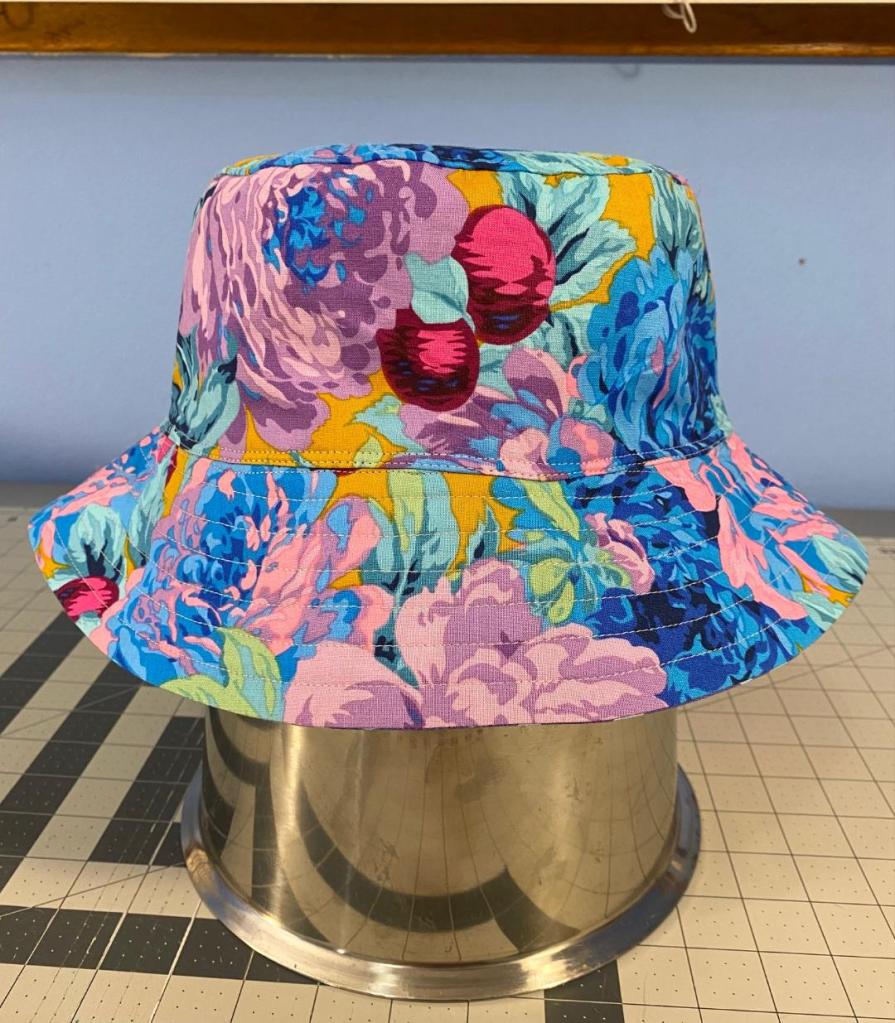
And look at that amazing fabric — Philip Jacobs Luscious. It’s really something. The pops of wine and ochre here and there give me chills!
I also like a simpler lining that doesn’t compete with the main fabric. I think it really allows the main fabric to be the star while offering a bold color with a simple but strong pattern in the lining.

It’s amazing to me that I can sew flat pieces of fabric together and end up with something so three dimensional. It makes me feel so powerful!
Amazing that with all the pining I do I still ended up sewing tucks into this thing. I’m still trying to figure out an easier way to do this… maybe glue? I’ll have to give it some thought because I’d like to speed up the construction a little.
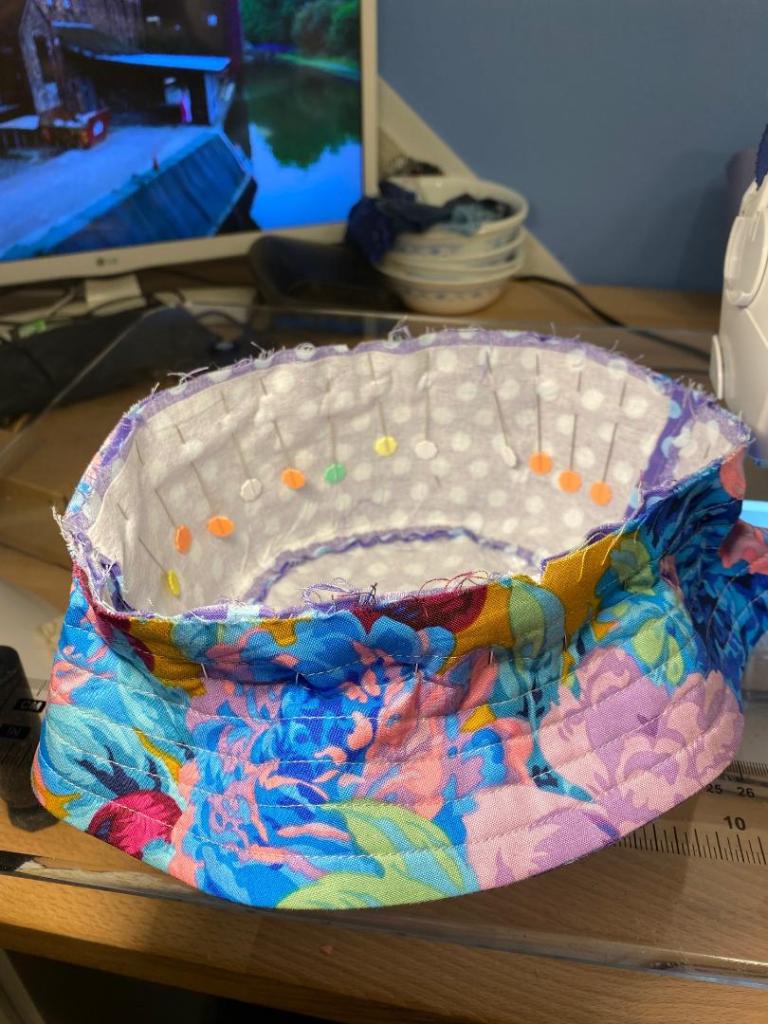
Imagine the mess I would have had without all that pinning!
Here’s a few more pictures because I like to look at this fabric… and this dog!


Another good day on tap tomorrow. Meeting some friends in the morning for some dog training and then more pickleball. And then agility class tomorrow night. I’m making the most out of my long weekend!

Beautiful hats and I absolutely love your model showing the hats off!
LikeLiked by 1 person
HOw would I photograph my hats without Bender?
Anne
LikeLike
What pattern is the hat from?
LikeLiked by 1 person
I’ve used a couple different patterns that are very similar. This hat was made on the Orange Bettie Bucket Hat pattern. It’s just one size and I’ve printed it at 100%, 105% and 110%. the 100% is too small for m. the 105% fits well. The 110% is too big. My head measures 23 inches.
i’ve also used the Red Poppy bucket hat pattern. I prefer the Orange bettie one because it has you cut the pieces on the fold and it’s more efficient and quicker to cut.
The Red Poppy pattern has several different sizes. The largest size was too small for my head.
LikeLike
Attaching the crown to the brim…after a dozen…it will become more automatic and perhaps a bit more streamlined. Things take time, enjoy that part of the process.
LikeLiked by 1 person
I love trying to find better and more efficient ways to do things, while still doing them nicely. I probably won’t rest until I figure this out!
Anne
LikeLike
All of your hats are absolutely gorgeous! I especially love this one – my colors! it looks so good on Bender. He wears it well. 🙂 About your hat puckering issue – Here’s what I’ve learned from years of sewing (clothing, crafts, quilts, …) – There are some ways to speed up item construction, but for some things, not so much. I don’t know if you’ve ever sewn set-in sleeves, but sewing the hat brim to the crown is a similar process. It’s one of the times that faster does not always win the race. Here’s an idea that you may have already tried and how I approach the task: Instead of the pins being placed vertically like in your pictures, I place them horizontally and at about the projected seam line. The pins are parallel to the raw edge and act like a stitched seam. While pinning, I’m able to pull the fabric a bit to fit the opening, and the horizontal placement of the pins keeps any potential puckers between the fake seam line and the edge. When sewing the opening, there’s a lot of stop and go since I’ve used a boatload of pins. Once I remove a few pins, I feel the fabric in the upcoming “pinless” section to make sure it’s not puckered. If I feel a potential pucker, I pull the fabric a bit so it flattens out and then continue sewing. This method works pretty well for me. I hope you enjoy your Monday holiday!
LikeLiked by 1 person
I thought of setting in sleeves as well. Careful pinning and then using your fingers to prevent tucks, just by the feel of the fabric. Although I’ve “tucked in” various blouse fronts and backs when I wasn’t careful enough!
LikeLiked by 1 person
Yup. And this has a lot of layers at this point too. I think I just went too fast. But I’m going to try a few different methods people have suggested I try. It’s a good opportunity to learn.
Anne
LikeLike
I will definitely try this method. It makes sense.
thanks!
Anne
LikeLike
Love your hats
LikeLiked by 1 person
thanks!
Anne
LikeLike
With the tip of Bender’s hat, he reminds me a little of Frank Sinatra! Now you will have to teach him to sing ” My Way” and Bender has a new career! LOl
LikeLiked by 1 person
Hahaha! He’s not a howler. I’ll have to teach him!
Anne
LikeLike
Such a pretty fabric combo, probably my favorite so far 😻and of course, such a handsome model🥰
LikeLiked by 1 person
that exterior fabric is really amazing!
Anne
LikeLike
I love all your hats and bags. Maybe using a walking foot would help ease the crown over in without getting wrinkles. It sure helps for piecing quilts.
LikeLiked by 1 person
Someone else suggested a walking foot. It might actually be a really good idea. I’ll put it on my list of things I need to try.
Anne
LikeLike
So cute. Love the colors and the model is pretty cute too.
LikeLiked by 1 person
He’s a good kid!
Anne
LikeLike
Love the dog in the hat!!! That needs to be turned into a portrait quilt! Enjoy your holiday – I’ll be in the basement, sewing.
LikeLiked by 1 person
That would be a fun portrait!!! Alas, I’ll have to make it available for someone to do that!
Anne
LikeLike
I use clips instead of pins for almost everything, especially when sewing thick seams together. I’ve also done a running stitch on when sewing multiple fabrics together so nothing slides even a tiny bit; like around the the inner edge of that brim prior to clipping it onto the base. Things like tucks and mismatched seams would drive me crazy too.
I once did alterations, for fun… and charged a bundle too! It’s amazing to me how some expensive brands get away with poorly finished and tailored items of clothing. Taking things apart is part of excellence.
LikeLiked by 1 person
I’m definitely going to try the line of stitching around the brim pieces prior to pinning it all together. That will be a quick an easy thing to try. Also going to try clips. I have some but only use them on the tops of my Farnkenbags with all that thickness and because that’s where I stab myself over and over!
Thanks!
Anne
LikeLike
I have had really good luck using Elmers washable school glue instead of pinning. This is my favorite fabric combination so far.
LikeLiked by 1 person
I’ll try glue if any of the other methods don’t work.
i agree on this fabric combo. It’s pretty amazing!
Anne
LikeLike
Your hats are great. I would try Elmers washable and use clips instead of pins. That’s the combo I use for bindings to keep them even without any slipping during the sewing process (I machine sew the binding).
LikeLiked by 1 person
I’m going to try clips and different methods of pinning before I resort to glue. But it’s nice to know it’s in my arsenal if I need it!
Anne
LikeLike
That fabric is appropriately named! I may just have to hit the online stores today! Bender is looking particularly jaunty today as well! After with the Sinatra comment. Enjoy your day!
LikeLiked by 1 person
He looks good in that hat!
Anne
LikeLike
That was I agree with the Sinatra comment. Hate spell check!
LikeLiked by 1 person
Just found your blog. I love quilts and border collies. Perfect combination! What pattern do you use for your hats?
LikeLiked by 1 person
I’ve used a couple different patterns that are very similar. This hat was made on the Orange Bettie Bucket Hat pattern. It’s just one size and I’ve printed it at 100%, 105% and 110%. the 100% is too small for m. the 105% fits well. The 110% is too big. My head measures 23 inches.
i’ve also used the Red Poppy bucket hat pattern. I prefer the Orange bettie one because it has you cut the pieces on the fold and it’s more efficient and quicker to cut.
The Red Poppy pattern has several different sizes. The largest size was too small for my head.
You can find either pattern easily with a Google search.
Anne
LikeLike
Great hat! Great model also. I love that your dog will cooperate for you.
LikeLiked by 1 person
He’s very cooperative and very tolerant!
Anne
LikeLike
Hats and tote bags –perfect !!!! love all of your designs.
LikeLiked by 1 person
Thanks!
Anne
LikeLike
Great pictures! Love your “model”!! You’re doing a beautiful job on the hats. It makes me want to try one. Can you give us the pattern name…sorry if you already did. I must have missed it if you did. Love looking at all the beautiful fabrics…”eye candy” is such a good description! Enjoy your day off!
LikeLiked by 1 person
I’ve used a couple different patterns that are very similar. This hat was made on the Orange Bettie Bucket Hat pattern. It’s just one size and I’ve printed it at 100%, 105% and 110%. the 100% is too small for m. the 105% fits well. The 110% is too big. My head measures 23 inches.
i’ve also used the Red Poppy bucket hat pattern. I prefer the Orange bettie one because it has you cut the pieces on the fold and it’s more efficient and quicker to cut.
The Red Poppy pattern has several different sizes. The largest size was too small for my head.
Anne
LikeLike
Another beautiful hat! I’ve made a couple, as well. Thanks for sharing the free patterns you found. I put mine together differently. I sewed the complete liner, brim and all, and the complete outer hat. Then sewed them together around the outside of the brim, leaving an opening to turn it right side out. Then I ironed the edge and sewed the concentric circles around the brim and it worked out great. Keeping the inner and outer sections separated made it easier to avoid puckers, I think. Maybe that would work for you, too?
LikeLiked by 1 person
I saw a pattern/tutorial the other day that showed putting the hat together that way. I can’t decide if it’s better or worse! I should probably try one that way just to see how it goes together!
Anne
LikeLike
So cute! Reminds me of sewing the bottoms of the little wine totes I make trying to get it all perfect with no tucks lol
LikeLiked by 1 person
I like things to be well made. Tucks are just not acceptable!!!
Anne
LikeLike
In order to eliminate the accidental tucks try staystitching (inside the seam allowance) on each individual piece. Now lay the two pieces together (that you have just staystitched, use clips to hold and machine baste them together. Using a longer stitch this time closer to the final stitching line but still inside the seam allowance. Use clips not pins, pins will pucker the fabric making it more difficult. You are sewing on a curve so try not to stretch your fabric by pulling as you are sewing. Do you have an even feed or walking foot? If so, use it.
The hats are fabulous! If these tips don’t solve the issues please feel free to email me.
LikeLiked by 1 person
I’m going to try clips instead of pins and the walking foot might be a really good idea. I do love my walking foot.
Thanks for all the info!
Anne
LikeLike
I’m making these hats, too. I’ve found the “tuck” problem pretty much disappeared when I started using the shortest pins in my arsenal instead of long quilting pins.
LikeLiked by 1 person
Oh, interesting. I do have some short pins I could try. I’m going to try some clips and other pinning methods. My readers have give me lots of ideas of things to try! My next bag will be an experiment!
Anne
LikeLike
Awesome hat and model! And the fabric prints and color combinations are fabulous! I have to try the set in sleeve method suggested by your follower and my namesake – Sara! Still trying to put together my first trial bucket hat. Thank you for the construction in process pictures.
LikeLiked by 1 person
Your first hat might be crap, but it also might be fabulous!!! Good luck!
Anne
LikeLike
Coming from the extreme quilting piecing point of view: Pins are awful, throw them out. I use a selection of “gluey” things. First, there are the wide glue sticks (UHU is expensive, Elmer’s craft glue sticks are cheap). They work for gross sticking projects, along with all of the adhesive sprays (get one that works on fabric to fabric, not paper to fabric) – I use 505. If you need to do more detailed work, I use glue pens. I use the one from Fons and Porter, but I suspect all of them are made in the same place. I use this for all curved piecing (not unlike sewing hats actually). Finally, for the most detailed work, I use tiny liquid glue drops.
Most of these things are on the quiltworx page:https://store.quiltworx.com/category-s/1840.htm
There are also techniques (I assume you know them all) about sewing curves. When you have glued the curve, and are preparing to sew the curve, you must put your hand in between the two fabric pieces (note, do not sew your hand!!) and lift the top piece up while you are sewing the curve. This helps keep tucks from appearing.
144245930_406750213952075_2032147386319288930_o.jpg
This is my current (ahem) lifetime project to teach me patience in cutting ombre fabrics as well as conquering curves.
LikeLiked by 1 person
Hmm, well crap. I’ll IM the picture to you since clearly I’m not smarter than this program.
LikeLiked by 1 person
The issue is not sewing curves to curves, it’s sewing straight pieces to curves! But I am going to try it with clips instead of pins. I will resort to glue if that doesn’t work.
Thanks for messaging photos of your quilt because I can’t get them through blog comments.
Anne
LikeLike
Love your hat and model! Can you share the name of the pattern please and thank you! Happy Memorial Day!
LikeLiked by 1 person
This hat is made on the Orange Bettie Bucket Hat pattern.
Anne
LikeLike
Beautiful, and that fabric certainly lives up to its name–Luscious! I think the answer to your tucks is….yes, MORE PINS. My 7th grade sewing teacher back in the dark ages when girls took sewing/homemaking and boys took auto and metal or wood shop, taught us how to set in sleeves without tucks. She used an almost solid row of pins right next to one another. Pin it in fourths, then eights, and continue on until every wannabe tuck is pinned! And I’m pretty sure we sewed over the pins, a big no-no I guess, but it worked, and as I continued to make garments for 30 years or more, I always used her method. Just sew slowly, though as productive as you are, I’m not sure you can do that!!! LOL Keep up the good work!
LikeLiked by 1 person
OMG! MORE pins??? Hahaha!
I’ve got a couple idea I’m going to try on the next one I make. I’ve gotten some good recommendations from blog readers!
Anne
LikeLike