
I actually think I’m almost there. After another hour or so in my sewing room tonight and some judicious use of my seam ripper, I have all the sections of this quilt sewn together with the exception of that pesky lower right corner.
But the really good news is that that lower right corner is actually ready to be sewn together!!! I almost can’t believe it’s true!
So here’s what I had to do tonight to get it to this point.
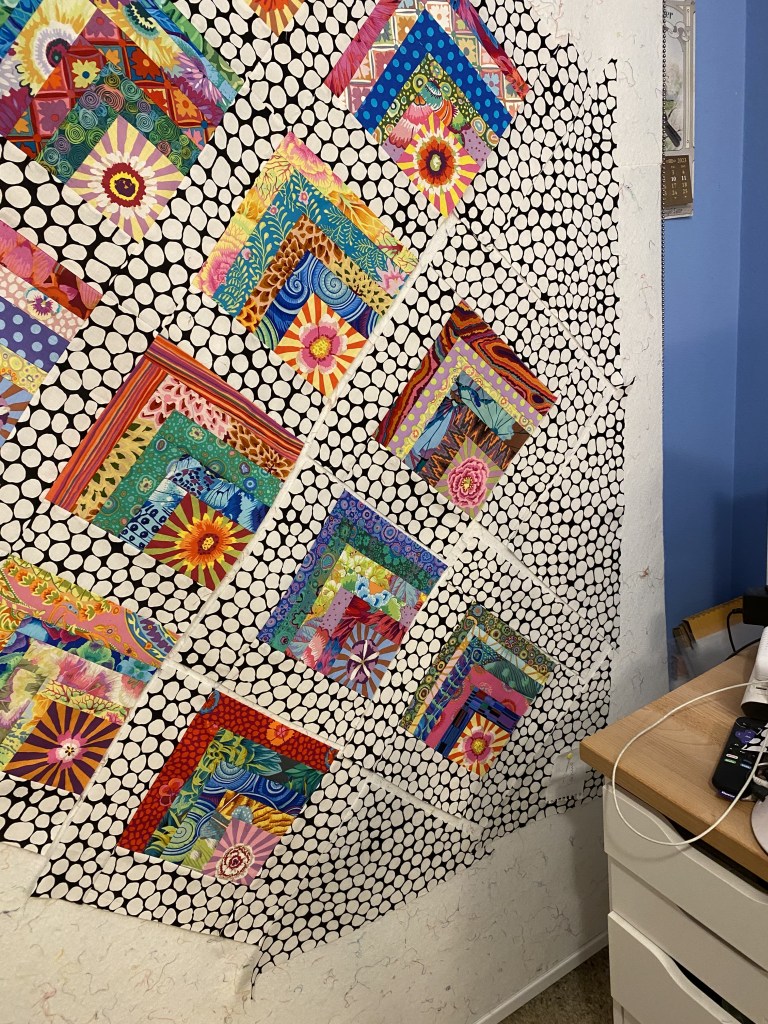
First, after looking at it and figuring out how the different sections were going to go together, I decided to sew the row of four blocks on the lower right corner to the center rectangle. I figured out that I could do that to actually HELP the construction of that pesky corner.
The large diagonal space between the rows in this photo is the seam I sewed together.
So that means that the lower right corner only has two rows in it… the row of three blocks and the corner with one sunburst block.
Then I decided to dig into the upper right corner and get it put together. The construction on this one is pretty straight forward, but the way I had sewn the sashing onto the blocks was making putting this together in a way that would join nicely with that lower right corner very, very difficult.
So I looked at it very carefully, determined what the issue was, and made a plan of action.
To make this section join nicely with the corner, I needed to remove the sashing on the bottom of the three blocks in the row of three blocks. That space in the middle of those blocks is where I removed the sashing from two of the three blocks.

This meant rekindling my relationship with my seam ripper.

It’s not a relationship I cherish.
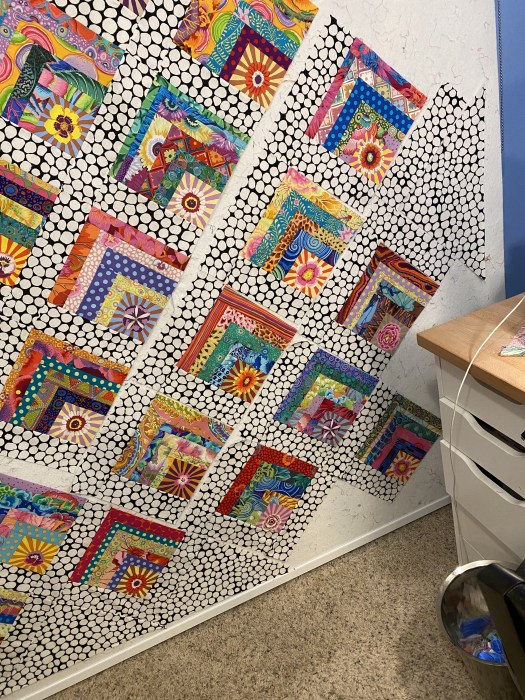
Once I had that done, I measured and cut a long piece of sashing and sewed it to the row below this row of blocks. Here it is all pinned in place and ready to sew.

So, here’s what that little adjustment made possible. It made it so that those corners of the blocks and setting triangles will all be sewn in one straight line, rather than having to do Y seams to get it put together. . . and probably some terrible mistakes if I took that approach.
Once I had that sashing moved to the row below, I was able to sew this upper right triangle together and put it aside for the final assembly.

I’m feeling pretty confident that the final pesky, irritating, challenging, swear-inducing corner will be done tomorrow night! Can that really be true???
I don’t think I’ve ever had a quilt top that’s been such a puzzle and brain challenge to get put together. I’m really wondering how much of this pain and frustration would have been avoided if I had put the sashing on the way I intended. It may not have completely alleviated the challenges, but I’m thinking they might have been simpler to solve. I’m thinking I want to make some 2 inch paper blocks and lay them out to see what difference that would make.
And now, a recommendation. Several people have commented that they want to make a quilt like this.
If you make a quilt like this, I recommend that you don’t sew your sashing to your blocks. Lay out your blocks and sashing on your design wall, then sew the rows together from there. I think it would all go together much more smoothly with that approach.
I’m going to restate that with every remaining post about this quilt. I may even go into older posts and add it so people who want to make this can avoid all I’ve gone through.
It was a beautiful spring day here today. I swear my daffodils have grown four inches since they were covered with snow a couple weeks ago. I’m even seeing buds forming!

We had a lovely walk in the sunshine this afternoon.

It was raining tonight so we didn’t get a walk. My boys were not happy about that.
I forgot to share this video of a bird singing in my back yard yesterday. It was so loud and I’m sure he was letting everyone know that spring has arrived!
I hope he knows what he’s talking about!

Yup. Sashing in the more traditional way would have been easier. 🙂 And the singing bird is a house finch. The males are pretty with a red head and a red rump. Thanks for sharing your your tribulations.
LikeLiked by 1 person
Thanks for the bird ID. I keep a Sibley’s book on my desk so I can ID the birds I see on my patio. I couldn’t actually SEE that singing bird… wasn’t even sure which direction it was coming from. I’ll check them out in the book. I’ve probably seen them but didn’t know what I was seeing.
Anne
LikeLike
I am making a quilt similar to this. It’s a serpentine block. Thanks for the tips!
LikeLiked by 1 person
I hope you have better luck than I did! good luck!
Anne
LikeLike
I was not as brave as you when I came across this dilemma. I laid my blocks on the floor (no design wall -a king top) and just studied them over and over,I was too afraid to start sewing. I was a happy gal when I figured it out. Your quilt is going to be so beautiful.
LikeLiked by 1 person
Exactly! I knew that if I didn’t figure it out before I started sewing I’d really have a mess on my hands! I’m glad I gave it time!
I’m so glad this isn’t a king size quilt! It might be in a box in the closet by now if it was!
Anne
LikeLike
I’m so happy you have light at the end of the tunnel!! What a challenge this has been. Your brain has been in overtime on this one. I am wondering if you couldn’t just sew the blocks with the sashing attached in rows ending and beginning with the triangle? And then add an extra border of jumble to make it wider. You and the boys deserve a beach day!! Go relax and unwind. Oh and please post beach photos!!!
LikeLiked by 1 person
Well, the problem is that stuff isn’t lining up. I could just sew it together in rows if I didn’t care if the quilt didn’t end up actually being a rectangle. I’m going to make some small paper blocks and play around with the layout to see where I went wrong. I have an idea what happened, but I’m not sure how I would solve it if I made a quilt like this again. But I’m driven to understand what went wrong.
Anne
LikeLike
About your comment on how the Jumble setting triangles cause the corners of the Jumble-sashed blocks to disappear. I wonder if your long arm quilter can use a different thread or texture in the setting triangles compared to the main on-point body of the quilt? The difference in thread/color/texture would help re-establish those block corners.
LikeLiked by 1 person
That’s an idea. I’m actually hoping that a contrasting binding will sort of frame it all in. I’ll play with different options. Thinking black and white stripe… maybe someone colorful. I’ll actually try some options to see what really works.
Anne
LikeLike
Hi Anne, I really love your blog. It’s so funny how it can be a small world in quilting. I’m taking a class at Asilomar through Empty Spools Seminars with Sandra Mollon as the instructor. One of the gals in our class is MG and also reads your newsletter/blog posts and loves it as well. It’s such a small world😊 Laura
Sent from my iPad
>
LikeLike
I love that you got a beautiful spring walk in…I’m a Portlander as well and I just woke up to more snowing and still snowing! My little daffodils must be very cold! Love your quilt, it’s beautiful.
LikeLiked by 1 person
I had some snow flakes this morning but nothing stuck. I have a friend in Oregon City and she had at least an inch this morning. My brother lives down near Bandon and they’re supposed to get 8-12 inches of rain this week! Yikes!
I saw my first crocuses on our walk this afternoon. Spring is so close! and I’m ready. over 50 degrees in the next week!
Anne
LikeLike
I have made this pattern and sewed it together in diagonal rows with the setting triangles already attached. No problem. You just consider the sashing as part of the block.
LikeLiked by 1 person
That’s exactly what I did. It all worked until I got to that lower right corner. I’m going to draw out some small paper blocks and lay them out and see what I did wrong.
Anne
LikeLike
I really enjoy your blog. I just watched your Frankenbag tutorial. Very interesting.
I make many bags and discovered that it is more efficient to quilt right onto the batting instead of using a backing. I also discovered that the best batting is Battilizer by Hoopsisters. It is cotton and very smooth. It is also great for placemats and tablerunners because you want stability but not much loft.
I live in Canada and buy it by the bolt, $100 Can., so it would be much cheaper for you. The bolts are small and easy to handle.
LikeLike
that video tutorial is actually not me. She doesn’t do a great job of crediting me. She’s pretty vague about it. You’re not the first person to think it’s me. so the way she makes her bags is not exactly like how I do it.
I like using a backing in my bags because it ads extra structure, which I like in a bag. And that’s why I use ugly batiks. I can get it cheap and it has a high thread count so its extra nice on the interior.
I’ll check out the batting. I like the idea of something with more stability.
anne
LikeLike
Quilting is such a fun adventure, I’ve actually been FMQ and it is so fun . I’m a little envious that spring is on your doorstep . It’s snowing here and 24 degrees. No end in the need future. Have some fun , enjoy
LikeLiked by 1 person
I actually saw some beautiful yellow crocuses this afternoon on our sunny walk! After the snow we had a couple weeks ago, it’s definitely heading quickly toward spring now!
I hope you get a break from the snow.
Anne
LikeLike
Thank you for your exuberant, spirited description of the sashing dilemma 😄.
This quilt will be spectacular 💕💕💕
I love your bird singing spring songs too! Enjoy your long weekend!
Hugs to Rico and Bender 🥰🥰
LikeLiked by 1 person
Sharing this challenge with others has sort of helped me noodle it out. and I’m so glad that I DID figure it out. Now I just need some oomph to finish sewing it all together. So close!
Bender appreciated your hug. Rico was a little horrified. 🙂
Anne
LikeLike
I so enjoy your posts, and your straightforward way of dealing with those quilting puzzles. It helps me be more patient when dealing with mine! Love your dogs, too…thanks for sharing them.
LikeLiked by 1 person
I actually enjoy that problem solving stuff. I like wrapping my brain around how stuff works… how it goes together. So when something isn’t working I can stick with figuring it out because it gives me some kind of freaky joy! It’s fun to share this all with others.
And the dogs. They just kill me! So many smiles every day! Can’t imagine life without them.
Anne
LikeLike
I love your fabrics and quilt designs. K Fassett rules as a designer. I have loved him since he was knitting sweaters.
LikeLiked by 1 person
I’m relatively new to Kaffe’s designs and color ways. A friend gave me a baggie of her scraps about six years ago and they were mostly KFC fabrics. I can still remember when I pulled out Phillip Jacobs’ brassica in the yellow color way. I really think it change my life! I had a physical reaction when I saw it. I love all the amazing colors. Can’t get enough of them!
How lucky are we to have these fabrics available to us?!?!?
Anne
LikeLike