Hexagon Finished

I got my Kaffe Fassett Collective hexagon quilt back from my long arm quilter a couple of months ago and I’m really happy with it.

IMG_3570

I based this off of a quilt I saw on the KFC page on Facebook. It’s basically the My Fair Lady quilt pattern in one of Kaffe’s books. Can’t remember off hand which one.

IMG_0127

I wish it photographed better. it’s much softer looking in person. These photos look pretty harsh.

IMG_3577

I made this out of strip sets. It was a lot of fun to make. I love the gray background fabrics.

The backing is made from Kaffe’s Paisley Jungle in tangerine. I added the strips of guinea flower because I knew matching the fabric would be a huge job and completely out of my skill set!  I just LOVE that backing!

IMG_3588

Here’s an earlier post on this quilt.

It’s quilted with a pattern called Bubbles Everywhere. It it even better than I imagined it would be.

bubbles everywhere 002-500x500

I think I’m going to keep this one for myself.


Lucky Stars Quilt Top Checked Off

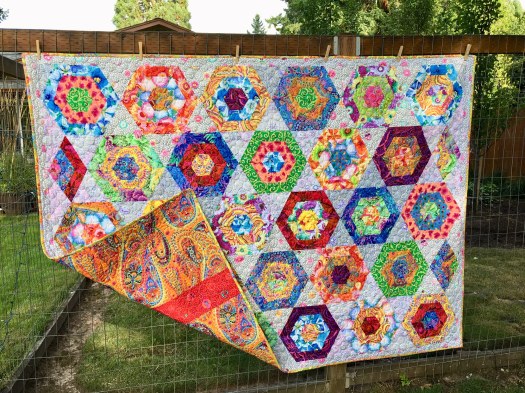
What a fun quilt to make! And it went together really quickly. Here’s the original post on this quilt.

IMG_4780 2

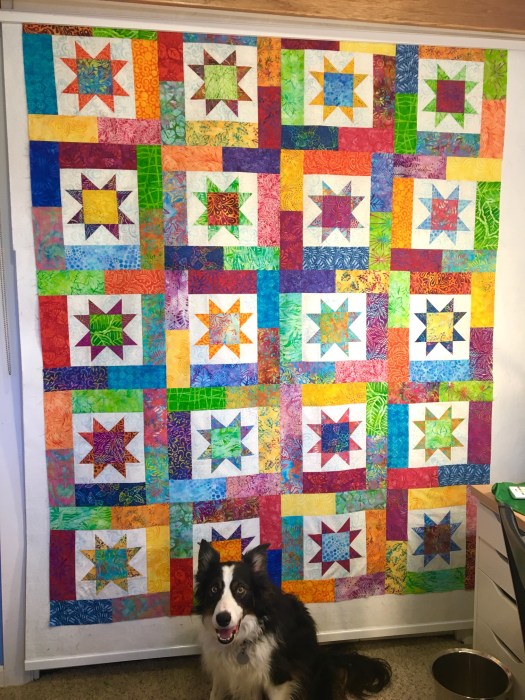
That’s Bender in the photo. He thinks quilting is really boring. So many things he’d rather be doing!

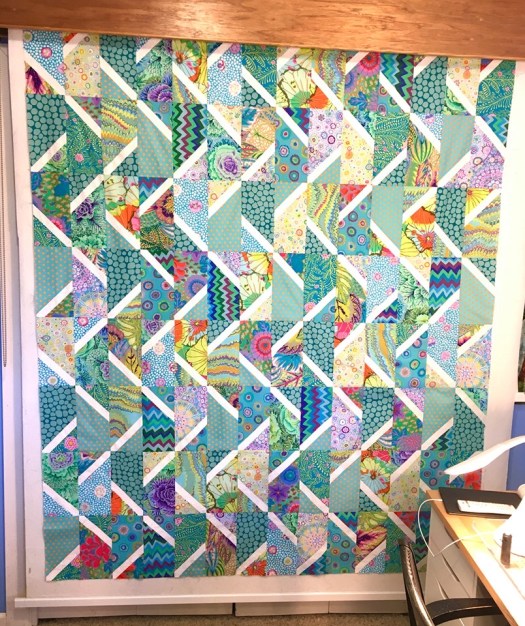
A friend of mine just made this quilt and even gave me her scraps to use in my quilt. So our quilts are almost the same quilt! I did add a bunch of batik scraps I had left over from making pouches.

I really love this little quilt. I just love the wonderful variety of batiks. There are some fabrics that only appear in one piece! It really is scrappy. I should count them, but I’m pretty sure there are more than 40 different fabrics in this quilt.

My friend struggled with her blocks on the design wall. She had sewn the 15 inch blocks together, and then moved the entire block to arrange the colors.

I decided to go about it differently to see if it was easier to arrange all the colors. I sewed all the stars first and tossed them up on the design wall and moved them around until they were arranged the way I wanted them.  I left enough space to add the larger strips to the design wall.

IMG_4659

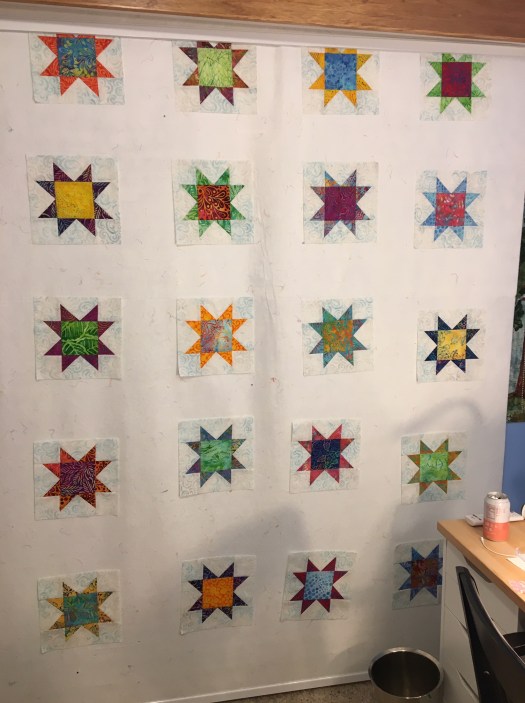
Then I added the larger strips to two ends of each block, on the top and bottom of one block, then on the sides of the next block, which is how they would be arranged in the final lay out. Once I had the colors arranged the way I wanted, I sewed the strips to either end of the stars, and put them back on my design wall in the same place.

A friend commented that at this stage, they look like a collection of flags from around the world.

IMG_4661

The next step was to sew all the smaller strips together in sets of two. Then I added these pieces to the design wall.

And I was right… this method made the layout much easier. Rather than having to move an entire block and try to get the colors to work, I could simply take one of the two-strip pieces and move it to another location.

IMG_4699

Once I had all the strips placed on the design wall, I shared a photo with my friends and even sent it to my long arm quilter. She immediately noticed something that needed to be moved. This is the photo she texted back to me.

IMG_4722

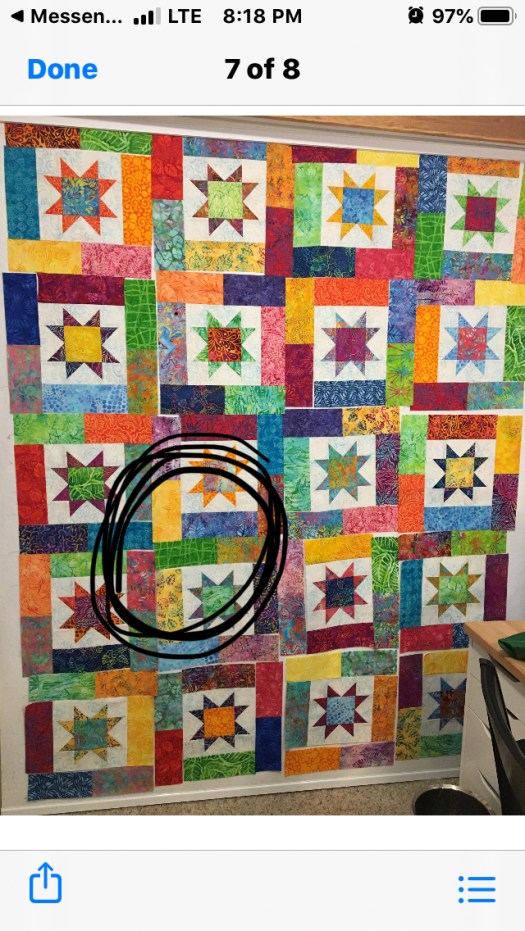
She said that those two vertical yellow strips really stood out to her.

So to fix them, all I had to do was rotate the center portion of that block and it took care of the issue… and it didn’t create any additional issues.

I will definitely put additional quilts on this pattern together the same way. And I already have another one in the planning stage.

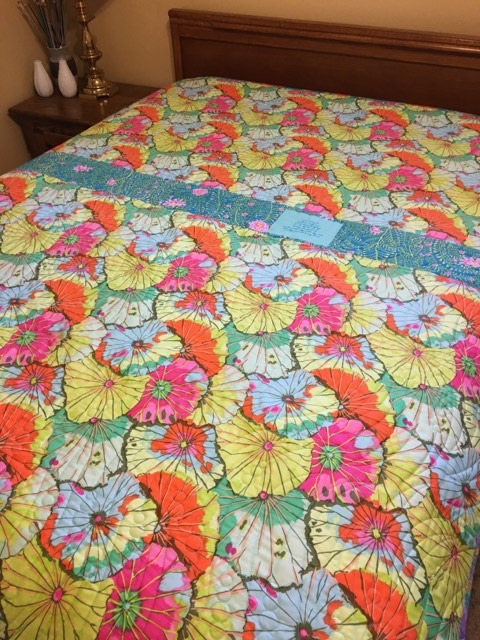
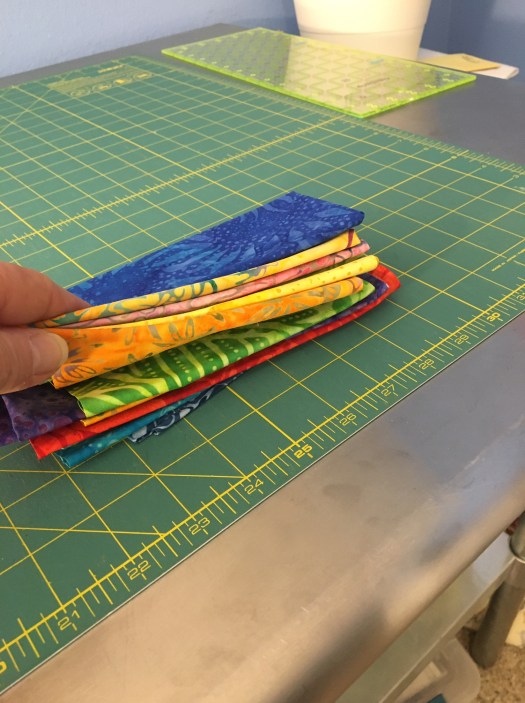
Here’s the backing I’m going to use on this quilt. I saw it in a really fun little store in Bountiful, Utah, that has a really amazing selection of batiks. Every time I go there I buy way too many pieces of fabric. And when I saw this fabric, I immediately wanted it for the back of this quilt.

IMG_4726

Boy… that’s a terrible photo!

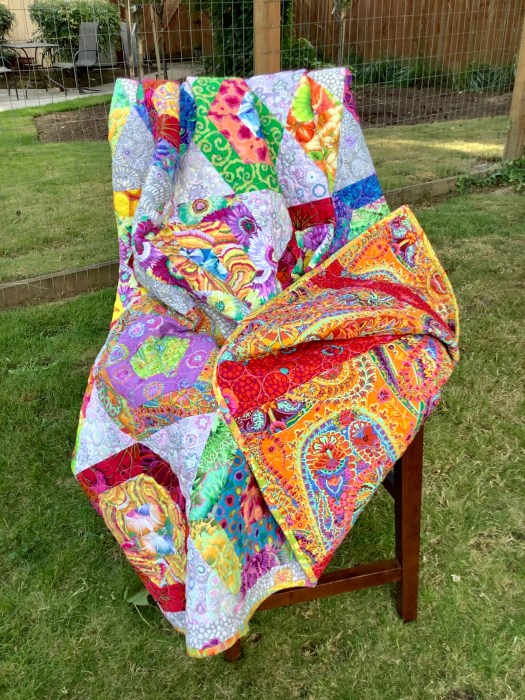
Now I need to decide what I’ll use for the binding. I’m thinking something that plays with the oranges and reds in the quilt backing. Pretty sure there isn’t anything in my stash so I’m just going to have to go shopping!

Fabric Greeting Cards

I had been thinking about making these fabric greeting cards for a while now and a couple of weeks ago found some of these cards in my local craft store. The cards are made for 4×6 photos. You just slip the photos in. The image shows through the die cut opening on the front of the card,  and the inside of the card is nicely finished and the back of the photo is covered with the quality card stock.

IMG_4556

So I bought some 4×6 index cards, cut some scraps of Kaffe Fassett Collective fabrics to 4×6 inches and used a glue stick to affix the fabric to the cards. Then I trimmed the cards about 1/8 inch all the way around in an effort to make them slip more easily into the cards.

And in just a few minutes, I had some really gorgeous blank greeting cards that will be perfect for gifts during the holidays.

The first cards I bought were around $15 for 10 cards. I found some on Amazon for about $20 for 40 cards. I made 40 cards in a matter of minutes!  The cards and envelopes are really nice quality. I’ve already bought another box of 20 to make some more cards for gifts.

img_4551.jpg

These are all so pretty! Click on each photo for a more detailed view.

Once they were done, I sorted them into sets of four cards and packaged them with envelopes in a cellophane packet. They look really high-end and they’re really pretty and cheerful. These large print KFC fabrics really work well for this project.

IMG_4567

My First Commission

I finished this quilt and shipped it off earlier this week. Since it has arrived at its destination, I can share it here now.

aaa quilt from left

And you’re not seeing double. This is the second quilt I’ve made out of these fabrics.

Someone saw it online and wanted to buy the original, but wanted me to make it bigger by adding big borders. Well, I loved the first quilt so much, and I felt like the wide borders would just make it look odd, so I talked the buyer into having me start over and make the same quilt bigger, and they agreed.

I was lucky to find the same layer cake that the first quilt was made from. So I ordered it lickity split and was on my way.

The buyer has blue bedroom walls and wanted blue fabrics in the quilt. I convinced them to let me find reds and yellows that had bits of blue, and I made a visit  to my LQS that has a good selection of KFC fabrics. I found a handful of fabrics that had pieces of blue in them, and the fabrics did the trick.

aa no

I went back and forth on the quilting design several times. The buyer wanted the quilt more “fluffy” so I opted for a looser design. I love the way the long wavy lines work with the vertical lines of this quilt. Here’s the quilting pattern that my long armer stitched into the quilt. It’s Urban Elementz Modern Beach Bubbles design.

modern-beach-bubbles

We chose a light yellow thread for the quilting, thinking it would read somewhat bright. I love the way it appears and disappears in the fabrics.

aaa quilting back good

aaa quilt back gooder

aaa back quilting really good

AA quilting front 1

This is the first quilt where I’ve included a label. The buyer requested one, so I enlisted the help of my friend, Carol, who has a top notch embroidery machine. I think I’ll do more labels in the future!

aaa label blurred

I opted to use the black and white jumble for the binding. For me, there just wasn’t any other choice. I just love what that fabric does on this quilt!!!

AAa Back & Border

The buyer said that the quilt exceeded their expectations and they appear to be thrilled with it. Plans on it becoming a family heirloom. What a lovely thought!

Turquoise Algorithm Quilt

Yes. I’ve made a lot of quilts on this pattern. Four to be exact.

But this is the one that started it all.

IMG_0245

I originally saw one of these posted on the Kaffe Fassett Collective page on Facebook, made by Lori Allison who owns All About Color Quilting and I fell in love with it immediately. I knew that I’d have to make it. And amazingly, I actually have the book that the pattern is in. My friend Linda gave it to me a couple of Christmases ago with the accompanying ruler.

(The pattern is called Algorithm by GE Designs. It’s in the Stripology Squared book.)

So I made a list of the fabrics I wanted to use and realized that I had most of them in my stash, but did have to purchase a couple of pieces. There were also a couple pieces in the original that I omitted and added a couple of other fabrics.

I took all the fabrics with me on vacation in August/September and cut out all the squares and strips for my quilt and cut out the same fabrics for my friend who has made the same quilt. I purchased the backing fabric while I was on vacation.

After I got home I got all the 10 inch squares cut and sewed in my white on white strips assembly line style. To make this process go more quickly, I folded all the strips in half, wrong sides together, and pressed the crease. Then I folded all the half-squares in half, right sides together, and pressed down 1/2 inch on the fold.

Here’s the quilt pieces all prepped and ready to start sewing. Once they’re prepped like this, you can really sew them all together quickly. it’s worth the time to do this work ahead of sewing.

IMG_0176

These creases made it really easy to match up the center of each piece with the center of the strip, and the varying wrong side/right side folds made the pieces nest nicely together for sewing.

I love sitting down at the sewing machine and really cranking through piecing quickly. I had these 56 squares all sewn together in a couple of hours. The first photo here shows the white on white I used. I like it much better than a solid white.

Once I got all the blocks sewn, squared up and cut, I tossed them up on the design wall. I usually like to just get them all up and then start moving things around. Part of this process usually involves sending photos to friends and having them point out things I’m not seeing. It can be hard to see areas that need work when you’ve been looking at it for hours on end.

This photo is of my friend’s quilt. I marked it up and sent it back to her showing a couple areas that needed to be adjusted. She sent plenty of photos of my quilt back with mark up as well.

IMG_0244

As I was putting my quilt together I pretty much knew that I wanted to use the citrus color way of Kaffe’s lotus leaf fabric. I just love the fabric, and this color way has been a favorite of mine since it came out. This fabric is in the front of the quilt as well.

IMG_4493

This quilt is at my long arm quilter as I type. Here’s the quilting design that she will be using. It will be really great with the verticality of the blocks. It’s Bohemian Beaded Shade from Urban Elementz.

bohemian-beaded-curtain

This quilt will be only my second with a label. It’s going to be a house warming gift for my sister and her husband. They will be surprised.

Sweet Animal Zipper Pouches

Earlier this fall I got some special orders for some of my zipper pouches with the Mia Charro animal panels. I had made one of the hippo pouches and some dog pouches earlier in the summer, and everyone just loved them. These panels are so adorable and have so much personality and color!

Each of these pouches has a zipper pocket on the back, and they are lined with batik that matches the frame around the panel. The hippo has blue chambray framing the panel, and has Kaffe’s lavender Mille Fiore for the lining.

I just love picking out the batiks to go with each of the panels. it’s really a great way to make the panels really sing. Of course, I just love batiks! So any time I get to make something from them, I’m happy.

I saw some of these adorable cat and bird panels at Center Diamond quilt store in Cannon Beach, OR, and picked up a strip of each. Maybe some day I’ll actually get around to making something from them!

Scrappy Batik Stars

I’m always thinking two or three projects down the line. I think I have at least 15 quilts in mind at this time.

My latest project is this really fun scrappy batik star quilt. I’ve had this pattern for over a year. I saw it made up in beautiful bright batiks at one of my local quilt stores and just fell in love with it. IMG_4510

I had actually pulled some gorgeous batiks from my stash to make this quilt right after I bought the pattern. I got looking at it a couple weeks ago and decided that I’d use my collection of batik scraps left over from making pouch sets. Plus, my friend who just made this quilt was visiting and let me use the scraps she had left over from her quilt.

So I was able to cut all the bright pieces from scraps. I purchased the light background at the same time I bought the pattern.

This is all that was left over from my bright batik scraps:

59548595984__3100BF7C-B815-4F4B-8CD1-1FAB59C898A2

That’s a really small pile!

I actually put all the pieces, nice and organized, into a bag thinking that I’d start sewing later. Ha! I couldn’t wait to get started!

IMG_4513

GAH! I just love batiks. I should have taken these photos during the day rather than at 10 pm. they just don’t photograph as well at night. But each block is just amazing! Click on each one to see a close up. That first one gives me chills!

I’m making a throw size quilt, which takes 20 star blocks. I have all but four sewn together. I’m still figuring out how to proceed once they’re done. Should I arrange the stars on the design wall, and then add the colored borders before sewing it all together? Or should I just assemble blocks, and then toss them onto the design wall? Still thinking about it.

These blocks will end up being 15 inches square, so this will go together pretty quickly.

IMG_4653

The colors are much more vibrant than the photo shows.

I heard from my long arm quilter today that the red and yellow algorithm quilt I sold is done! I will pick it up tomorrow night. Just can’t wait to see it.

Pink and Yellow Algorithm

Holy cow! Have I been busy! It’s been nearly three months since my last post here and I’ve been creating up a storm.

I just have to start chunking away at it all.

So, what happened after the blue Algorithm quilt? Well, I loved making it so much that I decided to use up another KFC layer cake and make another one. And I like this one even better! The best part? THAT BLACK AND WHITE JUMBLE… OMG! IT JUST MAKES THE QUILT SING!!!

8A12B131-E530-4A2C-A39E-AB9D177AF23F

And all the color. it’s so fantastic! I like this quilt even more than the original one that inspired me to make this pattern.

9C9A2FA9-E823-4A73-8B7D-0BC1DE3C6552

I started with a 2016 KFC Layer cake and added a few more fabrics to get the blocks I needed. It was so much fun to put this together because the fabrics were all just so amazing together!

I happened to find some of the yellow Roller Coaster on sale and bought enough for the back. I’m going to wait to take this to my long arm quilter because I have a couple in line in front of it, and I don’t really have any plans for this quilt so I can afford to wait.

E29B6FE3-D8E8-4B74-ACE7-48E3D611F7BC

I posted photos of this quilt on the KFC Facebook page and someone contacted me and wanted to buy it, but they wanted it bigger. After consider different options to make it bigger, I decided I loved it too much to mess with it and proposed to the person that I make the same quilt again, but make it the desired size, and they said yes. So there will be another, bigger version coming to this blog soon.

GAH! These fabrics!

A01063F3-9861-4DC5-9F02-C70267082780

Fastest Quilt Ever!

I’ve been obsessing over a quilt I saw on Facebook last week. Literally thinking about it all the time. I decided to dig into my stash and found this 2016 Kaffe Fassett layer cake and decided to make up this quick throw size quilt. I used a black and white batik that I got on sale for $4 a yard for the accent strips.

I happened to have the pattern that this variation is based on in a book a friend gave me as a gift a couple of years ago.

IMG_3343

This literally went together in three evenings. I sewed the blocks and white strips in assembly line fashion over several nights, then tonight I squared them up, cut them in half, and tossed them up on the design wall.

I wasn’t really crazy about this layer cake, and even at the point in the constuction in the photo below was sort of “meh.” But I just LOVE how it turned out when the blocks were done!!! I can’t stop looking at it!

IMG_3337

Then there was some magic that I can’t tell you about. It was some pretty fucking amazing magic!!!

With all the bias edges, the blocks ended up really wonky! So it was critical to square them up.

IMG_3338

It’s odd, but I just love squaring up blocks! These were damned easy to do because no seams have to match except the corners so I could basically just eyeball the center line. Makes squaring up very quick.

The quilt that I’ve been obsessing over is a version of this made from a more specific color way of Kaffe Fassett Collective Fabrics. I definitely want to make another version while I’m on vacation. I pulled a bunch of fabrics from my stash and ordered a few more to give ma all I need. I will share photos of my vacation quilt when it’s done.

This quilt was made on a variation of a pattern called Algorithm by Gudrun Erla. It can be found on the inter webs. You might also find one legit and legal video about these blocks.


Pouch Crazy!

I’ve been chunking away at the twelve batik pouch sets I cut out a few weeks ago. . . one a night a few nights each week and then a few on the weekends. I’ve got 11 of the 12 done.

IMG_3225

I just LOVE this blue and red set. The colors are so bold and saturated. I wasn’t sure about it when I selected the fabric, but I love it now.

IMG_3235

I’m not typically a pink lover, but this set is really pretty. The batik on the top is somewhat unusual. I’ll probably never see it again.

IMG_3229

I also really love this blue set. Blue isn’t my favorite color, but I love this shade of blue. And the fabric on the top is really fun and vibrant.

IMG_3226

And I love this black and red set. I love the contrast of the dots on the bottom and the botanical print on the top. It’s bold and I love it!

IMG_3227

And of course I love this green set. Green is my favorite color and this has just a hint of aqua to make it sing. It feels very watery to me.

IMG_3224

Nothing more cheerful than yellow. I love the sunburst on the top and the jaunty dots in the middle. It makes me feel happy!

And here’s the rest. One more to go to finish all 12.