Reducing the Pile

I’ve been working on finishing up the seven batik zipper pouch sets that have been cut out for months.

Two down, five to go.

I just LOVE this yellow set! The fabrics are so pretty. So cheerful. I love the pops of purple and aqua at the top. I just love this!

IMG_2367

This set is much prettier in person. I took the photo late at night, so the colors didn’t come out well. IMG_2322

Here’s some detail from the pink set… (click for a bigger photo)

I’ll make another set tonight. Better get up and get started before I lose my umph.

Hand Embroidered Pouch

IMG_2379

I’ve been wanting to try embroidering a panel for a zipper pouch, so sat down today with a piece of canvas that I washed and added some stabilizer to the back.

I’m well aware that I don’t have the patience to do a lot of hand work, so I started by doing some free motion embroidery of the flower stems on my sewing machine. Then I sat down and hand embroidered the flowers and leaves.

I just LOVE this blue chambray — I love the way it looks, I love sewing on it, and I love how the piece turns out… it looks so structured and tailored.

I used the same pocket method as in the other pouches I’ve recently made. it’s a really quick and easy way to put in a zipper pocket.

IMG_2374

I used a simple yellow batik for the pouch lining and for the lining of the pocket. It’s really cheerful and pretty. And it’s just lovely with the blue chambray.

IMG_2380

Look at how amazing the zipper installation looks on this chambray. So crisp and precise. I just love it!


This picture gives you an idea of how the pocket goes together.

First, sew the zipper to the top of the panel and pocket lining. Then fold up the lining (the pocket lining is essentially twice tie size of the panel) and sew it to the top edge of the zipper. Then sew on the side pieces and top stitch. Then sew on the bottom piece and top stitch. Then sew on the top strip and top stitch. That’s it. The sewing and top stitching on the sides seals the zipper pocket in place. Now you’re ready to put the pouch zipper in and finish the pouch.

IMG_2376

I just love the little zipper pulls. I made them from some micro fibre swede and little wooden beads. I just love them!

IMG_2387

UFO Zipper Pouches

I’m going to do it! I’m going to finish these seven batik zipper pouch sets that have been all cut out and ready for assembly, sitting in my sewing room for literally months.

IMG_2153

I sat down for a couple evenings last week and sewed the front and backs of all seven sets and selected the zippers for each set. The sewing went really fast because I did production line sewing and chain pieced each set.

Next step is to add the zippers.

IMG_2152

The zippers are the most time consuming part. But it’s worth taking the time to get them sewn in well. The details make all the difference!

IMG_2151

I just love working with these batiks. Picking out the fabric combos for each set is my favorite part of making them. I have probably made more than fifty of these batik pouch sets over the last few years, in addition to all of the sets I’ve made from border collie/batiks and from other fabrics.

These assemble basically like the pouches in my zipper pouch tutorial. It’s just that the front and back of the bag have three sections of fabric, finished with top stitching on the narrow center piece.

I start out with three third yard pieces of fabric and have enough to do the pouch fronts and linings, with some small scraps left over plus one piece about 12×12.

IMG_2197

Here’s the dimensions of the pieces for the pouch fronts and linings. Don’t forget the six pieces at 1×4 inches for the zipper tabs. These can be cut from the smaller scraps.

IMG_2198

The dimensions next to the pouch size are the measurements for the lining and the finished size of the pouch fronts.

Here’s a good representation of the batik pouch sets I’ve made. But it’s not all of them!

(click on each photo to get a bigger view)

Annie’s Hand Embroidered Pouch

On Easter weekend, a friend of mine flew into town and we drove down to Coquille, OR, to spend the weekend with my brother and his wife, Ann. This is the third year we’ve made this trip over Easter weekend. We usually just stick around the house, with a daily trip to the ocean and a quick stop for rockfish tacos at the Edgewater in Bandon.

Annie has recently gotten into making crazy quilt blocks with hand embroidery. She had made the embroidered panel below and gave it to me. I decided immediately that I’d sew it into a pouch.

IMG_2187

I thought about it for a few weeks, and decided that one of my blue chambrays, which I LOVE, would be nice with it.

Then I saw a video of someone sewing a pocket like this into the front of a zipper pouch, so I sat down with pen and paper and sketched out the dimensions.

I practiced on two pouches with this zipper pocket treatment first, so felt confident that I could pull this off and have it come out well with the embroidered panel.

The little woodland creature fabric is so cute! I saw it in the store and had to buy a yard. I had no idea what I would do with it. The paw print fabric is really fun too. The paws are sort of in a mandala print. A lot of fun detail and color.

Here’s the flat front of the embroidered pouch before the top zipper was sewn in.

IMG_2186

You first sew the zipper and pocket lining to the pocket front, fold up the pocket lining and sew it to the top side of the zipper, then add the sides, then the bottom, then you add the top strip and sew the top of the pocket zipper at the same time. All seams get a quick top stitch. It all goes together so easily and nicely.

Here’s the pocket lining.

IMG_2188

And the pouch lining.

IMG_2190

And I just love how the zippers go in with this more structured chambray fabric.

IMG_2192

IMG_2191

I’m going to try some improv machine embroidery on some canvas panels. I’m also going to keep an eye out at estate and yard sales for embroidered linens to see if there’s something I could use in a pouch. I love estate sales and they almost always have some kind of embroidered linens.

I do know that hand embroidery is NOT in my future.

I’m planning on sending this to Annie for a project bag for her hand embroidery projects.

Scrappy Black and White

I haven’t had much time for sewing the last few weeks. I’ve been busy with work and my weekends have been consumed by dog training seminars. And a friend of mine flew into town for a weekend on the Southern Oregon Coast with my brother and his wife.

I finally have a free weekend before work gets crazy for a couple of weeks. So I sat down at the sewing machine tonight to make a project that I assembled the fabrics for a week or so ago.

IMG_2040.jpg

I’ve been wanting to make a quilt-as-you-go zipper pouch from some of my black and white scraps. And I had some nicely sized border collie fabric to feature on the pouch.

I really like how it turned out. I love color, but I love graphic black and white too!

I sewed the pieces onto batting and quilted each scrap of fabric as I added it to the piece.

IMG_2041

I had several black and white fabrics already cut for linings, so I selected the one with dog paws. So perfect!

IMG_2043

My Lovely Paper Pieced Mountains

It felt so good to drive through the mountains last weekend that I decided to dive in and sew up some of the mountain paper piecing templates I purchased a few weeks ago.

IMG_1771

I wanted basic blues for the mountains, and a darker sky to make it look like a moonlit night. So I dug through my batik scraps and supplemented with some blue batik yardage. I added the green pieces at the bottom in an improv manner. I needed the panel to be a little taller and I wanted it to look more like a full landscape.

IMG_1772

I just love the darker blue dots for the sky. It feels like one of the bright snowy nights I remember from my childhood.

IMG_1770

The template package came with a bunch of different little mountain designs in each of three sizes so you can sew a lot of them and never make the same one twice.

IMG_1774

This paper pieced panel will be used in a zipper pouch, but I’m going to have a hard time deciding what fabric I’ll use for the body of the bag. Here are some options:

Taupe linen, gray chambray, blue chambray...

Three options in blue batik… light, dark, and way too busy!

Various orange batik options… Bright, lighter, and more mellow.

Yellow and beige batiks… It think these two are out!

I do have a few favorites in these options (see the underlined options above), but I’m nowhere near decided.

I still have to make a panel for the other side of the pouch and then I’ll have to make a decision.  Can’t wait to see how this works up.

Rico’s First Sheep Herding Clinic

I had been looking forward to this last weekend for a couple of months — Rico’s first sheep herding seminar in Central Oregon, near Bend. It was actually a handling seminar, so it was more about me and all I don’t know about sheep herding. Rico is such a natural!

I met Heather in Hubbard on Friday afternoon and we started our caravan drive across the Cascades.

IMG_1731

I can’t tell you how much I enjoyed the drive. It’s been ages since I’ve been in the mountains. It did my soul good to get above sea level and see some vistas.

It rained most of the trip, but the sun did come out. It was a pretty quick drive with only a few slow downs for construction and slow drivers. (That’s Heather in front of me.)

IMG_1730

We made it to Terrebonne, where our Air B&B was located, at about 5:30. Our third friend showed up about a half hour later. We gave the dogs a quick break, then headed out to dinner.

The Air B&B was fantastic! Two bedrooms with two securely fenced dog yards. It was much less expensive and so much better than a hotel. I loved that I could just open the front door and let the dogs out to potty! It was incredibly quiet and we didn’t have to live with the noise of our neighbors.

We were back at the Air B&B by about 8:00 and I was hoping for a good night’s sleep in preparation for a busy day of herding.

IMG_1734

I didn’t get any video or photos of Rico herding, but we spent a good deal of time in this pasture. This is my friend Heather with the instructor, and Heather’s young dog Navarre. I just LOVE Navarre.

Rico was such a good dog all weekend. I feel bad that he has so much amazing natural talent for herding and I’m no inept as a handler. There’s so much to learn about herding. I feel like I’m holding Rico back with my lack of experience.

46845811114_4b49f2f3a3_k.jpg

My friend Heather did get a couple photos of Rico and me getting ready for our turn with the sheep on Saturday.

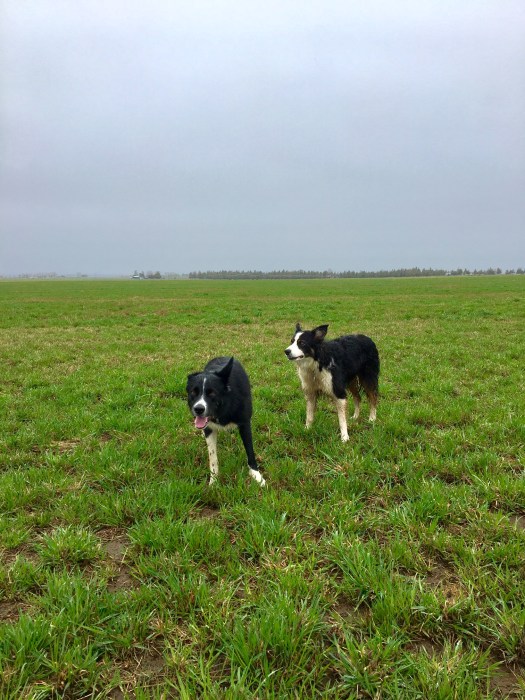
The clinic was held on a working farm, surrounded by huge fields that we were given access to for walks and dog pottying. We spent a lot of time in these fields over Saturday and Sunday. The dogs had an absolute blast running and playing! It’s so much fun to have them in a place where they can really open up and run full speed.

IMG_1736

Saturday morning was rainy and really windy. It cleared up and calmed down in the afternoon and we ended the day with a sliver of sunshine.

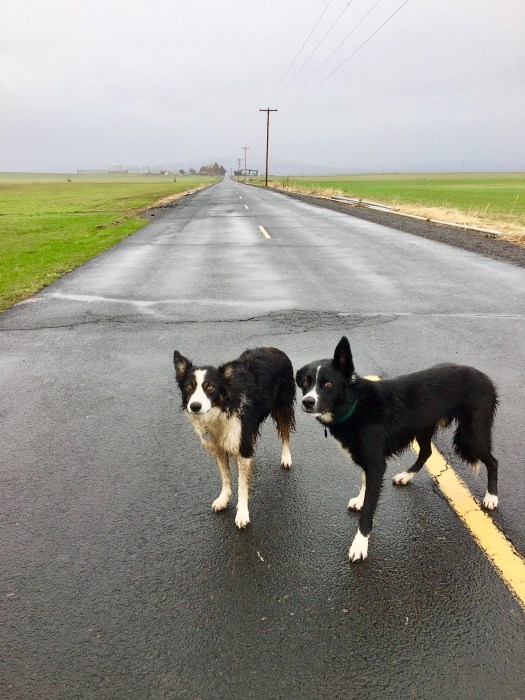
The forecast for Sunday called for rain and wind all day. Luckily, the wind was much milder than on Saturday, but it did rain most of the day. Every good Oregonian has solid rain gear, and I’m glad I didn’t leave mine at home. They say that in Oregon, there’s no such thing as bad weather, just inappropriate gear! My rain gear got a work out at this clinic!

Rico only worked in the round pen on Saturday as the instructor wanted to work on my skills. Sunday, we moved to the larger pasture, and Rico really rose to the occasion and made me so proud! It’s so amazing to watch him work sheep. His instincts kick in and he just seems to know what to do. There’s nothing like watching a dog do what they were bred to do.

Bender really enjoyed his field runs. I’m so glad we had access to these fields so he could have some excitement this weekend too. Both boys were so good.

I loved being in that country side! It was so nice to be up at a higher altitude. The rolling hills covered with juniper trees and sage brush made me feel like I was back home. The fresh air and views were so good for me!

IMG_1743

We drove home past Mount Hood and even got to drive in some snow at the summit. It rained the entire way, so we didn’t get any views of the spectacular Mount Hood.

The dogs are still tired a day after we got home. Nothing better than a tired dog!


Using Up More Scraps

I took today off work to recover from our weekend of sheep herding in Central Oregon. I had a nice sleep-in and then spent the day sewing. I’m itching to move on to some new projects, so I planned to use up the scraps I cut up last week.

There were enough scrap strip pieces left to make three pouches. So I pieced the six panels and selected fabric for the bodies of the pouches.

IMG_1759

I really like the red lotus leaf and LOOOOVE the black spots. The turquoise guinea flower looks better in person than in the photo, but it’s not my favorite. Sometimes you just don’t know how a fabric combination will look until you get it all put together.

I was on the phone with a friend tonight — the friend that introduced me to quilting and to Kaffe Fassett fabrics — and she offered to send me some strips from a KFC strip set that she’s had for awhile. So, more scraps are on their way to me!

I’ll probably make more of these pouches because there are some fabrics I want to try for the body of this design. I probably have a few more of these in me.

I do want to try some pouches with paper pieced panels. I recently purchased these paper piecing templates of snow capped mountains. 

mountains

I’m thinking I’ll make them from batiks, but I’ll also take a look at the KFC scraps my friend is sending and see if there’s something there that will work. I can picture these in a pouch made from my lovely blue chambray that I love so much.

I’ll probably give this a little bit of thought and then dig in later this week.

Pouch Mania

I’m having so much fun making these pouches out of gorgeous Kaffe Fassett Collective Fabrics. I keep trying out different fabrics for the body of the pouch and want to make 20 more! Each one is better than the last!

IMG_1661

These are made based on my zipper pouch tutorial. I just changed the orientation of the bag to vertical instead of horizontal. This post has a brief description of how I pieced the panel.

I’ve sold every one that I’ve made, and have orders for a few more. Luckily, I’m not tired of making these yet!

Magenta Scrappy Zipper Pouch

I ran out of scraps that I wanted to use. So I made some more so I could make this pouch.

How ridiculous is it that I MADE scraps!!!

IMG_1644.jpg

I dug out 17 half yard pieces of Kaffe Fassett Collective fabrics and cut a two-inch strip off of each one, then added a few pieces I had already cut that were long enough. I cut the strips in half and chose fabrics for sets of four strips.  Then I sewed these strips together, and cut into 1.5 inch strips on a 60 degree diagonal line.

Here’s what I ended up with.

IMG_1645

I cut half on the right and half on the left so that the diagonal slants go opposite directions. This gives sort of a zig zag effect when they’re sewn together.

I made the pouch according to my zipper pouch tutorial, and I quilted the pieced panel with a simple meander. (note: in the tutorial, the pouch front and back are sewn together with the 12-inch side as the top and bottom of the bag. These pieced KFC pouches are put together with the 10-inch side as the top and bottom. So these are vertical, and the tutorial assembles the pouches in a horizontal arrangement.)

IMG_1646

I’m going to make another one just like this but with royal blue polka dots on the top and bottom.

I’m really loving all these bright colors!