Several years ago I was in a quilt store in Wheeler, Oregon, on the coast south of Tillamook. They had a huge quilt hanging high on the wall that was made with KFC scrappy pineapple blocks. It was so amazing and it prompted me to purchase the pineapple ruler they had on display with it. I brought it home and quickly made ONE pineapple block. Then the ruler went in my ruler rack and the block hung on the closet door in my sewing room until I recently sewed it into this bag.
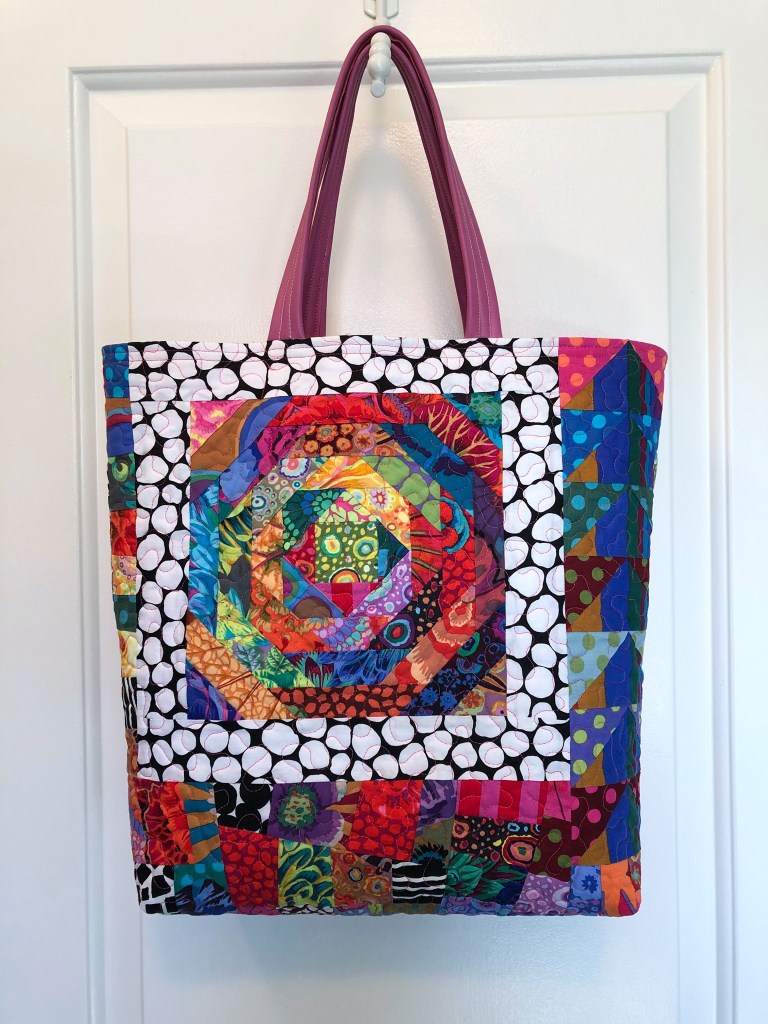
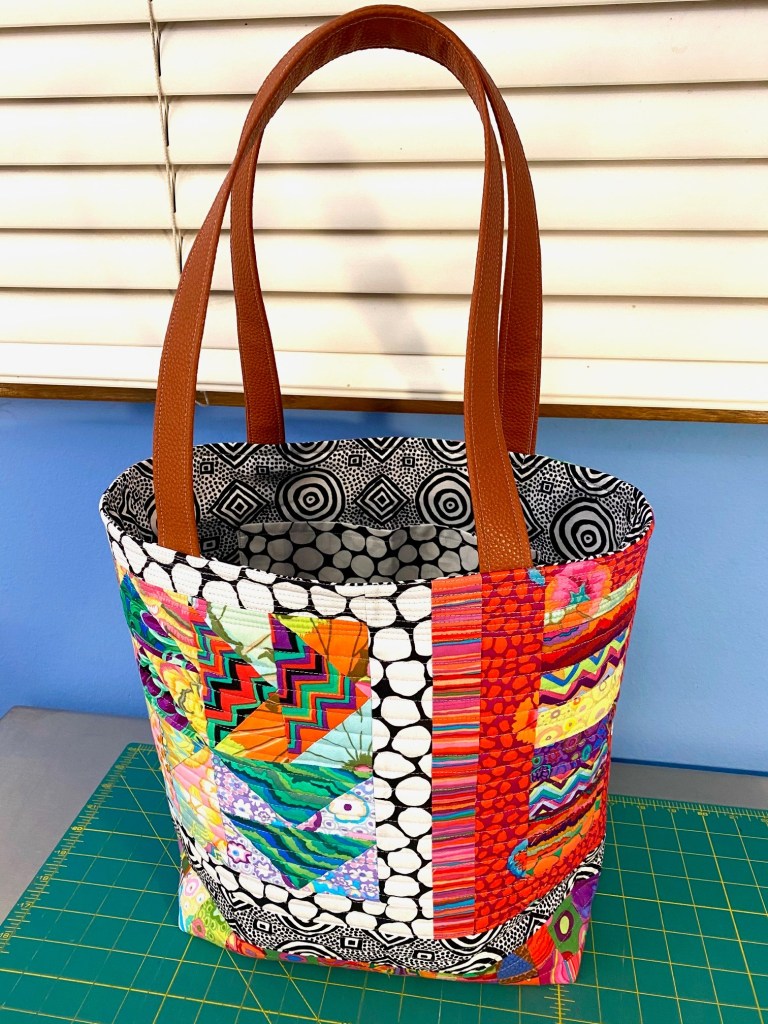
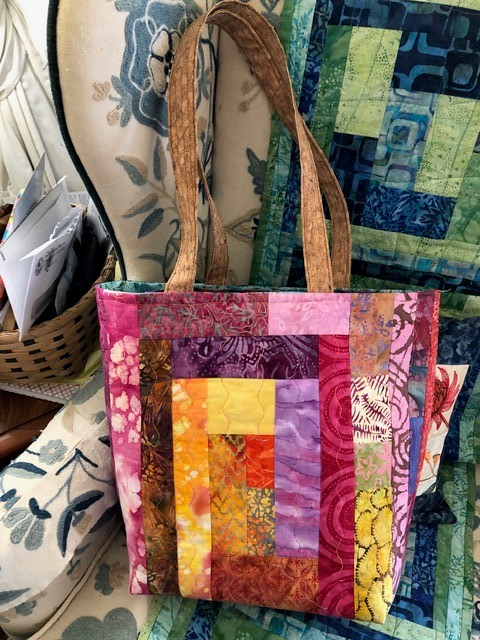
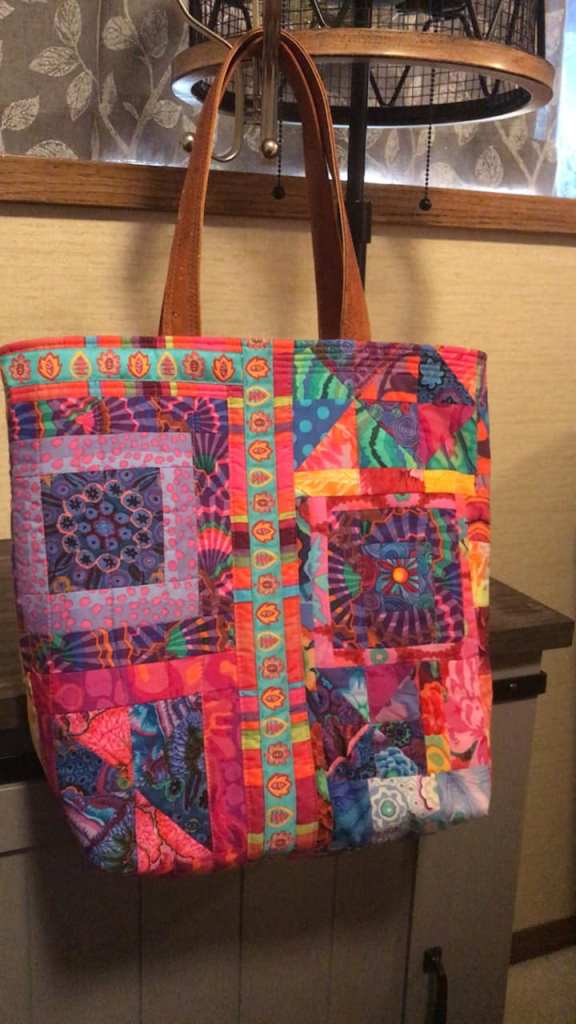
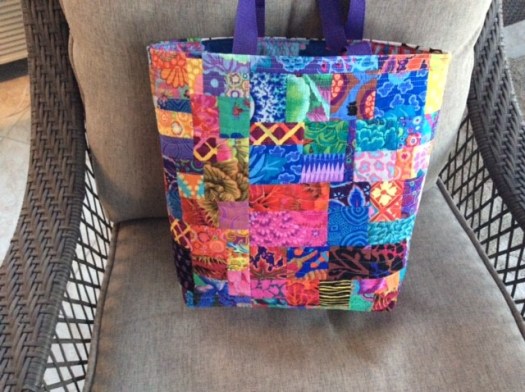
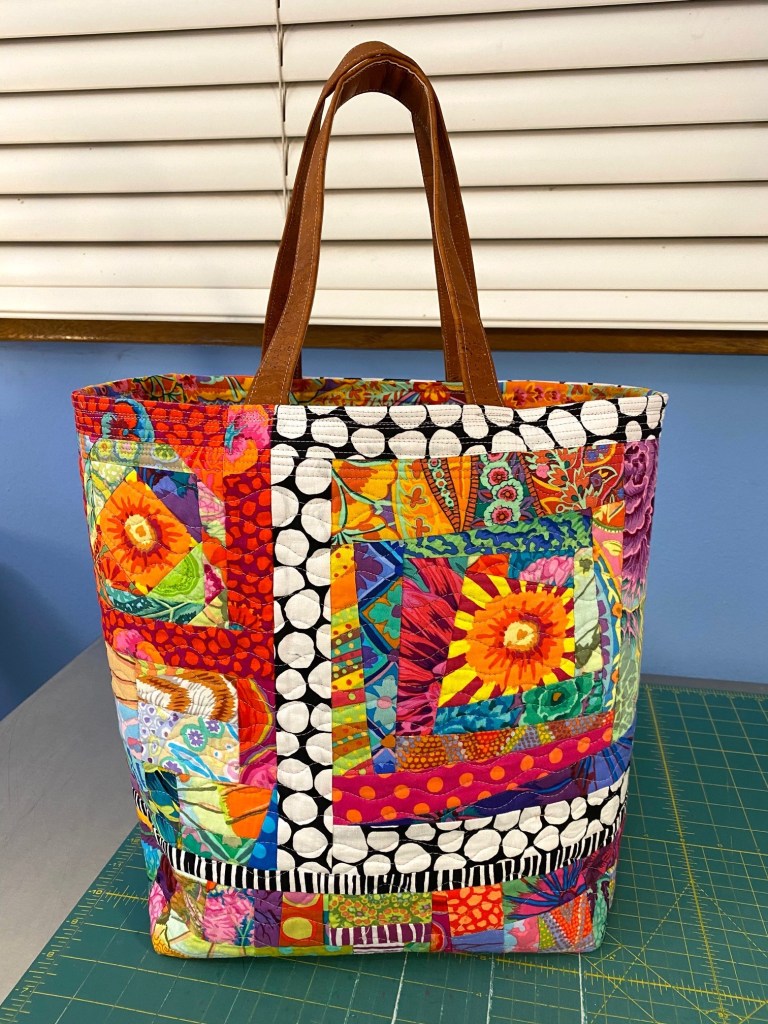
And then today one of my blog readers, Carol Scharp Allinson, posted these photos of a bag she made from my tutorial. Look at that big old pineapple block!
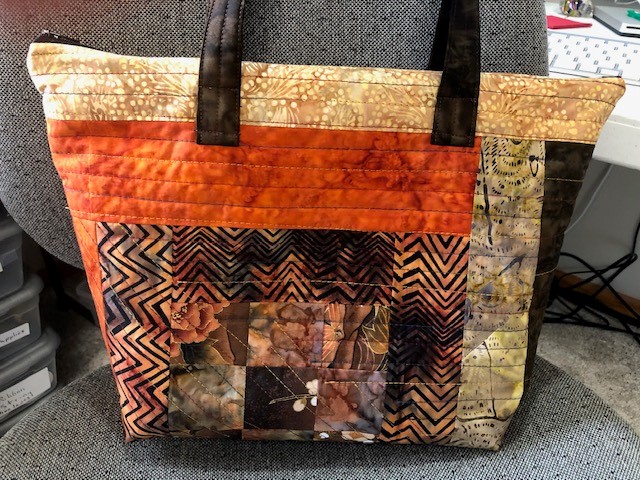
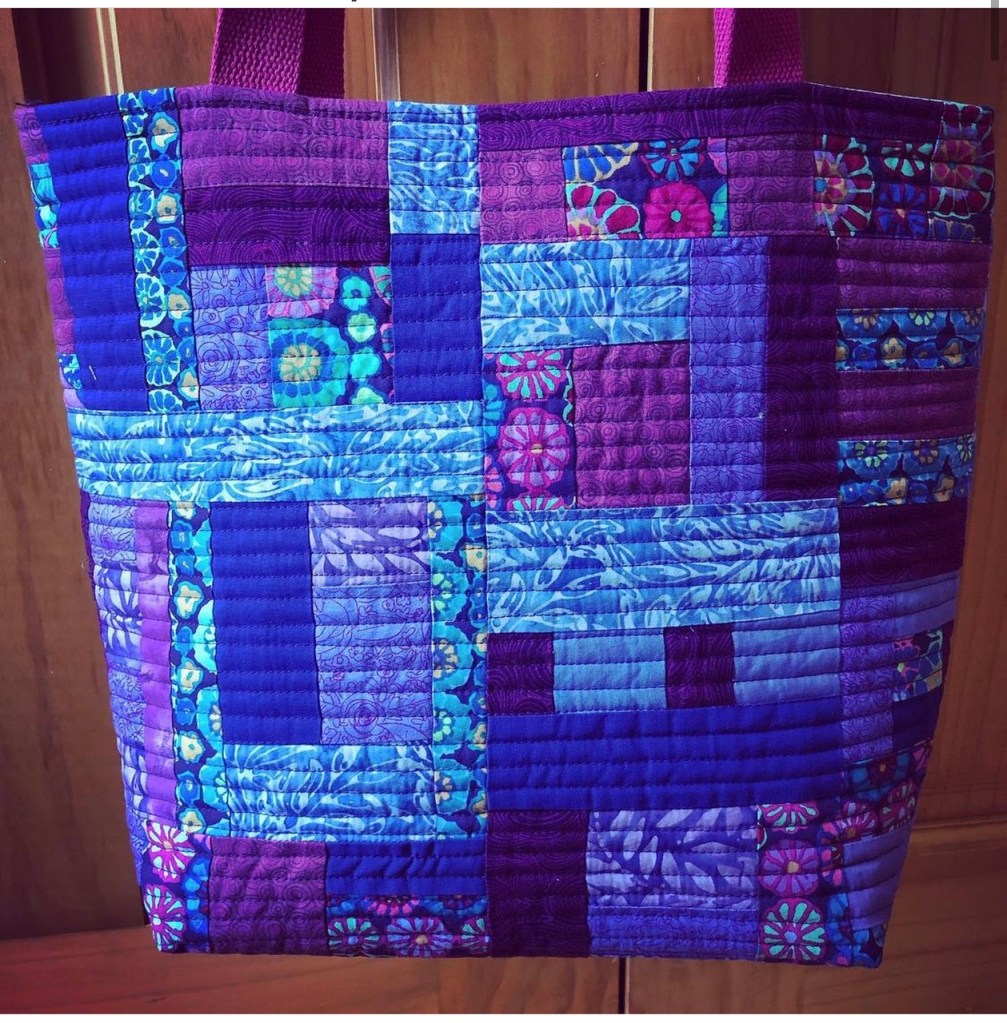
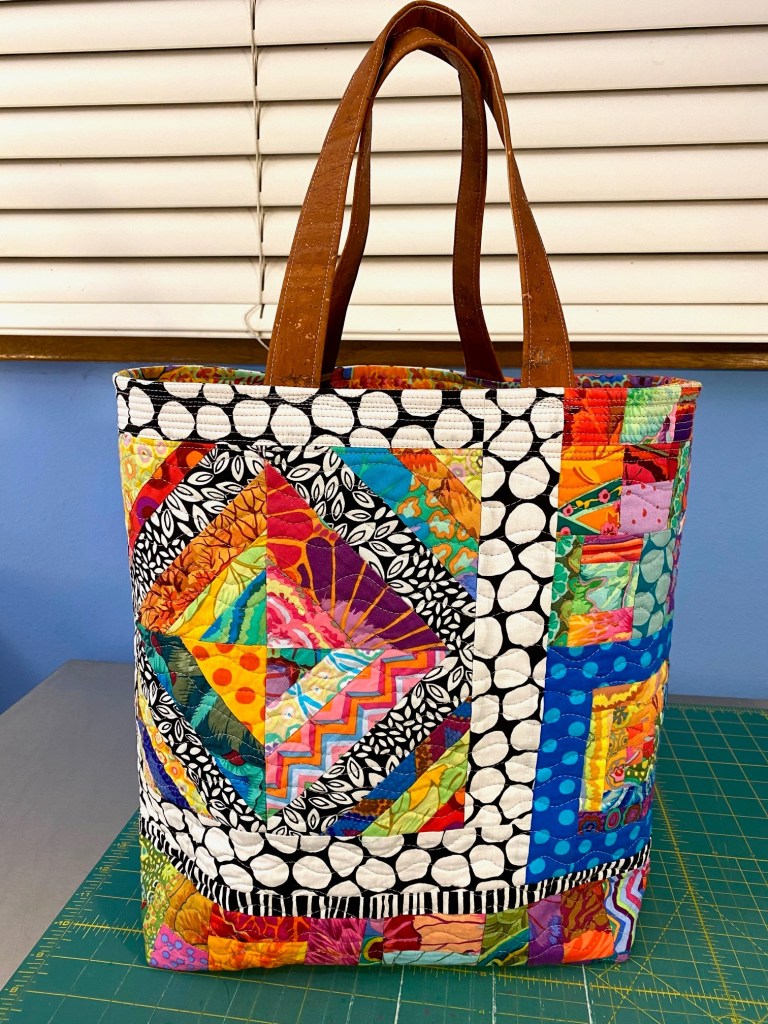
And here’s the back of the bag.
I love the deep and rich colors she used on the front of this bag. And I love that strip of spotted flying gees going up the side. I’m going to use that in the future! And the back is such a fun and eclectic mix of fabrics. It feels very lighthearted and fun. I am so impressed with the bags that my blog readers are making!
But what this bag has really done is inspire me to make more pineapple blocks! So tonight I dug out some batik scraps and started in.
I pulled up an online tutorial that shows how to use the pineapple ruler I bought in Wheeler. I promised myself I would read and follow it carefully because I get cocky and skip ahead and end up with gaps in my blocks. Not every row is trimmed the same way with this ruler!
I decided to make two blocks at one time so that I would cement the process with the ruler into my mind.
Ok. I got the first round done with no mistakes. But I know the errors usually show up in round 3.
I don’t know why this ruler seems so complicated to me. I guess one good thing is that it ensures that your block is nice and square on each row.
Woohoo!!! I got past row three with no mistakes!
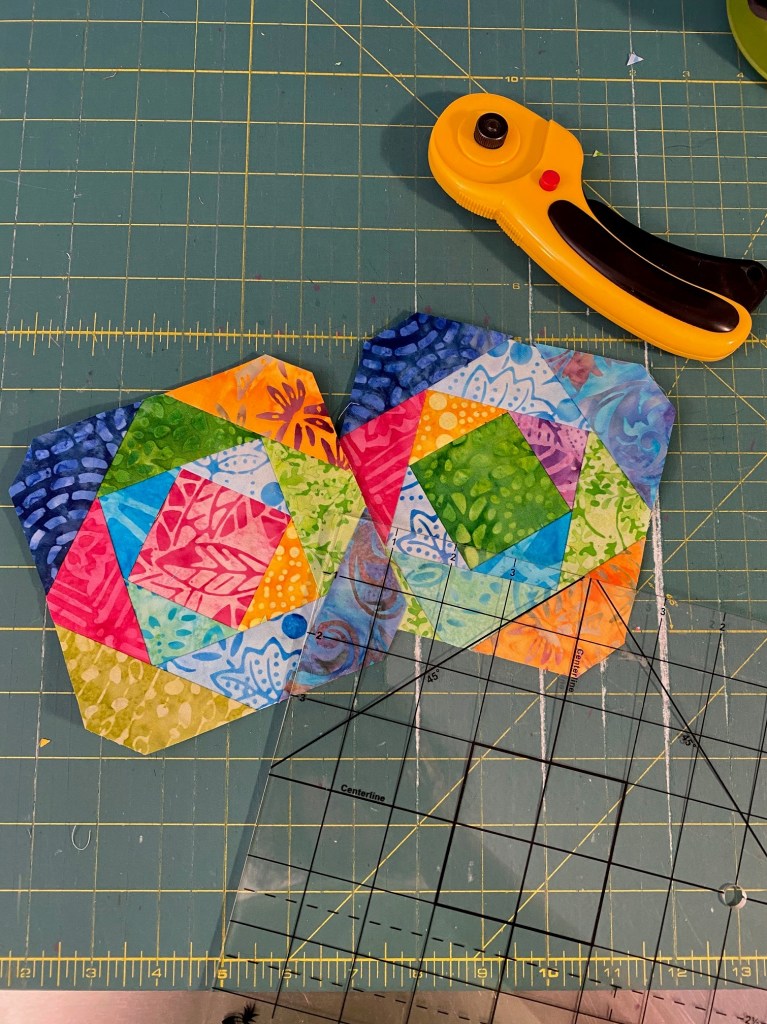
Smooth sailing from here on out! Here’s my two blocks prior to the final trim.
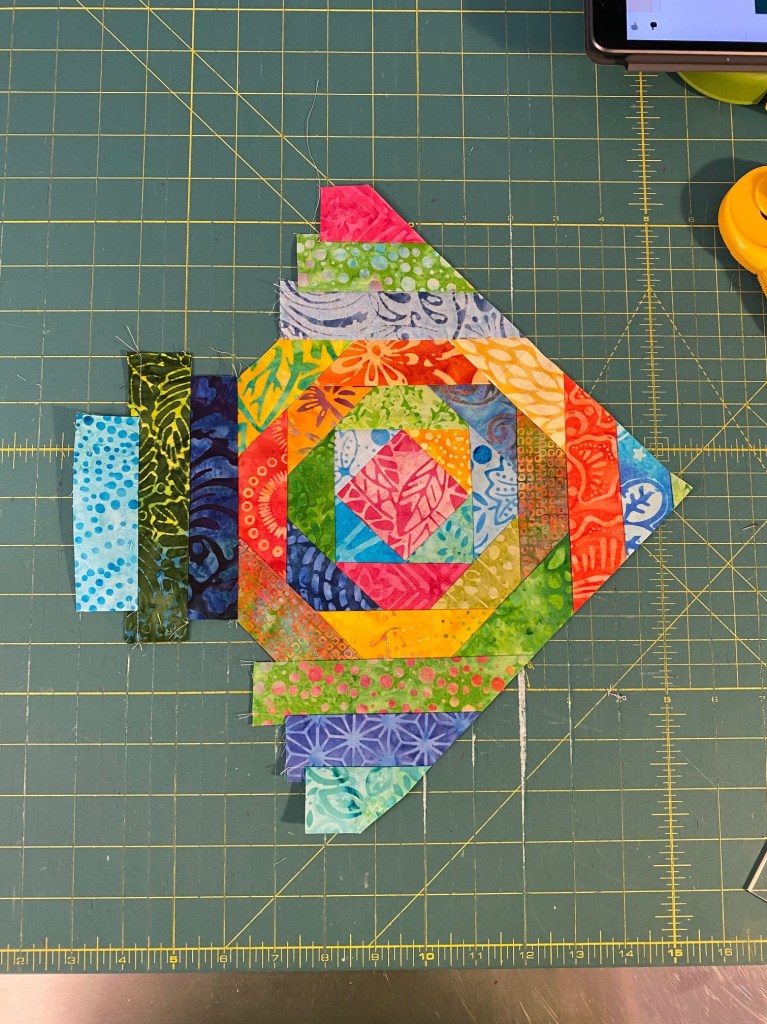
I had to take a photo when one block was half way trimmed because it looks like a fish!
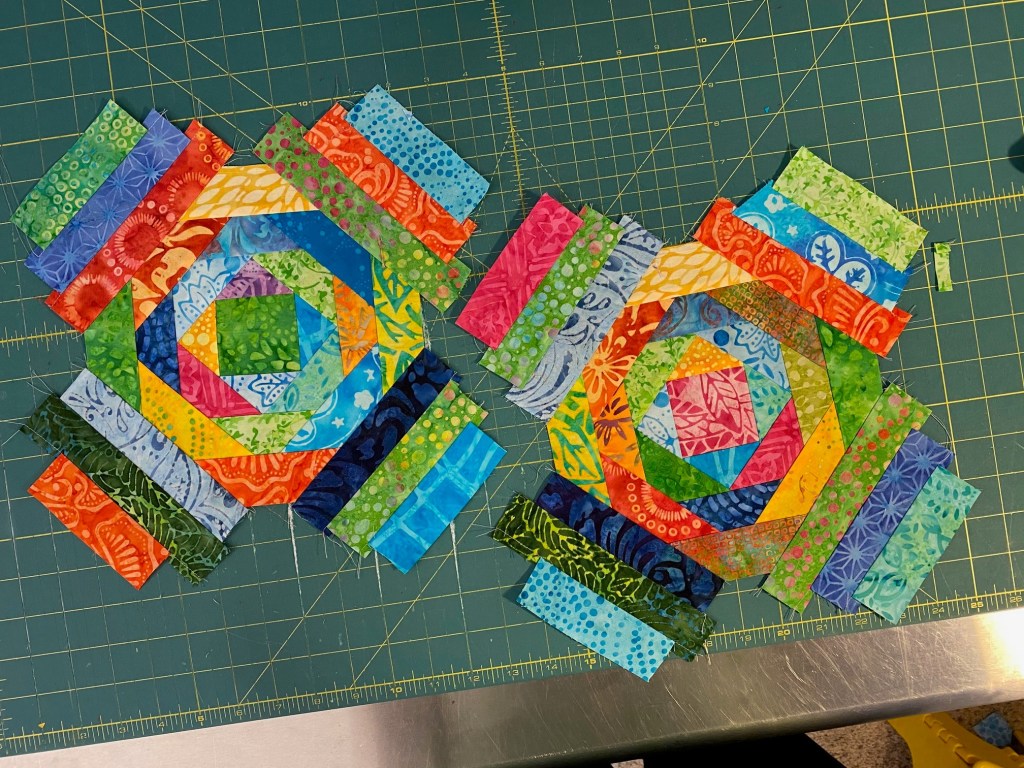
Here are both blocks with their final trim.
I feel like maybe I’ve gotten over my avoidance of pineapple blocks. And that’s good because I want to make some more out of KFC scraps and Aboriginal fabric scraps. I’m thinking the Aboriginal one will be really cool… I can just see it in my head.
That quilt store in Wheeler closed down a couple of years ago. It was such a cute little store and had beautiful batiks and a pretty good selection of KFC fabrics. It makes me so sad to see these local stores close. And we’ve seen a lot of them shut down in the last few years… most because the owners are ready to retire and are unable to find buyers.
I took Rico down to my friends place for a canine massage this morning. He tweaked his back a couple weeks ago and the massages seem to be helping him. When he was done I took him and Bender for a hike on BLM land. It was an absolutely gorgeous day and it felt really good to be outside and among the trees, hearing the birds sing.
When we got home a friend of mine came over to pick up that green Frankenbag I finished last night. She absolutely loved it! It was a little difficult for me to part with it, but I know it will be loved and appreciated.
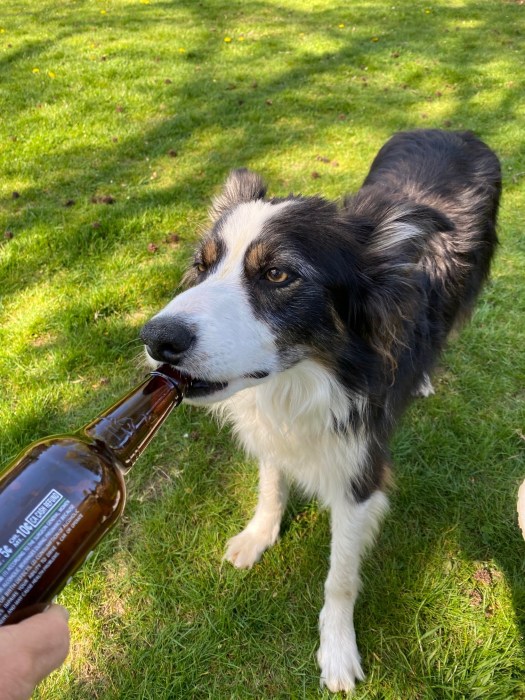
We sat in the back yard and chatted for a couple of hours and enjoyed some cold beer. It was really nice to get to have a casual non-work conversation with someone on a gorgeous day.
I finished up the green KFC Frankenbag tonight. And a friend of mine fell in love with it so it will be going to live with her.
I just love these green fabrics. The little pops of color all over the bag are pretty amazing.
Here’s the back of the bag.
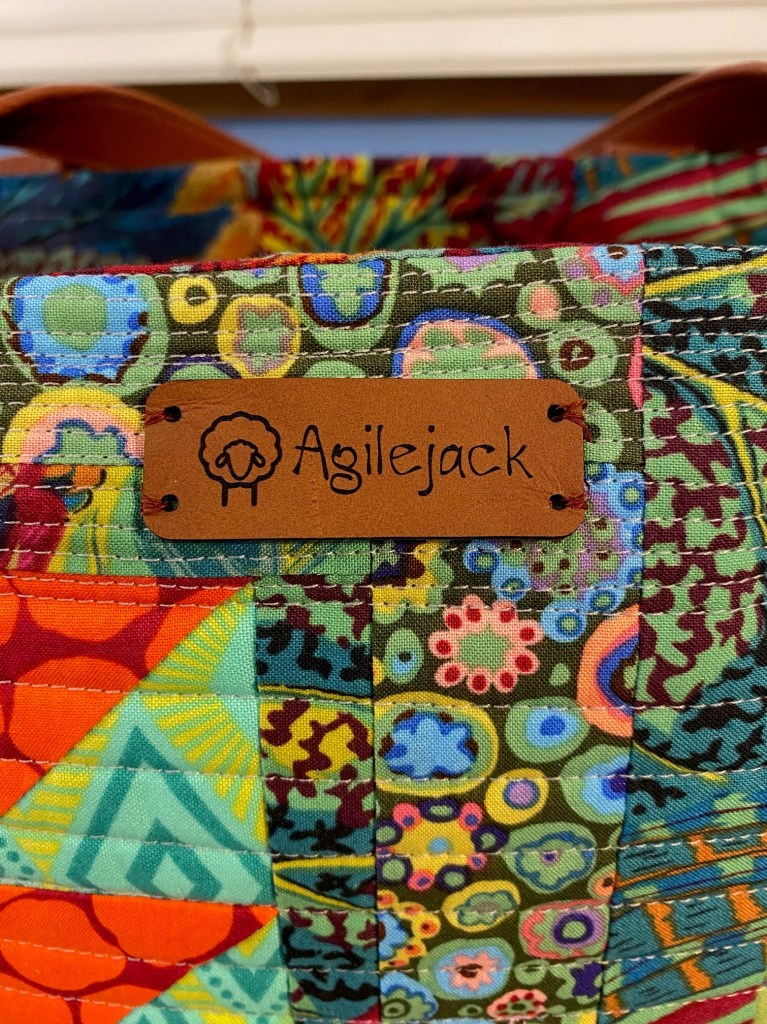
I ordered some faux leather tags the other day and and they arrived today.
I just love this little tag! And I love how it makes the bag feel finished. Amazing what a little label can do for making something look like really something!
I was so careful and it’s still crooked! It’s making me nuts. I’ll cut it off tomorrow and do it again. I wouldn’t be able to stop thinking about it if I didn’t fix it.
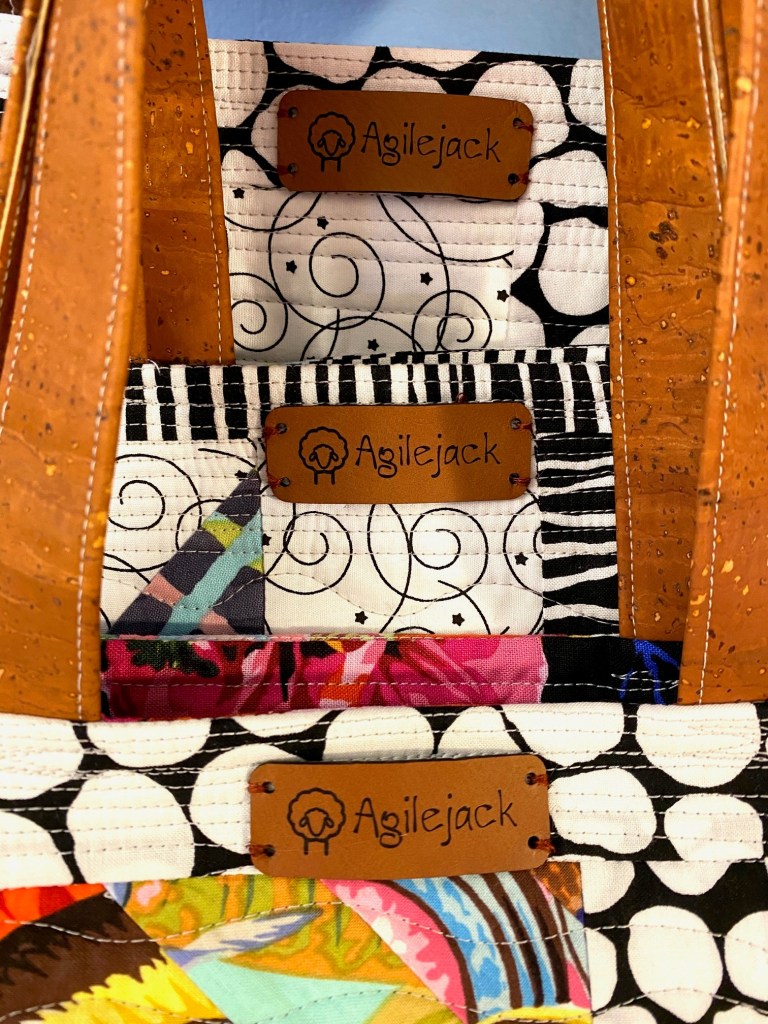
After I finished this bag I sewed labels on all the other bags I’ve made recently. It looks really good on this Aboriginal fabric bag.
More tags on more bags…
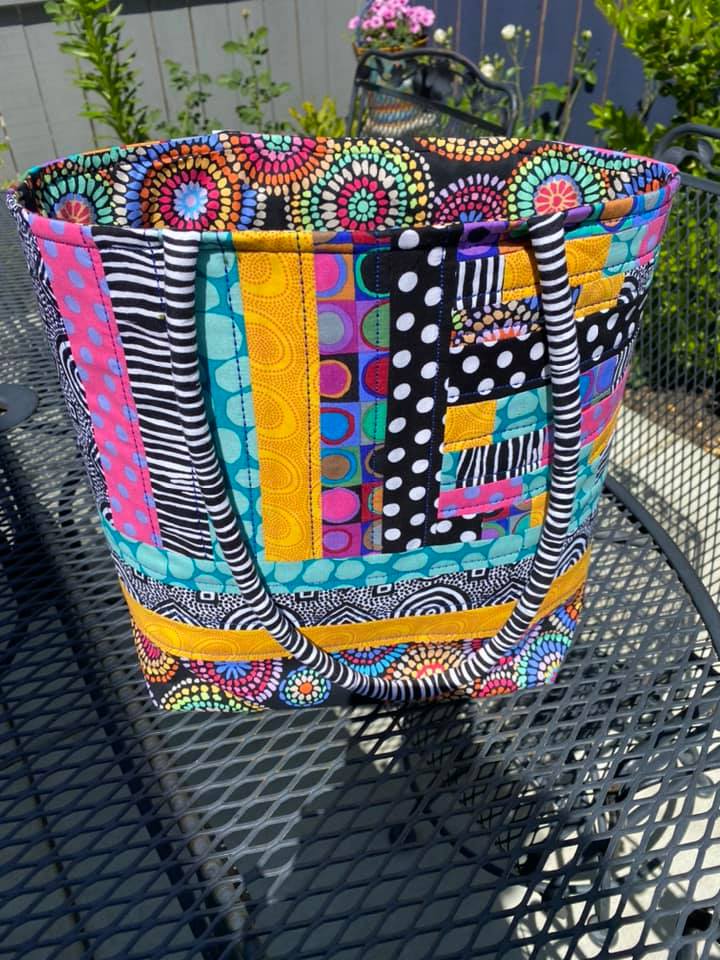
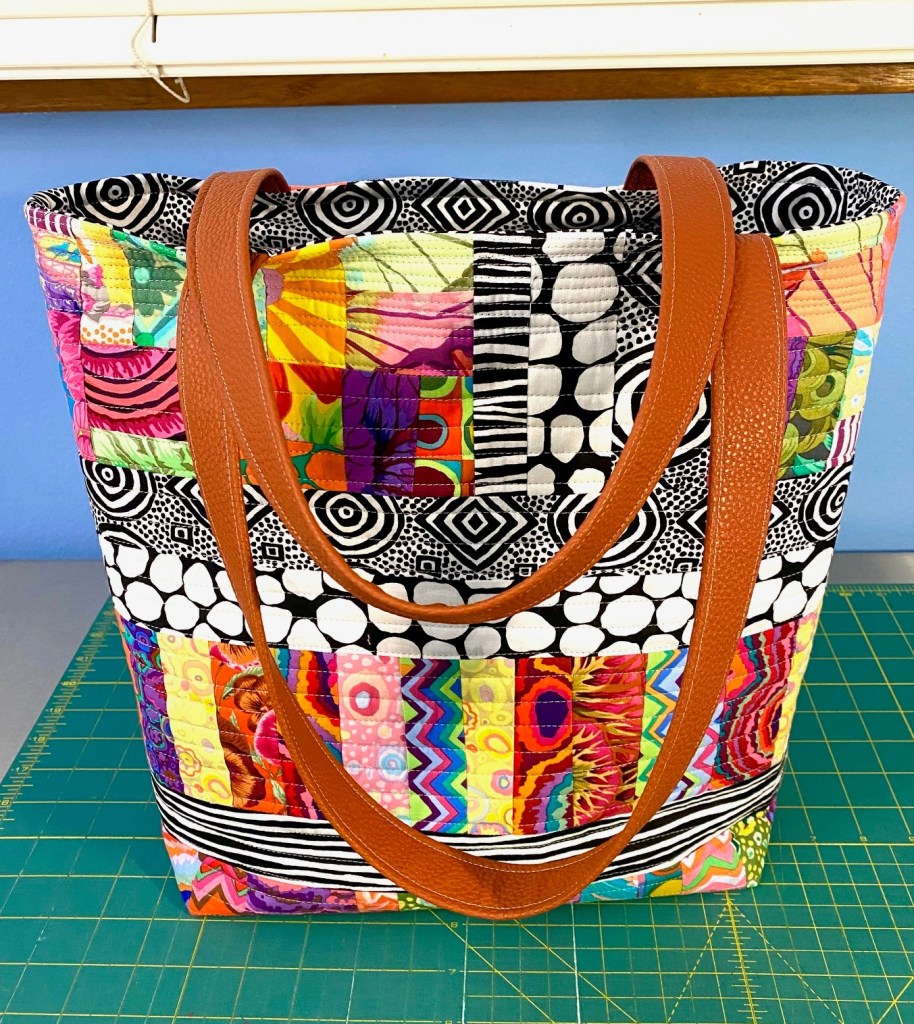
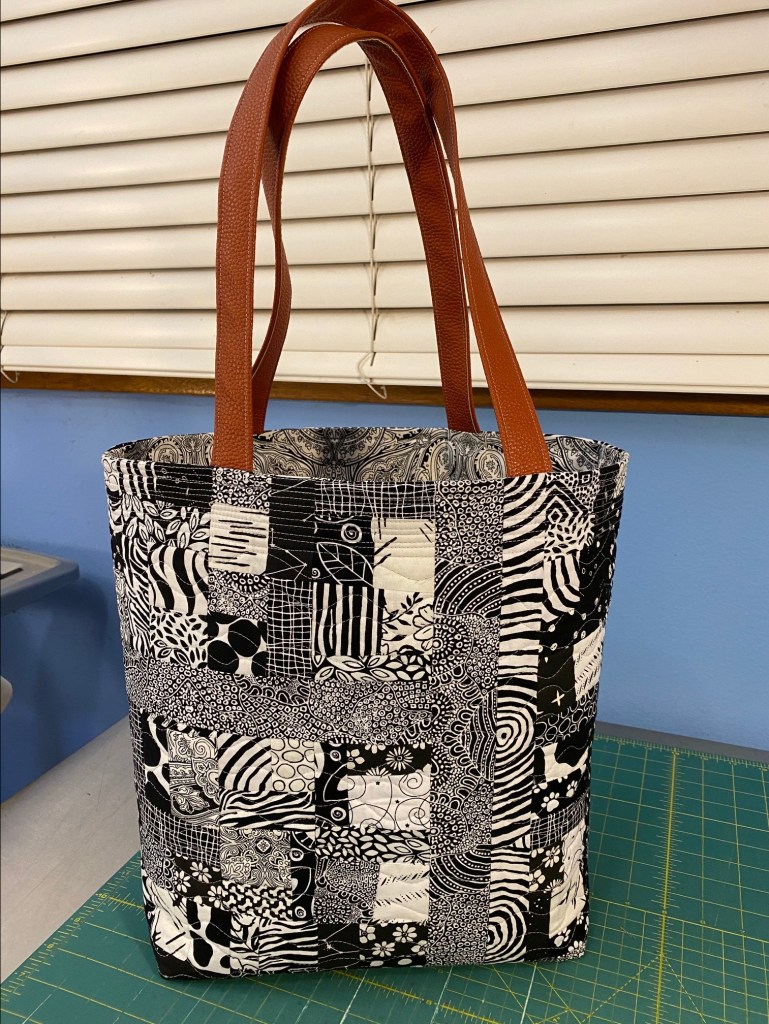
Another blog reader named Sharon Rose Marcum sent me photos of a bag she made from my tutorial. And I just LOOOOOVE this one! Her bold use of colors and patterns has really inspired me!
You know I’m a sucker for black and white with bold colors. And these pops of yellow ant turquoise are pretty fantastic too!
And the pocket that’s different from the lining is so fun!!! I love this bag! Sharon did an amazing job! She really dived right in boldly!!!
We’re having a crazy spring in Portland. When I took the dogs for a walk this afternoon the weather app on my phone said it was 88 degrees! I had to stop in the park to let the dogs cool off half way through our walk.
It’s pretty rough to have two such photogenic dogs.
I have secured an appointment for my first Covid vaccine on Tuesday. It’s a relief to have it in the books.
Still on my Frankenbag kick, last night I pulled out some Kaffe Fassett Collective charm squares that I’ve had for years and started playing around. They’re in my favorite color way… GREEN! I simply cut them into strips and sewed them into long rows. They will make fun pieces to combine with other orphan blocks and crumb quilting.
I like the greens, but they felt a little flat to me. I felt like they needed a pop of color for interest. I wasn’t sure how I was going to achieve that.
And then a package landed with a WHOMP on my porch this afternoon. Inside was more KFC scraps shipped to me by a friend, and sne sent me a pile of nearly sixty blocks that she had made in a class at her LQS… All of them containing KFC fabrics! They are going to be so much fun to incorporate into Frankenbags and other scrappy projects!
And in that pile of blocks were two that were perfect to introduce a pop of color into my green strips. I got one of those blocks assembled into a bag front tonight.
I got some borders put on the other block that I’ll use on the other side.
Amazing the hard work a little pop of color will do! And if I’m focused, I might get the second bag panel made and both panels quilted tomorrow evening. Come on weekend!
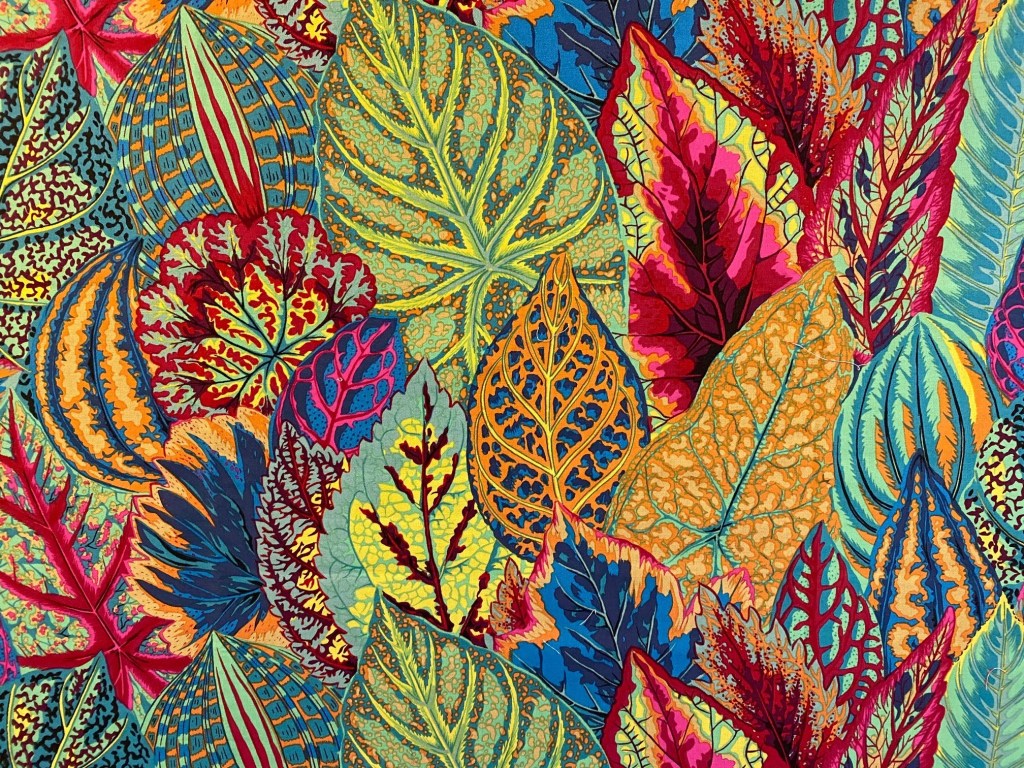
I’m going to line this bag with this gorgeous Philip Jacob’s coleus.
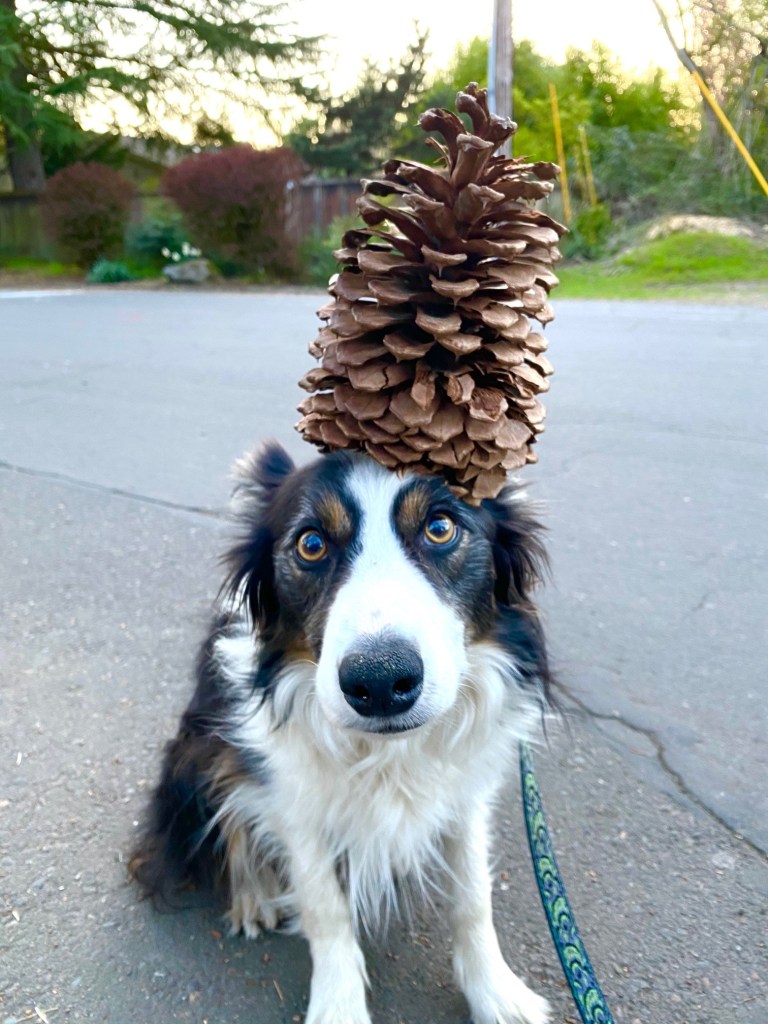
We found a HUGE pine cone on our walk last night. So, of course, we had to balance it on Bender’s head!
Holy cow! Have we been having glorious weather the last couple of weeks. It’s usually raining this time of year in Portland, but this year it’s sunny and warm. It’s such a joy to get outside every evening in the sunlight! Had a nice walk tonight as I talked on the phone with a friend.
When I got home I dug in and finished the lining on two of the bags that I shared last night.
I love the lining on this one! I just LOVE a graphic black and white print with these bright colored fabrics!
I made the pocket from black and white Jumble.
Here’s the back of the bag. I think I like it even more than the front! I want to do more with black and white combined with the bright colors. All kinds of ideas floating around my head on that.
Gah! I love it!!!
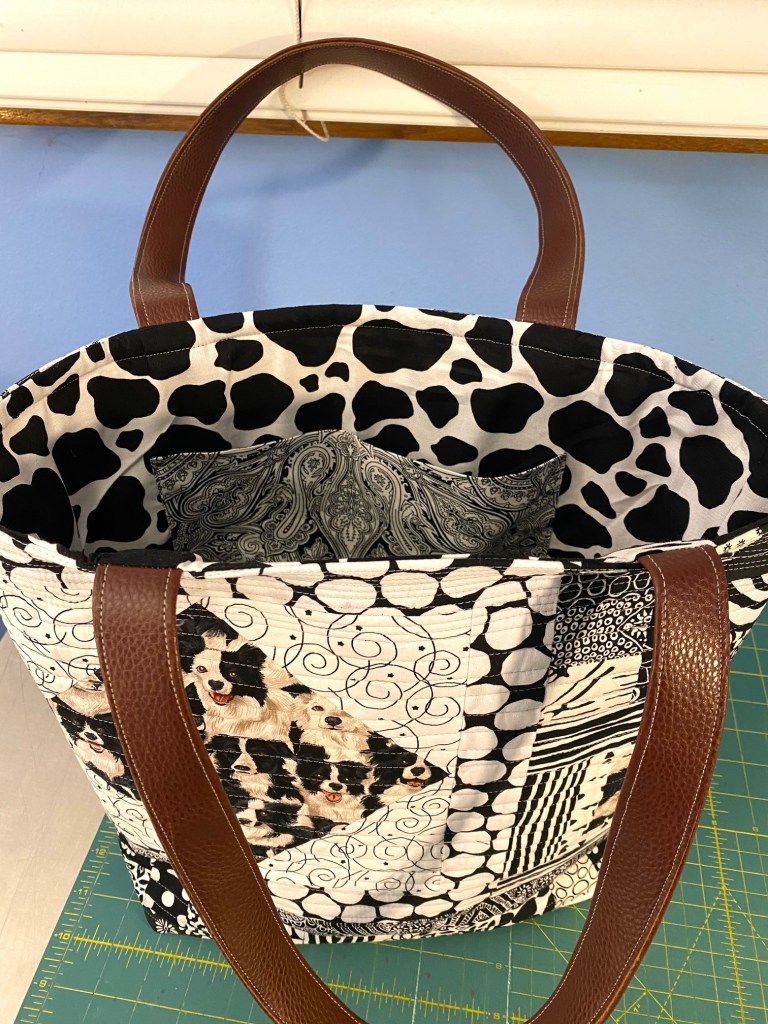
The other finish tonight is this border collie bag.
And that lining? It just makes me so happy!
And I just love the contrast of the delicate paisley on the pocket. Smiles all around on this one!
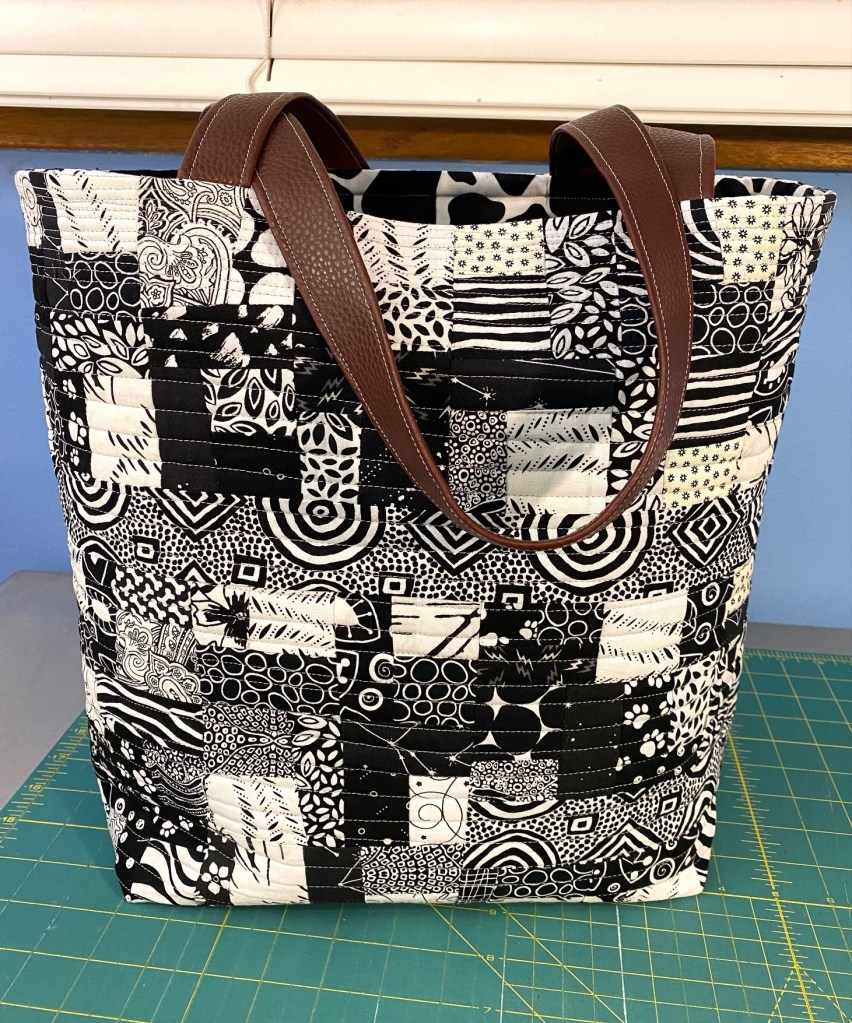
Here’s the back. I just love this black and white crumb quilting. I thought it would be bland, but it’s really fun!
For this bag made from Kaffe’s Paperweight fabrics I had planned on using Paprika paperweight for the lining.
But I’ve changed my mind. I’m going to use the Algae colorway instead. I think it will make the bag feel cooler and will be a more subdued color way which is a change for me. I’m going to have to order some as neither of the two pieces I have is big enough.
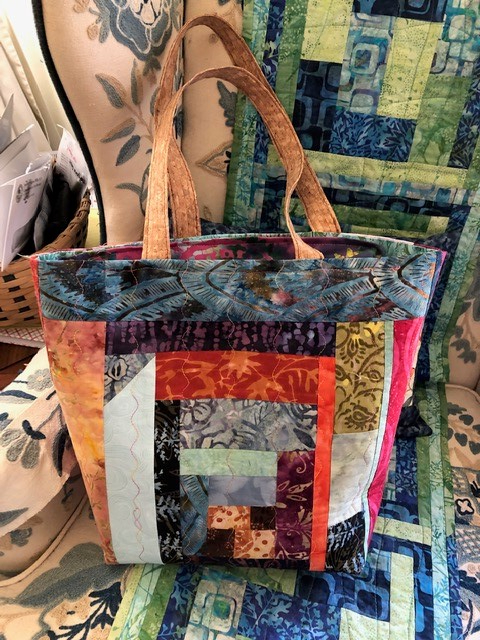
Two more of my blog readers send me photos of the Frankenbags they made.
Here’s the first one from Jean Boseman. And I’m a real sucker for batiks so this one makes me pretty happy! I can see several fabrics in this bag that I’ve used in previous projects.
This next bag is from Sally Zimmer. I love that she put a zipper in her bag. I’ve been thinking about coming up with a design that includes a zipper, and now I’m inspired to get it done!
I’ve had a productive couple days of sewing. Yesterday I worked on this new Frankenbag, but I made it from all new fabrics. Not scraps.
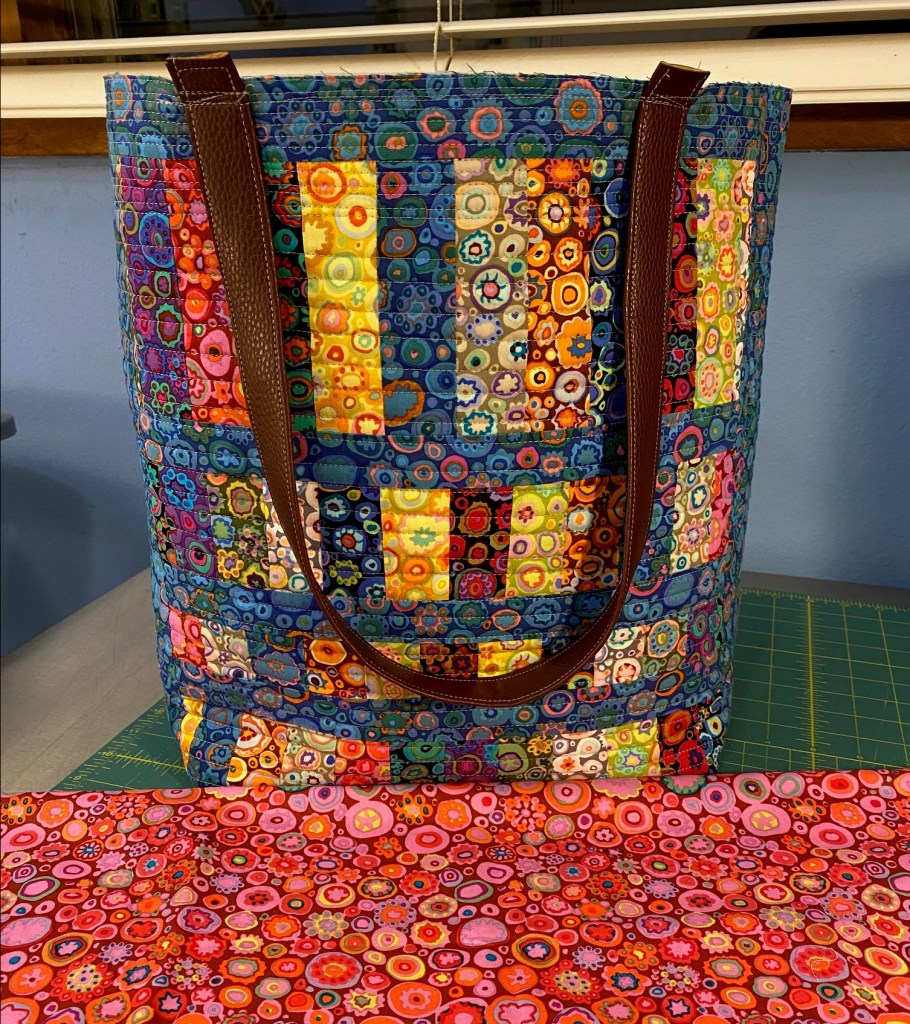
I’m considering this the front of the bag.
And I’m calling this the back. Although it really doesn’t matter which is which.
The only difference between the front and back is how I cut the sections of pieced strips.
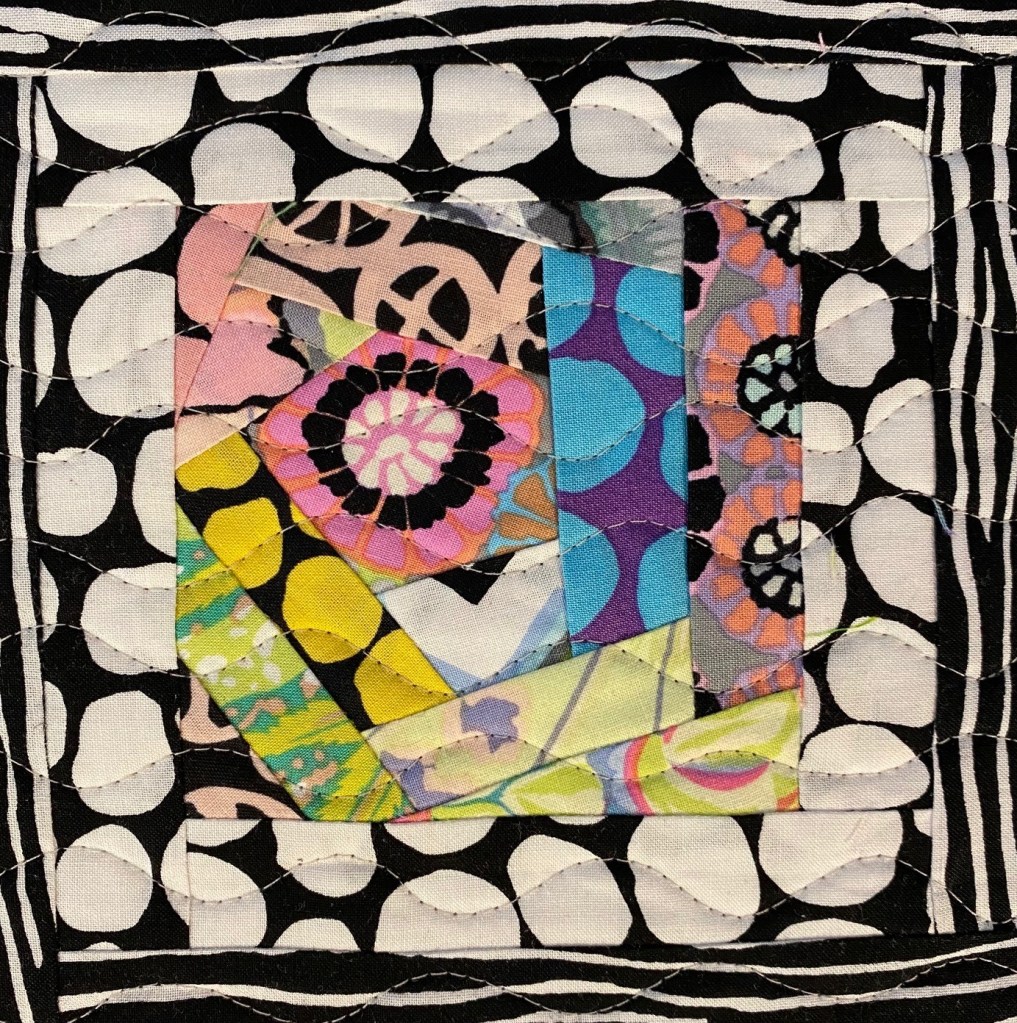
I love the straight line quilting on this one. I like the way it plays with all the circles and dots in the fabric.
I made this from a charm pack of Kaffe Fassett paperweight fabrics that I’ve had for several years. I could never figure out what to do with it. One charm pack isn’t much fabric. So this was a perfect way to use up that little collection of fabric. I have enough left over to make another bag. Thinking of maybe going with a green paperweight for the borders on the next one.
The red at the bottom will be the lining on this bag. I chose the red because the body of the bag feels a little dark to me and I thought the red fabric would brighten the whole thing up.
All I have to do to finish this is make the lining and sew it in. That’s a pretty small part of making these bags.
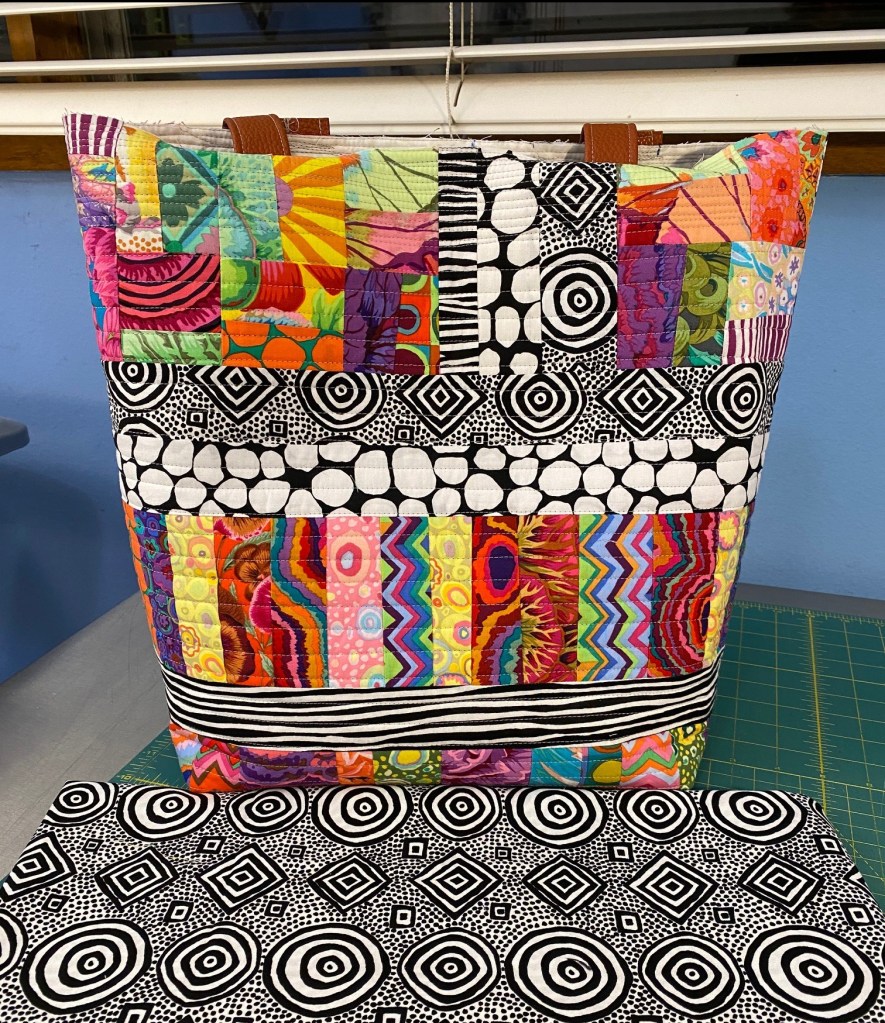
The other bag body I finished tonight was the one I made for my panel tutorial. Here’s the front.
The fabric at the bottom will be the lining. I think that will be a really fun pop of vibrancy! And I quilted this with straight line quilting and I love it!
Here’s the back of the bag.
And I have to say, I LOVE the back of this bag! Makes me want to make more on this idea!
I’ve received a couple more photos of Frankenbags that people have made following my tutorial.
Here’s another one from Elizabeth Wellenstein. I just love these saturated blues and purples! She made this for her mother in law’s 88th birthday!
And here’s one made by Nancy Elizabeth Ewert. She said she used some orphan blocks left over from a Gypsy wife quilt.
There are so many things I love about this one. I love the fussy cut blue millefiori. I love that vertical line of yellow and green nestled in with those stripes. I have all kinds of ideas after seeing this one.
Next up, I want to finish the three bags that still need linings. Then who knows what I’ll make. I would like to figure out a way to add a zipper closure to the top of my Frankenbag. I have some ideas, but I’ll have to plan it out and make at least one prototype. More on that as my ideas firm up.
If you make a bag, remember I’d love to see it and would love to share it here. Email me a photo at anne@agilejack1.com.
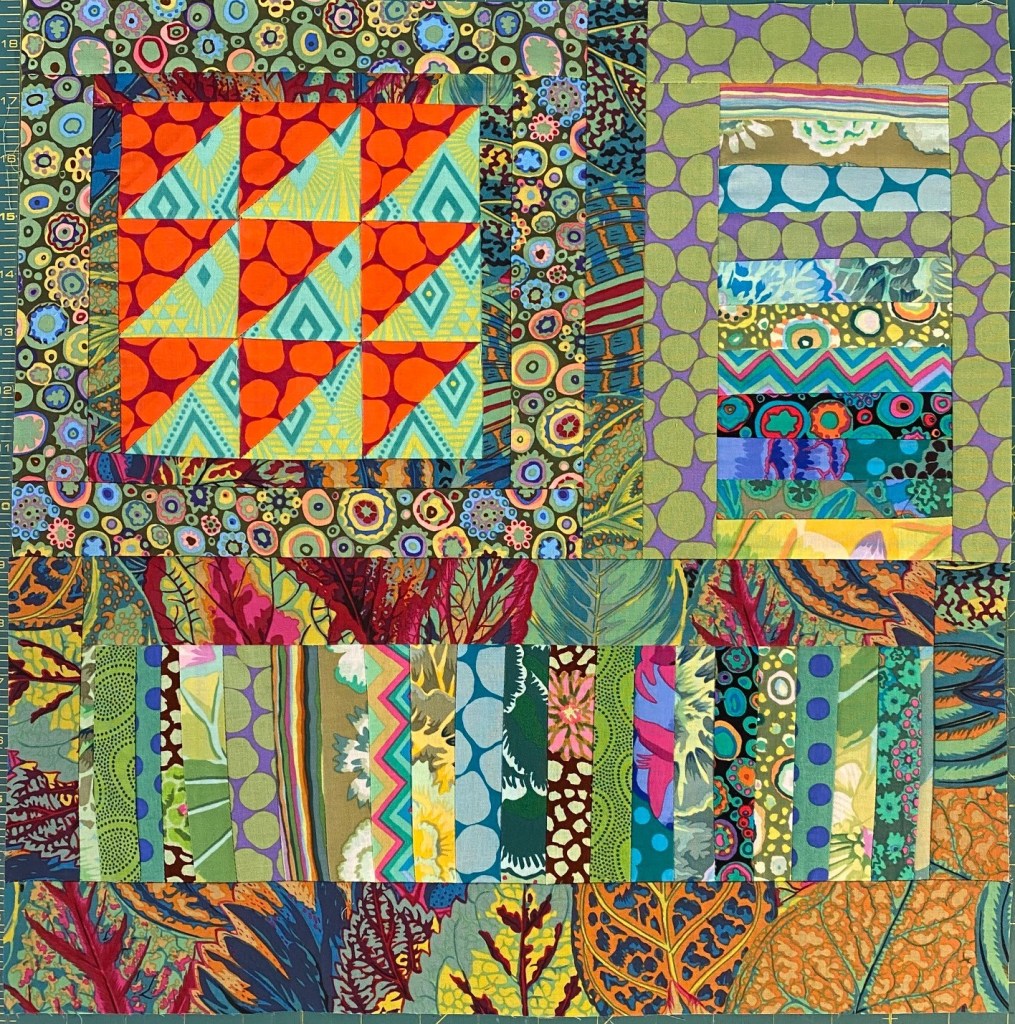
I made the front and back for another KFC Frankenbag Saturday afternoon. So I thought I’d take pictures as I made it to show you how I go about putting together the pieces and assembling these panels. For your reference, here’s a link to my Frankenbag tutorial.
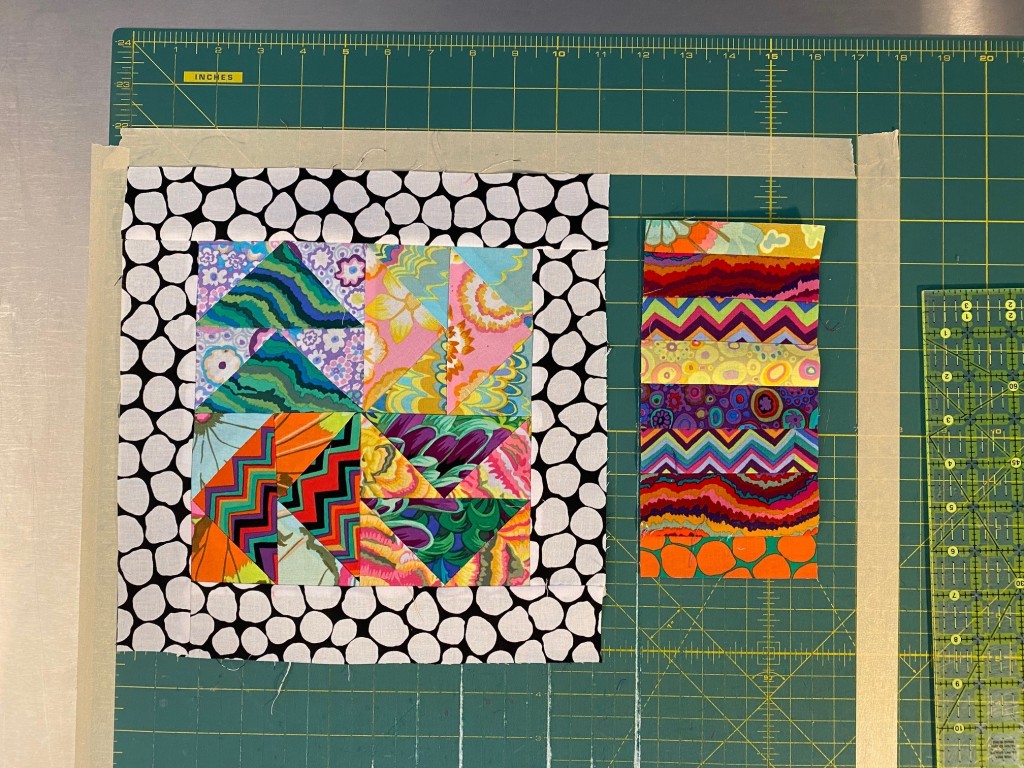
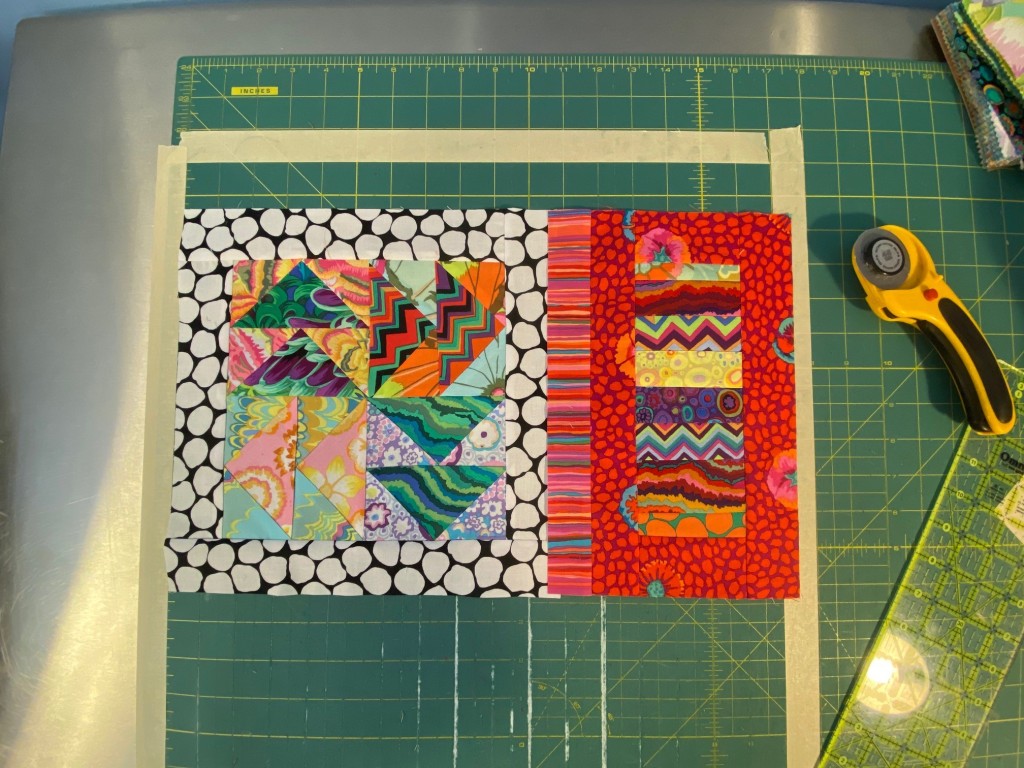
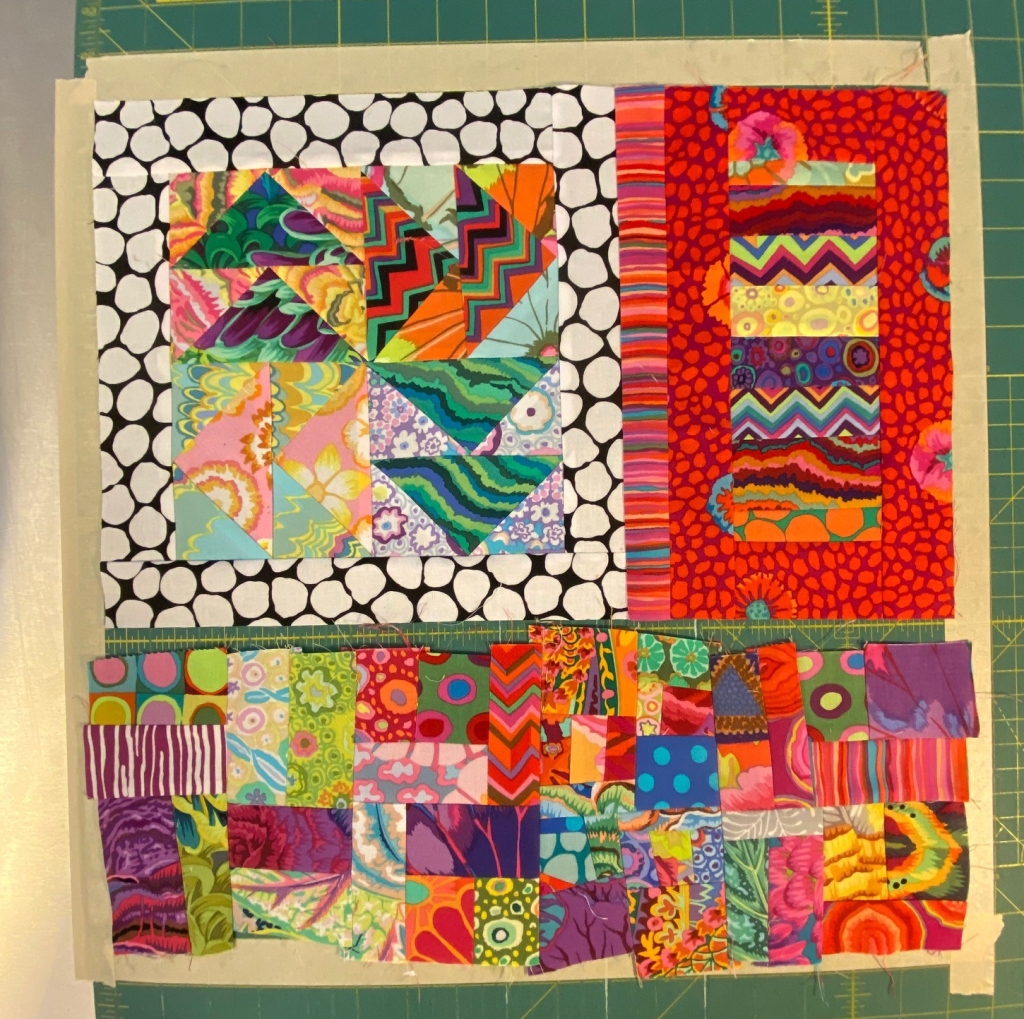
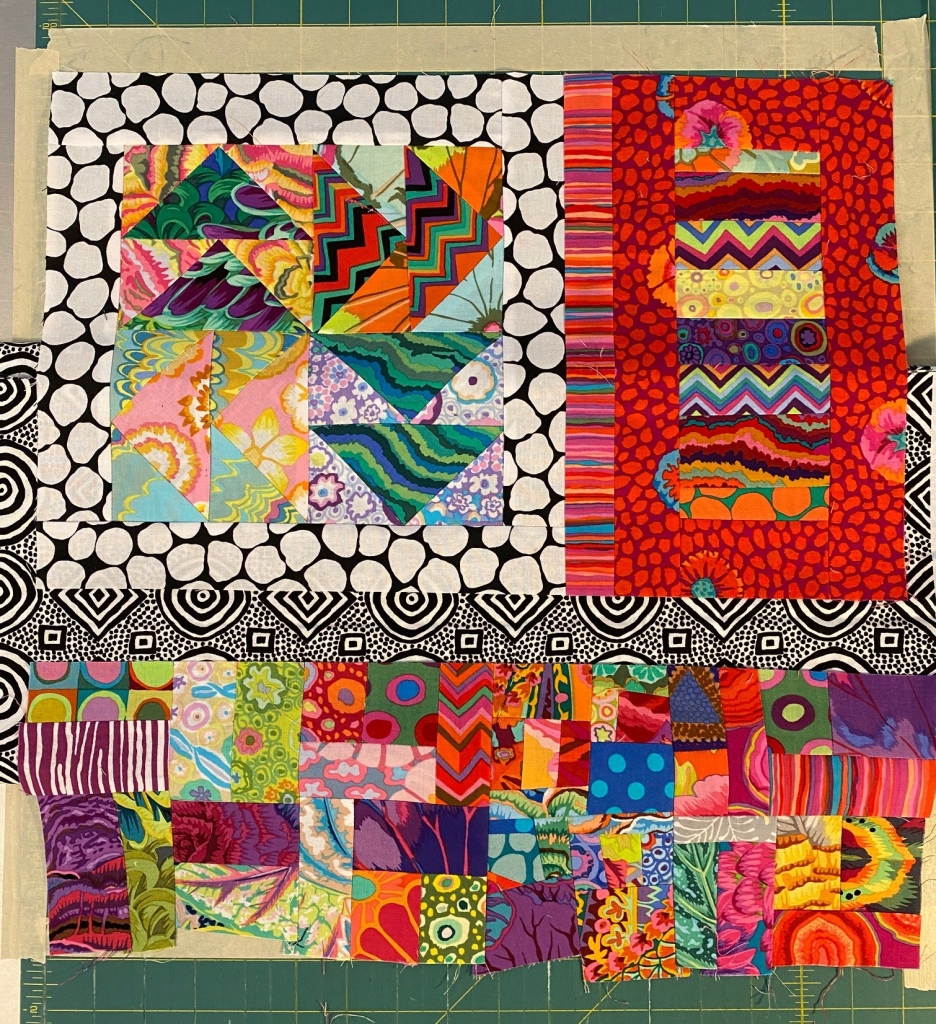
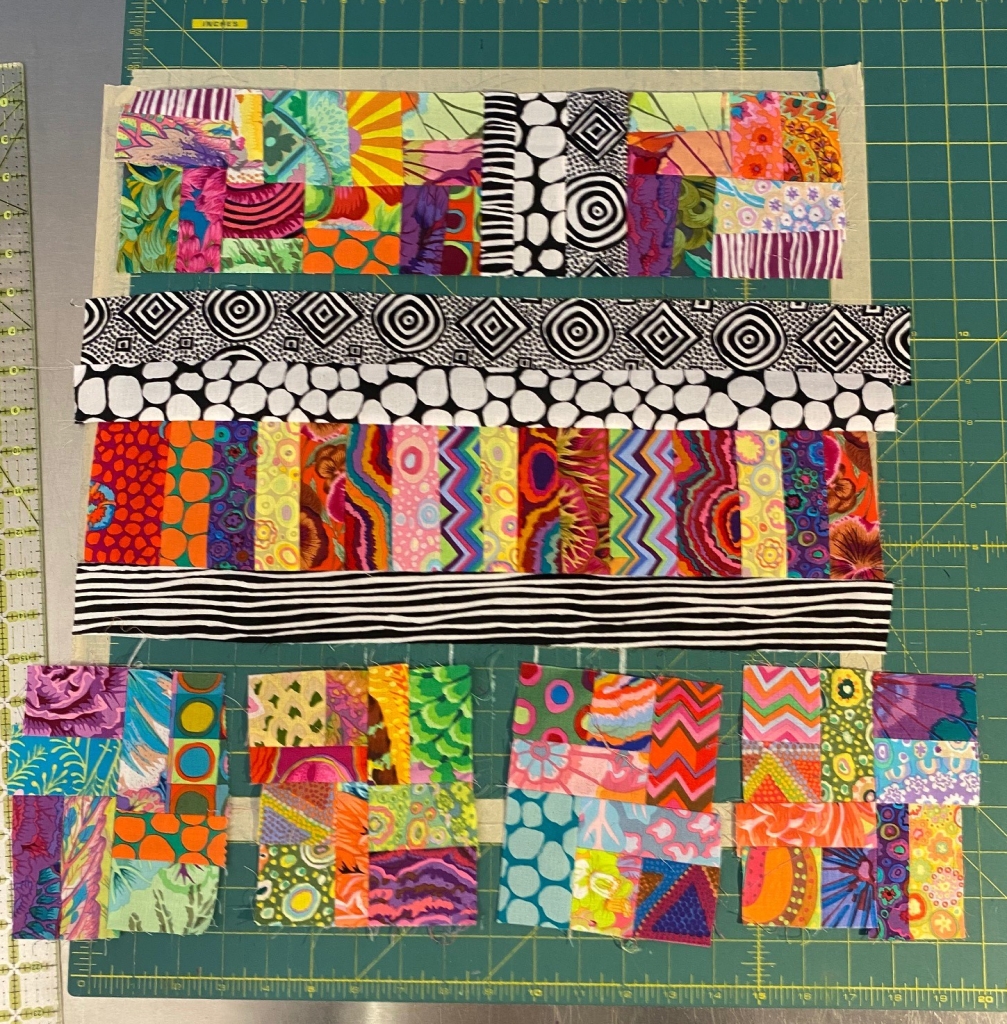
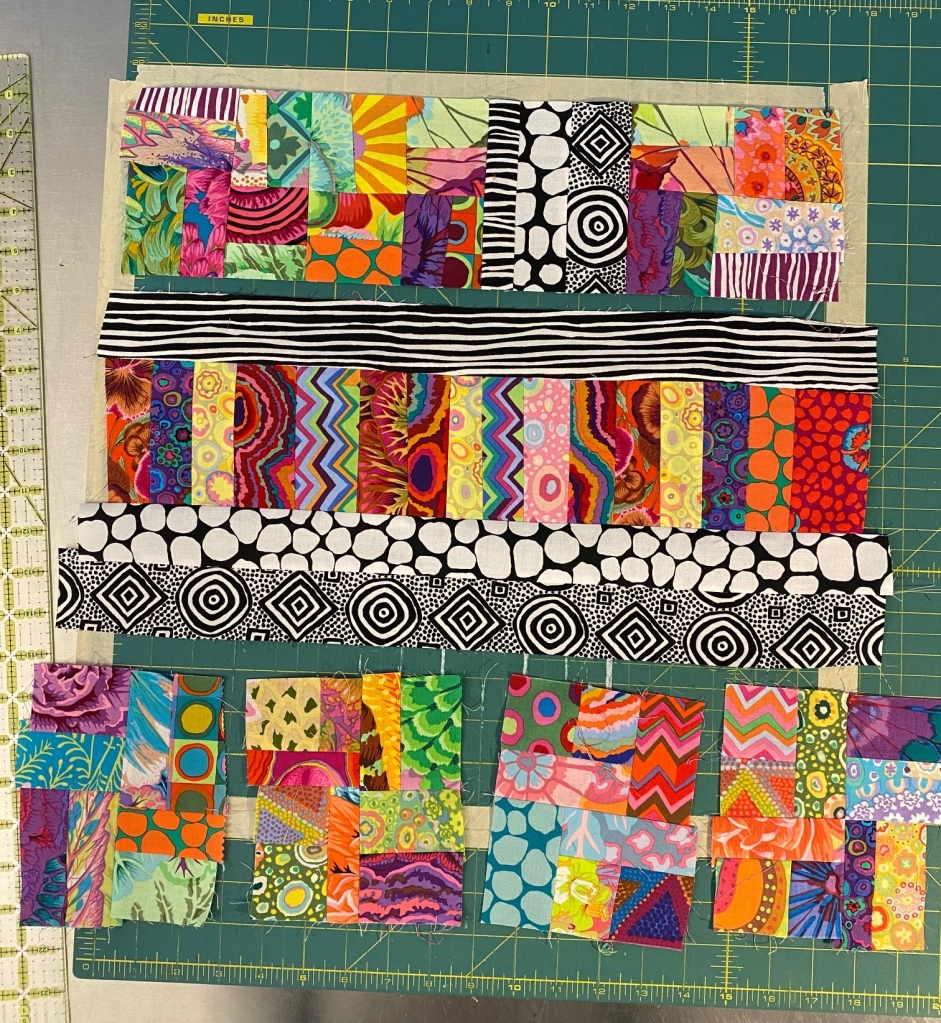
Here’s the final front and back that I’ll be showing you.
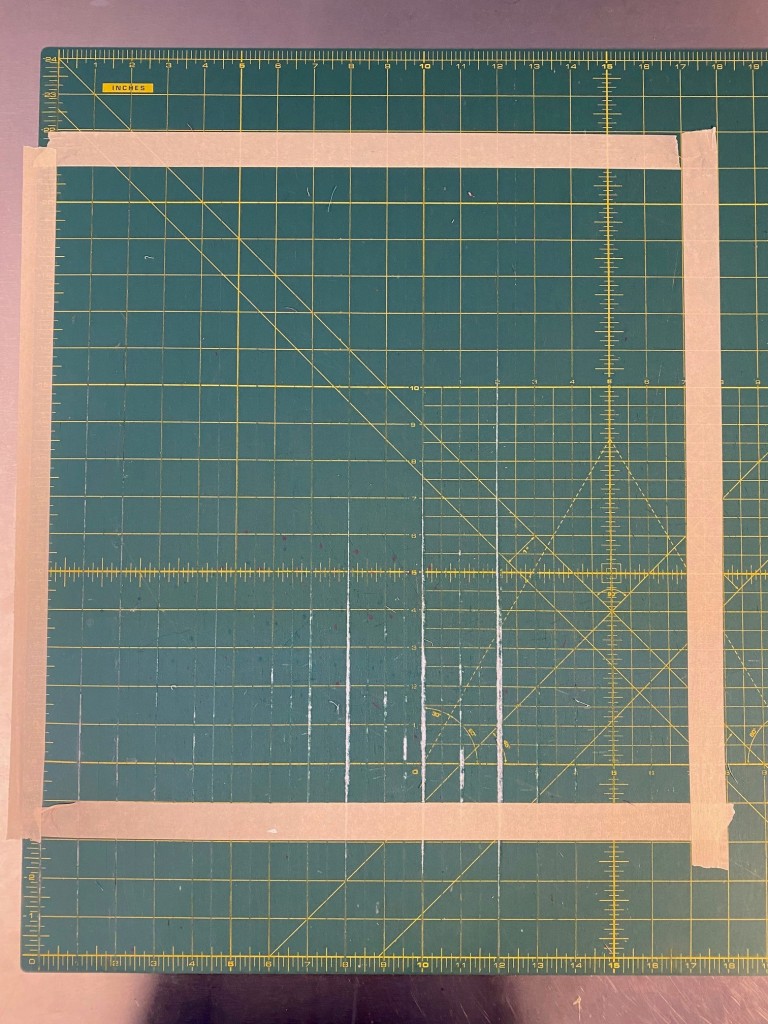
I taped off a 17×17 inch grid on my cutting table so it’s easier for you to see the size I want to make these panels. I don’t do this when I’m making my panels. Usually, I’m just using the measurements on my cutting table.
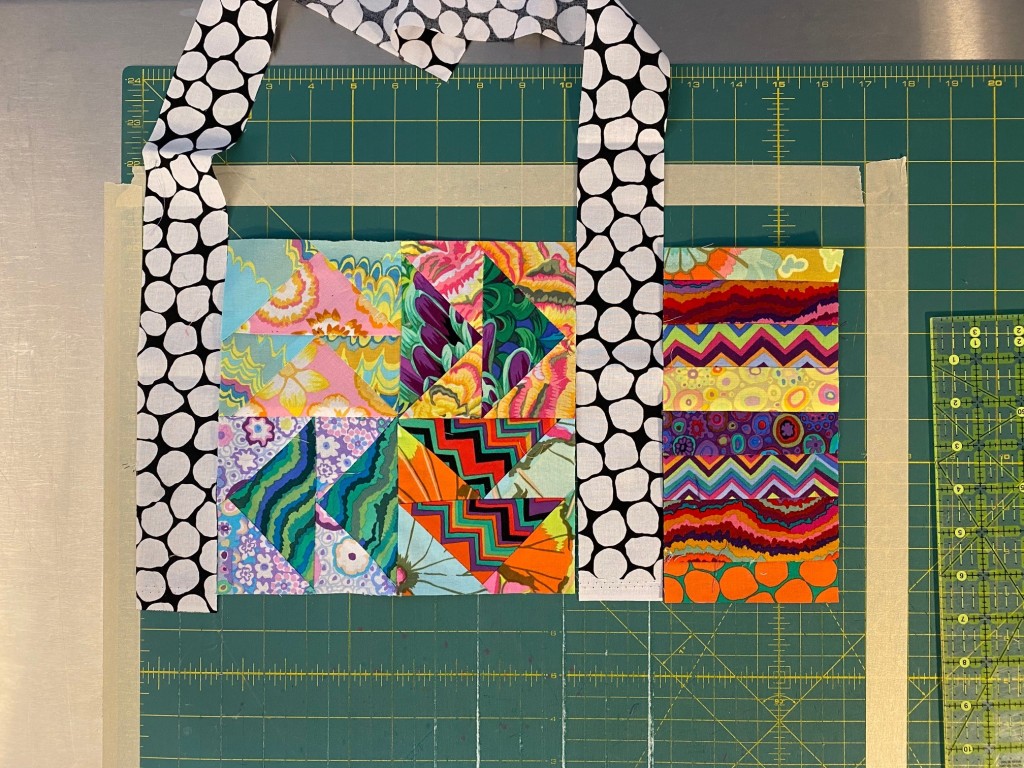
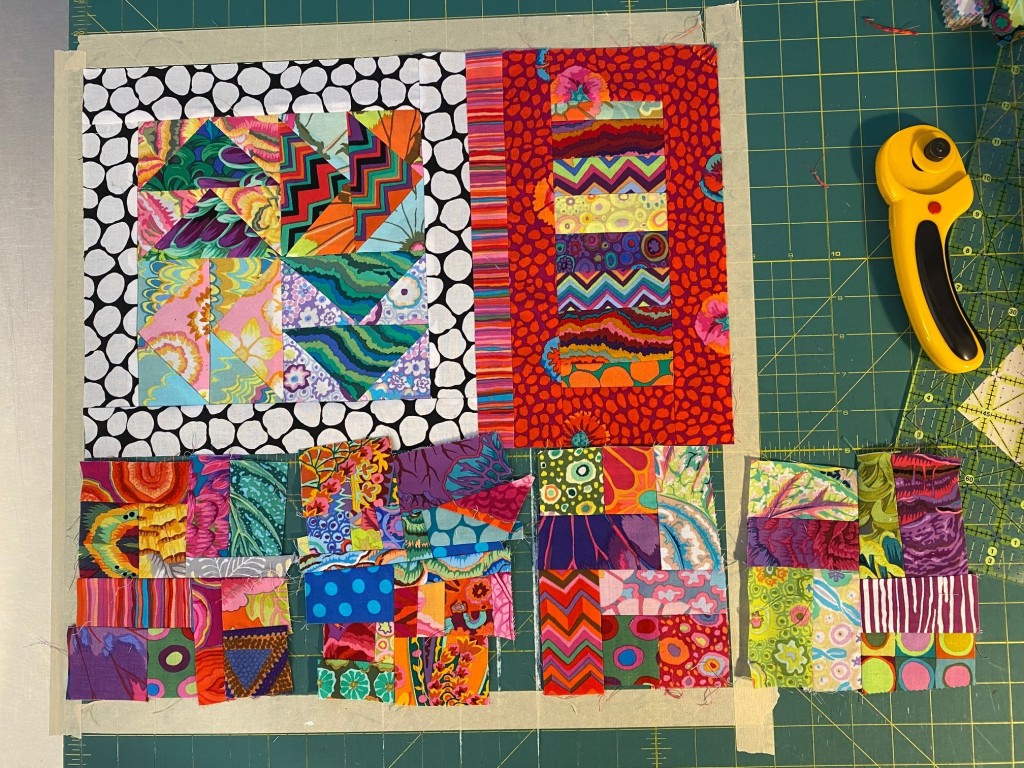
Here are the pieces I’ll use to make the front of this bag. There’s the larger flying geese block, the stacked block of strips on the right, and some crumb blocks at the bottom.
I think about putting these panels together a little bit like putting a puzzle together. Except that instead of finding a puzzle piece that has to fit the hole exactly, I MAKE a puzzle piece to fit that hole. If the puzzle piece is too big, I’ll cut some off. If it’s too small, I’ll add some fabric.
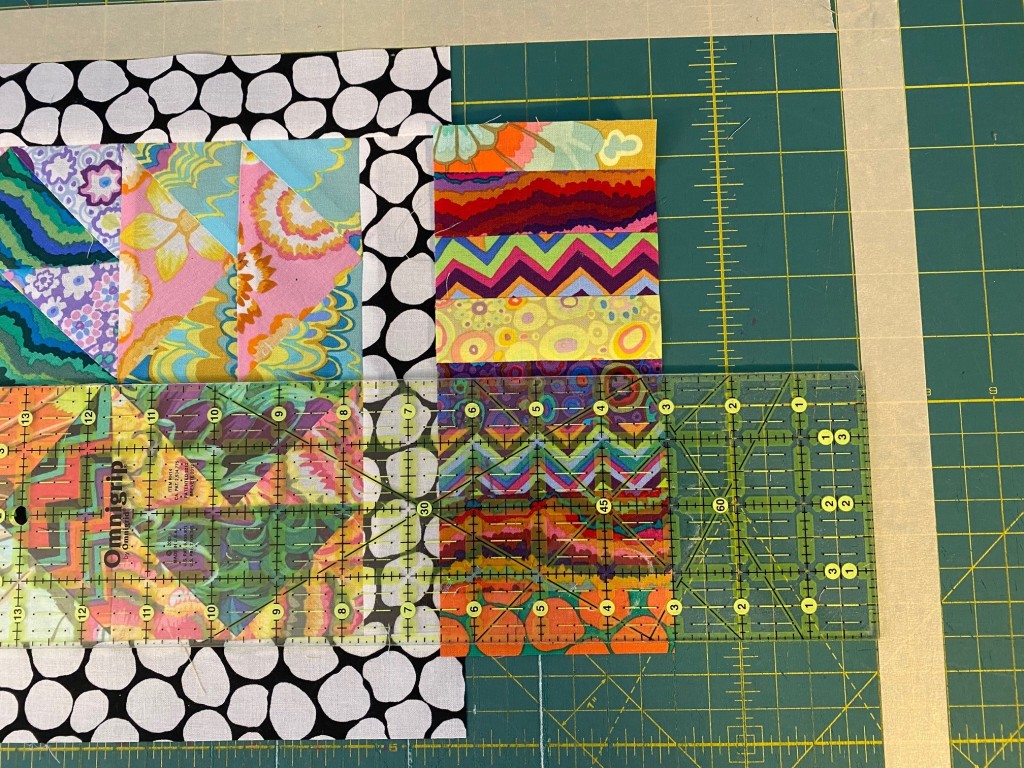
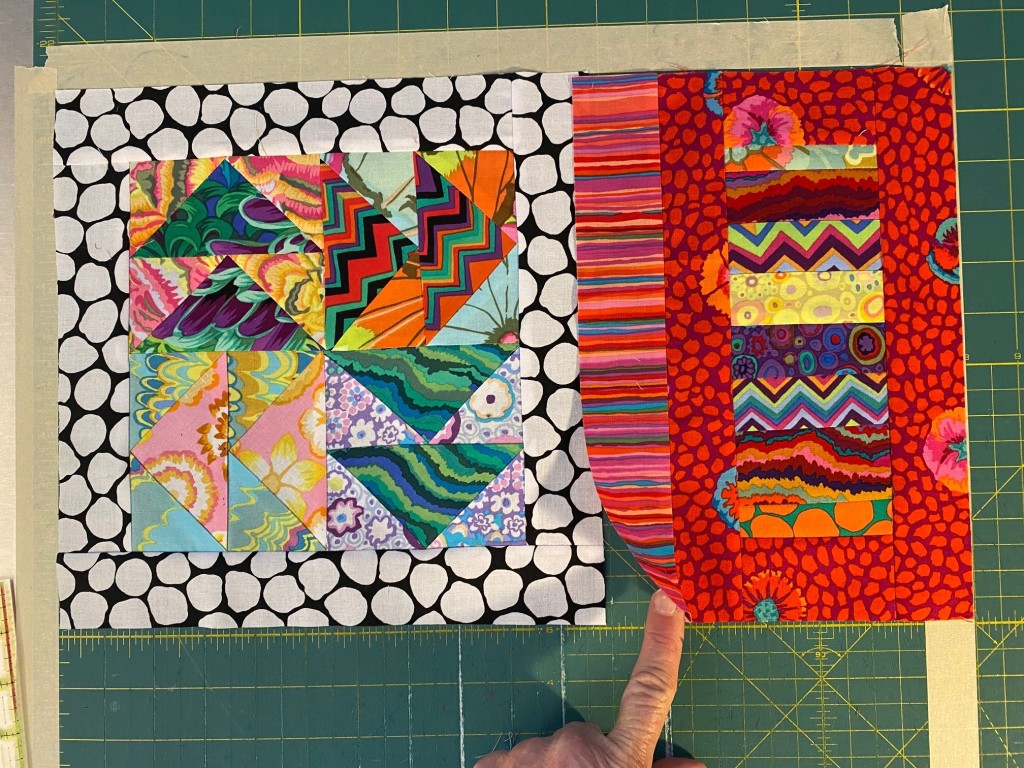
I assemble the top section of these panels first. The first thing I want to do is line up the pieces and get a general idea of how much space I’m going to need to fill to make it 17 inches wide. In this next photo you can see that I have about 4.5 inches of space that I need to fill. And remember that when you’re laying out these pieces you need to keep seam allowances in mind — you need to add extra width for the seam allowances. That’s an additional 1/2 inch of width for every vertical seam across the width. The more pieces you have horizontally, the more you’ll lose in seam allowances once it’s all sewn.
So I want to determine how I’m going to fill that 4.5 inches. I could add a crumb panel, or another block. But I like wide sashing on these pieces. So I start out by trying out different fabrics for the border on this larger block.
I’m pretending that I might actually use something here besides this Jumble. Haha. Nope. It will be Jumble! So I cut some two inch strips and sewed these borders onto that flying geese block. I like to use two inch strips because it makes a bold border, but it also gives me enough fabric that I can trim a little if I need to in order to make these pieces come out to 17 inches.
Before I get too far along I trim the big block so all the edges are straight.
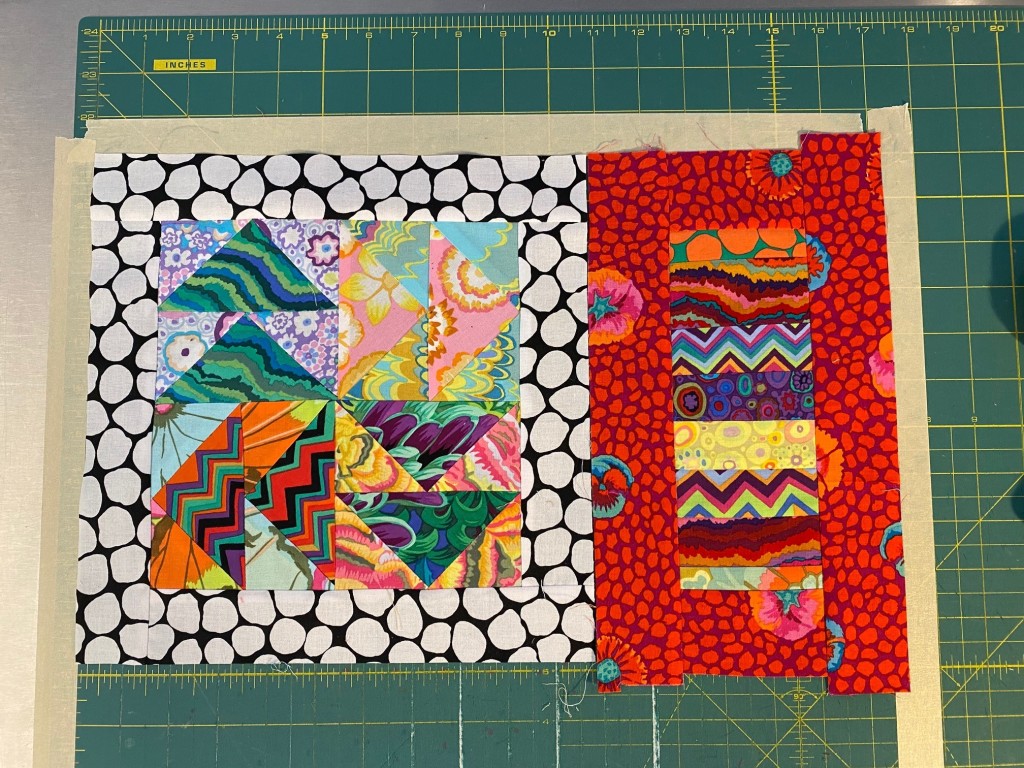
Now I can figure out how I’m going to fill the space around that vertical stripped block on the right. I trimmed a little off that block so that I could use a wider border on it.
In the next photo, I’ve overlapped the two existing blocks to mimic my seam allowance. You can see that I have about 3 inches to fill to make these two blocks 17 inches wide.
So I selected some red Guinea Flower to border this block, cut it into two inch strips and sewed it to all four sides of this block.
When I got to this point I realized that I has going to be less than 17 inches when I sewed that vertical seam between these two blocks because I hadn’t allowed enough for the seam allowance. No worry. Just select a fabric to sew between those two bordered blocks to get you the width you need.
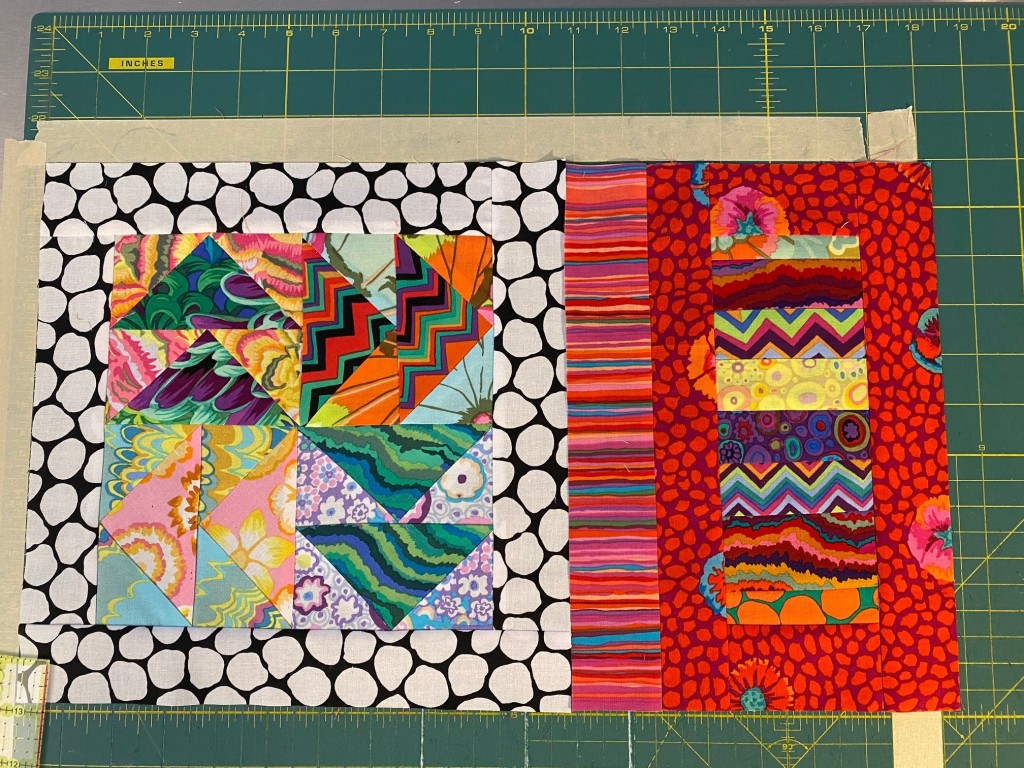
I love that red Strata fabric! It’s fun in a narrow strip. I sewed the Strata strip to the block on the right and checked my width again. See how I’ve overlapped the two blocks to mimic the seam allowance?
So it looks like I will have plenty of width when I sew these two blocks together. In fact… too much. So I trimmed a little off of that strata strip to account for the excess.
And when I sewed it all together I only had about a quarter inch to trim off of the right side. That’s pretty good.
I’m going to leave that quarter inch and move onto finishing the bottom of this panel. It’s nice to have a little extra that you can trim off at the end of the assembly. You don’t have to have it all perfect at this stage.
So next, I selected some of the crumb blocks that I made previously. I chose blocks that are similar in height, and selected enough to add up to more than 17 inches wide once they are trimmed and sewn together. At this point I’m just eye balling this. And it looks like I’ll have plenty of width with these four crumb blocks.
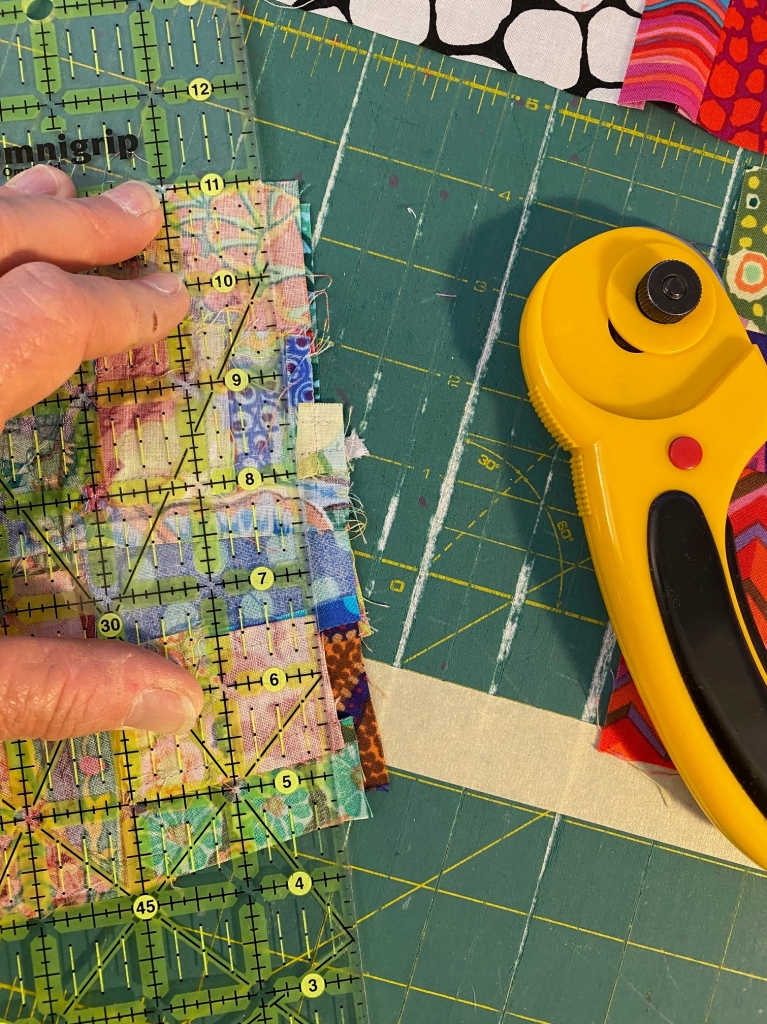
So next, I trim the edges of the blocks where they’re going to be sewn together so I’ll have a nice straight seam.
I do this on each seam and sew the crumb blocks into a strip, keeping the top edge of the blocks as even as possible.
Then I trim off the edge that will be sewn to the top part of this panel.
And when it’s lined up, I can see that it’s not tall enough to get me to 17 inches in height. So I needed to add in some more fabric. I could add more crumb blocks, but I decided to add a strip of fabric. So I pulled out some fabric to see what I liked in that space.
First I tried Crease.
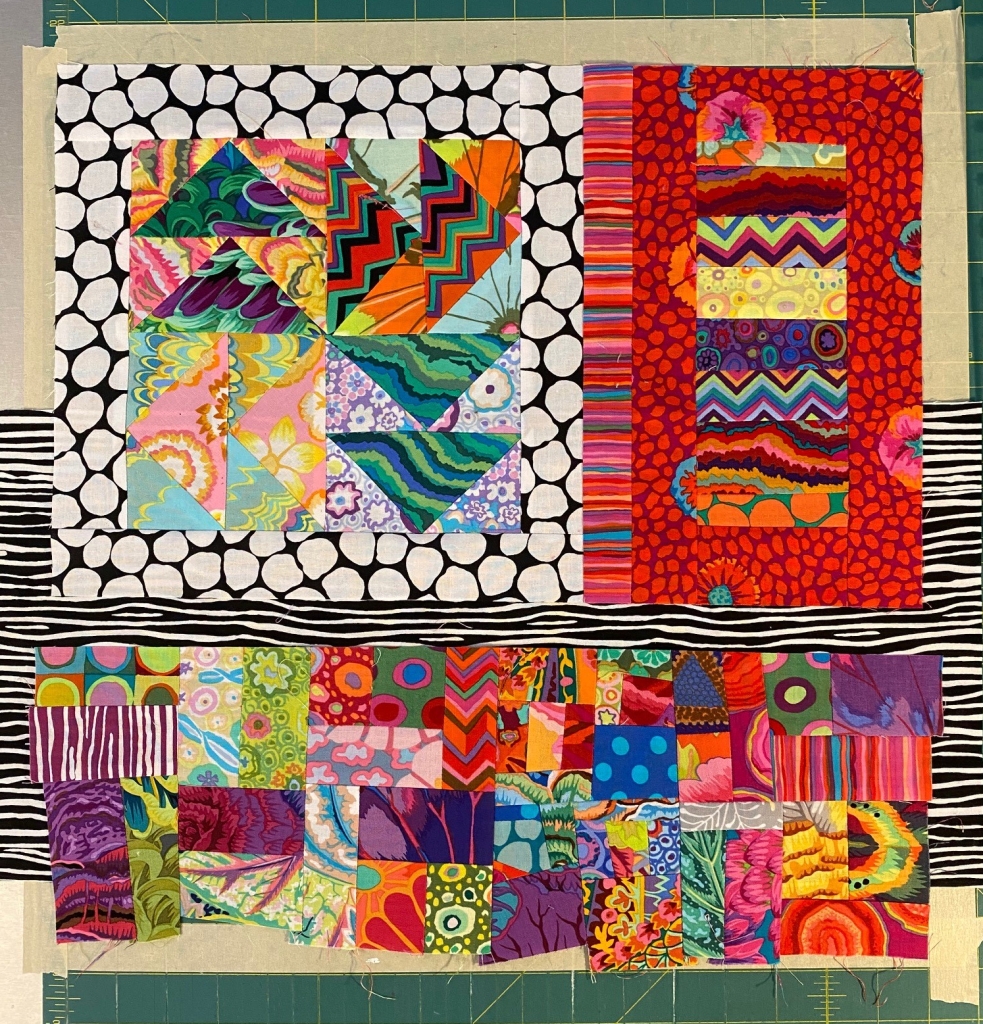
Then I tried this little zebra print I have in my stash.
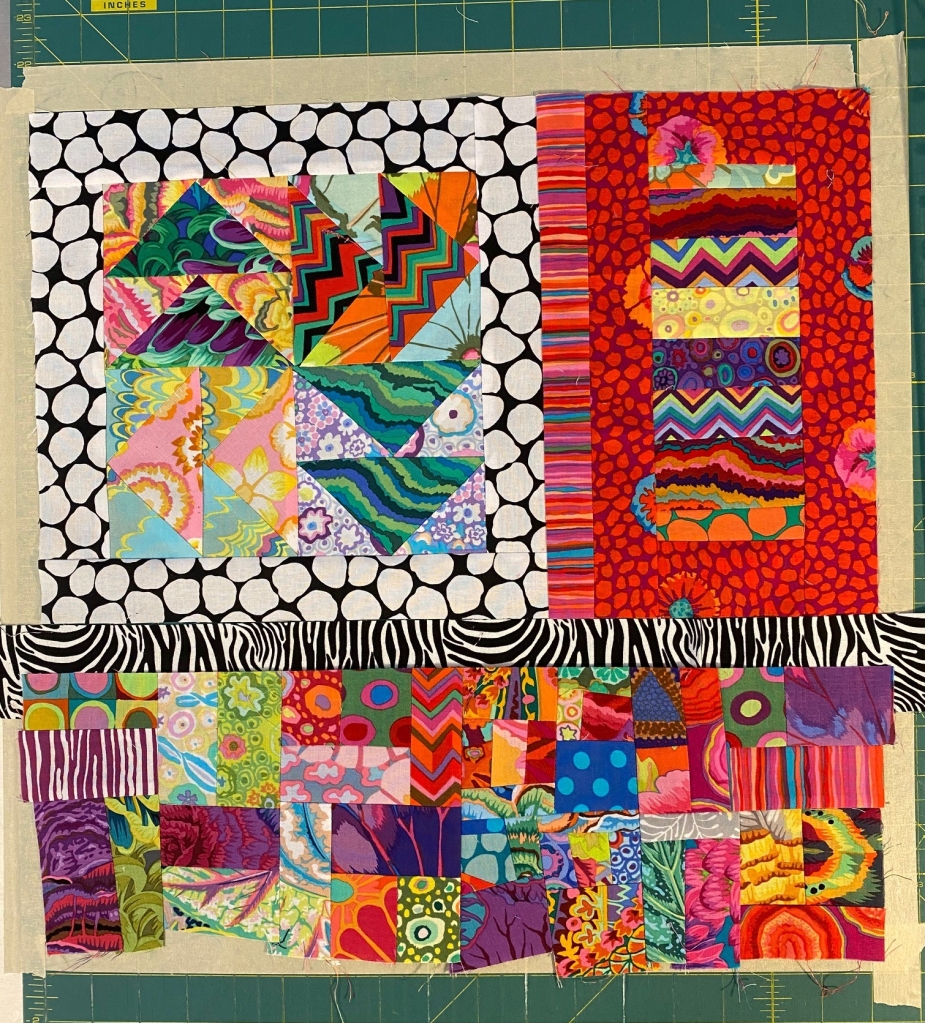
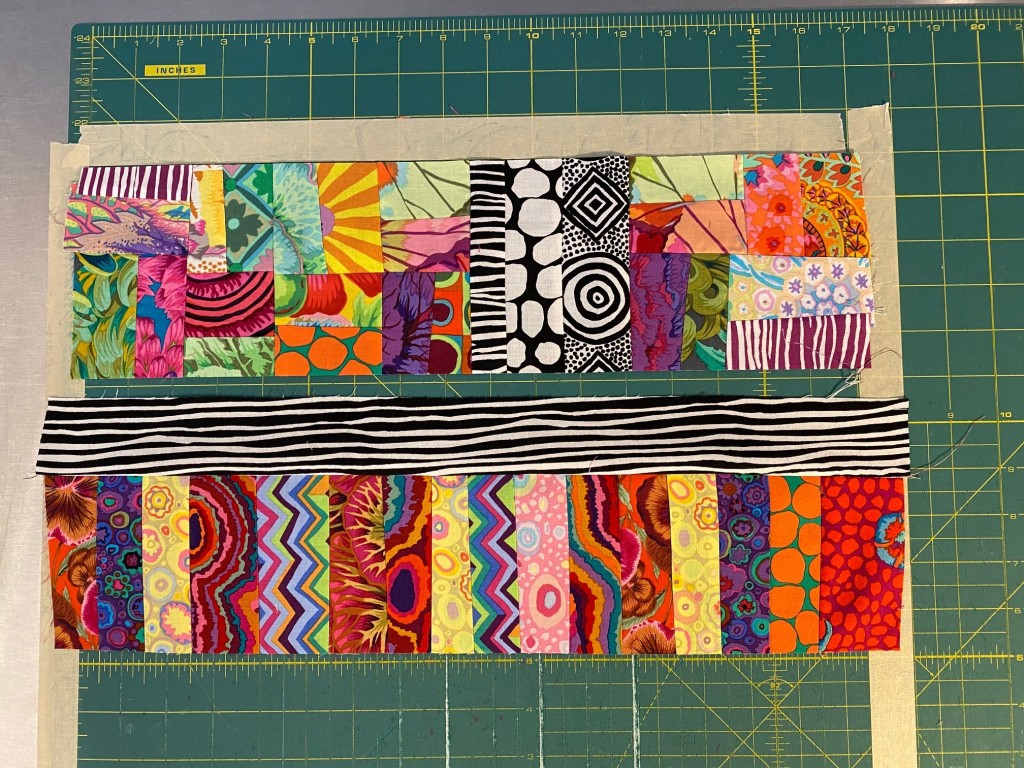
Then I tried Brandon Mably’s Vibrations. This is the one I decided to go with.
So I cut a 2 inch strip and sewed it in place.
And now that those two seams are sewn, you can see that I have a little more than 17 inches in height. So I trimmed off the little bit of excess at the bottom. And that means that this front panel is now 17 inches square. Yay!
Now let’s move onto the back panel. I’ve been making the back panel less involved than the front panel. So these bags definitely have a front and a back. You could certainly do something more involved for both sides if that floats your boat.
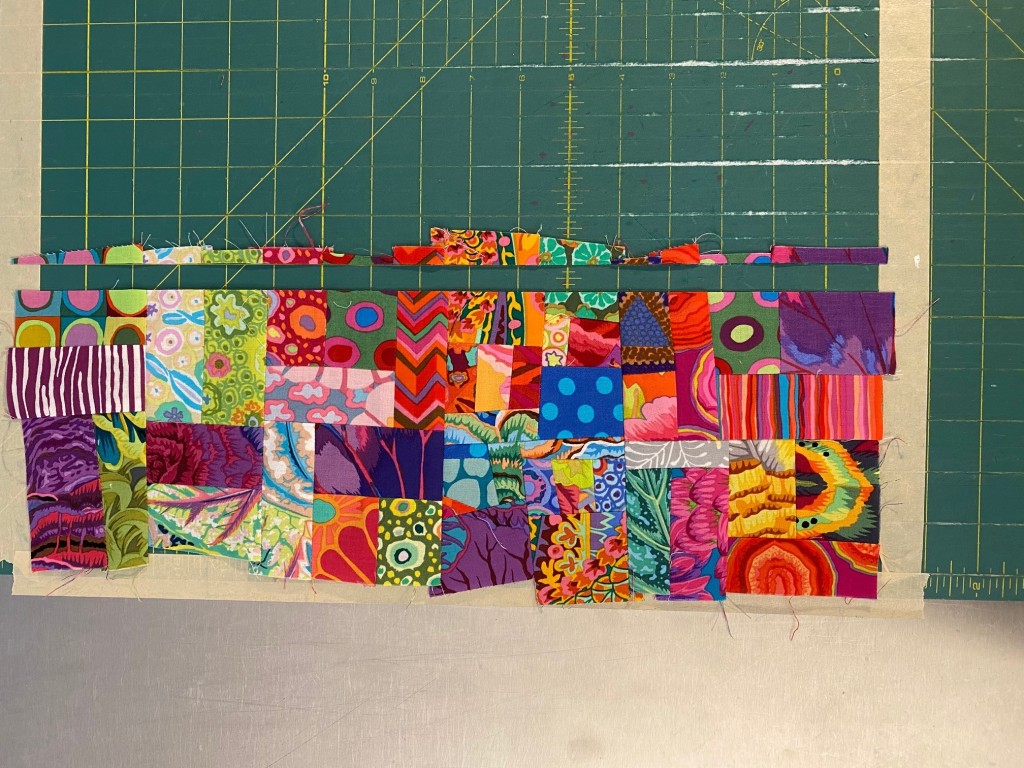
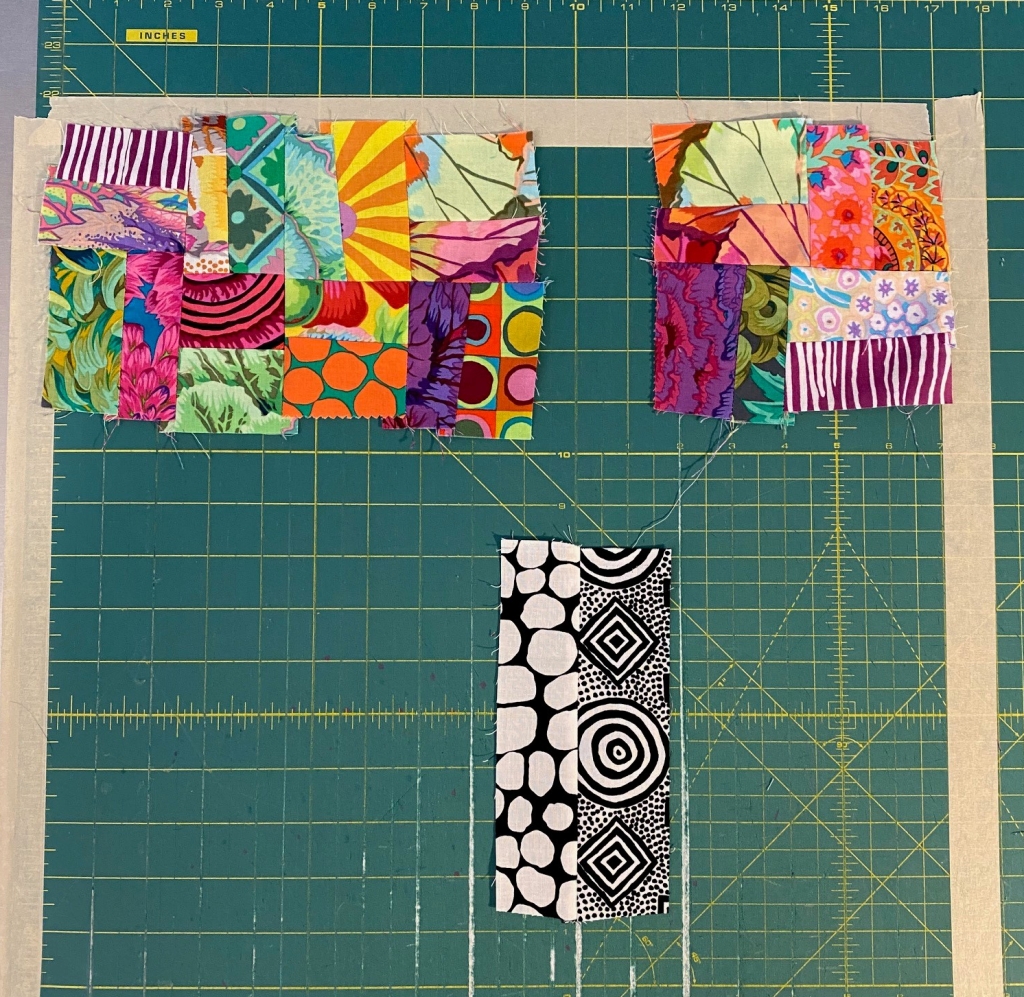
So, I’m using mostly crumb blocks on the back. I start by lining up some of my pre-made crumb blocks across the width of the space I taped off.
I had a choice to make on this first row. I could either add some crumb pieces to fill in that space, or I could make a little block to fill that space. I decided to use black and white KFC fabrics to fill that space.
When I eye balled these two strips to fill that space, I didn’t feel positive that I had enough width once I trimmed the blocks and sewed the seams.
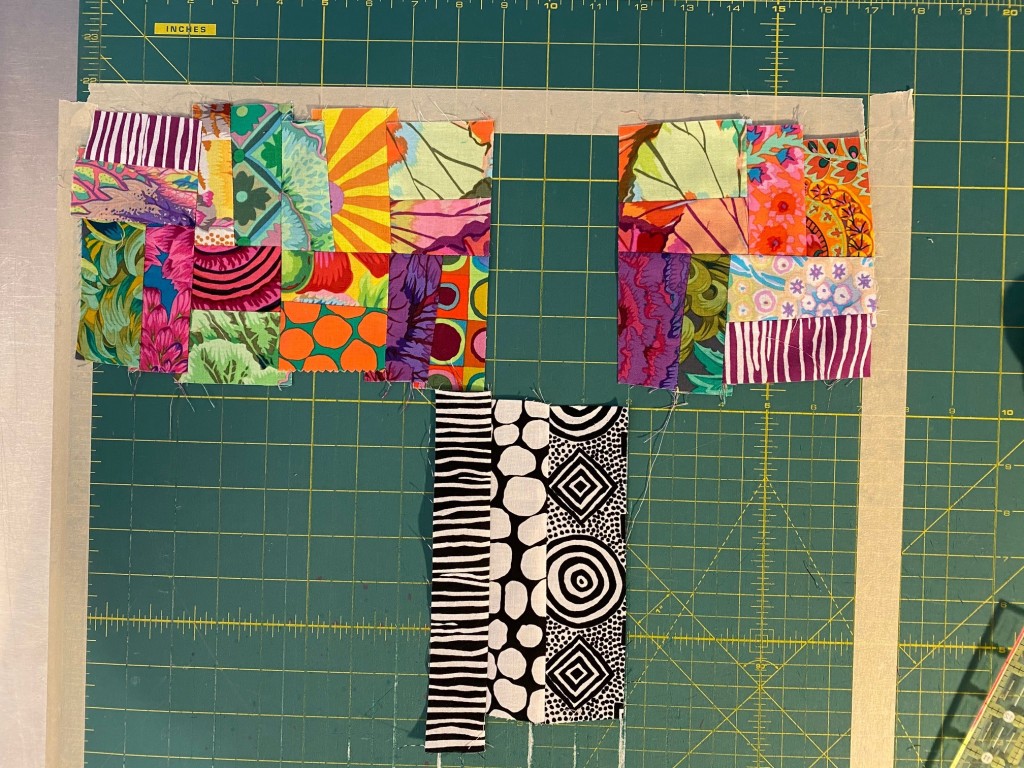
So I added another strip of black and white fabric to make that piece wider and it looks like we’re good to go now.
So I sewed it all together and It’s plenty wide now.
So I trimmed the bottom and top off straight and moved on to adding fabric to the bottom of this piece. I don’t trim the sides until I have this whole 17×17 piece put together.
I continued adding strips of fabric and crumb blocks, making those puzzle pieces and putting them in place… trying out different things as I went along.
Trying out different combos of fabric….
… and different arrangements.
And when I liked the arrangement, I sewed all the elements together and trimmed it to 17 inches square.
And that’s how I make my Frankenbag panels. With whatever blocks I decide to use in a panel, it’s all just a matter of making the pieces of the puzzle fit together.
Give it a try! This is really the fun part for me. Leave me a comment if you have any questions.
Holy cow! Am I glad that work week is over! Come on, weekend!
I had to work until after 8 pm tonight to get my annual budget ready to be submitted. Phew! What a ton of work.
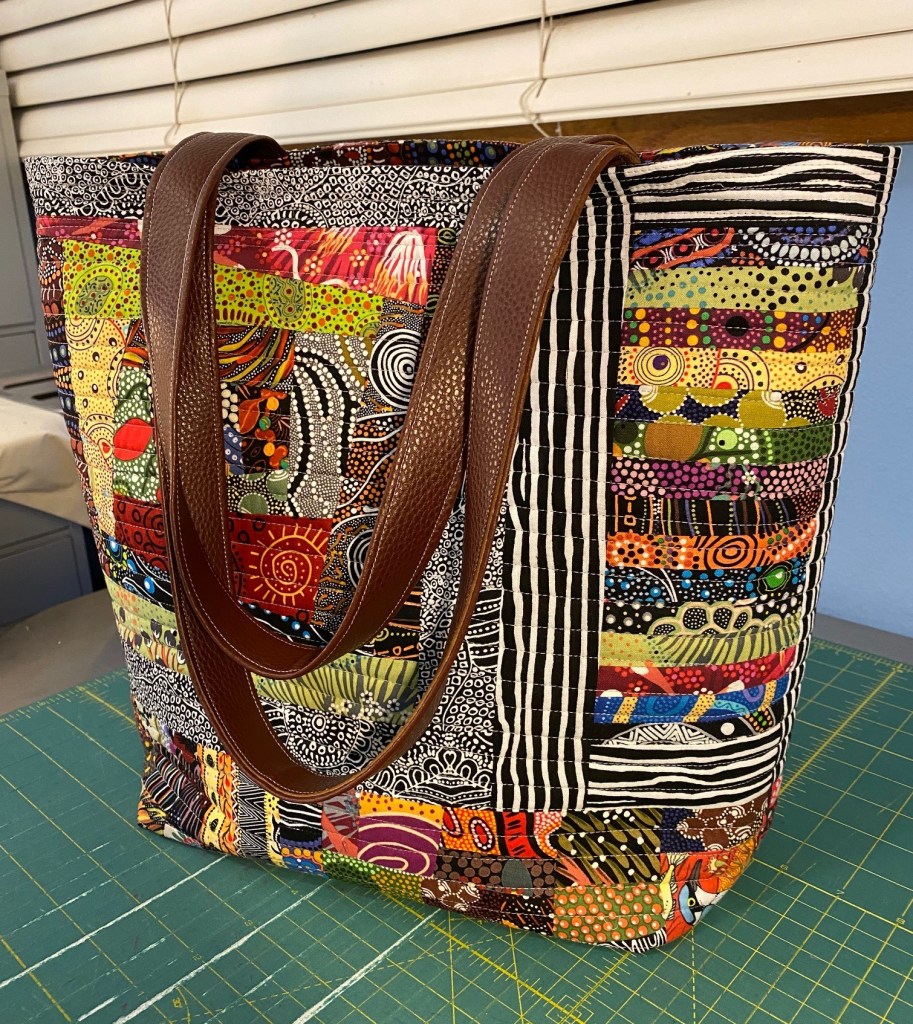
Relaxed with a little time in the sewing room and finished up this Aboriginal fabric Frankenbag. And I just LOVE it!
I’m pretty sure this bag will be living with me. I can just picture myself carrying this through an airport some day.
I love that panel of thin strips on the right side of this bag too. I’m going to doing a little more of that in future bags.
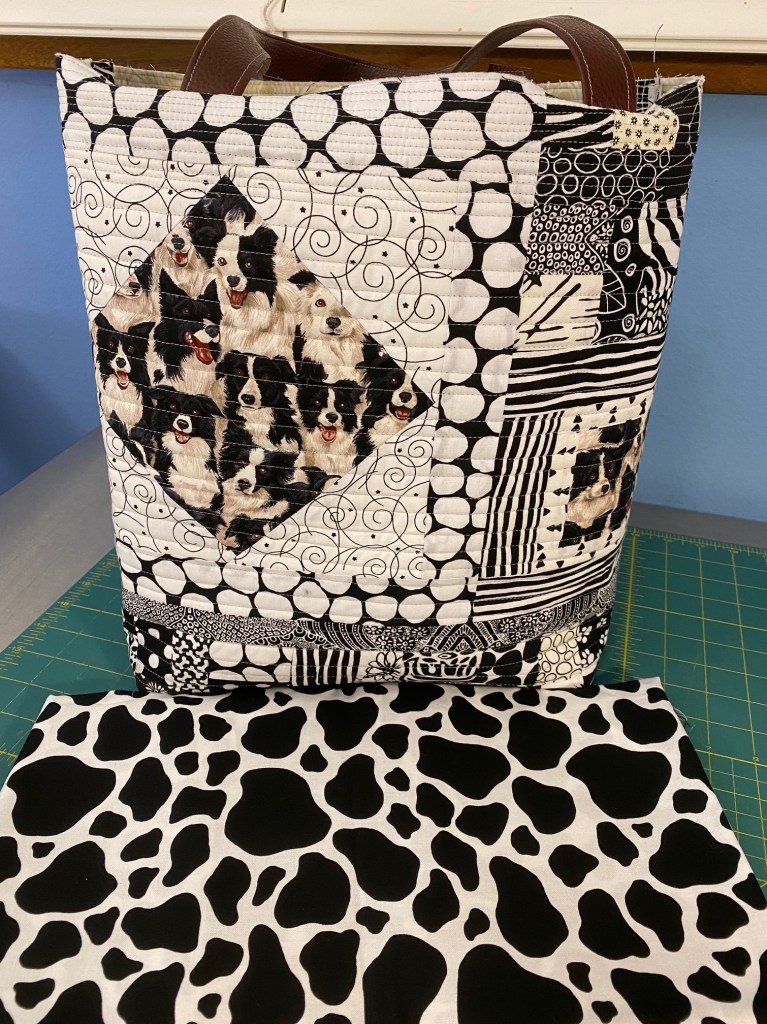
I also finished up the body of this second border collie bag. The pieced panels were already made. Tonight I made the quilt sandwiches, quilted the two panels, made the handles and assembled the outside of the bag. So all I have to do now is make the lining and sew it in.
I’m thinking I might use that bold black and white cow print for the lining. I just love that fabric! I bought about nine yards of it several years ago at a ridiculously low price. Maybe I’m the only one in the US who likes this cow print!
Today is Bender’s eighth birthday! I can’t believe he’s eight already.
This photo was taken by my friend Heather when Bender was about a year old. Heather is an amazing photographer. She loves to take photos of dogs and puppies. She took photos of Bender every week from the time I brought him home at eight weeks old until he hit the six month mark. There are a LOT of photos of bender as a puppy.
Work kept me from baking him our traditional peanut butter, carrot and honey cake tonight. I’ll make one for him in the morning.
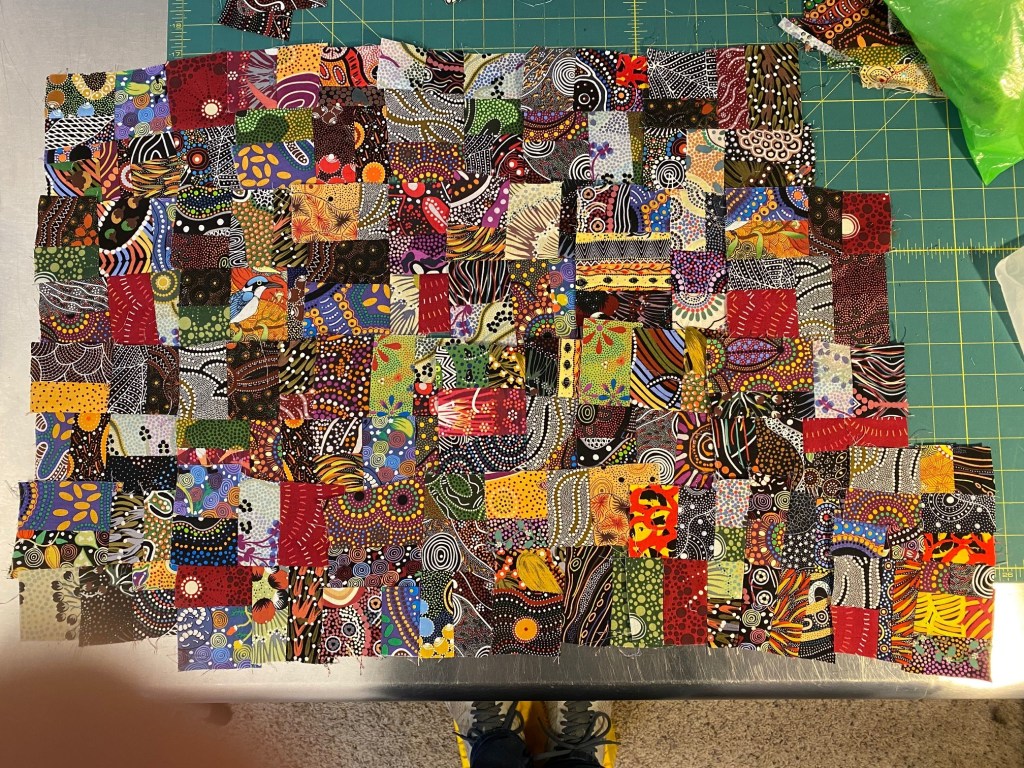
I dug into my bag of Aboriginal fabric scraps and started making crumb blocks for a tote bag last night. I don’t know why, but I tend to think of Aboriginal fabrics as being darker in tone. I wanted to see how these crumb blocks would look when they’re assembled so I lined them up on my cutting table. And what do you know… not very dark at all!
Here’s a closer look:
Pretty darned vibrant and colorful. I just love these fabrics!
A couple of years ago a friend of mine gave me a ridiculous pile of Aboriginal scraps, including around 50 2.5 inch WOF strips, tons of strips of varying widths, smaller pieces perfect for crumb piecing, and a pile of larger scraps.
I plan to eventually make a string quilt from these scraps. There’s probably enough that I can save the 2.5 inch strips for a 16 patch or trip quilt.
I think I have enough crumbs made for at least two Frankenbags. I’ll have to make some accent blocks since I don’t have any Aboriginal orphan blocks.
I just love little piles of trimmings!
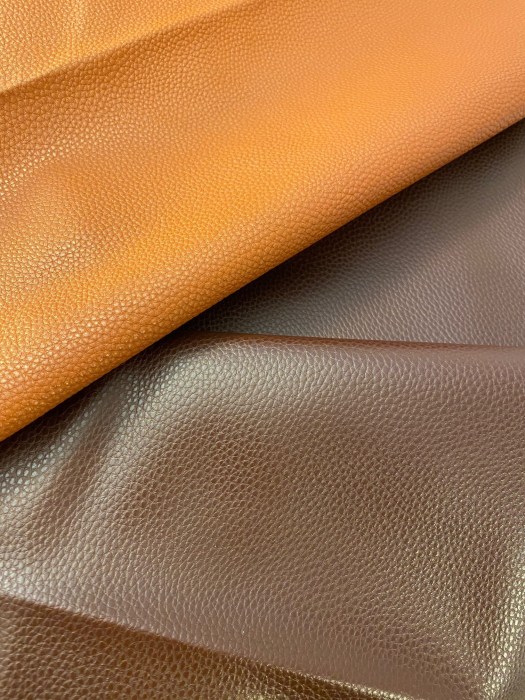
The darker brown piece of faux leather I ordered was delivered today. I really like the color. It’s not as dark as I thought it would. It’s a nice rich brown. The top one is what I used on the border collie bag.
The darker one feels a little thicker and stiffer. I think it will still sew up ok, but I’ll keep an eye on it. Some denim sewing machine needles I ordered were also delivered today.
Three more blog readers have sent me photos of their tote bags made from my Frankenbag tutorial. It’s really fun to see the different style of each person show so nicely in their bags.
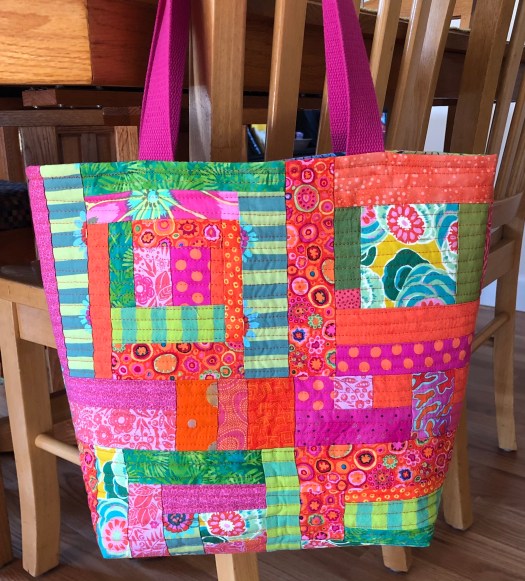
This bright and sunny bag was made by Elizabeth Wellenstein. I just love the colors and fabrics! I really like the straight line quilting too. I need to incorporate that in an upcoming bag.
This next bag was made by Susanne Biso. I just LOVE the modern feel of this one. It’s really a cool approach to this bag. And I love the little key fob she added to the pocket. This one gives me all kinds of ideas!
This last one was made by Sheila Plock. I love the diagonal strips on that large block. And the colors on the crumb piecing on the back are pretty fabulous.
She also used that gorgeous Philip Jacobs Padma for her lining. It’s so fabulous!
Sheila also sent this photo of an adorable Easter dog.
We have been having such an amazing streak of weather here in Portland. It’s been sunny and warm and just perfect. This time of year can be so wonderful here. The cherry trees are in bloom… so beautiful. Here’s one we saw on our walk this evening.
The next ten days look spectacular with lots of sun, no rain, and temps in the high 50s and mid 60s. Perfect spring weather. I think I’m going to have to water my lawn next week. It’s usually pretty rainy here this time of year. I’m guessing the rain will come back soon, but in the mean time I’ll enjoy this glorious weather and the evening light that I love so much.
I’ve been making two of these bags at the same time over the last few days and finally finished this first one up tonight.
It feels good to use up part of the large pile of black and white scraps that I have. But I probably still have enough to make two more bags… at least. I also have A LOT of that border collie fabric. It can be hard to find so when I see it I usually buy a couple yards.
Here’s the back of this bag. I actually like the back of the bag better with just crumb quilting, rather than including larger blocks.
I also made the handles on this bag longer so that It can go over your shoulder comfortably. It’s a good handle length… the bag just nestles right into my waist. So the handles aren’t so long that you can’t carry it by the handles.
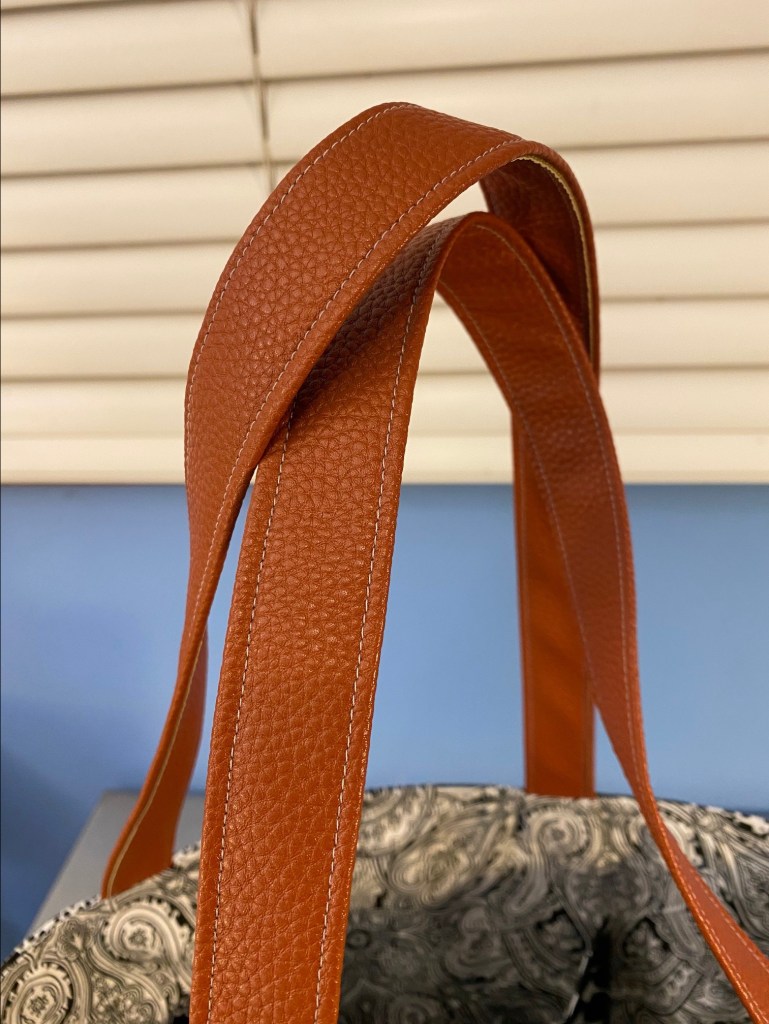
And speaking of handles… the first four of these bags I made had cork handles. And that meant that I had used up all the cork I had. So I looked around and found some on fabric.com. Well, it came the other day and it’s really thin and feels pretty flimsy. I toyed with the idea of using some batting inside the handle to give it some body, but I just don’t feel confident that the cork will wear well at all.
So I went online to see what options I had. Leather is really expensive and I’d hate to put that kind of money into a product that I can’t see and feel first. I landed on some “vegan leather” as they call it, or faux leather. It arrived this evening and I really like it! It’s soft and flexible and it sewed up nicely. The color of the one that arrived tonight is “brown” but seems a little orange to me. I also ordered a darker brown that will arrive in a few days. I’m curious to see what that color looks like.
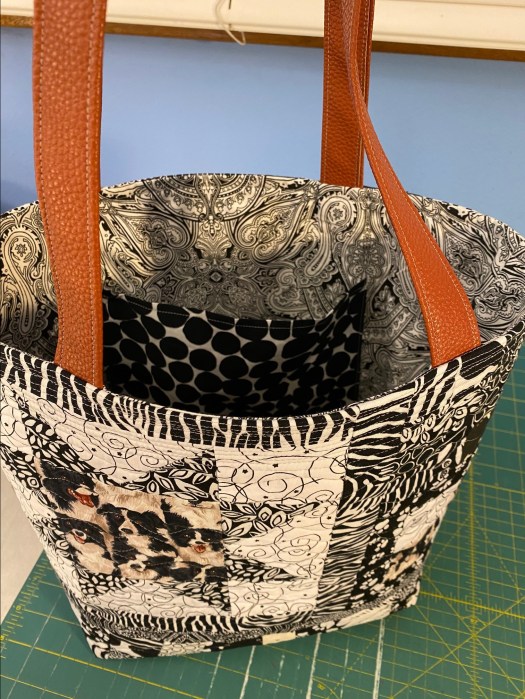
Here’s a look at the inside of the bag. The lining is a white and black paisley. And I LOVE a good paisley. the pocket is a fun pop of Brandon Mably’s Jumble, white with black spots.
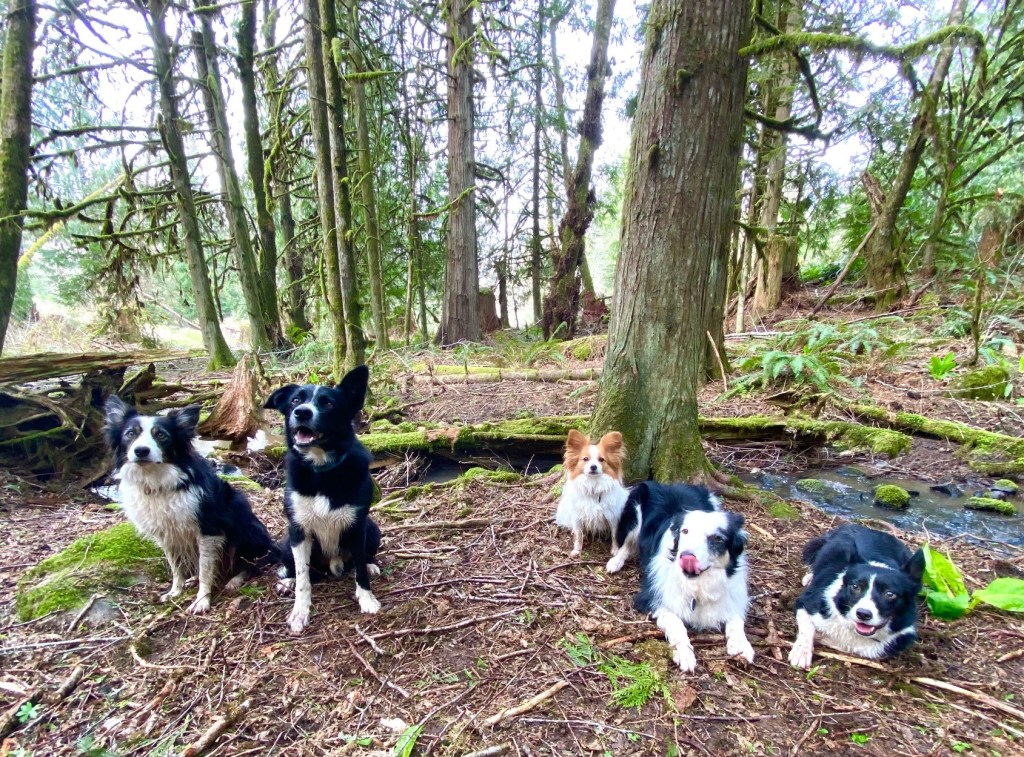
We had a nice weekend with some really incredible weather. Saturday I took my car in for an oil change. I left the dogs at home, but took a 4.5 mile walk by myself as they worked on my car, rather than sitting in the waiting room. Then I hurried home and ate some lunch, tossed the dogs in the car and headed down to Mollala, OR, for a sheep herding lesson. Rico was, of course, amazing!
After the lesson my friend and I took the dogs for a short hike down to the creek so they could cool off. Of course, we forced them to pose for a photo.
That’s some pretty awkward posing!!! But here’s a natural poser! Bender is an excellent level poser!
This morning I took the dogs for a nice 4.5 mile walk around the neighborhood, and then a friend of mine I haven’t seen for over a year came by with her husband to pick up the bamboo I had dug out last week. She is an amazing gardener and brought me a Rose of Sharon, a primrose, and some perennial grasses from her garden. I’m so excited about the Rose of Sharon!!! Here’s a photo I took of one back in September.
Those blooms are probably at least five inches across. I’m pretty excited to have one of these in my yard.
I got all the plants she brought me planted in pots this afternoon and then did some weeding. It was an absolutely glorious day!
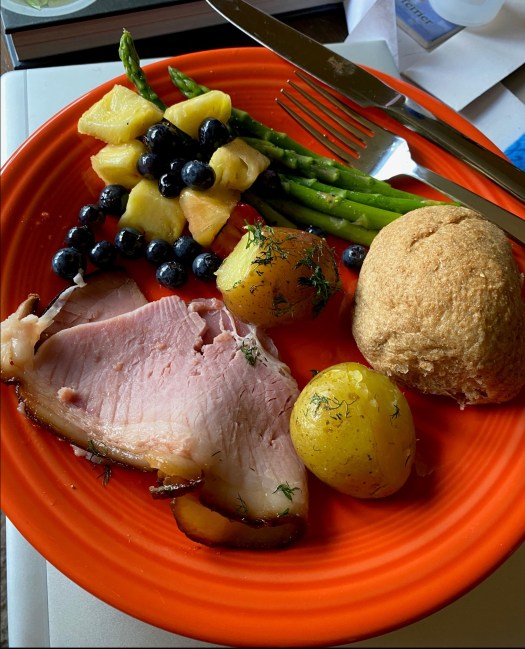
My friends brought me a really good ham dinner for Easter. They keep me fed on all the holidays!
After dinner I took the boys for another quick walk so we could all get our yayas out. And we saw this a couple blocks into our walk.
I’ve been chipping away on a couple of new Frankenbags over the last few days. Tonight I finished one and got the panels quilted for another one.
Here’s the front view of tonight’s finish.
It’s made from all KFC fabric scraps, except for one black and white fabric on the back — the one that’s set on the diagonal in the big block.
And here’s the back.
I decided to use one of my FAVORITE KFC fabrics for the lining — Paisley Jungle Tangerine. It’s so fantastic!!!
Hey! And look! It’s on the top of that wonky block on the front of the bag!
I’ve also been working on a bag made from the fabrics left over from this quilt. I finished piecing the panels last night and got them both quilted tonight. These fabrics are all KFC in the contrast colorway, except the jumbles aren’t contrast. And the swirly white background is not KFC.
These panels have taken some time to make because I’m somewhat limited on the scraps I have. It was tricky to make the blocks out of the limited longer strips I had available. But I made some fun ones.
One of the large blocks is a simple star block.
One smaller one is a not very perfect log cabin with a fussy cut center.
This other small block is free form and wonky with a fussy cut center.
And the larger block on the other panel is a sort of log cabin kind of thing.
I have a few crumb pieces left but not enough to make another tote. I’ll have to think about what I can make from them.
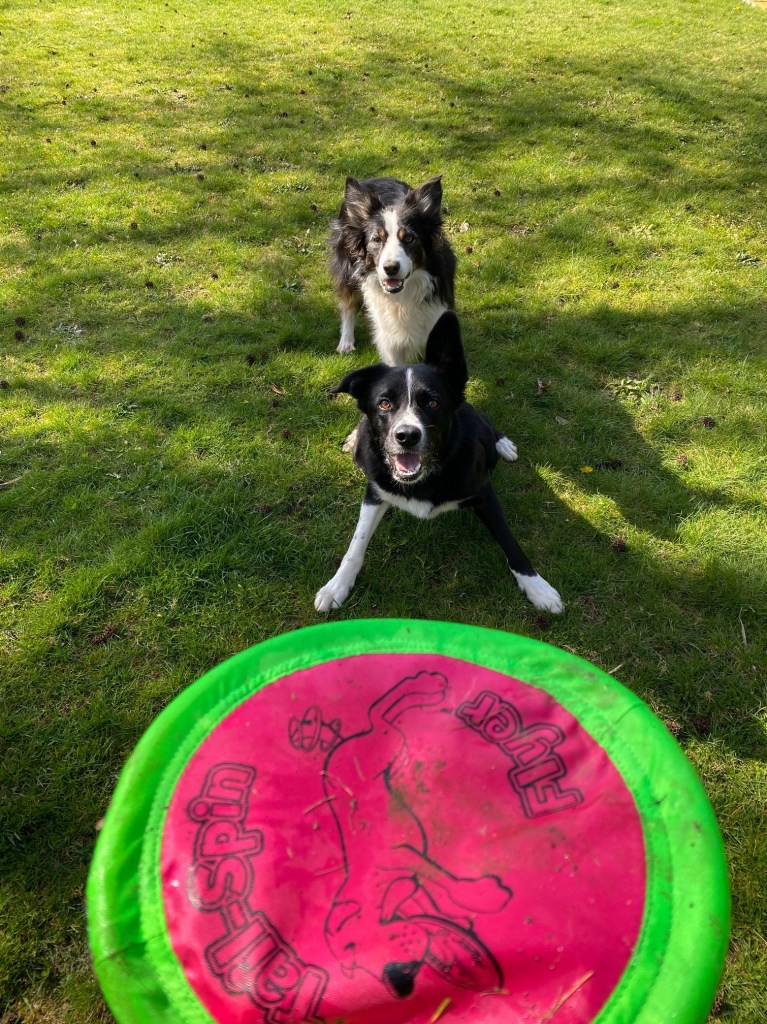
It was another nice day here in Portland. We had nice sunshine most of the day. The boys were happy when I stepped away from work for a game of frisbee.