Chasing a Squirrel on a Gorgeous Spring Day

Spring seems to have arrived in Portland over the last two days. And these boys are pretty fine with that. Me too!

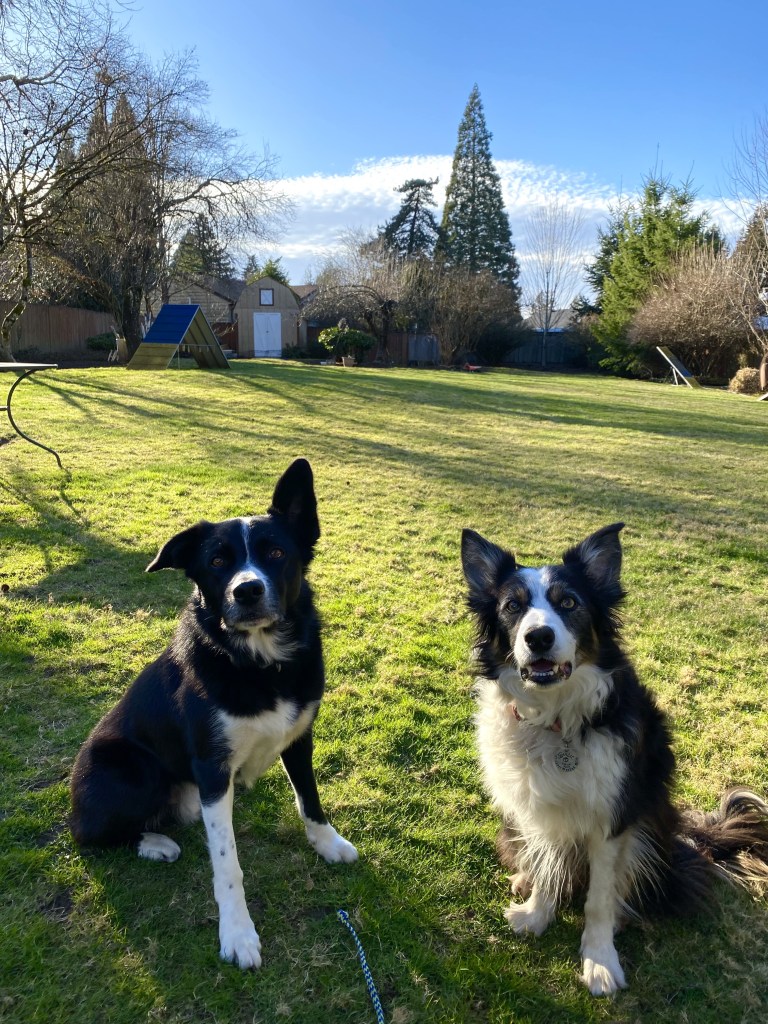
We call it the February Fake-out. We get a couple days of gorgeous weather and sun which fools us into thinking spring is here. Then we’re plunged back into winter.

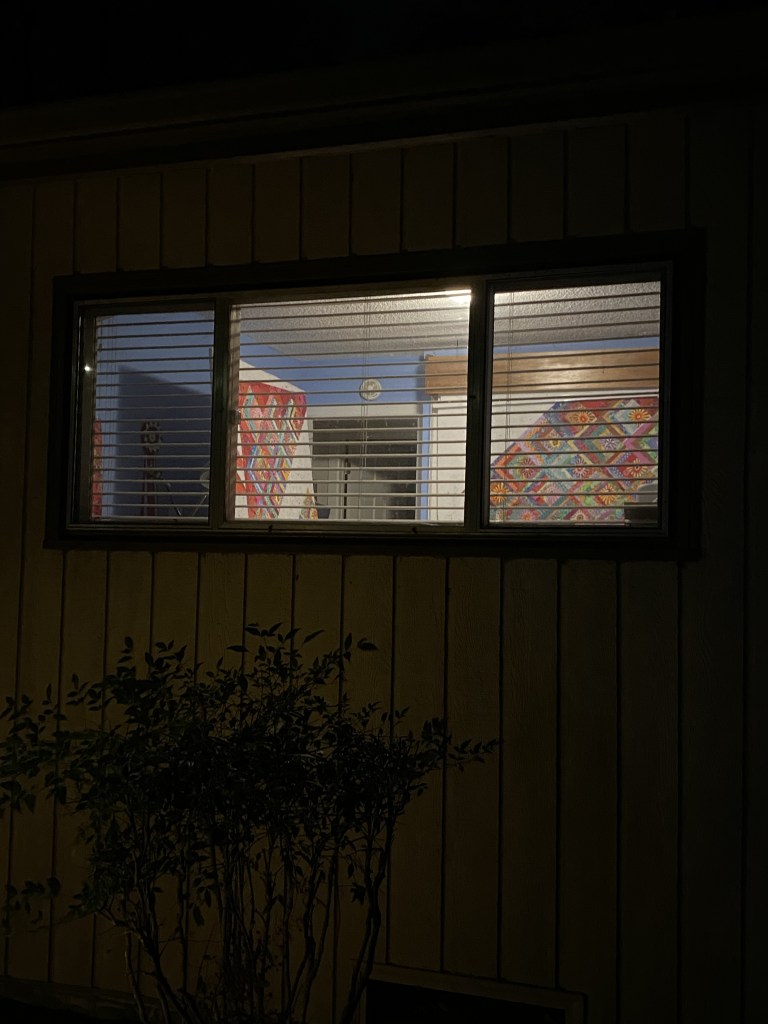
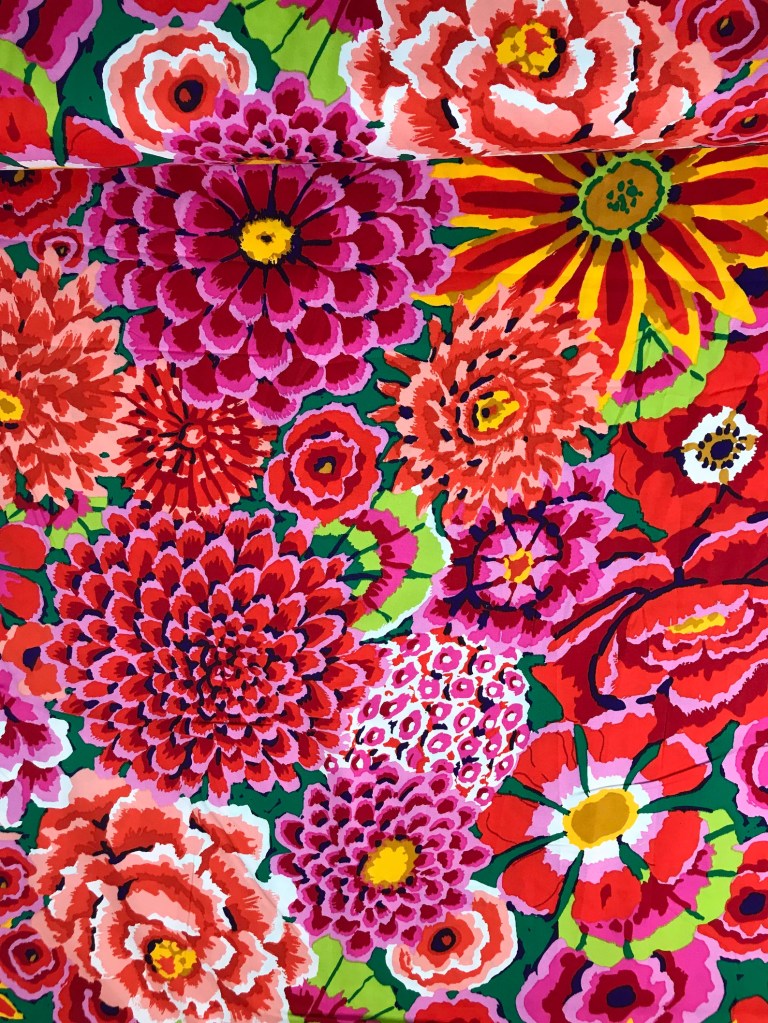
But I prefer to think spring is actually here. Here’s some proof.

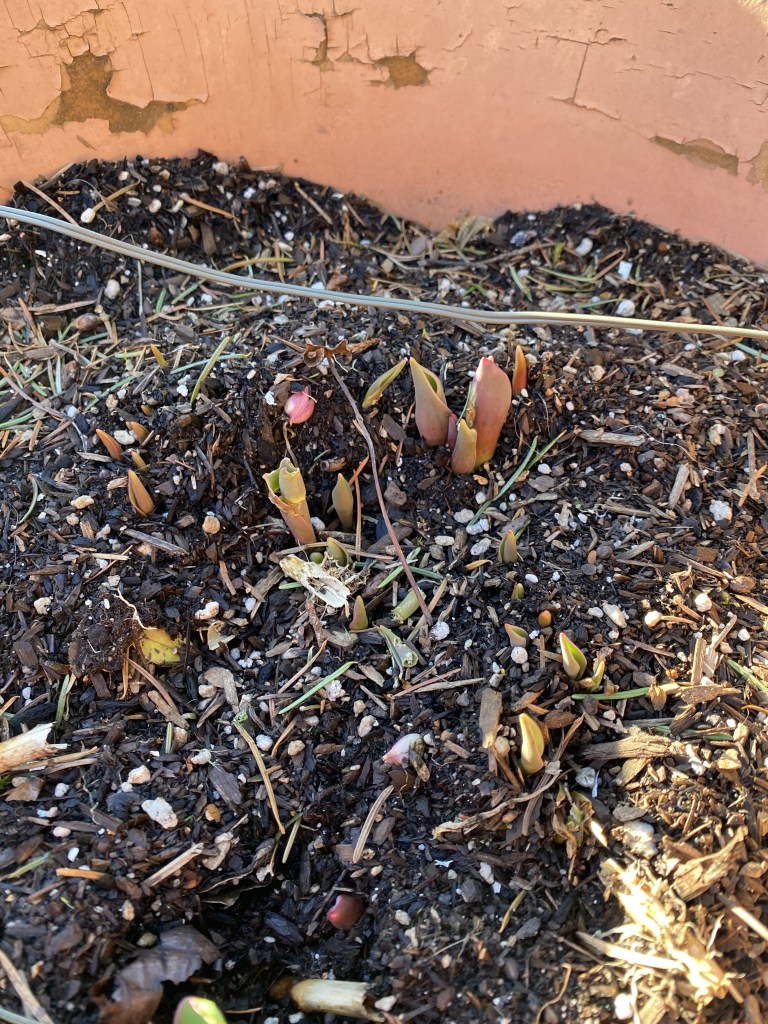
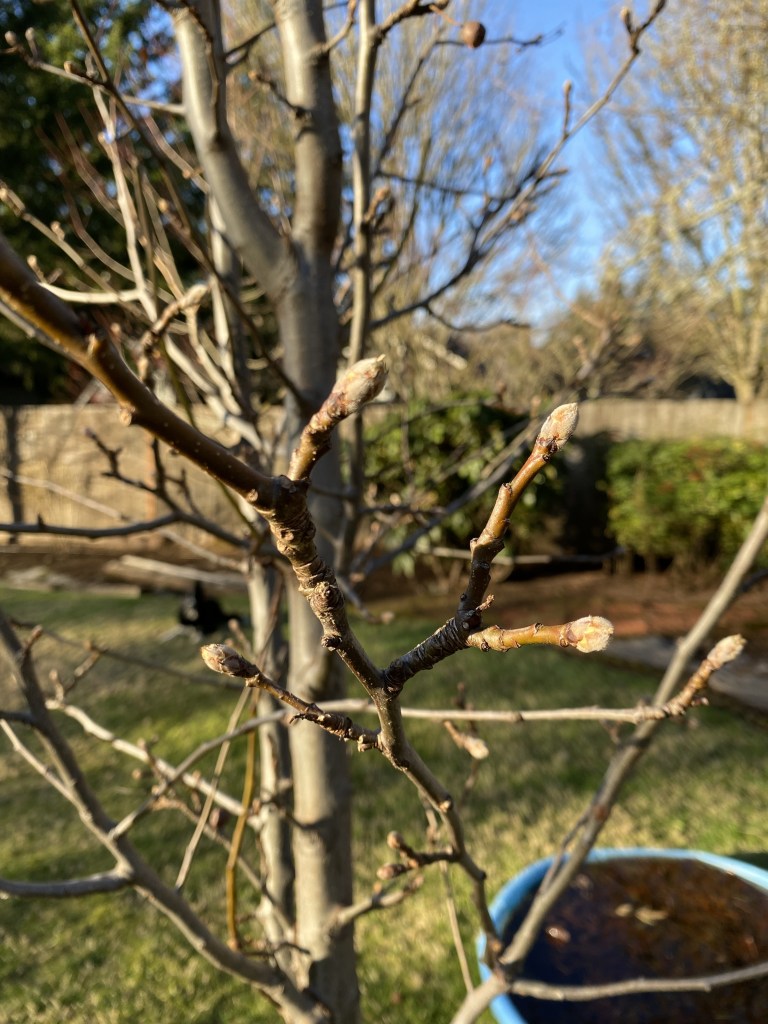
Looks like spring to me.

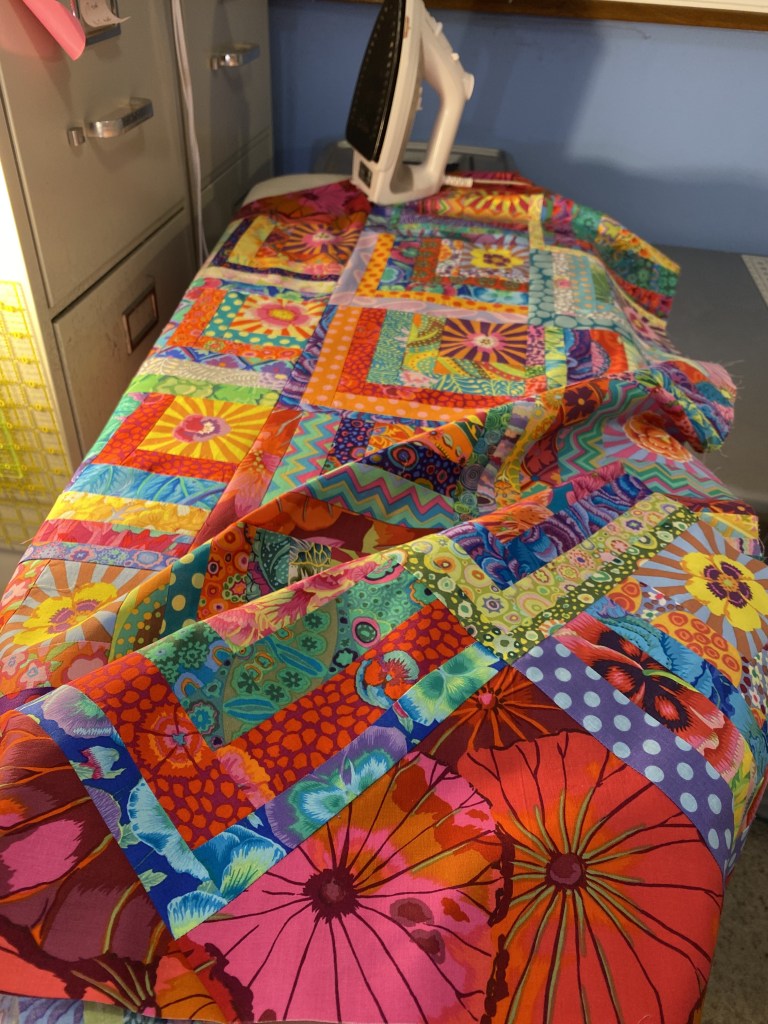
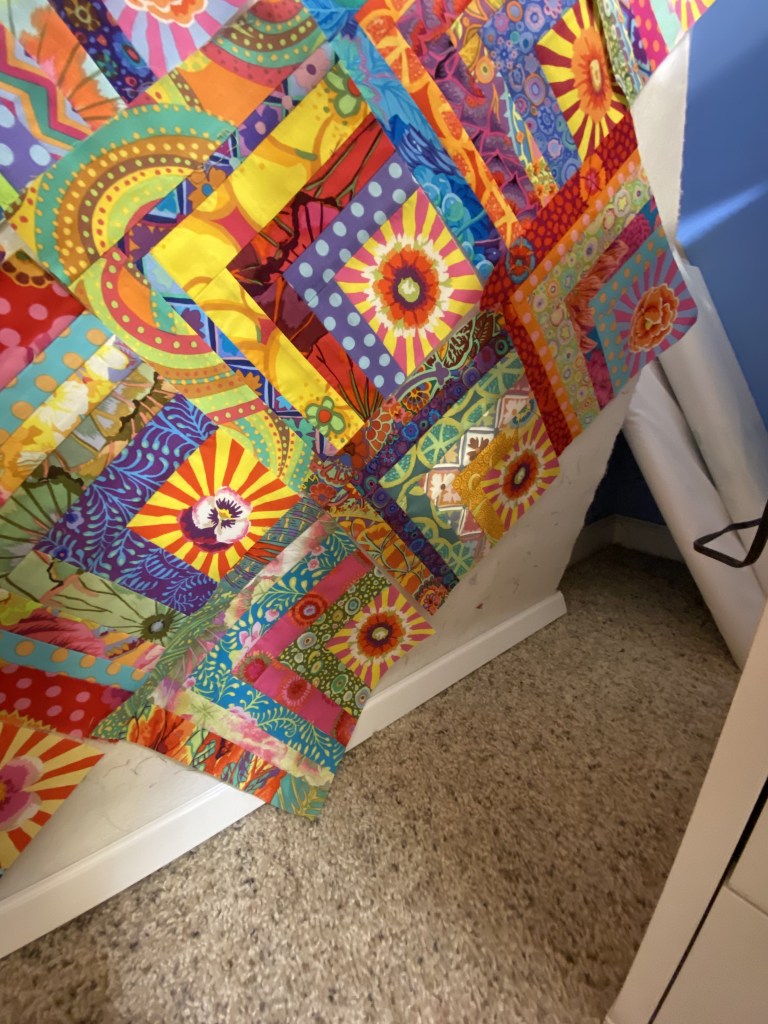
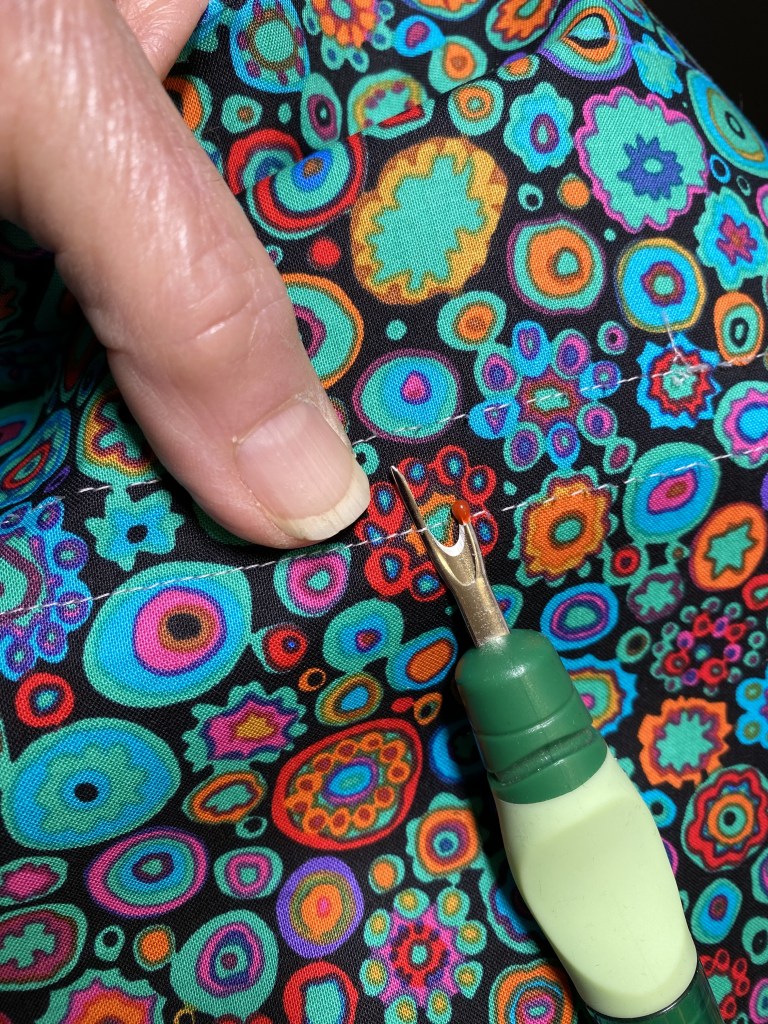
Since it’s clearly and officially spring now, I decided to chase a fabric squirrel and play around a little tonight with a project that I’ve been wanting to do for some time. It’s just the kind of thing I love… digging into my scrap pile and making some blocks in a free form way. And here’s what I did tonight.

I’ve been seeing some people on Instagram that are making this type of quilt. And I watched a tutorial a few weeks ago on making these fun little blocks.

There is actually a series of three tutorials by Terry Rowland. Here’s the first of the three. It shows how to make the blocks. The second video shows how to arrange the blocks. And the third shows how she sews the blocks together with the web method. I might have to get really brave and try that on a quilt.

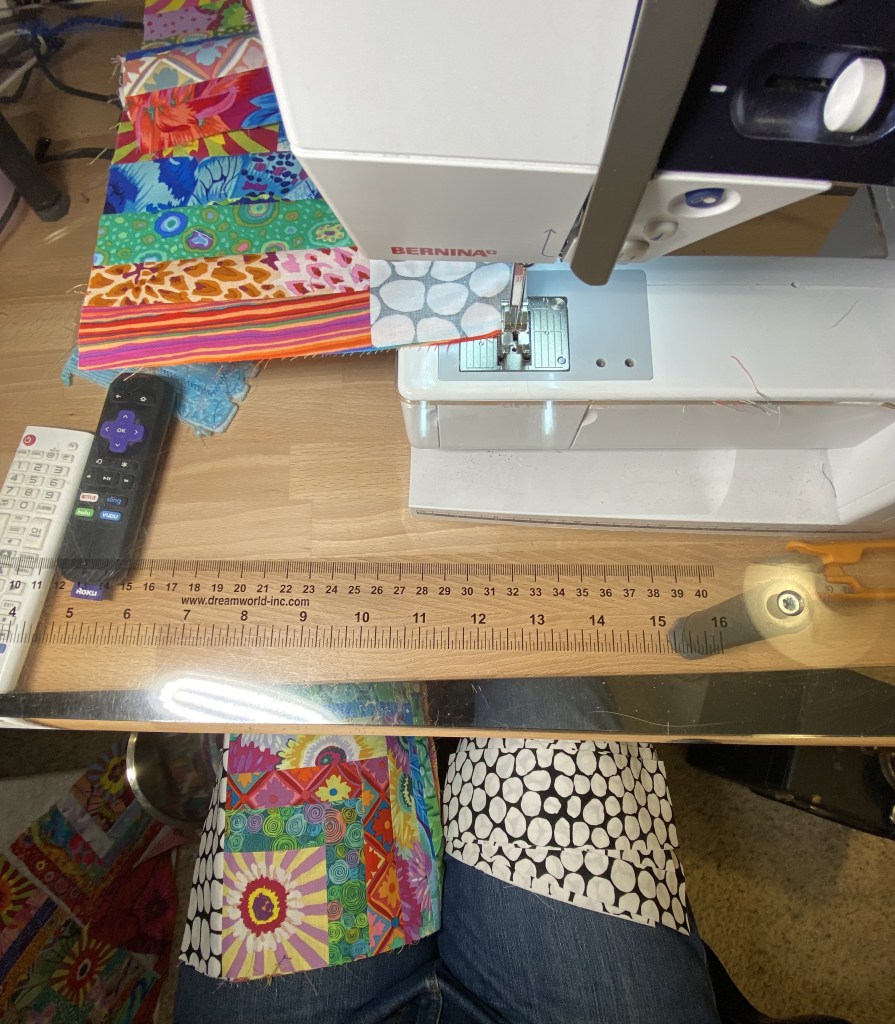
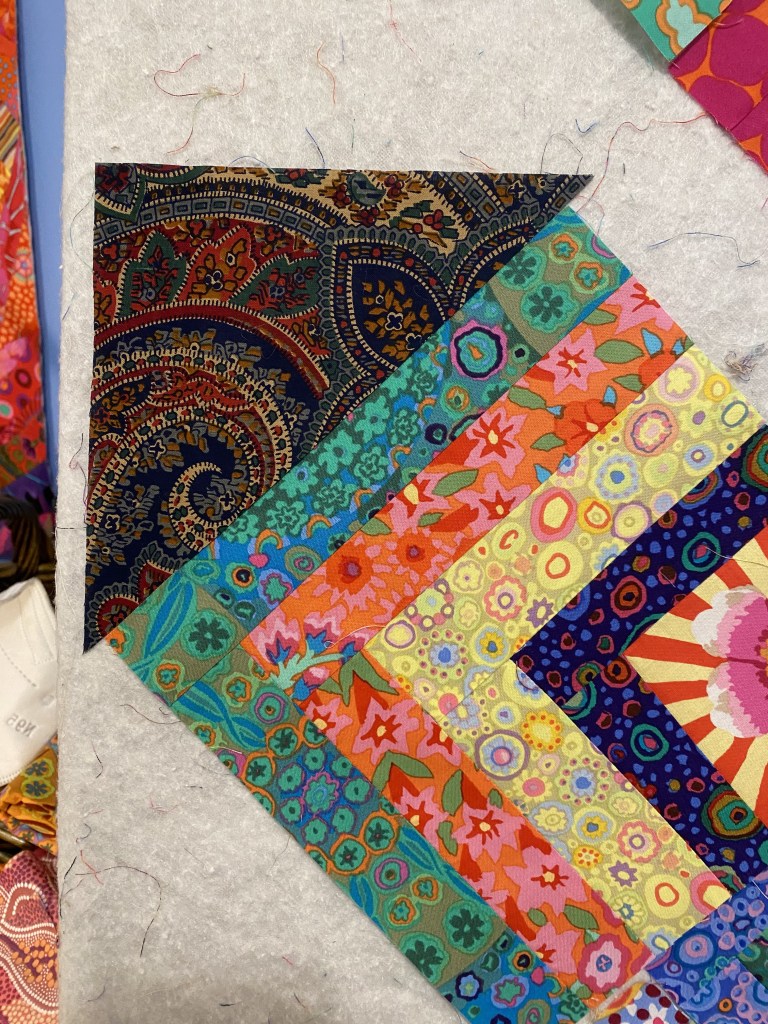
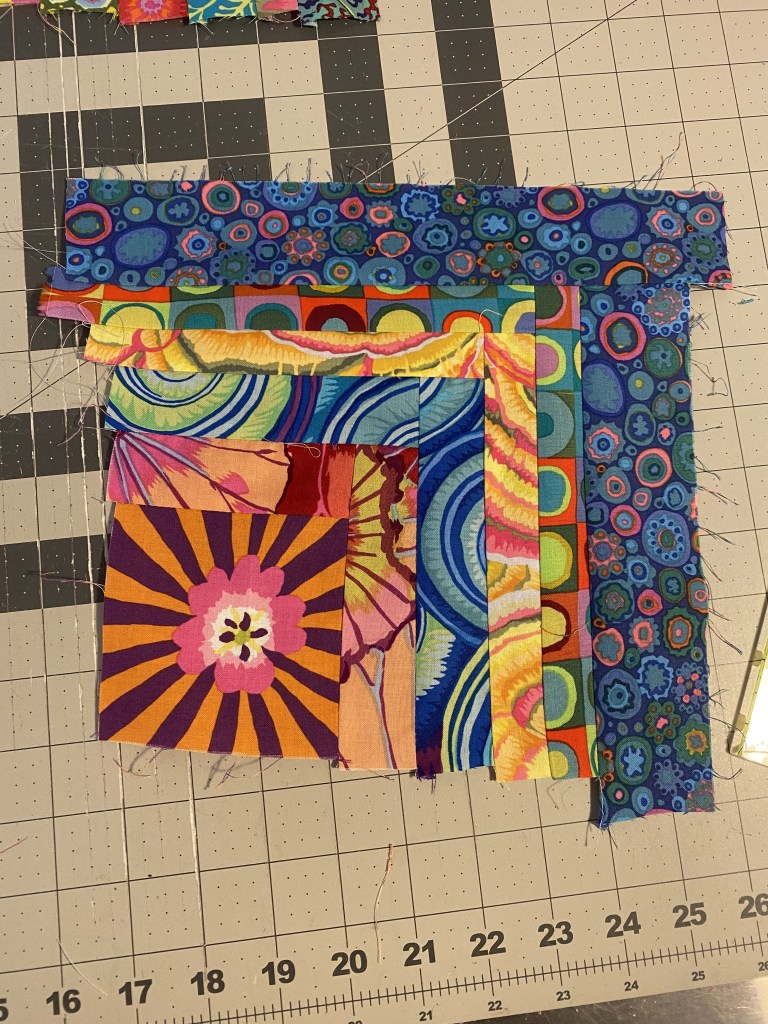
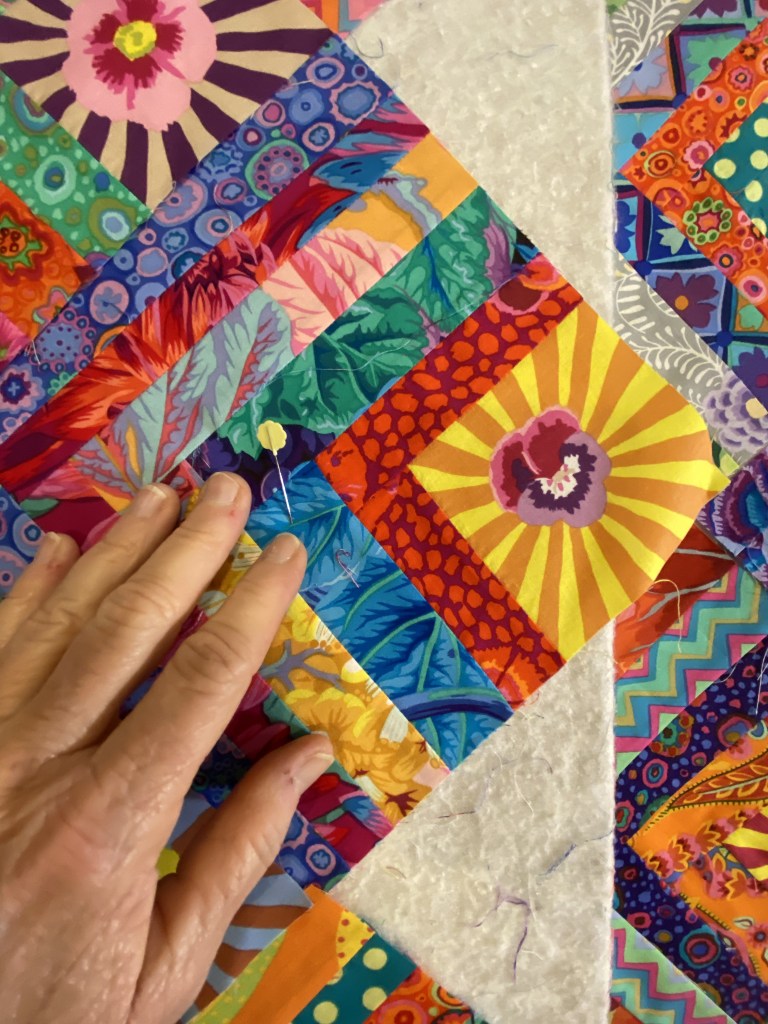
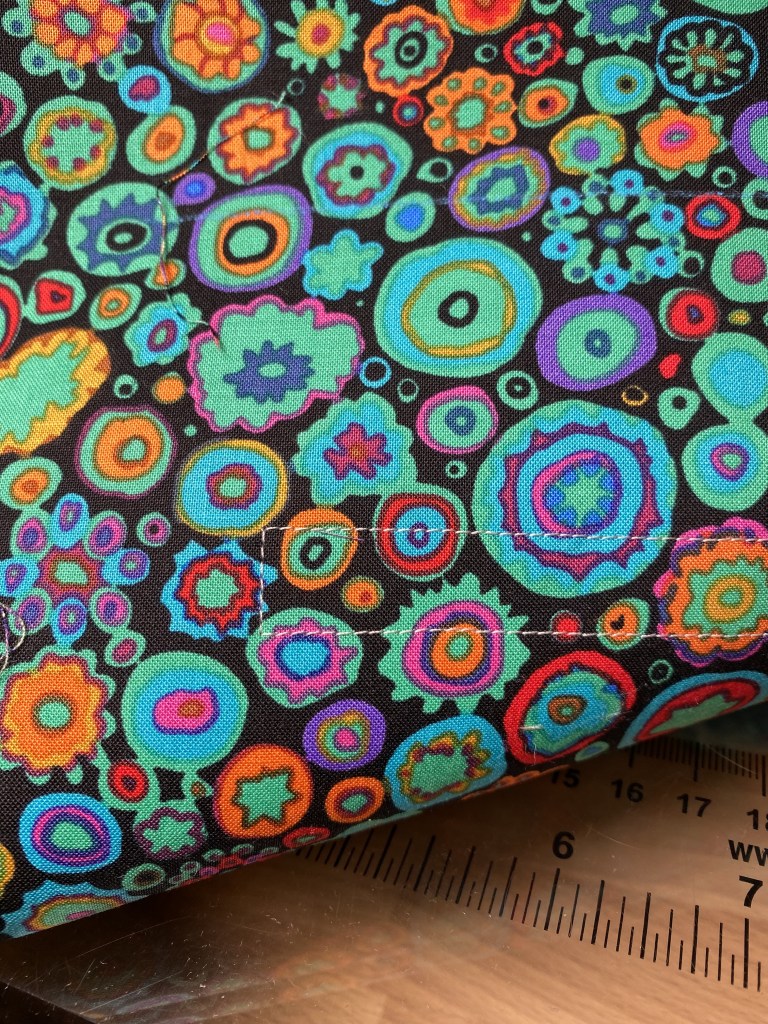
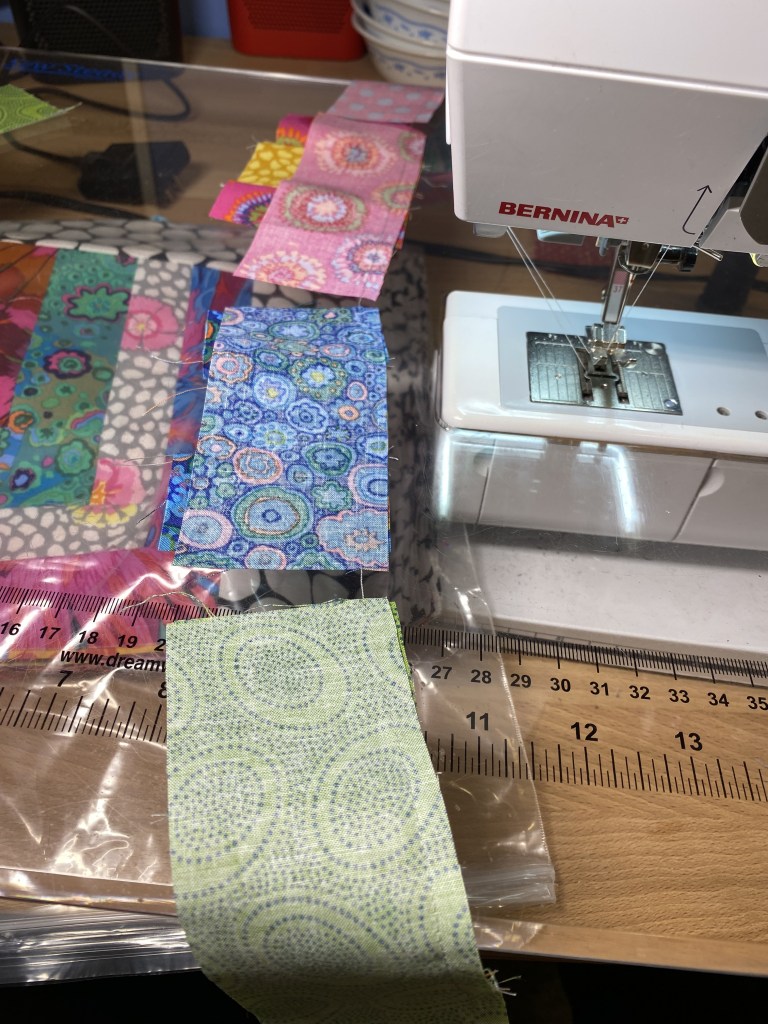
She squares her blocks up at 3.5 inches. I’m making mine 4.5 inches because 3.5 is just too small for me. Here’s the components you need for a block.

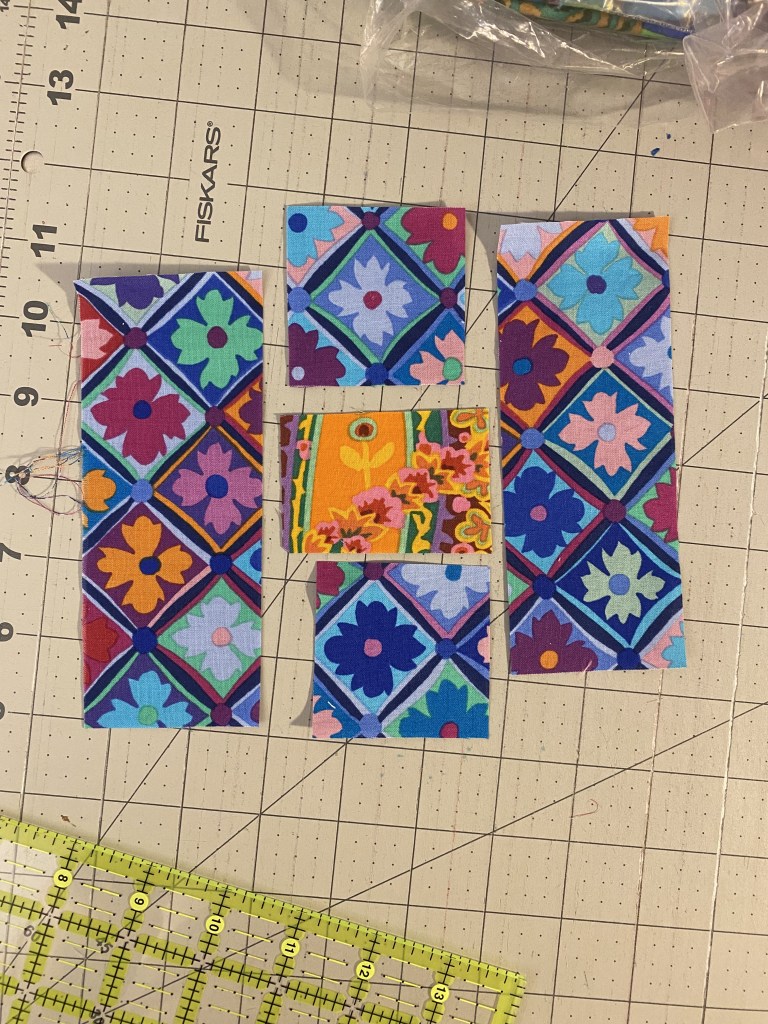
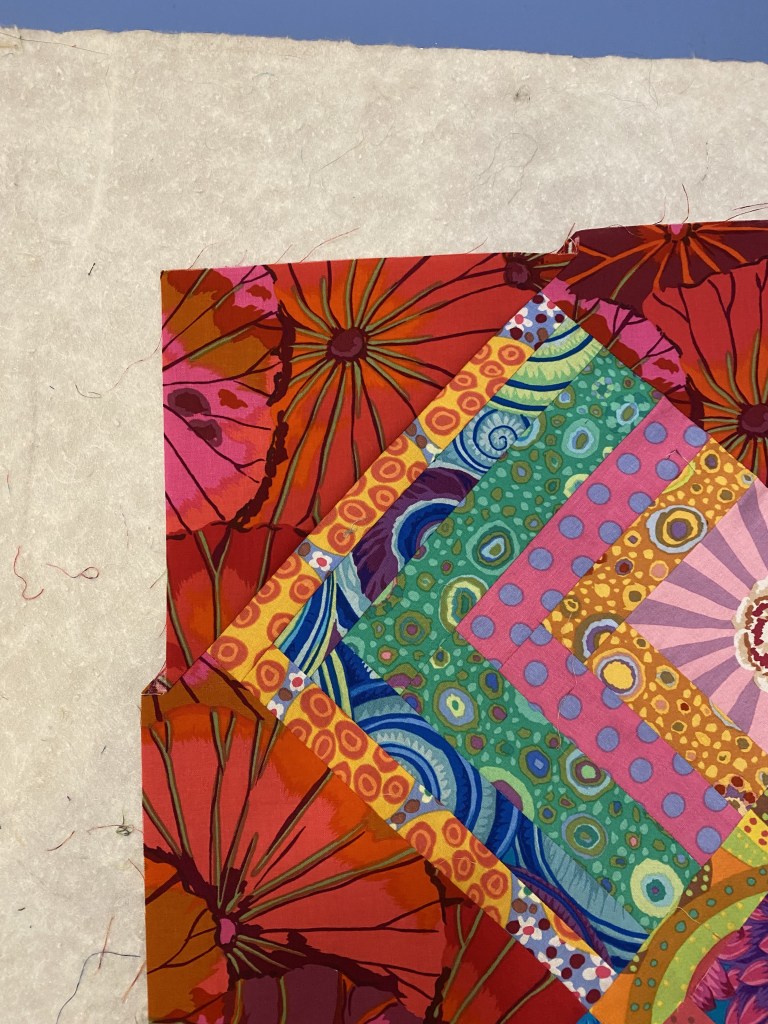
Each block is unique. The measurements for the pieces are just sort of a guideline. There’s no rules on the fabric in the center except that it should contrast with the fabric around the outside. It’s fun to build variety into the blocks with different shapes and colors in the center square/rectangle.

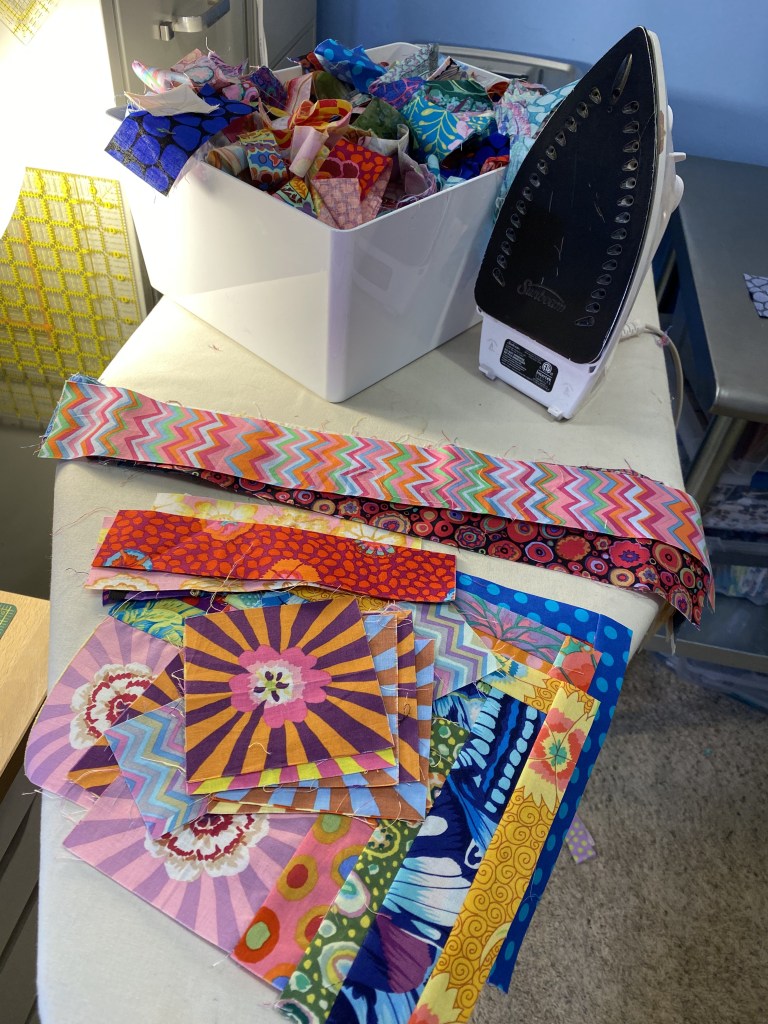
The blocks are really fun to make and it’s really fun to select and combine the fabrics. Have I told you I have a lot of scraps?

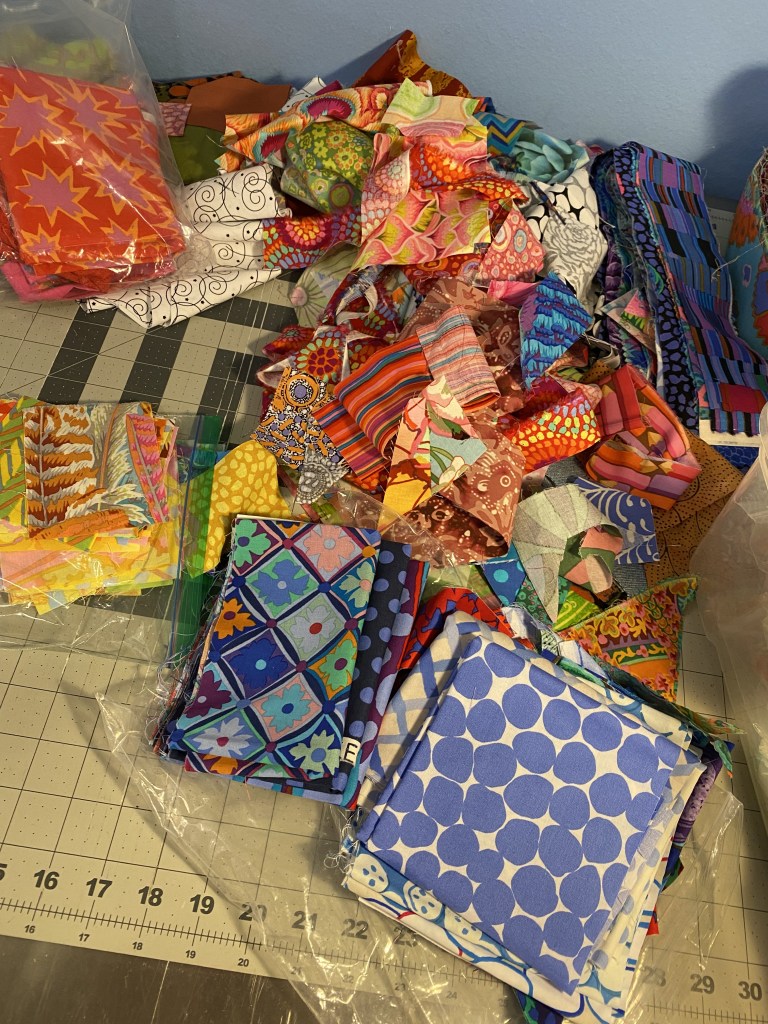
That’s a very small portion of my scraps.

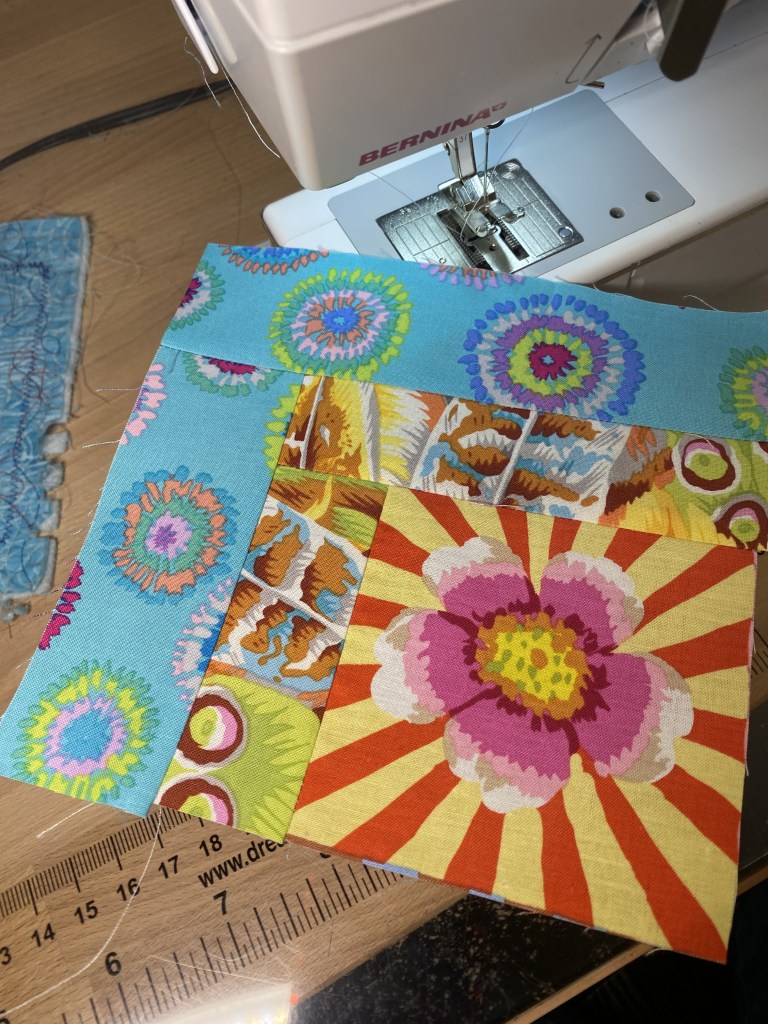
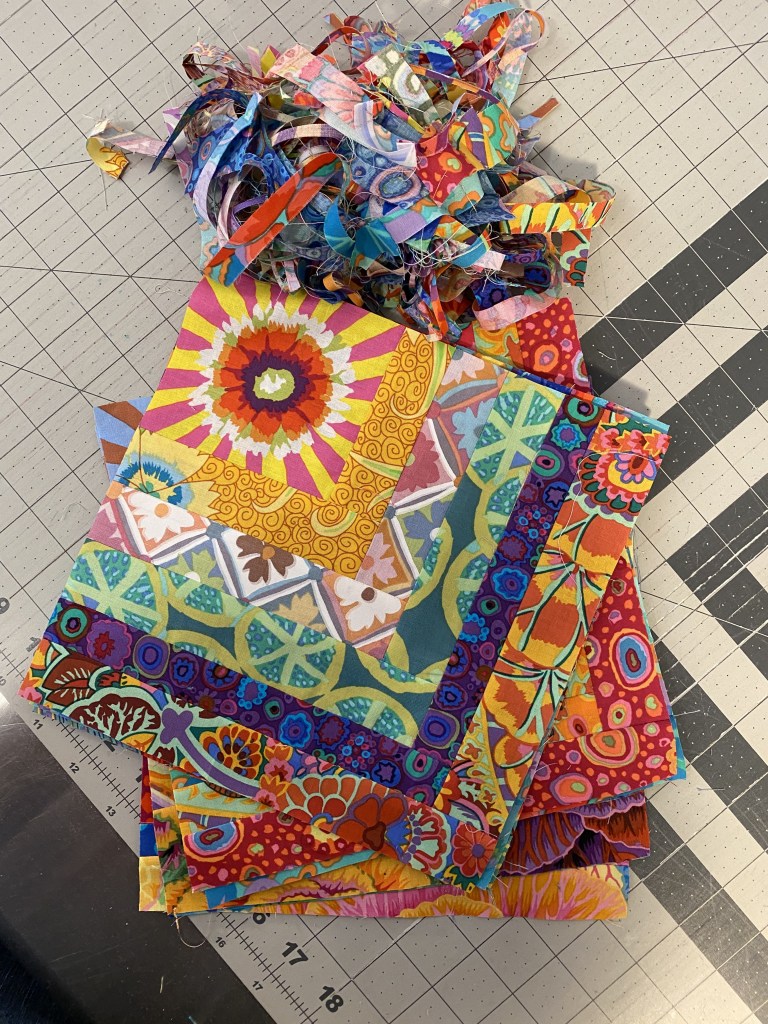
I’m making four or five blocks at a time and chain piecing as I go. I have the pieces for the blocks arranged in a stack and then I pull each set off the pile ad spread them out on my sewing machine extension table so they’re close at hand.

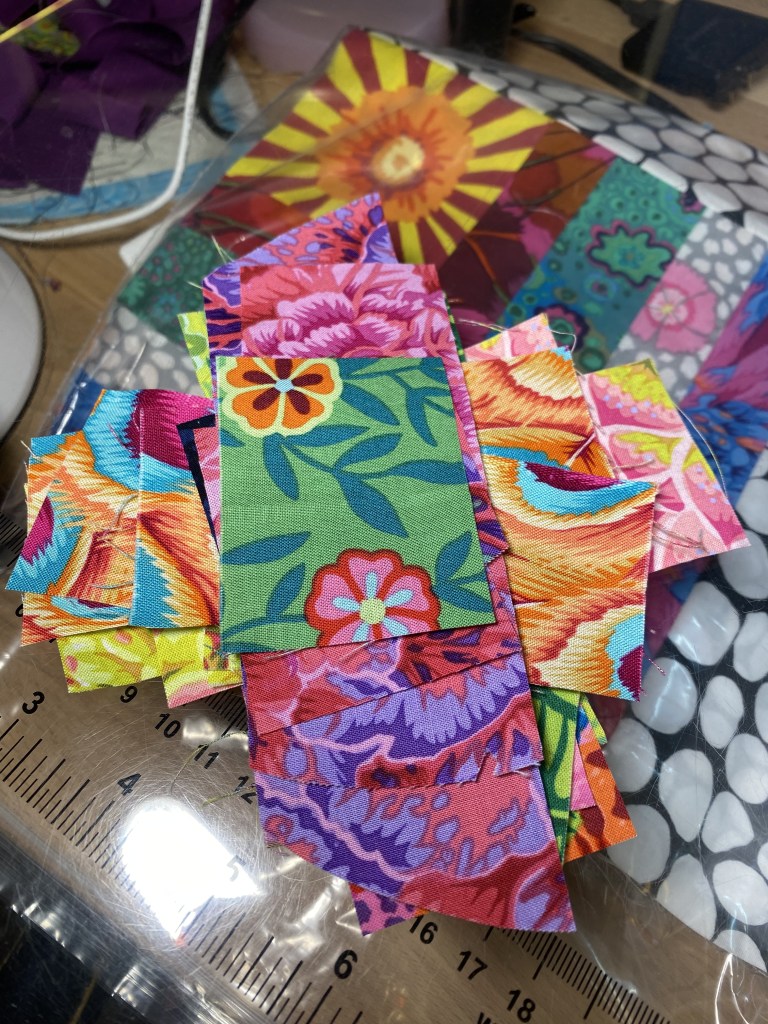
It speeds things up, but you really have to pay attention so you sew the right pieces together and don’t accidentally mix things up.

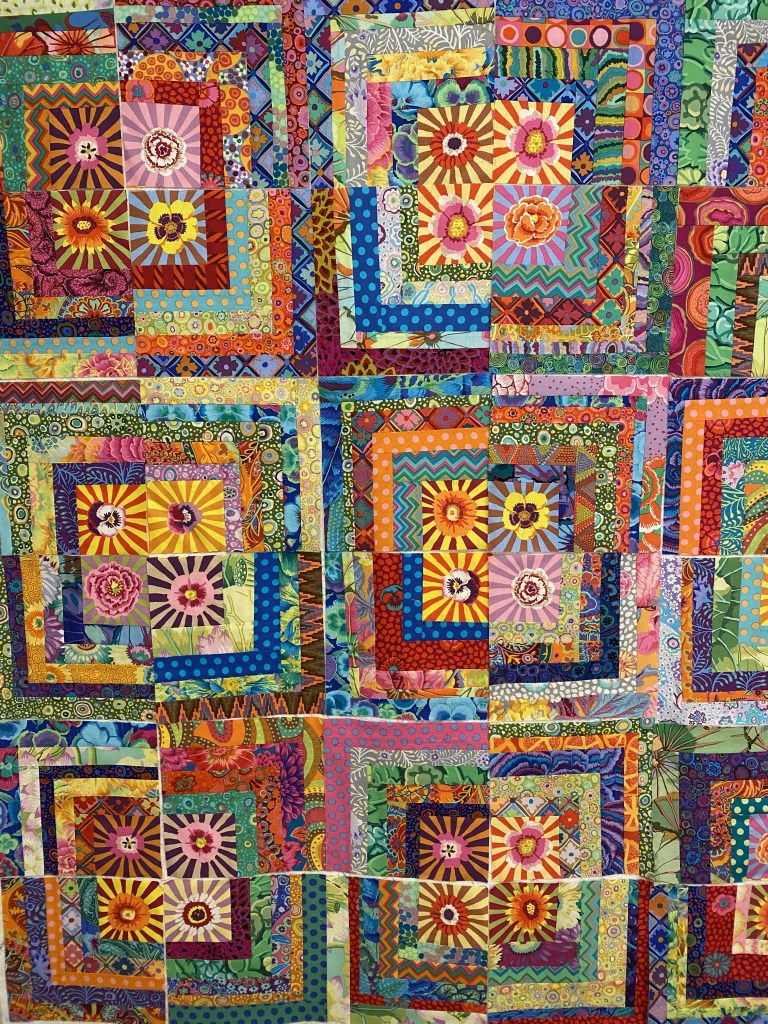
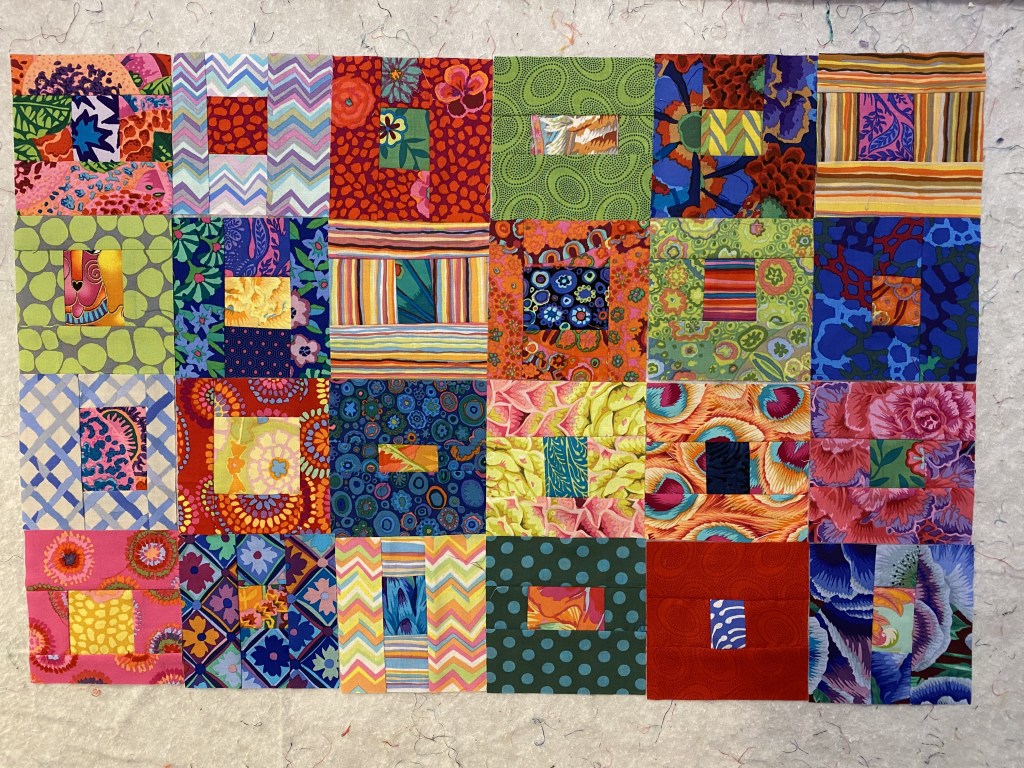
I made 24 of these blocks tonight. They sew up really quickly. It takes more time to select and prep the fabric.

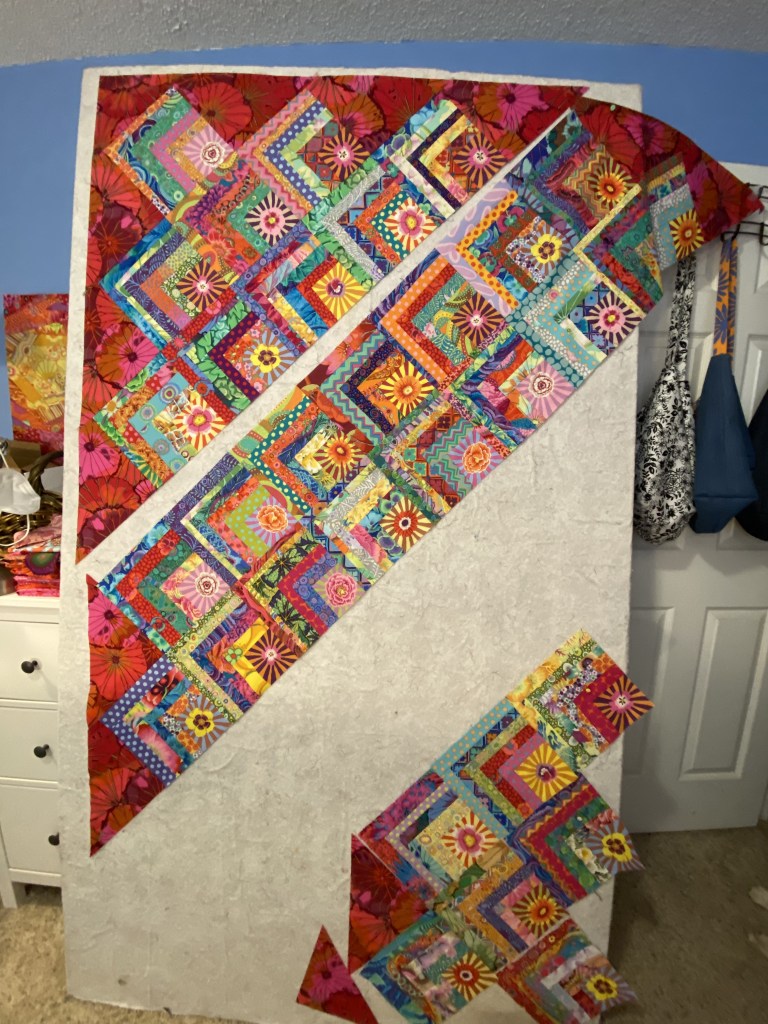
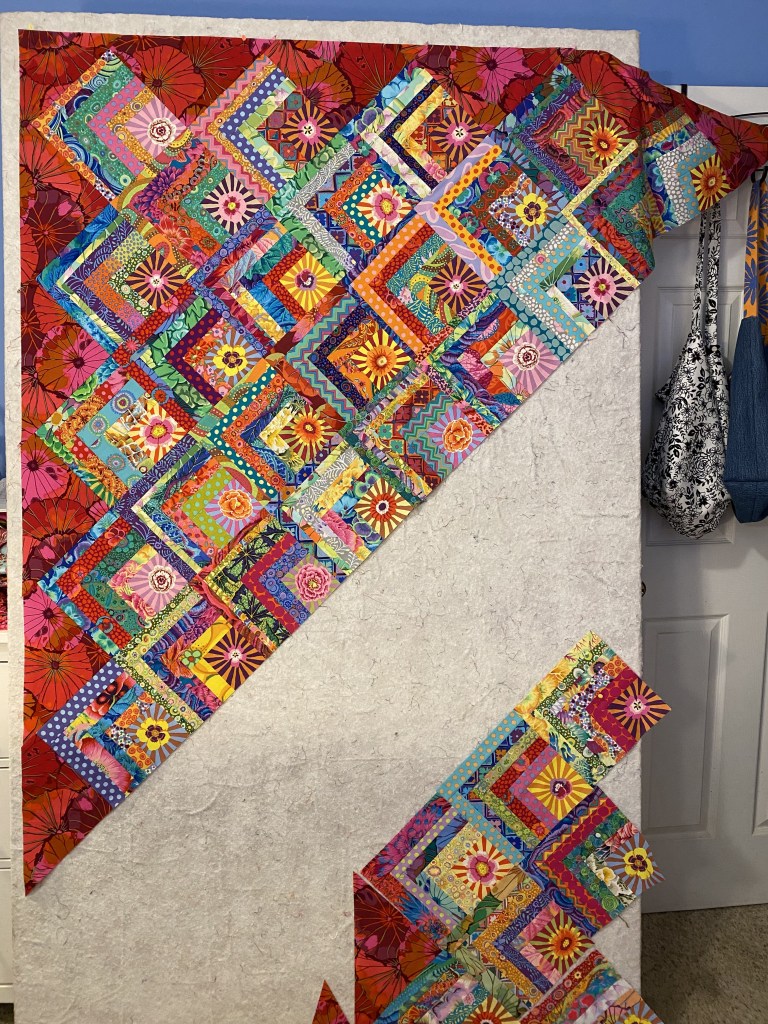
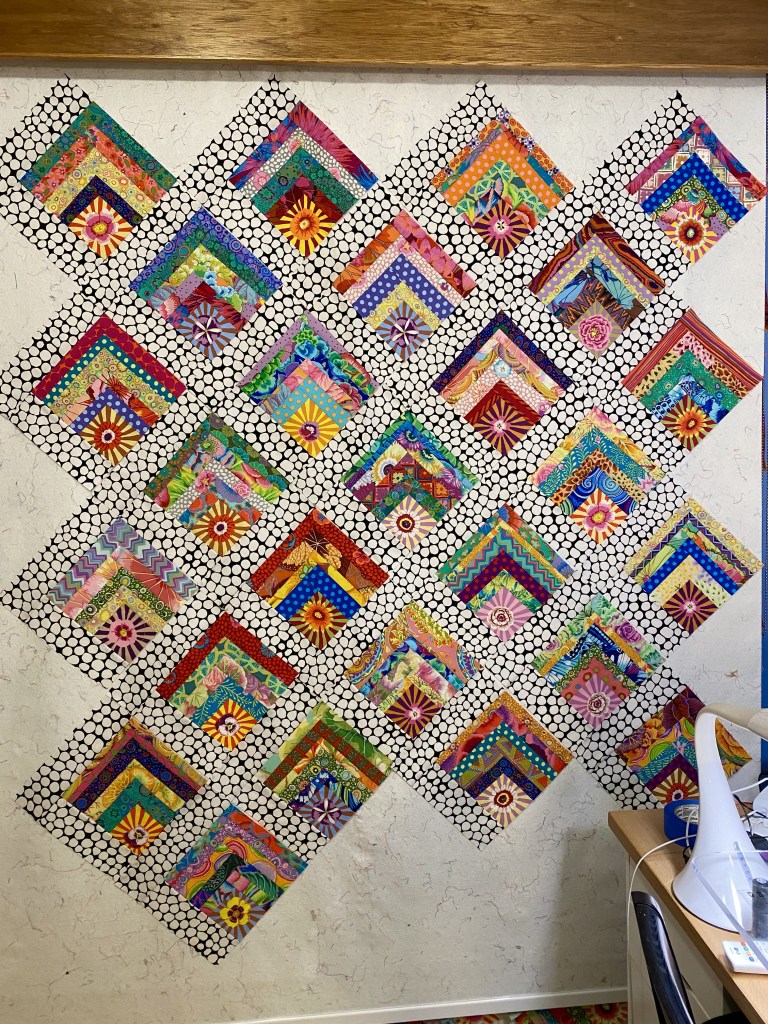
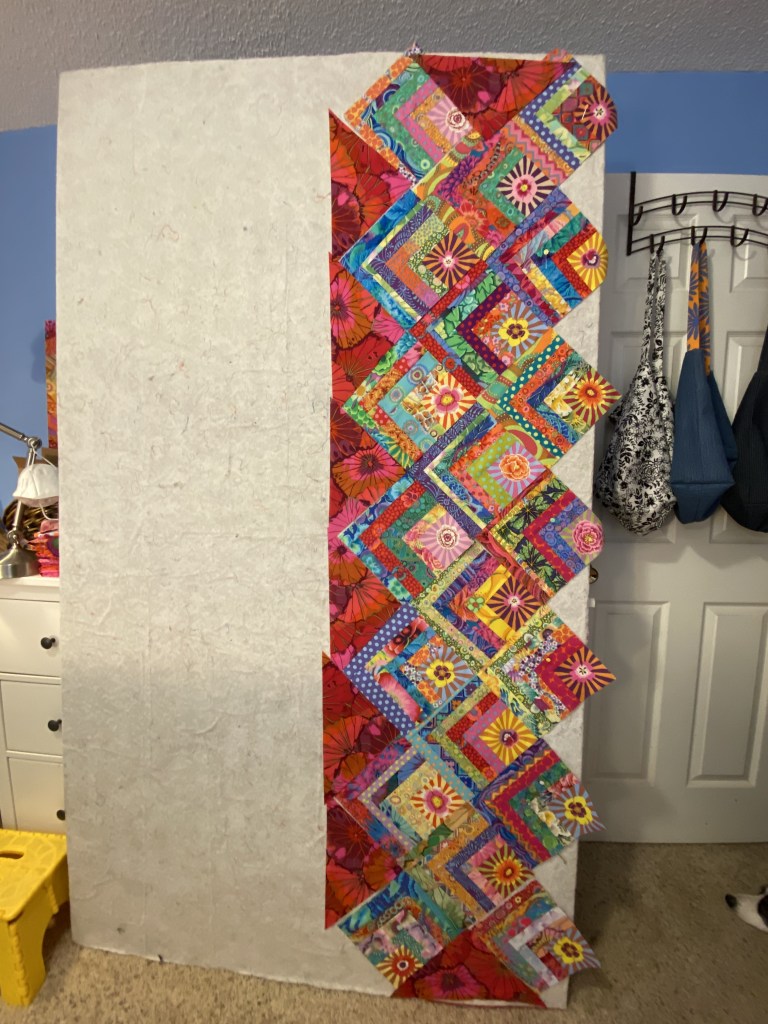
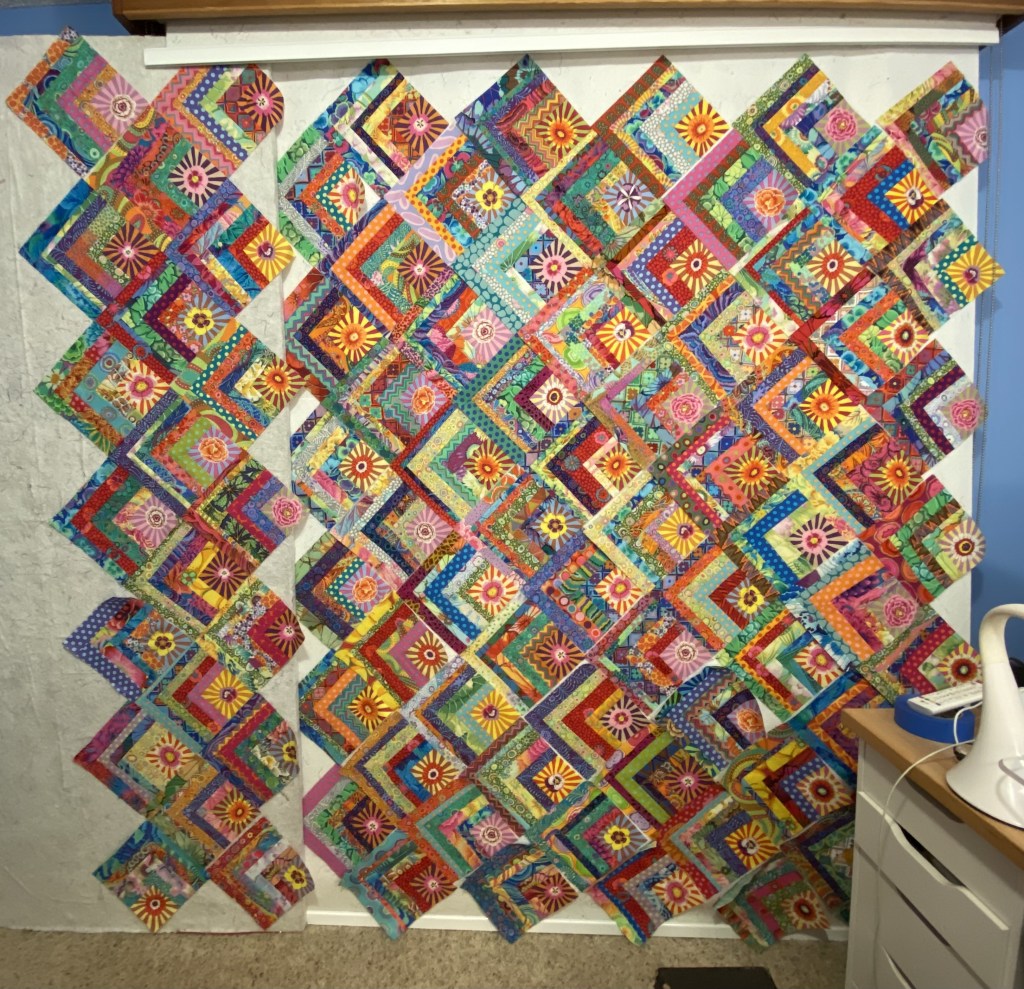
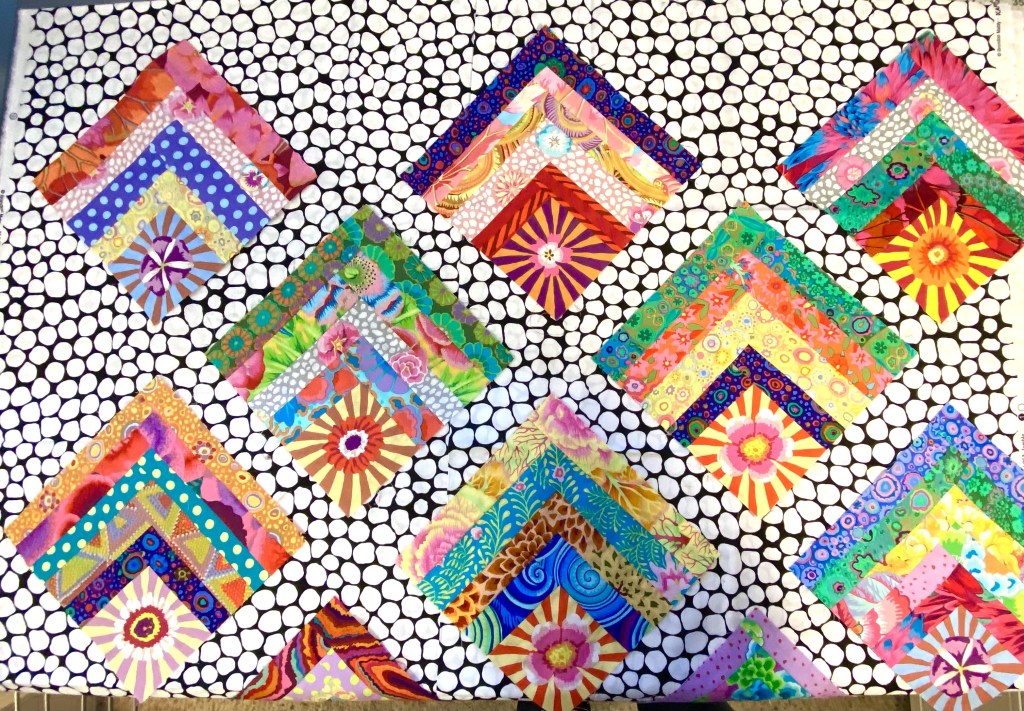
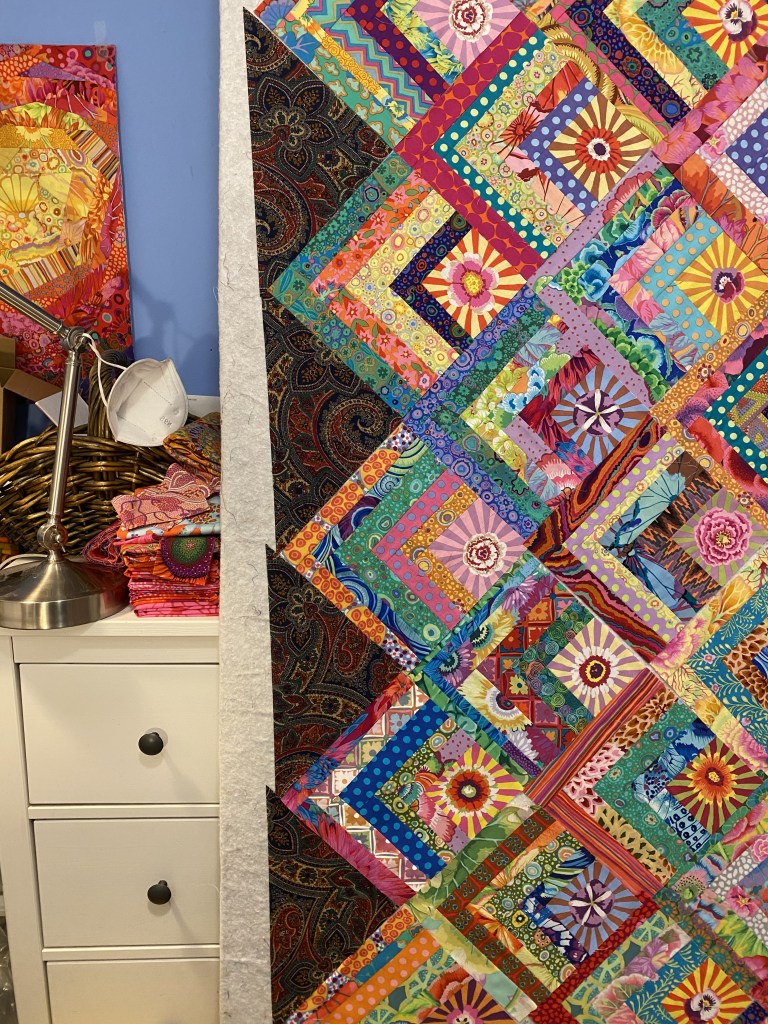
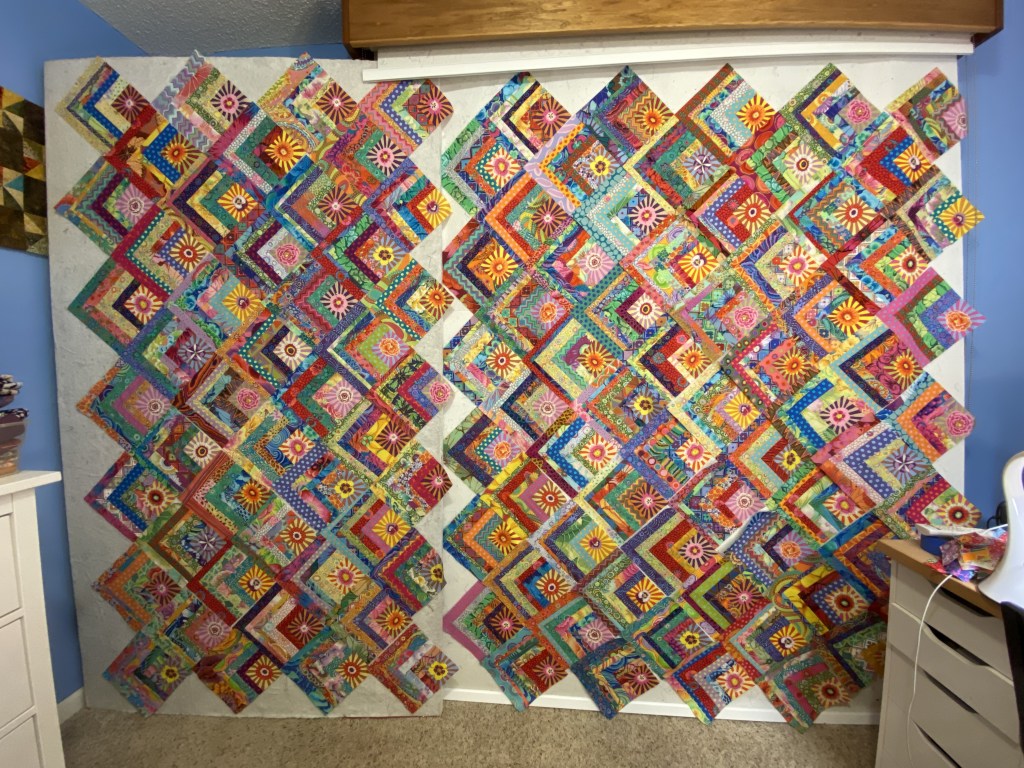
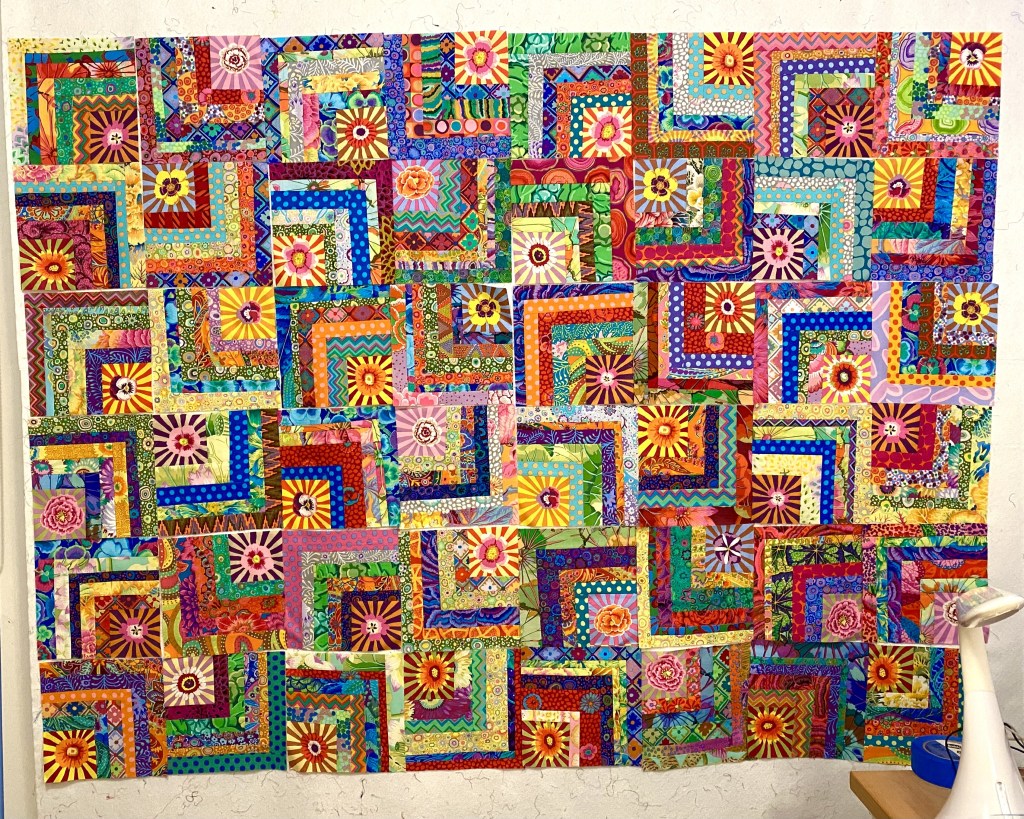
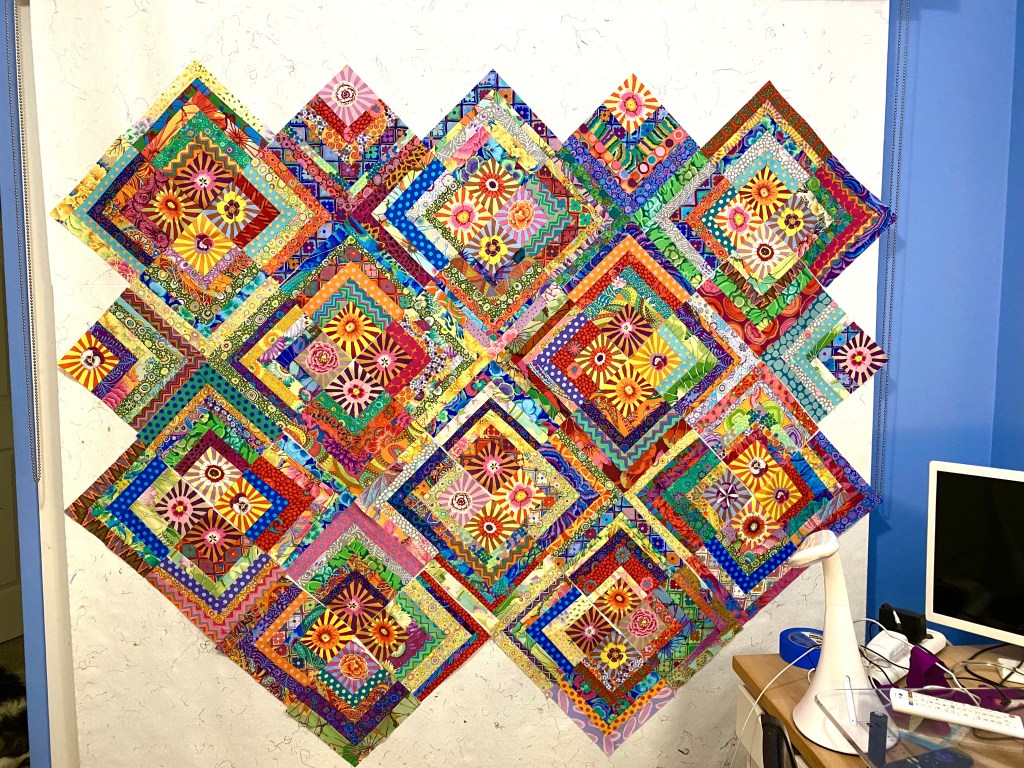
I don’t really know what I’m going to do with these or how many of them I’ll make. Eventually, I hope to have enough blocks and enough variety to arrange them into a sort of color wash.

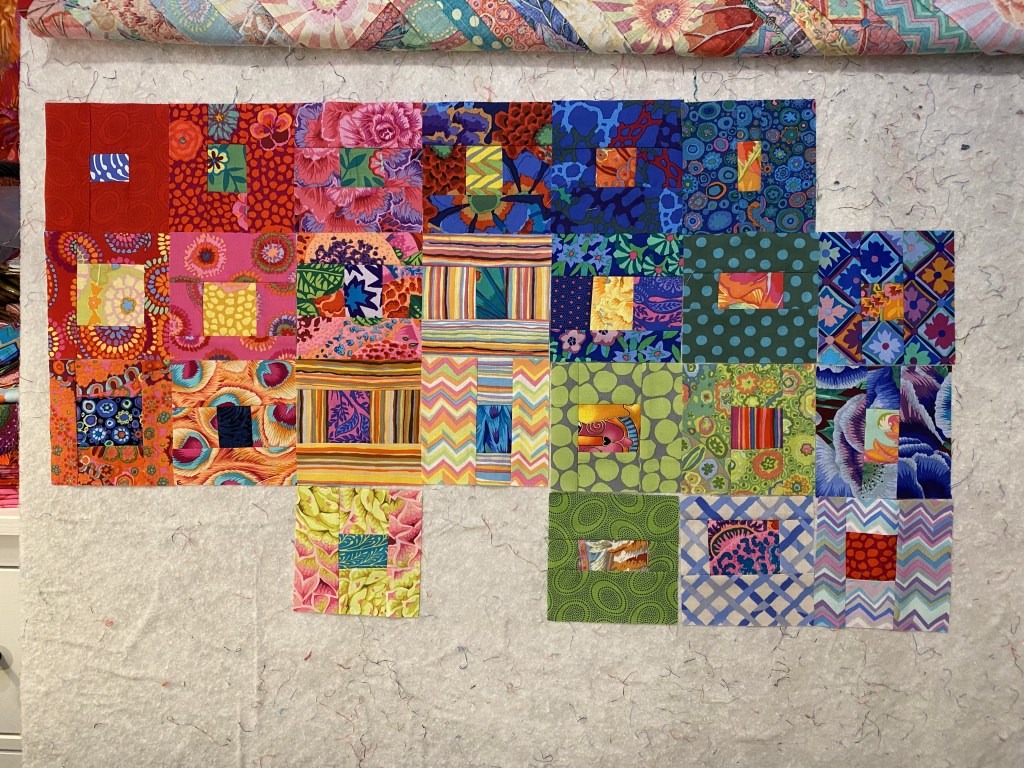
I don’t have enough blocks to give you more than an idea of what that might look like. But I think it has potential. I see a couple blocks that are bothering me. Might have to yank them out of there. Or they might be less bothersome as more blocks are added.

I also think I’ll might bring more than Kaffe Fassett Collective fabrics into this eventually. I might pull out my batik and Aboriginal fabric scraps. That would give me more color variation and I’m sure it would be fun to do some mixing and matching.

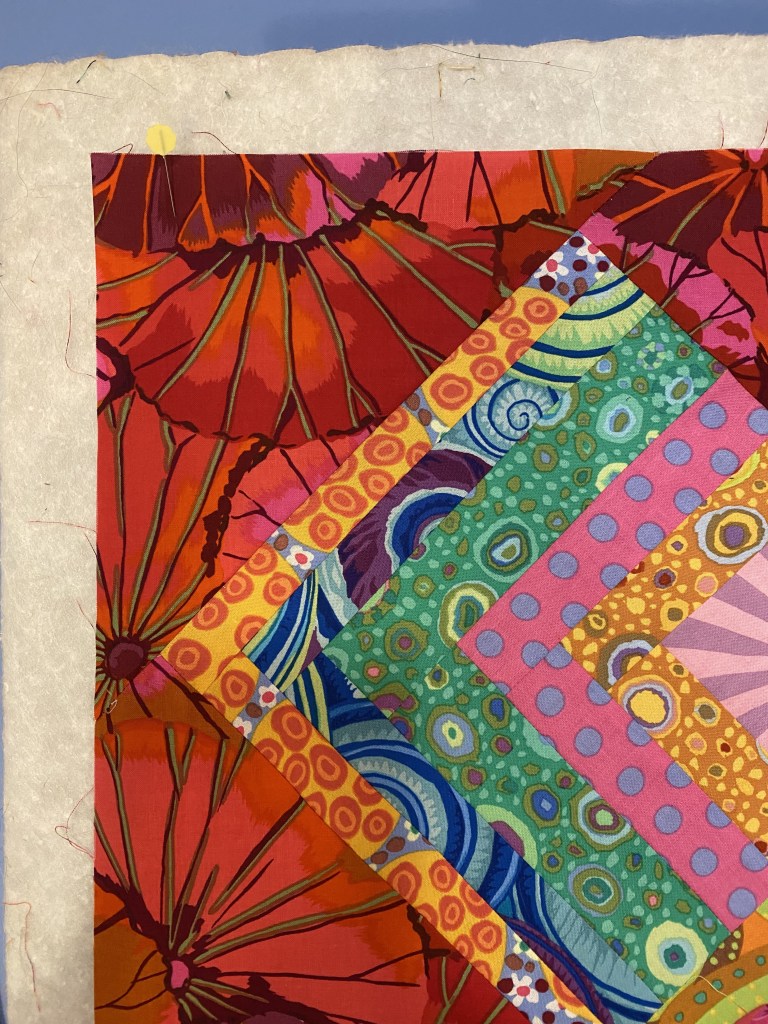
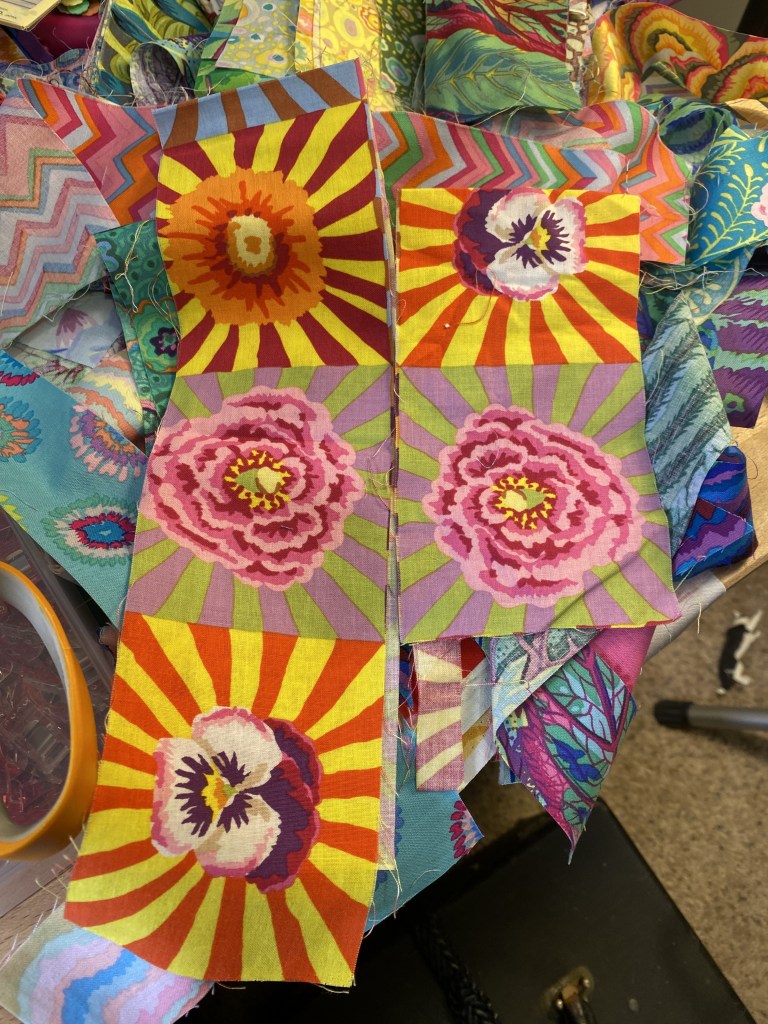
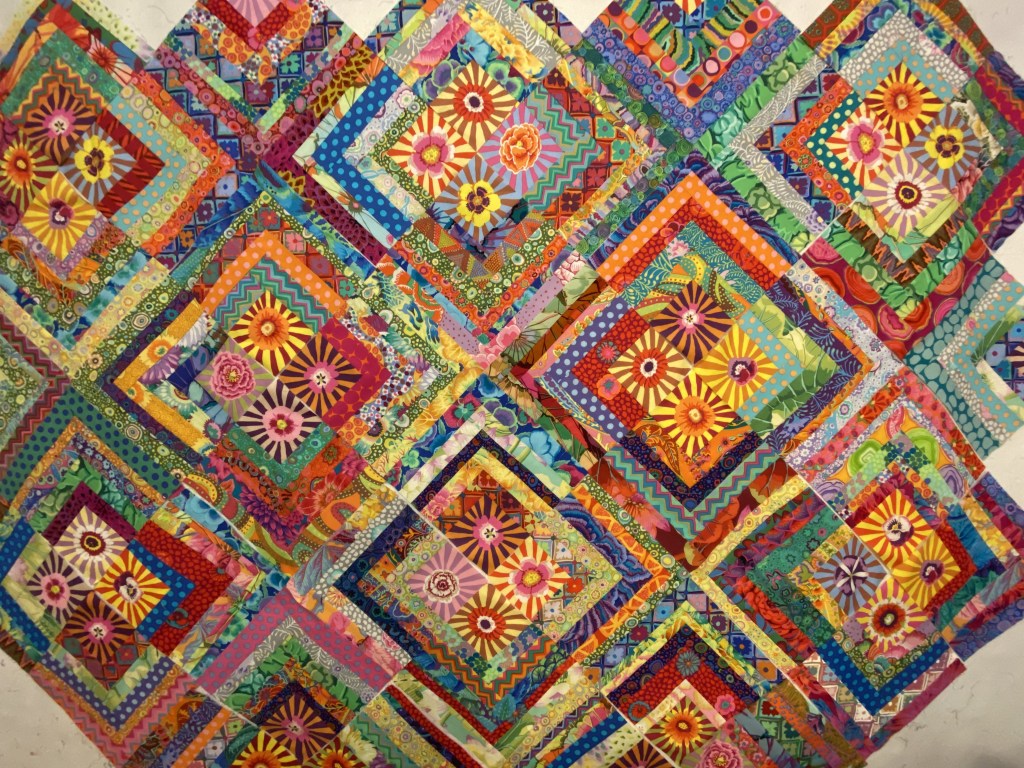
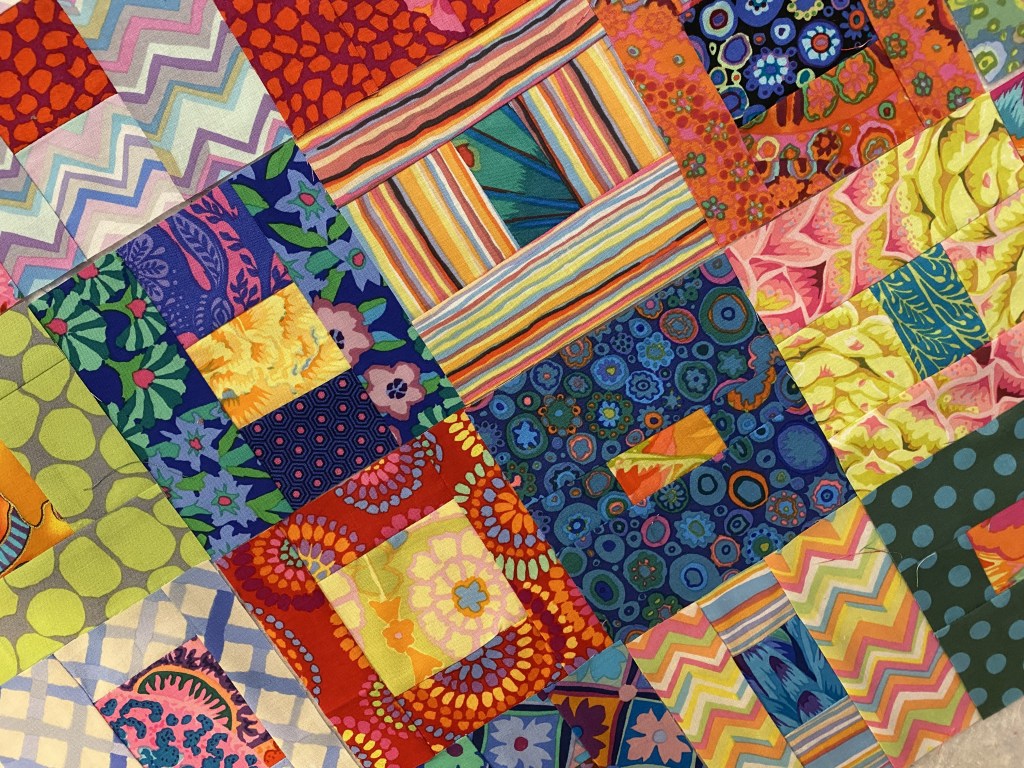
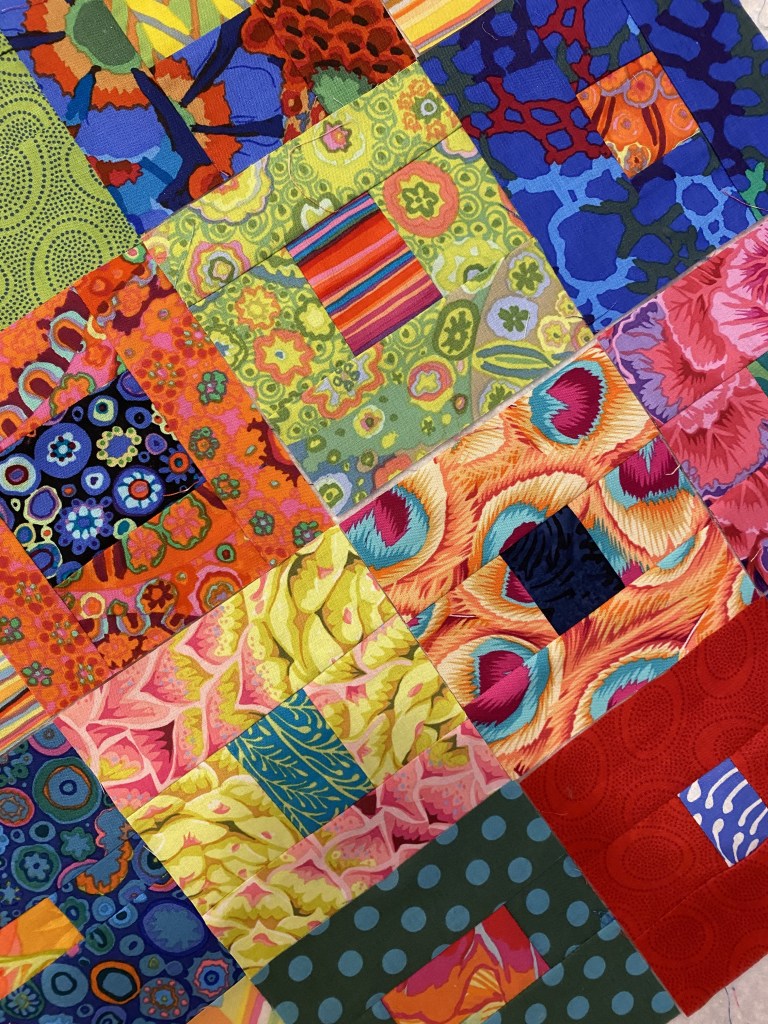
But these blocks are almost all KFC fabrics, except for a few of the centers. Here’s some closer looks.

I did make a couple blocks that were too small for me to square up at 4.5 inches. They have gone back into the scrap basket that sits next to my cutting table.

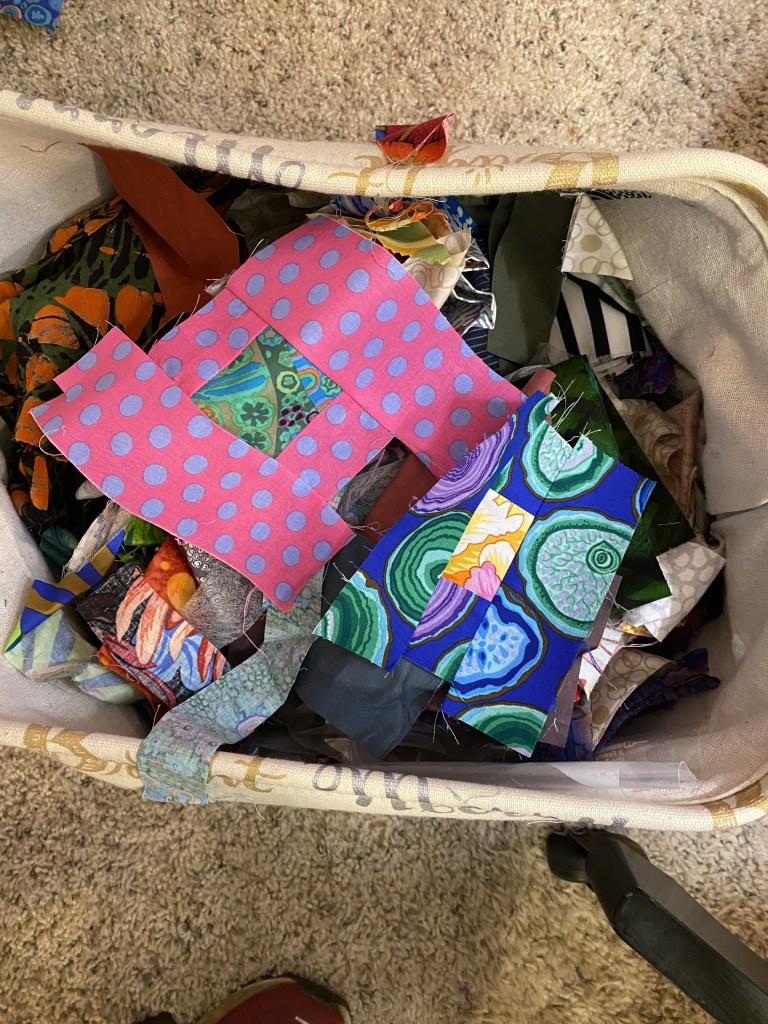
That scrap basket is just a little bit frightening. I’m not quite sure how to tackle it.

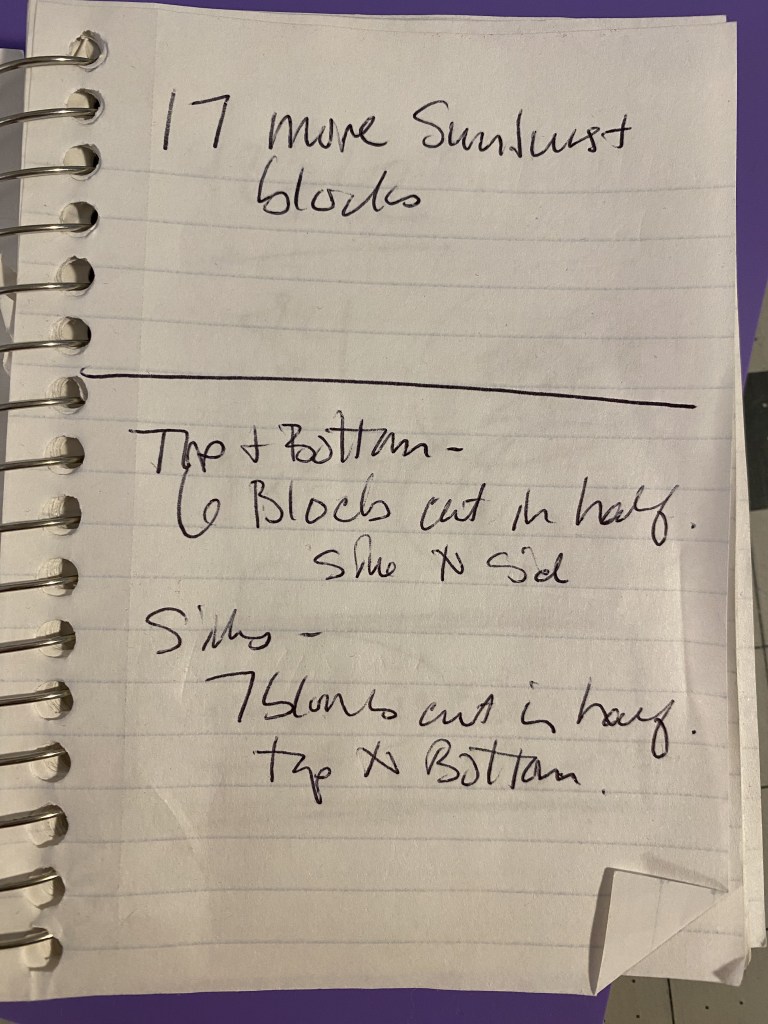
You might be thinking that I’m avoiding finishing sewing together my sunburst quarter log cabin quilt. And you would be right! This is much more fun!

Put Down the Bright Sparkly Thing and Get to Work

After breakfast and a nice morning walk with Rico and Bender, I got ready to head out for Rico’s sheep herding lesson.

He did a great job at his lesson, but the rain poured the entire time we were out in the field. Luckily, I keep my muck boots and a full set of rain gear in my car so we weathered it pretty well. I was wet by the time we were done and Rico was soaked to the skin with rain and mud mixed with sheep poop. So he got a quick shower in the hose before we got in the car to head home. He didn’t seem to mind.

The rain almost stopped by the time we were pulling away from the sheep farm so I decided to stop at the big field at Washington State University to let the boys have a nice run.

They love getting out in open spaces where they can really run full out. And it’s nice that they always come back and check in often.

You can always tell how much fun Rico is having by the amount of slobber on his head.

And, of course, we had to get a nice pose while we were there.

Once we got home I cleaned up my kitchen and then tossed a chicken with potatoes, carrots and onions in the oven. While it cooked I sat down and watched some pickleball. The house filled with the smell of roasted chicken and in about an hour I was enjoying a nice hot dinner.

Once I was well fed I hit my sewing room and pulled the left over blocks sashed in jumble off my design wall and packaged them up.

I knew that if I didn’t put these sparkly new blocks away I’d be distracted by them and work on that instead of working on the first starburst quilt top.

The first thing I did was cut some new corner triangles. Then I picked out that seam to remove the one that was too small and sewed on the new piece.

This time I cut these triangles perfectly! Phew!

Next I started working on piecing the next two rows of blocks. I had planned to get two rows pieced and sewn together. And it all went according to plan.

Since it was still relatively early I decided to go ahead and sew these two sections together and get them pressed.

Then I huffed and puffed and got it all up on my portable design wall.

That’s five rows of 13 that are done. I’ll just keep chunking away at this throughout this week. Maybe I’ll finish it up next weekend. Maybe I’ll finish it up before then.

Here’s a closer look at how those setting triangles overlap.

It leaves a border an inch wide.

Before I wrapped it up in my sewing room I wound five bobbins to have on hand and ready to load.

And when I left my sewing room I found Bender wound asleep, mostly in the hall but with head I the room. I usually kick him out because he’s always under foot and when I’m up and down, at the machine, at the ironing board, at the design wall, I tend to step on him.

He was almost completely obeying the rules.

A reminder for those of you who read my blog posts via email. If you go to my blog at http://www.agilejack1.com you can scroll through all my previous posts (I posted my 500th post a couple months ago!) You can also read the comments from readers, along with my replies. I do reply to every comment! You can also search if you’re looking for something specific.

Thanks for reading!

I Started a New Quilt. Of Course I Did

I couldn’t stand it. I just had to add the jumble sashing to the left over sunburst blocks. So I dug in after our dinner and walk this evening. I cut the sashing pieces to 3 inches, so they’ll finish at 2.5 inches. Then I sat down at the machine and started chain piecing… blocks on one leg, sashing pieces on the other.

It didn’t take very long to get all these blocks sashed and pressed and then I tossed them up on my design wall. And I like what I see!

I’m going to have to make six more sunburst blocks to complete this. But it might be the quickest quilt I’ve ever made! With left overs from a quilt that has taken more than two years to complete!

Here’s a little eye candy of these blocks with that fun black and white jumble.

What is it about that jumble that’s so magic?

My design wall has two roll up pieces of heavy, plastic backed flannel. The other sunburst quilt is on the second flannel behind this one. It’s a pretty handy feature.

I actually did work on the other sunburst quilt today. I got all the setting triangles and corner triangles cut and laid out on the design wall. It’s sort of a mess because the wall just isn’t big enough. So stuff is hanging off the edges and dragging on the floor. A number of pieces are actually pinned on.

That’s the section on my portable design wall. I didn’t get a photo of the rest of it.

I started assembling with the upper left corner and I got three rows all sewn together. I’m toying with the idea of putting this together in large blocks. Four large triangles like this one (one for each corner) and then three or four smaller blocks down the center. I really hate all those long lines of blocks.

I made a couple errors when cutting the setting triangles. There were four triangles that weren’t square. I’m guessing that I cut one side of the square shorter… meaning that I cut a rectangle.

It was pretty easy to identify them as I was laying it all out. I’ll have to cut some more tomorrow. I didn’t want to do it after out walk this evening because I felt a little tired and thought that would be an invitation to even more un-square triangles.

And I discovered another error as I put these three rows together. I cut the corner triangle too small. I think I cut it 1/2 inch to small.

Rather than trim the entire quilt top to match that corner, I’ll pick this out tomorrow and cut some new triangles.

The wide backing I ordered arrived today. That’s pretty damned good service! It’s really amazing! The scale of the print is BIG and I think it’s going to be fun with this quilt.

Those blocks are 8.5 inches square, so that print is huuuuge!!! And I love it!

We didn’t have our sheep herding lesson today so we slept in a little. It was raining this morning and I didn’t get the boys out for a nice long walk until early afternoon. We walked about 4.5 miles and then came home and after a short nap, these boys were ready to go again.

But instead, we jumped in the car and took a quick trip to Costco. It’s been a few months since I went to Costco so I had a ton of stuff to unload and put away when I got home.

When we were getting ready for our shorter walk this evening, I made sure I left the light in my sewing room on so I could see my sunburst quilt when I came home.

That’s where all the magic happens!

Rico has a sheep herding lesson tomorrow afternoon with a trainer who is not our regular teacher. Then I need to do some tidying up around the house to start getting ready for my company that’s coming in a couple weeks.

Our winter radio fundraising drive starts this Thursday and goes through Saturday, Feb 19. My friend will arrive a week from Friday. I’m really looking forward to her visit! We’re trying to decide what quilt we’re going to work on when she’s here. I think we might make a 16 patch!

Old Decisions Un-made and New Decisions Made

The sunburst quilt that I thought was ready to put together was being built to a size that my brother said they wanted for their queen bed. It was an odd size that he requested: 84 x 104. The more I thought about that odd size, the more it bothered me.

So last night I called my brother and his wife to see if they really wanted it that size. Apparently my sister in law had measured the bed and doesn’t remember why she had recorded that rectangular size. I told them that queen size quilts are typically square and around 90 inches on each side. My brother ran upstairs and measured their bed and said that size would work really well.

So, during my lunch break today I took a look at the blocks on the design wall and then put pen to paper to sketch out how to make it square and the size I want. And all I had to do was remove the three rows on the left side. Here’s the resulting square layout.

It sounds so easy. But before I did all thisI messaged my friend Karen last night, an experienced and accomplished quilter, to ask her about calculating the finished size of a quilt with blocks set on point. I was having a tough time wrapping my head around it.

Being a scientist and very math-capable, she generously provided a formula that was like a foreign language to me.

So I asked her to explain it to me like I was a math challenged liberal arts major. Here’s what she said:

And that all made sense to me. So I was able to determine, with as much confidence as someone with poor math skills can have, how big this quilt top would be once all the blocks were sewn together. It will come out to around 81 or 82 inches.

I really wish that I had a better foundation in math when I was young. It would come in really handy . In the mean time, I have my friend Karin.

Did I say that I decided to use Kaffe’s wine lotus leaf fabric for the setting triangles and border? And I’m going to make the setting triangles larger than the blocks because I want them to overlap at the points of the blocks so that I won’t lose my points when I sew on the border. The points will float in the red fabric.

I will add a sizable border in the same fabric to get the quilt up to around 95 inches to allow for shrinkage from quilting and washing.

I also decided to purchase some wide backing fabric since this is a good size quilt and I wasn’t looking forward to piecing the backing. I knew that it could likely make me delay finishing this quilt yet again.

Here’s what I bought. It’s Kaffe’s Enchanted in red. I think it will be really fun with that scrappy quilt top.

I purchased it last night and had confirmation ths morning that it had shipped.

I used one of the Kaffe wide backings on my blue 16 patch quilt that I gave as a Christmas gift a year ago.

These wide backings are a cotton sateen and they are lovely. They feel soft and silky, and the prints are a larger scale than their regular quilting counterparts. I’m really happy to be using another one since I was so happy with the first one.

I could feel the weight of piecing a large backing lift from my shoulders as soon as I clicked the button to complete my purchase on this one! Ahhhhh.

And now that I’m making this quilt top smaller, I have 26 of the sunburst blocks left over. I tossed around a couple ideas of what to do with them. Here’s one I like.

You know me. I like me some graphic black and white fabrics with these bright prints!

I would makes the sashing pretty wide. maybe finish them at around 3 inches. I’d like to be able to make a throw size quilt out of these 26 blocks without having to make more blocks!!! And I have plenty of that black and white jumble in my stash.

I’m absolutely exhausted tonight after being on the job at 6 am both of the last two mornings. I’m looking forward to more sleep tonight! And I’m really happy tomorrow is Friday!

I Made One Block… and Tested Some Setting Triangles

I’m participating in a conference this week that has people attending in person and also includes people participating virtually. I’m one of the virtual folks. The actual conference is happening on the east coast so I have 6 am start times tomorrow and Thursday.

Since I need to be up and at ’em at a ridiculous hour — 6 am! (Have I told you that I stay up way too late?), I’ve already taken some Advil pm at 9 pm so I can get to bed at a reasonable hour. So not much time in my sewing room tonight.

I decided I wanted to do two things. First, I wanted to make that one block that I needed for my sunburst quilt top. Second, I wanted to cut some crap fabric to test my measurements of the setting triangles.

I ran across a video tutorial today that is a really good explanation of how to cut setting triangles. It’s sort of extra-mathy. Math is not my strong suit. But it has really good explanation of how to calculate, cut and handle your fabric to make sure you’re not putting your bias edges in the wrong place. That’s pretty important

This is a great video but a little more than I felt prepared to wrap my head around this evening. So I grabbed my Quilters Reference Guide and pulled some fabric out of a box I’ve been filling for Good Will. I selected the right measurements for my triangles based on my finished block size. Then got to cutting.

First I cut one large block, then sub cut it diagonally. This method insures that you don’t have your bias edge along the outside edge of the quilt top. Both bias edges will be sewn to the quilt blocks.

Then I tried one of those triangles with my quilt blocks, and it’s pretty much perfect!

Here’s that dark, dreary fabric making me feel like this will actually work really well!

Next I moved onto the corner triangles. I cut a square the correct size, according to my reference guide, then cut that in half diagonally.

And, again, perfect fit! The bias edge on this one is the center cut line, which is sewn to the corner block.

Here’s a look at what I’m using for my setting triangles and how it looks with these blocks.

Once that testing was done, I started looking for my sunburst fabric so I could cut ONE little sunburst to make the final block. Amazingly, I found it pretty quickly. It was in the drawer where I thought it was.

I have over four yards of this fabric. I bought it when I heard a few years ago that this was going to be discontinued. I’m so glad I have this. I don’t have plans for it right now, but there are so many fun things you can do with it!

I also have a smaller quantity of the blue color way.

So I carefully cut one little sunburst out of that fabric.

And immediately after doing that, I noticed that there were a couple strips of these sunbursts in the pile of scraps that I was using to make blocks last night.

Well, of course! Wish I’d seen that before I cut into that yardage. Oh well.

This one block went quickly since there was a good deal of fabric all pressed and ready to go.

Here’s the final block before and after I squared it up.

Then I set about finding a place for this on the design wall.

I may start cutting these setting pieces tomorrow night. Not sure how much oomph I’ll have after being on the job so early

We had a lovely sunny day today. But still quite cold.

The temps will be warming a little in the next few days and we’ll see some rainy days too.

A Puzzle to Solve and an Aha Moment

Last night I stepped into my sewing room to look at the sunburst blocks on my design wall as I was thinking about cutting setting triangles when I noticed something. I didn’t get a picture of it before I started working on this top tonight, so I drew some illustrations.

Here’s what I noticed. At the top of the quilt, there was one block in each corner, which is correct. At the bottom of the quilt top, there were two blocks in each corner. In this illustration, the red blocks at the bottom are the problem.

(Keep in mind that I’m talking about the top and bottom of this quilt top as it’s oriented on my design wall. It’s actually flipped on it’s side. So what I’m calling the top and bottom are actually the sides… in case you’re wondering why my quilt is so short and so wide!)

And why is it a problem? Well, when it comes to adding triangles to finish the corners, there will be a smaller triangle in each of the top corners. But the bottom corners will require a larger triangle to make the quilt square. So it will look really odd and unbalanced.

So I started noodling about the best way to solve this problem, and I decided that adding another row of blocks to the bottom would solve the issue.

In that illustration the green blocks are the additional row. you can see how it fixes the issue on those bottom corners.

BUT… this would require making additional blocks. Don’t ask me how many because I’m so confused by this time I can’t keep track.

So I was thinking this was the way I would proceed, but I wasn’t in love with making more blocks because I thought I was done. My brain said, “We’re done with these blocks and we’re moving on.”

When I took the boys for our afternoon walk this puzzle was on my mind. I kept trying to figure out if there was a way to solve this without adding another row of blocks.

And then it hit me… the solution! THIS is the moment when the solution. hit me.

Look how happy I am! It must be a really good solution! I thought that if I just moved the vertical row from the right side to the left side, the problem would be solved.

I was so happy for the remainder of our walk, satisfied that I wouldn’t have to make those additional blocks.

So after work I started drawing this out to demonstrate how brilliant I am. Here’s the result…

By moving the far right row of blocks to the left side of the quilt, I had managed to move the problem corners from the bottom of the quilt to the top.

Well, hells bells.

Back to the drawing board.

So it looked like my options were to add a row to the bottom of the quilt, or add two rows to the sides. That second option would mean I’d have to make even MORE additional blocks and would probably make this already long quilt much too long, and it would make me have to do some odd stuff with the borders I’m planning.

So I submitted to the plan to make additional blocks and add them to the bottom of the quilt.

So after our chilly walk this evening I hit the sewing room. I dug out the small pile of sunbursts I had cut previously and started sorting scraps.

So many scraps!

Once I had everything pressed I sat down and went at it.

I think I made nine blocks. I might have made seven. Maybe is was six.I lost track because I had some that needed a row added to get them up to size. But anyway… when I finished up to night I had nine blocks to square up. I think.

These blocks end up pretty wonky and need a good squaring up. Just my kind of sewing!!!

But they are beautiful once squared up.

There’s just enough wonk in there to make me happy!

And what is it about squaring up blocks that I love so much? I find it terribly satisfying.

Here’s all the blocks I either made or finished tonight. All squared up and lovely.

Ok. It WAS nine.

So then I set about getting these blocks up on the design wall.

The good news is that all four corners now look hunky dory. Phew!

The bad news is that I’M ONE BLOCK SHORT!!!!! Dammit!

If you look back in the corner at the lower right, behind my sewing table… you’ll can see it.

So now I have to make one more block!!! But first, I’m going to have to dig into my stash and see how long it will take me to find that sunburst fabric so I can cut one pathetic little square from it!!! Good grief!

I’ll make myself feel a little better by celebrating how pretty these blocks are and feeling good that I have 118 blocks done. That’s a lot of blocks! But not quite enough.

Original Layout It Is

I decided that I’m going with the original layout for my starburst blocks. So I hit the sewing room after dinner and tossed all the blocks up on my design walls.

Here’s where they are without any adjustment.

Have to use my additional design my retractible wall isn’t big enough to handle all these blocks.

I pinned on the far right and top row of the blocks on the portable board so they won’t fall off when I move the board.

I have to move that board because it’s covering the door to my sewing room

I think I have enough blocks to finish this quilt. I might have to make one or two. I was too tired tonight to figure it out tonight.

I have a few blocks that aren’t quite big enough to square up to 8.5 inches. So I’m going to have to add an additional strip of fabric to each one.

I think I might have exactly the number I need. That would be nice. I will probably start sewing this bad boy together tomorrow.

Here’s a close up view of these blocks. They’re really pretty!

After breakfast this morning and before our walk I threw a batch of tomato basil soup into the crock pot.

I made sure I sprung for the good quality tomatoes.

It smelled really good as it simmered away all day.

I had some for dinner and it was really tasty. Here’s the recipe. I doctored it a little.

After I finished up in my sewing room tonight I found Rico sound asleep on the sofa.

I think I disturbed him.

I’m going to go and play some indoor pickleball at a middle school tomorrow. I went there last Sunday and it was pretty good.

More Playing. Less Decision-Making

It’s been a busy couple of days at work this week. I didn’t finish work tonight until 6:30. After dinner and a nice long walk, since we didn’t get much of an afternoon walk, I didn’t have much oomph to actually accomplish something meaningful in my sewing room.

Instead, I played a little bit with the sunburst blocks on my design wall. I still think it’s likely that I’ll go with my original layout, but it’s fun to look at other options. So, although I haven’t made a final decision, my direction is pretty assured.

Wanda from the Exuberant Color blog suggested in a comment on my last post that I try the four-sunbursts-together layout I shared the other night, but make the blocks straight rather than on point. So I moved the blocks around. Here’s the result.

And again… I like this better in person than in the photos. But I’m not sure I love it. What I DO like about it is the way the blocks sort of come and go. Which four blocks my eye rests on keeps changing. Some that I see have the sunbursts in the center. Others have the intersection of the strips in the center. I do like that sort of abstract and dynamic feel of this layout.

But here’s a close up that gives a little different perspective.

After I took these photos I decided to try one more layout. I rotated the lower left and upper right block in each foursome.

This one looks like total chaos, but there’s actually order in that chaos. You can follow rows of sunbursts diagonally across the quilt in each direction.

I’m positive I wouldn’t use this layout, but it was fun to see what it looked like. I’m not sure how much more playing I’m going to do with these blocks. I’m feeling sort of ready to go back to the original layout and get these all up on the design wall and arranged the way I want them. Then I’ll need to get moving on those setting triangles.

This handy book that a friend recommended to me a number of years ago has a page about calculating the size of your setting triangles.

It’s a really great and handy little book. It gives you all kinds of calculations that you can use when putting a quilt top together. I refer to it pretty regularly. It doesn’t have a lot of pictures or images, just pages and pages of really good info. This page tells you how big to cut your setting triangles to fit your blocks.

This blog post shows the fabric I decided on for my setting triangles. This blog post shows some different options I looked at. This blog post shows some more options when I was feeling a little more serious about this choice.

There was actually a time when I seriously thought I would make more of the sunburst blocks to use as the setting triangles. I don’t remember how long that serious thought lasted.

The last time I was working on this quilt I made a note of the size my brother requested. It’s on a sticky note hanging on one of the filing cabinets in my sewing room. He wants it to be 84 x 104 inches. Kind of an odd size, but he measured their queen size bed and would like it made to fit the bed and their liking. So I will make it that size, with a few extra inches to allow for quilting and shrinkage.

At that time I had all the blocks up on the design wall and decided how many more blocks I needed to make. I remember writing down some notes on this in a notebook. But which notebook? So tonight I started digging through several notebooks that are in a drawer in my sewing room.

Here’s the kinds of things I write in those note books. It can be vague. So very vague.

I have no idea what quilt that was for. It looks like I may have been calculating binding and borders. So with this sort of note in mind, I was worried that any notes I had made on my sunburst blocks would be so vague that I wouldn’t know them when I found them.

But I got lucky!

So, I needed 17 more blocks, which included the blocks to be used for the setting triangles… I think. The blocks I have completed are in three different groups. There’s a baggie of the finished and trimmed blocks. Then there are two smaller piles. One pile of 10 blocks that are trimmed to 8.5 inches square. And another smaller pile of 5 blocks that haven’t been trimmed. I’m pretty sure I intended those untrimmed blocks to be the setting triangles. I left them untrimmed because I wasn’t sure how big they needed to be.

So, the point of all this is that I’m pretty sure I have all the blocks I need for this quilt top. But I won’t know for sure until I get it all up on the design wall and get it measured then calculate how much length and width I’ll lose with my seam allowances.

I’m planning to make a couple of borders to get this top to the size I need. I even have the fabric for borders and a piece of fabric for the backing.

So I have no excuses to stop me from wrapping this up. Now I just have to make myself do it! I swear that I will NOT put those blocks back in the project box without finishing this top!

I sure am enjoying our streak of nice weather. I had a lovely, yet short, walk this afternoon with the boys in some glorious sunshine. Last night I popped out after work at 5:00 and was tossing the ball for Bender and Rico. And look….. it’s still light at 5:00! Our sun will set tomorrow night at 5:07 pm.

I can’t tell you how incredibly happy it makes me to see the evening light starting to return! The boys are happy too… if it means they get a little fun after I finish work at night!

I’ve been having my handyman do a few jobs for me the last couple weeks. One of the things he did was install my new locking mail box. We have some mail theft issues around the area and it’s a good idea to have a mail box that locks since I get packages pretty regularly as well as checks in the mail.

Every time I take a photo of those boys I see the different looks on their faces. Can you guess which one is just fine with posing for photos and which one finds is not quite so enjoyable? They are definitely individuals with different personalities!

Another UFO Back on the Design Wall

I’ve been thinking 2023 might be the year of the unfinished project. I got such a sense of satisfaction from finishing my jewel frames quilt top in December that I’m itching to dig into another one.

So this evening I pulled out my sunburst quarter log cabin blocks and tried a different arrangement.

When I first put these blocks up on the design wall I really liked this layout.

And then I looked at my photos of the original layout and I decided that was the better look.

Here’s a closer view that really shows the blocks.

I think it definitely looks better without all those sunburst clumped up together. And this photo above shows the blocks the most like they are in person.

Here’s a view of more blocks.

This will be for my brother and his wife for their queen size bed. I’m pretty sure I am really close to having all the blocks done. I may only have one or two left to make. Later this week I’ll get this all back up on the design wall, make sure I have all the blocks I need, cut the setting triangles, then start sewing this baby together.

And, of course, while I’m thinking about finishing up some UFOs, I’m also thinking about new things to make.

I’ve been thinking about something blue…

Maybe something simple with 8 inch squares sashed in this gorgeous cobalt blue sharks tooth fabric, and set on point. Blue is not my favorite color, but I just love some of these gorgeous blues.

I’ll noodle on this for a while.

I recently purchased some fabric on sale for a backing for my red Fractured quilt. I bought the fabric online so had to make the assumption that it would work with the quilt.

I thought it would read more purple and red, but that teal in it is really strong. It’s not the best match, but it’s going to have to do since I’ve bought it! I think it will be fine once it’s quilted. I’ll bind it with the solid purple.

We have a nice stretch of weather coming up over the next ten days. No rain in the forecast. it will be so nice after the wet stretch we’ve had since the first of the year. But before the good weather arrived, we had a touch of snow on Saturday during Rico’s sheep herding lesson.

When we took our walk this morning we had full sunshine and it was glorious!

I went and played pickleball in a middle school gym this afternoon. It was fun but it was really hard to see the ball and there were so many lines all over he court it was hard to know which ones to pay attention to.

I got a new app on my phone that makes cartoons out of photos of your dogs. So I played around with it a little over the weekend.

Some of them turned out really well.

Some of them … not so good.

Poor Rico looks like his nose has been screwed on!

So I gave it a try with a photo of me…

It’s so funny how the four different versions came out completely different. And I have a rabbit (or some other critter) coming out of the side of my head!

So I gave it a try with another photo…

Hahaha! So funny how the app translates the photo!

I’ll close tonight with this cutie patootie.

Finally Tackled that Blasted Lining

After our evening walk I finally forced myself to get in to my sewing room and finish the lining for my new Frankenbag. It feels good to have it done.

I really like this bag. I like the dark feel of it. it’s bright, but sort of broody. Here’s the other side.

I really like the dark lining, fully acknowledging it will be really hard to find pennies in the bottom of this one!

There’s a nice pop of pink on the inside with the slip pocket and zipper pocket.

And my favorite little tag. And because someone always asks, this is the Etsy seller where I get my tags.

I’m glad to have this done and not having that lining taking up space on my cutting table.

These boys let me know what they thought of the time I spent working on this today.

And to make It even longer… I did make a major flub as I was putting the lining together. I sewed the zippered pocket to the wrong side of the lining. It’s so obvious in this photo that the fabrics aren’t right sides together.

And this was just totally wrong.

So you know what I had to do…

The good news is that the dark fabric made it really easy to pick out that line of stitching.

I want to share with you something that was a game changer for me. When I first got my sewing table I found myself always getting my foot caught in the cord to my foot pedal. The cord comes over the front of the table and down to the floor. So I added a command hook to the inside of one of the cabinets that hold up the table. I slip the cord behind that hook and it keeps it out of the way of my foot.

It’s such a simple thing but it made such a huge difference!

Today was actually a little more productive day than the rest of the weekend. I took Bender and Rico for a lovely four mile walk this morning. The weather was really nice. The sun tried to come out but didn’t make it while we were walking.

After a trip to the grocery store the sun managed to come out so we took advantage and tossed the ball around the back yard.

t was a lovely afternoon. It felt like a spring day.

The sun makes all the moss almost glow!

Close up, the moss looks like trees.

We wrapped our evening with a nice conversation with a friend as we walked around the neighborhood.